


22
Version 2019/01
Operating Instruction Manual HKT (Part 2)
9
Cleaning/Maintenance/Servicing
9.1 Care/Cleaning
Observe the safety instructions and instructions for
general cleaning/care of trailers in the operating
instruction manual, "Car Trailers"
(General Points - Part 1).
Crushing hazard!
During the cleaning process, there is a risk of
crushing your fingers/hands in the lowering
mechanism.
Cutting hazard!
During the cleaning process, there is a risk of
crushing your fingers/hands in the
lowering mechanism.
►
►
Do not touch the movable mechanical
components when lowering / lifting the cargo
bed. - Do not reach into it.
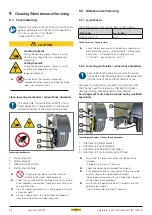
Clean lowering mechanism / wheel shock absorbers
The service life, functionality and safety of your
trailer depends to a large extent on the regular
maintenance/care of the lowering mechanism.
1
2
3
4
Lowering mechanism
1. Positioning bolt
2. Fender bracket
3. Wheel shock absorbers
4. Positioning drill-hole
►
►
During spraying, do not aim the water jet
directly at the wheel shock absorbers.
►
►
Check for any soiling of the lowering mechanism / wheel
shock absorbers and remove if necessary each time after
you use the trailer.
►
►
Clean the lowering mechanism in the lowered state with
a clean dry cloth.
►
►
Do not scratch or paint the wheel shock absorbers or
treat them with corrosive media (abrasives).
CAUTION
9.2 Maintenance/Servicing
9.2.1 Tyres/Wheels
The following tyre sizes can be used on HKT trailers:
Tyre type
p
max.
in bar
195 / 50 R 13 C
6.25
Table: Tyre size / Tyre pressure
►
►
Check the tyre pressure on all wheels on a regular basis
and before long journeys. (See the table: "Maintenance
instructions" in the operating instruction manual,
"Car Trailers" (General Points - Part 1))
9.2.2 Lowering mechanism / wheel shock absorbers
The wheel shock absorbers are virtually mainte-
nance-free. The damping effect will decrease after
long periods of use and long intervals of use.
The lowering mechanism / wheel shock absorbers and
their fixings need to be regularly checked for oil leaks,
damage, ageing, breakage and material fatigue.
Servicing work must only be carried out by qualified
specialists.
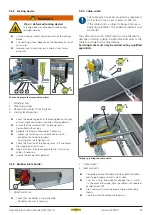
1
2
3
4
4
2
Lowering mechanism / wheel shock absorbers
1. Attachment: Fender bracket
2. Attachment: Positioning bolt
3. Attachment: Wheel shock absorbers
4. Attachment: Positioning angle (drill hole)
►
►
Ensure that the screw connections have been firmly
attached.
- Retighten the screws if necessary.
►
►
Check the wheel shock absorbers for oil leaks.
►
►
If the absorption effect is reduced or if there are visible
oil leaks, replace the wheel shock absorbers.
Use only genuine spare parts, see designation / type no.
on the wheel shock absorbers.
►
►
Ensure that the positioning bolts fit smoothly into the
positioning drill-hole.
- Adjust the positioning angle if necessary.