background image

020-9905 User Manual Q3 (Advanced 3 year old child) Rev G                                              Page 7 of 82 
© 2016 Humanetics Innovative Solutions 


1.  Introduction 

 
In the late 1970s and early 1980s, TNO and others developed the P-dummies, a series of 
child dummies that covers almost the complete child population up to 12 years. The P-
series  dummies  are  still  test  tools  for  the  European  regulation  ECE-R44  and  are  also 
adopted by many other standards. 
 
In 1993 the International Child Dummy Working Group started the development of a new 
series of child dummies as a successor to the P-series. This new series was called the Q-
series.  Part  of  the  development  and  evaluation  of  the  Q-dummies  took  place  within 
European  Research  programs  like  CREST

1

,  CHILD

2

,  CASPER

3

  and  EPOCh

4

  all  aiming  at 

improving child safety in cars. As of December 2011 the series is available in five age 
groups, representing a Newborn, 1 year, 1½ year, 3 year, 6 year and 10 year old child.  
 
Nowadays members of this Q family are applied in UNECE Regulation R129 which became 
effective per January 2013. Also various consumer rating programs world-wide apply Q 
dummies.  
 
Humanetics  reserves  the  right  to  make  improvements  or  implement  changes  to  the 
dummy, the certification or the user manual if this is deemed necessary. We will of course 
inform our customers of any changes or modifications should they occur.  


Figure 1. 

Q0 – Q6 dummies: from left to right Q1.5, Q3, Q0, Q6 and Q1 


1


CREST. “Child Restraint System for Cars”, EC-contract number C-RTD SMT4-CT95-2019.


2


CHILD. “Child Injury Led Design”, EC-contract number G3RD-CT-2002-0079


3


CASPER. “Child Advanced Safety Project for European Roads”, EC Grant Agreement 218564.


4


EPOCh. “Enabling Protection for Older Children”, EC Grant Agreement 218744


Содержание Q3

Страница 1: ...020 9905 User Manual Q3 Advanced 3 year old child Rev G Page 1 of 82 2016 Humanetics Innovative Solutions Q3 Advanced 3 year old child User Manual ...

Страница 2: ...cs Innovative Solutions Copyright 2016 Humanetics Innovative Solutions All rights reserved The information in this manual is furnished for informational use only and is subject to change without notice Humanetics Innovative Solutions assumes no responsibility or liability for any errors or inaccuracies that may appear in this manual Notice This product may contain lead A list of components that ma...

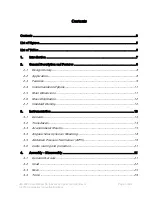
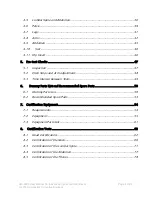
Страница 3: ...istory 8 2 2 Application 8 2 3 Features 9 2 4 Instrumentation Options 11 2 5 Main Dimensions 11 2 6 Mass Distribution 12 2 7 Standard Dummy 12 3 Instrumentation 13 3 1 General 13 3 2 Transducers 13 3 3 Accelerometer Mounts 15 3 4 Angular Velocity Sensor Mounting 18 3 5 Abdomen Pressure Twin Sensor APTS 19 3 6 Cable routing and protection 21 4 Assembly Disassembly 21 4 1 General Overview 21 4 2 Hea...

Страница 4: ...2 Click Stops and Arm adjustment 48 5 3 Time Interval between Tests 49 6 Dummy Parts List and Recommended Spare Parts 50 6 1 Dummy Parts List 50 6 2 Recommended Spare Parts 53 7 Certification Equipment 54 7 1 Requirements 54 7 2 Equipment 55 7 3 Equipment Parts List 61 8 Certification Tests 62 8 1 Head Certification 62 8 2 Certification of the Neck 66 8 3 Certification of the Lumbar Spine 71 8 4 C...

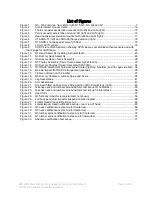
Страница 5: ... 3000 32 Figure 15 IR TRACC attachment hardware spine frontal right top bottom and rib cage side left 34 Figure 16 Q3 side impact IR TRACC arrangement optional 35 Figure 17 Tighten nut down on the lumbar 37 Figure 18 Q3 Dummy Abdomen Lumbar Spine and Pelvis 38 Figure 19 Leg Assemblies 41 Figure 20 Arm Assemblies 43 Figure 21 Hip insert fitted on Q dummy sitting position left straight legs right 46...

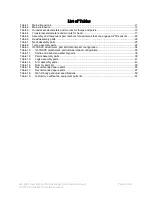
Страница 6: ...ors 20 Table 6 Head assembly parts 22 Table 7 Neck assembly parts 25 Table 8 Torso assembly parts 29 Table 9 IR TRACC attachment part list frontal impact configuration 34 Table 10 IR TRACC attachment part list side impact configuration 35 Table 11 Spine and abdomen assembly parts 36 Table 12 Pelvis assembly parts 39 Table 13 Legs assembly parts 41 Table 14 Arm assembly parts 43 Table 15 Dummy part...

Страница 7: ...oving child safety in cars As of December 2011 the series is available in five age groups representing a Newborn 1 year 1 year 3 year 6 year and 10 year old child Nowadays members of this Q family are applied in UNECE Regulation R129 which became effective per January 2013 Also various consumer rating programs world wide apply Q dummies Humanetics reserves the right to make improvements or impleme...

Страница 8: ...hicles conference in 20055 In 2006 the New Programme for the Assessment of Child restraint Systems NPACS adopted the Q dummies for their test protocols 2 2 Application The Q3 dummy is suitable for frontal as well as side impact CRS evaluations to be used for both homologation consumer rating and research purposes Applications include Child Restraint Systems CRS type approval testing This includes ...

Страница 9: ...stances Special attention has been paid to the handling characteristics of the dummy ensuring the dummy can be assembled and disassembled quickly and installing the dummy in the test configuration is simple and repeatable The influence of transducers upon the kinematics of the dummy is minimized and protection of transducers and cables is integrated in the dummy design Head The head is largely mad...

Страница 10: ...n used to determine the required stiffness Lumbar Spine The lumbar spine is a flexible rubber column which allows shear and bending in all directions A six channel load cell can be mounted between the lumbar spine and the pelvis Pelvis The Q dummy pelvis has removable hip joints An accelerometer array can be mounted in the pelvis Special hip joints are available that allow to position the dummy in...

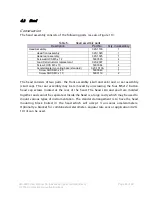
Страница 11: ...y deflection Abdomen Pressure Lower Lumbar Spine Fx Fy Fz forces and Mx My Mz moments Pelvic Ax Ay Az linear acceleration 2 5 Main Dimensions The main dimensions of the Q3 are provided below Table 1 Main dimensions Description Q3 Dimension mm Tolerance mm Seating height head tilted forward 544 9 Shoulder height sitting 329 7 Stature 985 9 Chest depth 146 5 Shoulder width maximum 259 9 Hip width 20...

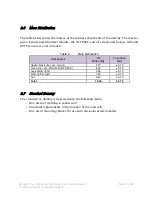
Страница 12: ... and APTS sensors are not included Table 2 Main distribution Component Q3 Mass kg Tolerance kg Head Neck incl acc mount 3 17 0 10 Torso incl acc Mounts IR TRACC 6 00 0 30 Legs left right 3 54 0 10 Arms left right 1 48 0 10 Suit 0 40 0 10 Total 14 59 0 70 2 7 Standard Dummy The standard Q dummy is delivered with the following items One piece of clothing a yellow suit Structural replacements in the ...

Страница 13: ...al transducer A 6 channel load cell Humanetics model IF 217 or IF 218 can be placed in the upper neck lower neck and lumbar spine location 3 2 Transducers The Q3 dummy can be fitted to measure any or all of the following parameters see also notes below Head Standard 3 uni axial accelerometers in head Ax Ay Az Optional 3 angular velocity sensors Applied Technologies Associates type ARS 01 or ARS 06...

Страница 14: ...es not require any correction for measurement of the moment around the OC joint The theoretical OC joint coincides with the neutral axis of the moment measurement of the Humanetics load cell 4 Additional accelerometers may be mounted in the dummy for extra redundant information There are no fixed points for attaching these accelerometers Instead double sided tape may be used to attach the accelero...

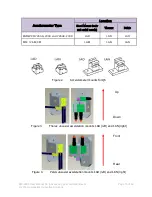
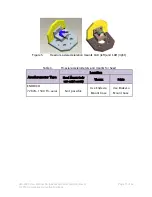
Страница 15: ...y 20 3 3 Accelerometer Mounts Humanetics support three brands models of accelerometers or equivalent Endevco 7264 and 7267A series Entran EGAS Series and EGE3 73 Tri axial Kyowa ASM Series MSC 126M CM Uni axial accelerometers The uni axial accelerometers and mounts that can be used for the Q3 dummy are listed Table 3 The mounts and their orientation are depicted in figure 2 to 5 Tri axial accelero...

Страница 16: ...ocation Head Mount only uni axial accels Thorax Pelvis ENDEVCO 7264A 2000 and 7264B 2000 I AD I AO I AO MSC 126M CM I AM I AN I AN Figure 2 Accelerometer mounts for Q6 Figure 3 Thorax uni axial acceleration mounts I AO left and I AN right Figure 4 Pelvis uni axial acceleration mounts I AO left and I AN right Up Down Front Rear ...

Страница 17: ...e Solutions Figure 5 Head uni axial acceleration mounts I AD left and I AM right Table 4 Tri axial accelerometers and mounts for head Accelerometer Type Location Head Mount only uni axial accels Thorax Pelvis ENDEVCO 7267A 1500 Tri axial Not possible Use Endevco Mount base Use Endevco Mount base ...

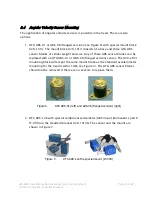
Страница 18: ...weight and size Any of these ARS sensor blanks can be replaced with an ATA ARS 01 or ARS 06 flanged version sensor The 020 2014 mounting block will accept the same mount block as the standard accelerometer mounting for the head I AD or I AM see Figure 2 The ATA ARS sensor blanks should not be removed if there are no sensors to replace them Figure 6 ATA ARS 01 left and ARS 06 flanged version right ...

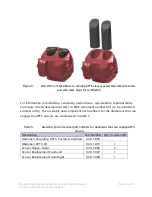
Страница 19: ...sed on Q3 Figure 8 40 mm APTS sensor The APTS are mounted inside a special abdomen assembly part number 020 5005 This part has two blind holes for the sensors parallel to the lumbar spine The APTS are inserted aluminium cap down and the sensor cables come out through small holes at the base on the blind holes The bladders are put into Lycra sleeves to reduce friction with the abdomen and held in p...

Страница 20: ...njury criteria development refer to EEVC document number 661 to be submitted summer 2016 The assembly and component part numbers for the abdomens that can engage the APTS sensors are summarized in table 5 Table 5 Assembly and component part numbers for abdomens that can engage APTS sensors Description Part Number Qty in Assembly Abdomen Assembly APTS Tested Certified 020 5005 Abdomen APTS Q1 020 5...

Страница 21: ...acic spine At the lumbar spine thorax interface the cables go either towards the left or the right side The abdomen has been formed to allow the routing of the cables in such a way that they lie recessed between the rib cage and the pelvis skin A cable guide 020 4411 cover is mounted on the back of the thoracic spine 4 Assembly Disassembly 4 1 General Overview The Q dummy consists of the following...

Страница 22: ...e standard 020 1013A 1 Screw SHCS M3 x 40 5000649 1 Screw SHCS M3 x 10 5000119 2 The head consists of two parts the front assembly skull and skin and a rear assembly skull cap The rear assembly may be removed by unscrewing the four M5x12 button head cap screws located at the rear of the head The head skin and skull are molded together and cannot be separated Inside the head is a large cavity which...

Страница 23: ...d cell from the neck 1 First remove the head rear assembly by unscrewing the four button head cap screws at the back of the head 2 The accelerometer array can be removed in order to reach the screws in the upper neck load cell or the load cell replacement 3 With the accelerometer array removed the M5 SHCS screws that attach the load cell to the neck can be reached through the top of the head 4 Rem...

Страница 24: ...e head front assembly 5 Replace the head rear assembly and tighten the four bolts Note As shown in the head assembly section it is advised mount the head onto the neck before placing the accelerometers in the head cavity To remove the accelerometers the procedure described above must be performed in the reverse order Alternative Instrumentation The cavity in a Q3 dummy head is large enough to acce...

Страница 25: ...onded metal interface plates attached to the top and bottom The neck assembly has four threaded inserts in the top surface which are used to mount the upper neck load cell Humanetics model IF 217 or IF 218 or its structural replacement 020 2007 onto the neck The upper neck plate has two cut outs towards the rear to allow proper routing of the upper neck load cell cables The neck cable assembly con...

Страница 26: ...020 9905 User Manual Q3 Advanced 3 year old child Rev G Page 26 of 82 2016 Humanetics Innovative Solutions Figure 11 Q3 Dummy Neck Assembly ...

Страница 27: ...le assembly The neck cable is pre stretched and clamped down at manufacturing and should not be disassembled In case of cable damage customers are recommended to replace the complete neck cable assembly 020 2200 There is no adjustable pretension in the cable The nut 020 2204 can be tightened firmly Assembly Head Neck Perform the steps described under disassembly in reverse order Instrumentation 1 ...

Страница 28: ...tive Solutions 6 Mount the head instrumentation in the head and close the head with the skull cap Note Always mount the upper neck load cell BEFORE the head accelerometers as the accelerometer array will block the top access to the screws through the head Figure 12 Q3 Dummy Head Neck Assembly ...

Страница 29: ...ft Locking Boss 020 4404 1 Rib Cage Assembly 020 4100 1 Bracket IR TRACC Attachment 020 4406 1 Screw FHCS M4 x 0 7 x 10 5000023 2 Screw BHCS M5 x 0 8 x 16 5000416 6 Shoulder Interface assembly RH 020 3310 1 Shoulder Interface assembly LH 020 3320 1 Screw BHCS M4 x 0 7 x 12 5000005 8 Clavicle 020 3201 1 Screw FHCS M6 x 1 0 x 12 5000139 2 Scapula Molding RH 020 3102 1 Scapula Molding LH 020 3103 1 S...

Страница 30: ...020 9905 User Manual Q3 Advanced 3 year old child Rev G Page 30 of 82 2016 Humanetics Innovative Solutions Figure 13 Q3 Thorax Assembly Part of torso assembly 020 4400 ...

Страница 31: ...s above for the procedure how to do this and then divide the dummy in two parts by removing the thorax lumbar spine screws This gives easy access to the internals of the upper torso and to the various bolts and screws Note to prevent unnecessary wear the rib cage and shoulders should not be removed from the thoracic spine under normal circumstances Arms 1 The first step is to remove the arms To do...

Страница 32: ... head cap screws of each shoulder spine interface 6 The shoulder swivel assembly can be disassembled by removing the four M4 button head screws in the shoulder retaining cap Two holes are provided in the shoulder retaining cap to adjust the click stops in the shoulders as described in the pre test checks Assembly To assemble the thorax perform the operation described above in reverse order Note Th...

Страница 33: ...etween the load cell structural replacement 020 2015 and the neck Remove the load cell structural replacement and the neck torso interface plate together by unscrewing the four M5 x 12 socket head cap screws 3 Remove the neck torso interface plate 020 2015 from the load cell structural replacement by unscrewing the four M5 x 10 countersunk screws 4 Install the load cell by reversing the procedure ...

Страница 34: ...07 2 Screw SHCS 5 40 x 5 8 9002975 1 Screw FHCS M4 x 0 7 x 10 5000023 2 Figure 15 IR TRACC attachment hardware spine frontal right top bottom and rib cage side left Frontal Impacts 1 To use the IR TRACC IF 362 for frontal impacts the IR TRACC should first be equipped with its attachment hardware 2 First place the holding boss 020 4404 onto the back of the IR TRACC and unscrew the set screw 3 Then ...

Страница 35: ...mounted in side impact orientation The bracket shown below is mounted onto the inside of the rib cage using the rib attachment holes These parts are included in Q3 side impact kit 020 Side Kit but not included in the standard dummy The side impact IR TRACC mounting bracket assembly is listed in table 10 Table 10 IR TRACC attachment part list side impact configuration Item Description Part No Qty i...

Страница 36: ...e assembly consists of a rubber column with metal interfaces bonded to the top and bottom See figure 18 The top interface is U shaped vertical elements at the front and back The thoracic spine fits into this bracket and is secured using the two M6 x 43 screws At the bottom side four M5 x 12 cap head screws are used to attach the lumbar spine assembly to either the model IF 217 load cell or the loa...

Страница 37: ... structural replacement to the pelvis 4 Remove the load cell or load cell structural replacement from the lumbar spine by removing the four M5 x 12 socket head cap screws The cable assembly should not need to be removed under normal circumstances If it becomes necessary use a screwdriver in the slot at the top of the cable to prevent the cable from turning and unscrew the self locking nut with a w...

Страница 38: ...ser Manual Q3 Advanced 3 year old child Rev G Page 38 of 82 2016 Humanetics Innovative Solutions Assembly Perform steps 1 to 4 under disassembly in reverse order Figure 18 Q3 Dummy Abdomen Lumbar Spine and Pelvis ...

Страница 39: ...the lumbar spine 4 Attach the load cell to the lumbar spine using four M5 x 12 SHCS 5 Mount the assembly onto the pelvis casting using four M5x12 counter sunk screws 4 6 Pelvis Construction The pelvis casting is a single metal casting which fits into the pelvis flesh The two items are completely separable The upper legs with the ball and socket hip joint assemblies fit into the two openings at the...

Страница 40: ...oint Do so by removal of the two button head M4 screws see Figure 19 Note It is possible to change the friction setting of the hip joints To do so the spacer between the hip cups must be removed This is only done when doing out of position testing to lock the leg at the hip Skin 6 When the legs are removed the pelvis flesh can be removed from the pelvis casting by pulling it downwards Instrumentat...

Страница 41: ...n the knee joint a limited range of motion has been built in At the end of this range rubber stops are used to smoothly decelerate the motion and thereby preventing spikes on the measurement signals The parts of the legs are listed in table 13 below Table 13 Legs assembly parts Description Part No Left Part No Right Qty in each Assembly Leg assembly L or R 020 9100 020 9200 1 Upper Leg Assembly L ...

Страница 42: ... the motion stop screw place upper and lower leg in a 90º angle with respect to each other 4 Turn the motion stop screw into the leg as far as it will go Then turn it back half a turn and check that the motion of the lower leg is without significant friction Note It is not possible to change the friction setting of the knee joint in the legs The legs are fully supported and positioned by the child...

Страница 43: ...est of motion This prevents hard contact and reduces spikes on measurement signals Table 14 Arm assembly parts Description Part No Left Part No Right Qty in each Assembly Arm assembly L or R 020 9300 020 9400 1 Upper Arm Assembly L or R 020 9301 020 9401 1 Lower Arm Assembly L or R 020 9302 020 9402 1 Arm Shoulder shield 020 9305 1 Shoulder Screw SHSS M5 20 020 9909 1 Stop Screw 020 9901 1 Click S...

Страница 44: ...w joint before assembly of the lower arm 3 Align upper and lower arm at the shoulder screw hole and screw in shoulder screw 4 Place upper and lower arm under a 90º angle with respect to each other 5 Turn the motion stop screw into the arm as far as it will go Then turn back half a turn and check that the motion of the lower arm is without significant friction The correct position for motion stop s...

Страница 45: ...nd or thorax paragraphs by removing the two M6x43 screws from the lumbar spine thorax interface 2 The abdomen can then easily be taken from the dummy Note It is not advised to remove the abdomen from the assembled dummy as this places forces and strains upon the material which can in time result in wear and tear Removing the abdomen as outlined in this paragraph enhances the durability of the abdo...

Страница 46: ...vis flesh thus potentially restraining the dummy from submarining The insert is made from a soft polyurethane to maintain dummy range of motion There is some free range of motion for adduction for positioning There is also an overlap at the top of the insert to help prevent the lap belt going under the abdomen The insert is fitted to the dummy before fitting the suit see figure 21 below The insert...

Страница 47: ...ks in the material Rib Cage Check the rib cage for tears and cracks in the material Deform the rib by hand as this will show cracks if present Cracks can be hidden by PVC skin that covers the outside of the rib cage To find significant damage pay special attention to the rib cage edges Lumbar Spine The lumbar spine rubber should not be damaged Inspect the rubber molding for tears and cracks Replac...

Страница 48: ...put in two stable positions The first is vertically along the body the second one 20 degrees forward from the vertical Again the arms should be able to rotate freely until they reach the click stop position The force exerted should be sufficient to resist the torques generated by the mass of the arm upon the shoulder joint The joints will be adjusted in new dummies supplied by Humanetics In case t...

Страница 49: ...em and the arm will be too large and the arm will not rotate under gravitation Do not over tighten the spring plunger it could grind into the plastic elbow material 5 3 Time Interval between Tests When conducting tests with the dummy or with dummy components a time interval of at least 30 minutes should be observed between consecutive tests Except for the head assembly this also applies when a lat...

Страница 50: ...sted and Certified 1 020 4200 Clavicle Retainer 1 020 2007 Load cell Structural replacement 1 020 4401 Thoracic Spine Frontal Impact 1 020 4402 Pivot Pin Gimbal 2 020 4403 Gimbal Shaft 1 020 4404 Shaft Locking Boss 1 020 4405 Gimbal Ring 1 020 4406 Bracket IR TRACC Attachment 1 020 4407 Spacer IR TRACC Attachment 2 020 4411 Cable Guide 1 5000005 M4x12 BHCS 8 5000084 M5x10 FHCS 8 5000002 M5x12 SHCS...

Страница 51: ...Description Qty per dummy Remark 020 3000 Shoulder Swivel Assembly 2 020 3002 Shoulder Swivel Body 2 020 3005 Shoulder Retaining Cap 2 5000328 M8 Spring Plunger 4 020 7103 Detent Peg 2 5000650 Spring LCM 090F 1 MW 2 5000651 12mm Internal Circlip 2 5000005 M4x12 BHCS 8 020 3102 Scapula Moulding Right 1 Replaces 020 3100 020 3103 Scapula Moulding Left 1 Replaces 020 3101 020 3201 Clavicle Moulding F...

Страница 52: ... assys 020 7303 Hip Spacer 2 Replaces plastic cups assys 5000005 M4x12 BHCS 2 5000002 M5x12 SHCS 4 020 8000 Suit 1 Part No Description Qty per dummy Remark 020 9100 Left Leg Assembly 1 020 9101 Upper Left Leg Assembly 1 020 9102 Lower Left Leg Assembly 1 020 9908 Shoulder Screw Modified Knee 1 020 9901 Stop Screw 1 020 9200 Right Leg Assembly 1 020 9201 Upper Right Leg Assembly 1 020 9202 Lower Ri...

Страница 53: ...er 5 before each test and certify the dummy regularly as described in chapter 8 To safeguard continuous operation with the Q3 dummy it is recommended to take and maintain the spare parts in stock as listed in table 16 Table 16 Recommended spare parts Description Part No Qty in Assembly Rib Cage Assembly Test Cert 020 4100 1 Upper Left Leg Assembly 020 9101 1 Lower Left Leg Assembly 020 9102 1 Uppe...

Страница 54: ...east 4 hours prior to the use in a test The testing laboratory environment should be controlled to have A temperature of 20 2 degrees Celsius A relative humidity of 40 30 When conducting certification tests a time interval of at least 30 minutes should be observed between two consecutive tests This also applies when for example a lateral test is followed by a frontal test using the same dummy or d...

Страница 55: ...drop test and should have equivalent roughness and size Neck and Lumbar Spine Certification Equipment A pendulum which meets the requirements of CFR 49 part 572 33 c is needed to perform the certifications of the neck and lumbar spine see sections 8 6 and 8 7 The spine or neck is mounted upside down on the pendulum arm using an interface plate which replaces the standard part 572 pendulum mounting...

Страница 56: ...020 9905 User Manual Q3 Advanced 3 year old child Rev G Page 56 of 82 2016 Humanetics Innovative Solutions Figure 23 Q series neck and lumbar spine head form test set up for lateral test ...

Страница 57: ... 5 2 TE 2650 4 YOKE POTENTIOMETER 6 1 TE 2650 8 BALANCE WEIGHT 7 1 TE 2650 1 PENDULUM INTERFACE 8 2 5000628 SCREW SHCS SS M5 X 8 X 40 9 2 6002209 GL60 10k 354 HOLLOW SHAFT POTENTIOMETER CONTELEC 10 2 TE 2650 5 SHAFT POTENTIOMETER 11 2 5000477 PIN DOWEL M4 X 16 12 2 TE 2650 6 FORK 13 1 TE 2650 7 ROD 14 2 5000470 SCREW SSCP M3 X 0 5 X 4 15 1 TE 2650 11 SPACER FLEXION HEAD FORM 16 4 5000394 SCREW FHC...

Страница 58: ...ly to the small end of the central block In the lumbar spine test no load cell or load cell structural replacement is required between the lumbar spine and the head form See 23 right and 24 right Two rotational potentiometers are used to measure the angle of the head form relative to the pendulum arm One potentiometer is attached to the pendulum interface the other to the head form see 23 and 24 A...

Страница 59: ...able 18 consists of a hollow metal tube closed at both ends two axles with suspension pulleys and a speed vane An accelerometer which measures the longitudinal acceleration must be mounted on the rear end An Endevco model 2262CA 200 or equivalent is recommended The total mass including instrumentation suspension pulley wheels and speed vane as well as the impactor face dimensions are specified in ...

Страница 60: ... must be measured and recorded Figure 26 Full body pendulum impactor suspension wire diagram Abdomen Test Rig The abdomen test compresses the abdominal insert between a Q3 abdomen certification support block Part number TE 020 9910 and a flat plate The support block shape matches the shape of the inside of the abdomen The support is placed on a horizontal surface and the abdomen is placed on the b...

Страница 61: ...le 19 Q Dummy certification equipment parts list Part No Description Test 020 1050 Head Certification Mass Q Dummies Head Drop Test TE 2651 Head Positioning Basket Head Drop Test TE 2650 Head form Q Dummies Neck And Lumbar Spine Test TE 020 9910 Abdomen Certification Support Abdomen Test Q3 TE 020 9920 Full Body Probe Q3 Thorax Test Q3 ...

Страница 62: ...ion Parts No Qty Head front assembly 020 1020 1 Head rear assembly 020 1025 1 Head Accelerometer Mounting Base 020 1013 1 Screw BHCS M5 x 12 5000565 4 Screw SHCS M3 x 10 5000119 1 Screw SHCS M3 x 40 5000649 2 Load cell blank drop test mass block representing half the load cell 020 1050 1 Screw FHCS M5 x 10 5000094 4 No tears of the skin or synthetic materials are allowed Also check that all screws...

Страница 63: ...o it which allows the use of a magnet to keep the head in place The net allows easy adjustment of the head in any orientation 2 The z axis of the head should make an angle of 28 2 degrees with the horizontal plane and the medial lateral axis should be horizontal 1 degrees When released the head should impact the surface with its forehead The z axis of the head is parallel to the skull cap plane se...

Страница 64: ...of this manual Users are advised to use a thin wire basket TE 2651 to position the head The net has a piece of steel attached to it which allows the use of a magnet to keep the head in place The net allows easy adjustment of the head in any orientation 2 Position the head in such a way that the mid sagittal plane has an angle of 35 2 degrees with the horizontal axis and the anterior posterior axis...

Страница 65: ... Impact Head certification set up rear view of head Data Processing 1 All three accelerations should be filtered at CFC1000 2 Determine the resultant head acceleration Requirement 1 The maximum resultant head acceleration response should be between 100 and 130 g 2 The acceleration in X direction should be between 20 and 20 g ...

Страница 66: ...umbar spine The head form rotation during the test is measured using two rotational potentiometers One is installed on the base of the neck pendulum interface the second one is attached to the head form Both potentiometers are linked with a thin shaft see Figure 29 and 30 The sum of the two angles measured on the potentiometers is the angle of the head relative to the pendulum Moment is measured u...

Страница 67: ... other side of the head form This ensures that the inertial properties of the head are symmetrical in the impact direction 6 Insert the rod connecting the axes of the potentiometers and tighten the screw on the bottom most axis to secure the rod The other end of the rod should be able to slide freely through the upper most transducer axis The rod must be protruding from both sides of the transduce...

Страница 68: ...oftware zero all transducer readings by averaging the part of the signal before time zero and subtracting this from the transducer reading 6 Integrate the pendulum acceleration to check the deceleration velocity of the pendulum The velocity of the arm must be calculated at a point 1657 4 mm from the pendulum pivot point 7 Sum the potentiometer signals to derive the total head angle of the head for...

Страница 69: ...of the neck in the certification is the same as the initial bending direction experienced in the test the dummy is being certified for LHS or RHS 4 Attach the head form neck system to the part 572 pendulum The impact side of the neck should point in the direction of motion of the pendulum see Figure 30 5 Install the potentiometers to the mounting interface and on the head form s central block Moun...

Страница 70: ...nals should be performed with the pendulum arm in the vertical position 3 Lift the pendulum up to its pre test height Do not leave the head neck system in this position for more than 1 minute as the neck will start to deform due to the mass of the head form 4 Release the pendulum Data Processing The data processing procedures of the lateral test is equal to the procedure mentioned in the frontal t...

Страница 71: ...pendulum A head form is used to load the lumbar spine This head form consists of two flat disks connected by an interface which allows certification of both the neck and the lumbar spine The head form rotation during the test is measured using two rotational potentiometers One is installed on the base of the neck pendulum interface the second one is attached to the head form Both potentiometers ar...

Страница 72: ...is in the direction of movement of the pendulum arm see Figure 31 4 Attach the head spine system to the part 572 pendulum The front of the head form should point in the direction of motion of the pendulum see Figure 31 5 Install the potentiometers to the mounting interface and on the head form Mount the balance weight for the potentiometer on the other side of the head This ensures that the inerti...

Страница 73: ... readings at CFC600 3 Determine time zero of the impact by finding the 1 g deceleration level in the pendulum signal after filtering 4 Software zero all transducer readings by averaging the part of the signal before time zero and subtracting this from the transducer reading 5 Integrate the pendulum acceleration to check the deceleration velocity of the pendulum The velocity of the arm must be calc...

Страница 74: ...LHS or RHS 3 Attach the head spine system to the part 572 pendulum The side of the head form should point in the direction of motion of the pendulum see Figure 32 4 Lift the pendulum up to its pre test height and check that the head form is in the correct initial position 5 Install the potentiometers to the mounting interface and the on the head form central block Mount the balance mass for the po...

Страница 75: ...m3 with crush strength of 1 8 lbs cu ft with a nominal length of 76 2 mm 3 inches 2 Auto balancing and shunt calibration of the transducer signals should be performed with the pendulum arm in the vertical position 3 Lift the pendulum up to its pre test height and check that the head is in the correct initial position Do not leave the head spine system in this position for more than 1 minute as the...

Страница 76: ...m velocity decrease should be as indicated in the table below Time ms Lower limit m s Upper limit m s 10 1 3 1 7 20 2 7 3 7 30 4 0 4 8 To meet the requirements of the lateral lumbar spine certification test 3 The maximum head angle first maximum should be between 42 0 and 52 0 degrees This value should occur between 45 and 65 ms from the time zero point 4 The minimum head angle first minimum shoul...

Страница 77: ...sure the distance between the two plates Equipment required Description Q3 Top plate mass 2 05 0 05 kg Additional mass 8 05 0 050 kg Total mass 10 10 0 050 kg Abdomen support block part no TE 020 9910 Figure 33 Abdomen certification test set up Test Procedure 1 Place the abdomen on the appropriate Q3 abdomen certification support block TE 020 9910 Ensure a good fit and orientation of the abdomen o...

Страница 78: ...abdomen can be fitted but must not have the pressure bladders it must have the foam insert cylinders used for certification The dummy is to be tested with the suit Prior to the test the dummy should be inspected for possible damage It is particularly important for the thorax tests to check the condition of the rib cage the shoulder spine interface and the clavicle No cracks or tears are allowed Al...

Страница 79: ...t should be between 40 and 60 degrees Make sure the dummy is motionless Place the upper arms vertically alongside the body and let the lower arms rotate downward to let the hands touch the seating surface 2 Impactor alignment Let the impactor hang in its lowest position Check that the probe is in a horizontal position that is within 2 degrees The impactor front surface should be directly in front ...

Страница 80: ...ause damage to the IR TRACC Use the 3 80 kg test probe as described in section 7 2 equipped with an accelerometer to measure the impact deceleration The impact velocity must be measured and recorded This can be done with the speed vane on the test probe Test Procedure 1 Dummy positioning The dummy should be seated on a clean dry surface consisting of two 0 60 x 0 65 m flat plates of 2 mm Teflon sh...

Страница 81: ...ment at the side of the rib 3 Make sure that the IR TRACC is not mounted for frontal impact as the side impact test can cause damage to the IR TRACC when it in its set up position for frontal impacts 4 Measure and record the impact velocity with the speed vane on the probe 5 The minimum time interval to observe between tests on the thorax is 30 minutes Data Processing 1 All data channels should be...

Страница 82: ... Rev G Oct 2016 Table index added In dimension table 259 tolerance 7 was 9 305 5 was 9 253 5 was 9 In weight table torso 6 00 kg was 5 80 kg Total weight 14 59 kg was 14 40 kg Total weight tolerance 0 7 Kg was 0 4 kg Added section 3 5 Abdomen Pressure Twin Sensor APTS Exploded view and table for thorax revised for new scapulars 020 3102 and 020 3103 was 020 3100 and 020 3101 Plastic hip cups 020 7...

Отзывы: