1
User manual
P
e
n
d
l
F
D
2011-01
Страница 1: ...1 User manual P Pe en nd de el l F FD D 2011 01...
Страница 2: ...between moving and stationary parts 13 7 4 Electromagnetic disturbance 14 7 5 Resistance level of ignition 14 8 Product description 15 8 1 Body works Pendel FD 15 8 2 Frame 15 8 3 The wheels 15 8 4 T...
Страница 3: ...es 37 11 3 Tyre pressure 38 11 4 Tyre profile 38 11 5 Lights 38 11 6 Fuses 38 11 7 The brakes 40 11 8 The drive motor and compressor 40 11 9 Cleaning of the body work 40 11 10 Batteries 40 12 Errors 4...
Страница 4: ...4 2 Information manufacturer The Pendel is manufactured by Huka B V Munsterstraat 13 7575 ED Oldenzaal The Netherlands phone 31 0 541 572 472 fax 31 0 541 520 415 mail info huka nl website www huka nl...
Страница 5: ...l sizes The PENDEL is designed for road traffic a moped third party insurance is compulsory The PENDEL is only suitable for use on paved roads Besides adequate understanding of traffic the user needs...
Страница 6: ...roduct Wheelchair scooter Class C Device name Huka Pendel FD I the undersigned hereby declare that the equipment specified above is in compliance with the Essential Requirements Annex 1 of Medical Dev...
Страница 7: ...e send back to Huka B V for investigation According to the results of this investigation the guarantee will be supplied In case of damage or faults contact your local supplier first to inform them Mak...
Страница 8: ...is factory guaranteed Damage to the product as a result of repairs by non authorized persons will automatically void the warranty on the product or parts In case of a defect or technical problem imme...
Страница 9: ...ve should not exceed 17 If you drive the first time with the Pendel FD make sure you try it on a large free area like a empty car parking Make sure you have somebody with you who can help you For road...
Страница 10: ...ainst which the wheelchair is secured need to be adjusted according to the size of your wheelchair see 8 Adjusting the wheelchair securing system If required the performances of the driving regulator...
Страница 11: ...inside the Pendel during driving This can lead to very dangerous situations Always make sure you r wheelchair is properly secured before using the Pendel Worn out brakes or poor adjusted brakes have...
Страница 12: ...r and his wheelchair User the reduced speed setting in areas where lots of people are like shopping centers Don t pull other vehicles with your Pendel this might damage the drive motor Don t take pass...
Страница 13: ...his area of cleared from objects or persons before lifting the Pendel in to driving height When lowering the Pendel the gap between the rear wheels and the body woks in this specific area will get sma...
Страница 14: ...s of the radar installation might have influence on the electronics of the Pendel FD Avoid areas close to Radar installations The radio waves of the radar installation might have influence on the elec...
Страница 15: ...rame is made out of steel tubing which has been powder coated This results in a light but rigid frame 8 3 The wheels Pendel FD has three wheels one in the front and two in the rear The rims are alumin...
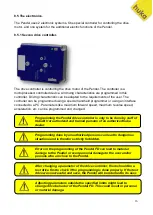
Страница 16: ...d acceleration etc can be programmed and changed Programming the Pendel drive controller is only to be done by staff of Huka BV or authorized and trained persons of an authorized huka dealer Programmi...
Страница 17: ...ters in this software cannot be changed 8 6 The batteries The Pendel uses two large 24 volt batteries to power the Pendel Each battery has a capacity of 100 Ah The additional functions controller is n...
Страница 18: ...ive influence on the autonomy Climbing kerbs If you climb a kerb with the Pendel the vehicle will need more power for climbing Climbing kerbs frequently will influence the autonomy of the Pendel 8 6 1...
Страница 19: ...Emergency switch 10 Safety switch 11 Release switch 12 8 7 1 Steering handle The handlebar is used to steer the Pendel It is adjustable in height depth and angle On special demand you can select a di...
Страница 20: ...he Pendel FD will decelerate until standing still Before switching on the Pendel check if the throttle moves without any hesitation or resistance Moving the throttle to fast could result in a fast acc...
Страница 21: ...ght 6 Tachometer 7 see separate manual for more information Reverse driving button 8 Slow speed driving button 9 Lifting button 10 Lights button 11 Hazard lights button 12 1 3 2 4 6 5 7 8 9 10 11 12 D...
Страница 22: ...moment the driving is automatically blocked Battery indicator The battery indicator shows how much energy is left in the batteries If all lights are on the batteries are full If only the red lights a...
Страница 23: ...will light up Lifting button If this button is pushed the compressor will be activated and the Pendel will be lifted in to driving position Lights button By pushing this button the lights of the Pende...
Страница 24: ...s The mechanical brake A The left brake lever on the handlebar is a mechanical brake which activates the brake in the front wheel This braking system is also activating the brake lights on the Pendel...
Страница 25: ...e the batteries Push the plug of the charger into the socket until you hear a click The plug is now secured and you can charge the batteries To disconnect the plug first push the button of the socket...
Страница 26: ...d grip 8 7 8 Indicators The indicator is activated by pushing the indicator switch left or right Push left to activate the left indicators push to the right to activate the right indicators To switch...
Страница 27: ...ay it is always possible to push the Pendel out of the danger zone in case of an emergency 8 7 10 Safety switch The safety switch is an additional safety feature If the Pendel is switched on you can b...
Страница 28: ...n points and the rear ramp Depending on the size of the wheel of the manual wheelchair the fixation points can be adjusted How to adjust the fixation point is explained in chapter 9 2 Be sure to put t...
Страница 29: ...level and that there are no objects underneath like stones Also make sure that when the Pendel is lifted in to driving position the ramp is not blocked and can move free During closing of the ramp ma...
Страница 30: ...an be moved 2 Move the handle bar into the right height 3 Tighten the bolt The angle of the handle bar 1 Release the bolt B with an Allan key size 6 mm until the handlebar can be moved 2 Move the hand...
Страница 31: ...hit the wheelchair s tyre 4 Tighten the Bolt D a bit 5 Now lower the Pendel so the ramp goes down 6 Now loosen up Bolt D again and move the fixation point for aprox 6 mm out 7 Now tighten bolt D firm...
Страница 32: ...irst drive Make sure the mirrors are always set correctly before each drive The mirrors are very important tools when you are driving on public roads The first drive is very important This is your fir...
Страница 33: ...he throttle on the handle bar towards you The Pendel will now start to move Turn the throttle more to accelerate Making a turn If you want to take a corner reduce the driving sped first and then turn...
Страница 34: ...n push the Pendel out of its danger zone release the throttle handle and the parking brake will get on again If the parking doesn t get on switch the Pendel on now the parking brake will active Don t...
Страница 35: ...y surfaces Drive carefully if it rains or when there is snow and ice on the roads Reduce speed when entering a corner Cornering at high speed might cause instability of the Pendel and yourself Don t p...
Страница 36: ...ark check before you drive checking the brakes user before every drive or every week checking the tyre pressure user every week checking the tyre quality user every week checking the batteries dealer...
Страница 37: ...onnect the main plug first and then disconnect the charger plug from the Pendel Read the manual of the charger first before charging the batteries The charger delivered with the Pendel might differ fr...
Страница 38: ...0 Watt Rear indicator 24 volts 10 Watt Rear brake light 24 volts 15 Watt 11 6 Fuses The Pendel is secured with several fuses These fuses protect the electronics against short circuit and overload If a...
Страница 39: ...39 Position of the fuses A Main fuse 100 A B Fuse box C Fan fuse 7 5 A Right rear light 3 A Left rear light 3 A Head light 3 A Horn 1 A PCB 10 A Compressor 30 A A B C...
Страница 40: ...e it an additional protection film again dirt 11 10 Batteries The batteries are maintenance free Should they be replaced contact your authorized huka dealer They only can replace the batteries Since t...
Страница 41: ...s still active switch safety switch off off off off fuse PCB broken replace fuse PCB off off on error in electronics contact your dealer on off on no click main relay broken replace main relay on off...
Страница 42: ...know the Pendel is OK for selling Your dealer can also help you selling the Pendel 14 Disposal of the Pendel If the Pendel needs to be disposed get in touch with your local authorized huka dealer You...
Страница 43: ...3 00 Tyre pressure recommended tyre pressure 2 5 bars Maximum speed Forward 15 km h Reverse 5 km h Autonomy aprox 40 60 km under normal conditions Max slope 17 Turning circle 3 9 meters Length 1760 m...
Страница 44: ...44 Notes...
Страница 45: ...45 Huka BV Munsterstraat 13 7575 ED Oldenzaal The Netherlands tel 31 0 541 572 472 fax 31 0 541 520 415 mail info huka nl web www huka nl...