background image


                                                                                                                          Kamvas Pro 12


10

 /


19


www.huion.com 


2.2.2 Press Keys 

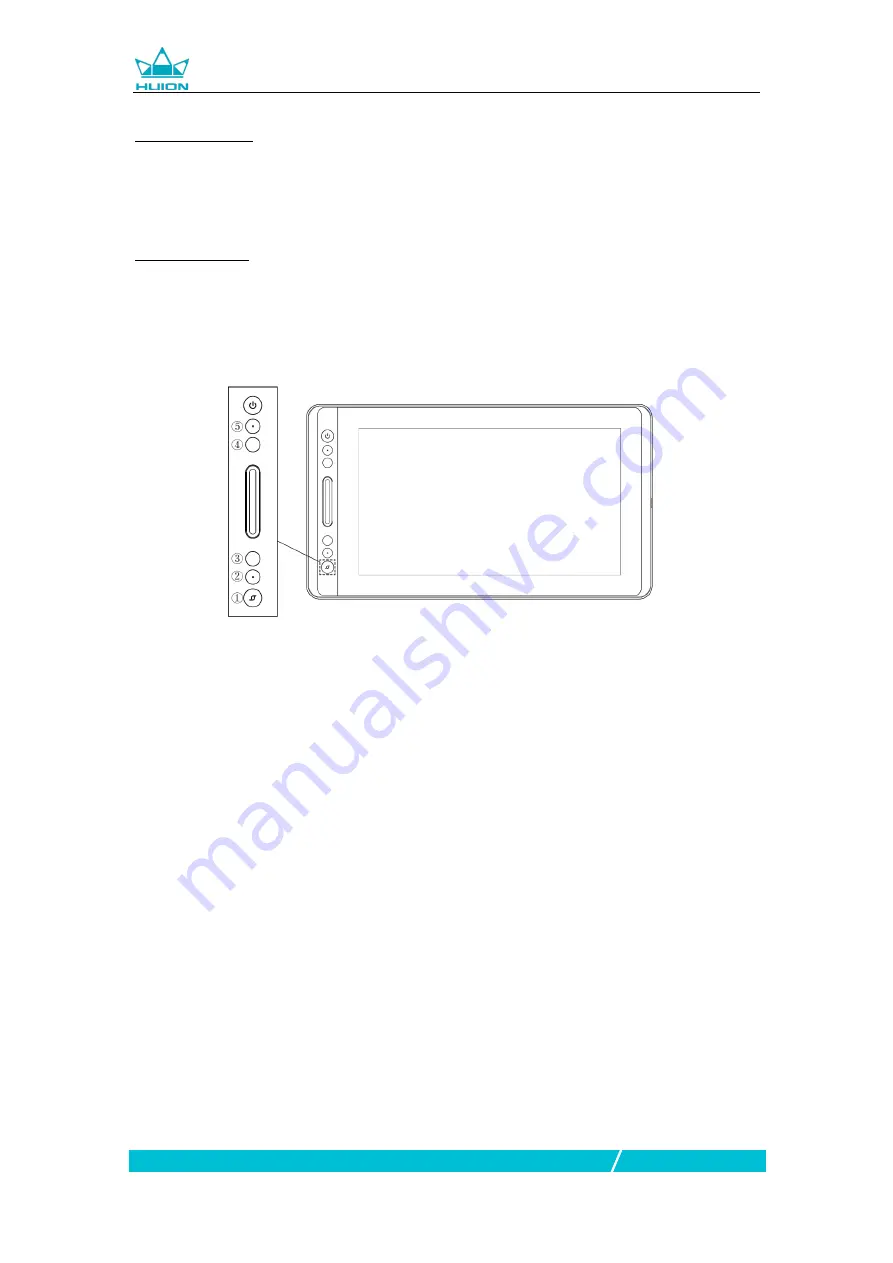
There are 4 press keys on the top left side of the display, which you can modify the 
functions  according  to  your  own  habits,  thus  will  help  to  improve  your  work 
efficiency. 

2.2.3 Touch Bar 

The left side of the display is provided with a touch bar, you can slide up and down 
to achieve zoom function, or you can self-define the function on the driver. 
 

2.3 OSD Function 


Enter OSD Menu: 

1. Press  ①  - “Function Button” around three seconds until the OSD menu appears 
and meanwhile the indicator will be on. The function of the Keys  ②③④⑤  will become 
OSD function. 
2. In the menu, the function of  ②③④⑤  will become as the following: 
②  AUTO: Before entering menu, its function is auto adjustment. 
After entering menu, its function is back to previous menu. 

  MENU: Press to call up the menu, after entering menu, its function is confirm. 

  -    : After entering menu, its function is down/left/decrease. 
⑤  + : After entering menu, its function is up/right/increase. 

Exit OSD Menu: 

3. Press  ①-“Function Button” again for around three seconds until the indicator will 
be off, the function of the Keys  ②③④⑤  will become shortcuts function again. 


Содержание KAMVAS Pro 12 GT-116

Страница 1: ...Kamvas Pro 12 User Manual For Windows and Macintosh OS Model GT 116...

Страница 2: ...ur display 8 To protect your display please switch off the power when it is not in use During blackouts or not using for long time please unplug the display from the socket 9 Don t overload the socket...

Страница 3: ...Display 9 2 3 OSD Function 10 3 Function Setting 11 3 1 Device Connection Prompt 11 3 2 Working Area Setting 11 3 3 Press Keys Function Setting 13 3 4 Pen Button Setting 13 3 5 Pressure Sensitivity Se...

Страница 4: ...g depicting different lines and colors just as the pen writes on the paper which brings you a real shock experience To give you a better understanding and using of your KAMVAS display please read this...

Страница 5: ...w huion com 1 2 3 3 in 1 Connection Cable USB HDMI Power Type C 1 2 4 Power Adapter Please choose the right plug according to your country or region and assemble it to the power adapter It may not com...

Страница 6: ...ecially for your KAMVAS display you can adjust the angle of the display according to your usage habit and make you feel more comfortable in painting and creating 1 2 6 Other Accessories Digital Pen Pe...

Страница 7: ...Windows 7 or later macOS 10 12 or later 1 4 2 Install via Download Please download the driver from our website www huion com download After finishing installation you can find the driver icon in the s...

Страница 8: ...pencil Adjust your grip so that you can toggle the side switch easily with your thumb or forefinger Be careful not to accidentally press the switch while drawing or positioning with the pen Notice Wh...

Страница 9: ...will move to the new position accordingly Press the pen tip on the screen to make a selection Tap the screen once with the pen tip or touch it to the screen with enough pressure to register a click 2...

Страница 10: ...be set to two different customizable functions You can use the buttons whenever the pen tip is within 10mm of the display active area You do not have to touch the pen tip to the display in order to u...

Страница 11: ...und three seconds until the OSD menu appears and meanwhile the indicator will be on The function of the Keys will become OSD function 2 In the menu the function of will become as the following AUTO Be...

Страница 12: ...itors When the KAMVAS Display and other monitors are used in the same system the movement of the screen cursor on the standard display depends on the system configuration If the secondary display is a...

Страница 13: ...e active area of the Display This is the default setting 2 Same Ratio with LCD 3 Customize Area 1 Enter coordinate values or2 Drag the corners of the foreground graphic to select the screen area 3 2 3...

Страница 14: ...ress Keys Select the function to be achieved on the pop up dialog box then click APPLY or OK to take effect Touch Bar you can slide up and down to achieve zoom function Enable Disable Press Key Check...

Страница 15: ...sure sensitivity will be changed by dragging the slider up and down the smaller the value the more sensitive the pressure 3 6 Pen Pressure Testing You can gradually apply pressure to the stylus on the...

Страница 16: ...ry Settings Click Restore Default to restore to the factory settings Cancel Calibration Click Cancel calibration or press ESC on the keyboard to cancel the calibration 3 8 Enable the Windows Ink featu...

Страница 17: ...ion com 3 9 Data Export and Import The driver supports exporting and importing your customized configuration data of the product which is convenient for you to use different software and avoid the tro...

Страница 18: ...or 16 7 M 8bit Touch Touch Type Passive Electromagnetic Resonance Resolution 5080 LPI Pressure Level 8192 Accuracy 0 5 mm Center 3 mm Corner Sensing Height 10 mm Report Rate 266 PPS Pen Model PW507 Di...

Страница 19: ...wire are not bent or fractured There is chromatic aberration As the regional color temperature is different so minor chromatic aberration is a normal phenomenon Images jitter or ripple images appear I...

Страница 20: ...uarter 4 HuaiDeCuiGang Industrial Park Fuyong Street Bao an District Shenzhen 518106 China Note Information in this manual is subject to change without further notice For more information please conta...

Отзывы: