background image

48 

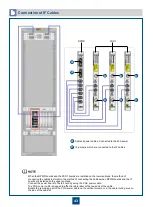
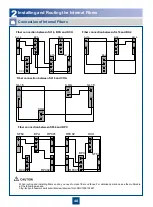
Connection of Internal Fibers 

Installing and Routing the Internal Fibers 

Fiber connection between SL16, BPA and DCU 

Fiber connection between SL16 and BA2 

Fiber connection between SL16 and COA 

Fiber connection between SF64 and RPC 

BOUT

BIN

OUT

IN

BPA

SL16

POUT

PIN

OUT

IN

BPA

SL16

OUT1

IN1

DCU

OUT2

IN2

BOUT

BIN

POUT

PIN

OUT1

IN1

DCU

OUT2

IN2

OUT1

IN1

OUT

IN

BA2

SL16

OUT2

IN2

OUT

IN

BA2

SL16

OUT1

IN1

OUT2

IN2

OUT

IN

SL16

OUT

IN

COA

SL16

OUT

IN

OUT

IN

COA

BPA

OUT

IN

DCU

RPC02

SF64

RPC01

RPC02

DCU

RPC01

SF64

BPA

OUT

IN

SYS

LINE

SYS

LINE

SYS

LINE

SYS

LINE

OUT1

IN1

OUT2

IN2

OUT1

IN1

OUT2

IN2

BOUT

BIN

POUT

PIN

BOUT

BIN

POUT

PIN

When routing and installing fibers onsite, you need to clean fiber end faces. For detailed operations, see the multimedia 
at the following website: 
http://support.huawei.com/carrier/docview!docview?nid=DOC1000132657 

Содержание OptiX OSN 2500

Страница 1: ...HUAWEI TECHNOLOGIES CO LTD OptiX OSN 2500 Quick Installation Guide Issue 12 Date 2017 09 30 ...

Страница 2: ...ective holders Notice The purchased products services and features are stipulated by the contract made between Huawei and the customer All or part of the products services and features described in this document may not be within the purchase scope or the usage scope Unless otherwise specified in the contract all statements information and recommendations in this document are provided AS IS withou...

Страница 3: ...Fiber Attenuation Page 53 Engineering Labels Page 54 to 56 End Positions of the Installation Holes Page 6 Installing Fiber Management Trays Page 9 to 10 Installing the SS61COA Page 11 to 13 Installing the SS62COA Page 14 to 16 Installing the RPC Frame Page 17 to 18 Engineering Labels Assembling Cable Connectors Page 57 to 59 E1 T1 Cables and E1 T1 Interface Page 35 to 37 Installing and Routing the...

Страница 4: ...inding Cables Binding intervals between cable ties or optical fiber binding straps inside the cabinet cannot exceed 250 mm The distance cannot exceed 200 mm for user cables Binding intervals between cable ties for all cables and corrugated tubes outside the cabinet are determined according to the distance between the two horizontal beams If the cable trough does not contain any beams the binding i...

Страница 5: ...ing tape Phillips screwdriver Flat head screwdriver Adjustable wrench Heat gun Utility knife COAX crimping tool Wire clippers Wire stripper Cold press pliers Network cable tester Multimeter COAX stripper RJ45 crimping tool Diagonal pliers ...

Страница 6: ...able 120 ohm 8xE1 cable 48 V DC power cable 75 120 ohm clock transit cable 1 75 120 ohm clock transit cable 2 75 ohm clock cable Alarm output and input cable Alarm cascading cable between subracks COA cascading serial port cable COA serial port cable COA power cable PGND cable ...

Страница 7: ... damaged which may resulting in faults on the NE Boards are fragile and valuable When handling or placing a board exercise caution and put it into a dedicated packing box Coherent boards such as TN12LSC TN11LTX TN15LSXL and TN55NS3 must be packed with original packaging materials during transportation If the original packaging materials are lost contact Huawei Holding aboard without hand protectio...

Страница 8: ...5 Front View a Introduction to the OptiX OSN 2500 Equipment 1Exterior of the OptiX OSN 2500 Subrack Oblique View b ESD jack Air filter Fan Cable trough PIU Bolt for the PGND cable ...

Страница 9: ...e routing cables For information about how to remove the doors see the N63E Cabinet Installation Guide To ensure safe operations assign a minimum of two persons to install the subrack Positions of the installation holes Installing Components 1Positions of the Installation Holes First install subracks in the lower part and then in the upper part of a cabinet If there is only one subrack install it ...

Страница 10: ...ating nuts Place the subrack along the guide rail and insert it in slowly Use panel screws to fix the subrack to the front column of the cabinet through the holes on the mounting ears Floating nut Holes for installing mounting ears of the subrack in the N63E cabinet Installation hole 1 2 3 Holes for installing mounting ears of the subrack in the T63 cabinet ...

Страница 11: ...lt the power jumpers are capped Position of the jumpers of the SAP To set the input voltage of the equipment When the jumpers are not capped the equipment is supplied with the 60 V power When the jumpers are capped the equipment is supplied with the 48 V power It is the default state NOTE NOTE Power module CPU J10 J9 J6 ...

Страница 12: ... By default the fiber management tray is installed in the lower part of the cabinet and is more than 50 mm away from the subrack The fiber management tray must also be more than 50 mm away from the air inlet and outlet of the subrack The fiber management tray can be installed in a cabinet that is not fully configured with subracks but future expansion will be affected due to reduced installation s...

Страница 13: ...cted to the optical interface board are on different sides of the cross connect and timing board With the attenuator used the optical fibers connected to the optical interface board are on the same side of the cross connect and timing board With the attenuator used the optical fibers connected to the optical interface board are on different sides of the cross connect and timing board Variable opti...

Страница 14: ...rts MONITOR 1 and MONITOR 2 are alarm output ports Fiber connections of the SS61COA Subrack 1 Subrack 2 The SS61COA a case shaped amplifier for 1550 nm optical signals can be used as a pre amplifier or a booster amplifier 5Installing the SS61COA IN OUT IN OUT IN OUT OUT IN IN OUT OUT IN Optical fiber Optical fiber 10 dB fixed optical attenuator 10 dB fixed optical attenuator Optical interface boar...

Страница 15: ...install the SS61COA inside the cabinet 125 mm of space is required By default the SS61COA is installed below the lower subrack and is more than 50 mm away from the subrack The SS61COA can be installed in a cabinet that is not fully configured with subracks but future expansion will be affected due to reduced installation space in the cabinet Cable tray Installation effectiveness ...

Страница 16: ...that are separately used in the SS61COA They are not used however if the SS61COA has been connected to the subrack Connect the SS61COA to the alarm devices in the equipment room as required a b c Serial port cable COA power cable COA power cable COA power interface F f cable a b c ...

Страница 17: ...r connector Transmit port SC PC Receive port E2000 RS 232 1 RS 232 2 Power input port Fiber connections of the SS62COA The SS62COA a case shaped Raman amplifier can be used only as a pre amplifier IN OUT IN OUT OUT IN IN OUT Optical fiber Optical interface board Optical interface board SS61COA BA BPA SS62COA ...

Страница 18: ...provide a space with 125 mm in height By default the SS62COA is installed at the bottom of the cabinet first and third floating nuts The spacing between the SS62COA and the subrack is more than 50 mm The SS62COA can also be installed in the other position of the cabinet which is not fully configured The capacity expansion will be however affected in the future because the space is occupied 1 2 ...

Страница 19: ...16 Cable Connections c COA power interface F f cable a b a b COA power cable ...

Страница 20: ...rack If the COM port on the AUX board is idle you can connect the LAN port on the RPC board to the COM port on the AUX board by using a network cable Fan tray assembly RPC board Power module Installation Procedure c 2 2 1 1 Phillips screwdriver Install the mounting ears Secure the RPC frame on the columns Holes for installing mounting ears of the RPC frame in the T63 cabinet Holes for installing m...

Страница 21: ... 45 connect at the other end of the network cable in the LAN interface on the RPC board Insert the RJ 45 connector at one end of the network cable in an idle interface of the HUB Insert the RJ 45 connect at the other end of the network cable in the COM interface on the SAP board in the subrack SAP Power cables of the RPC frame HUB a a ...

Страница 22: ...Installation holes of the mounting ears of the subrack in the N63E cabinet Installation holes of the mounting ears of the subrack in the T63 cabinet DCM DCM frame Mounting bracket Screw 1 2 3 3 Cable clip 4 4 Lead the optical fibers out from the subrack Run the optical fibers downward along the fiber trough at the cabinet side to the cabinet bottom Pass the optical fibers through the inlet at the ...

Страница 23: ...al Installing Batteries b Connect four batteries in series and fix them on the lower layer tray Connect four batteries in series and fix them on the upper layer tray Connect the battery series in parallel Installation Position a 50 mm Subrack Power system EPS75 4815AF To BAT To BAT Upper layer tray Lower layer tray NOTE ...

Страница 24: ... cabinet by using four screws N63E cabinet T63 cabinet 1 2 Installing the EPS75 4815AF Power System in the ETSI Cabinet c Cable Connection of the UPM d A B To the 110 V 220 V live wire To the 110 V 220 V neutral wire To the grounding A B To the storage battery To the storage battery Before installing the AC input power cables install an upper level AC input circuit breaker to protect the system Be...

Страница 25: ...et a Installing and Routing Cables Cable Holes at the Bottom of the N63E Cabinet b Cable hole Fiber hole Power cable hole Ground bolt Fiber hole 251 mm 66 mm 188 mm 81 mm 300 mm 155 mm 62 mm 155 mm 600 mm Cable hole Cable hole Cable hole 360 mm 184 mm Fiber hole Cable hole Cable hole Cable hole Fiber hole ...

Страница 26: ...GND Cables Connections Between Power Cables a Power cables are classified into cabinet power cables and subrack power cables The subrack power cables are connected to the power distribution unit and are bound to the rear column before delivery Connect the subrack power cable connector to the PIU board in the subrack during installation Power cables for the subrack PGND cable Connections between po...

Страница 27: ...brack power cables are connected to the power distribution unit and are bound to the rear column before delivery Connect the subrack power cable connector to the PIU board in the subrack during installation Power cables for the subrack PGND cable DPD100 2 8 PDU Ground Point A NEG1 B NEG1 A RTN1 B RTN1 48 V 0 V 48 V 0 V a a Office ground ...

Страница 28: ...et Route the power cables through the cable hole on the top of the cabinet and then route the power cables to the wiring terminal of the DC power distribution box Plug the two hole OT terminals of the power cables from top downwards with the fluted sides facing the front side of the cabinet into the wiring terminals marked with RTN and NEG respectively on the DC power distribution box Power Cables...

Страница 29: ...e on the NEG input terminal on the PDU with the protruding side facing outward M8 screw PDU with 4 in 1 short circuiting copper bars A1 4 B1 4 A1 B1 Power Cables and PGND Cables Upward Cabling DPD100 2 8 PDU Do not install or remove power cables while the equipment is powered on Ensure that the power is switched off prior to removing or installing a power cable to avoid bodily injuries Install the...

Страница 30: ...acing the front side of the cabinet into the wiring terminals marked with RTN and NEG respectively on the DC power distribution box Install OT terminals correctly according to the wiring terminal labels on the plastic cover of the DC power distribution box Power Cables and PGND Cables Downward cabling c Phillips screwdriver Adjustable wrench Diagonal pliers Connect the power cable and PGND cable i...

Страница 31: ...PDU with the protruding side facing outward PDU with 4 in 1 short circuiting copper bars A1 4 B1 4 A1 B1 Power Cables and PGND Cables Downward cabling DPD100 2 8 PDU Do not install or remove power cables while the equipment is powered on Ensure that the power is switched off prior to removing or installing a power cable to avoid bodily injuries CAUTION Phillips screwdriver Adjustable wrench When i...

Страница 32: ... the subrack power switch to the ON side The switch is on the DC PDU which is on the top of the cabinet Use the multimeter to test the resistance between the the NEG RTN and PGND The value should be more than 20 kilohms Turn the switches of all the subracks to the OFF side If the test result shows that the resistance is less than 20 ohms it indicates that a short circuit occurs between the working...

Страница 33: ...nterface or the cabinet indicator concatenation interace before powering on the subrack Connect the cabinet indicator cable between the cabinet indicators and the LAMP1 interface on the SEI board of the lower subrack Connect the cabinet indicator concatenation cable between the LAMP1 interface on the upper subrack and the LAMP2 interface on the lower subrack Cabinet indicator concatenation cable T...

Страница 34: ...rning alarm output 3 The positivie of minor and warning alarm output 7 Reserved 4 Reserved 8 Reserved Pin Funciton Pin Funciton 1 Alarm input 1 5 The ground of alarm input 3 2 The ground of alarm input 1 6 The ground of alarm input 2 3 Alarm input 2 7 Alarm input 4 4 Alarm input 3 8 The ground of alarm input 4 Alarm input interface ALMI1 ALMI2 Alarm output interface ALMO1 and alarm output concaten...

Страница 35: ...ical alarms or major alarms occur in one of subracks the indicators on the alarm monitor become on Cabinet 1 Cabinet 2 Alarm concatenation cable between subracks Alarm output and input cable To alarm monitor Alarm concatenation cable between subracks ...

Страница 36: ...33 Upward Cabling c Cable distribution plate To the alarm monitor SEI board ...

Страница 37: ...34 Downward cabling d Cable distribution plate SEI board To the alarm monitor a a ...

Страница 38: ...lation You can connect the DDF to the D75S board by using the 75 ohm E1 cable only to the D12S board by using the 120 ohm E1 cable only and to the D12B board by using the 120 ohm or 75 ohm E1 cable The T1 cables have the same outer view pin assignment and installation procedure as the 120 ohm E1 cables 75 ohm 8xE1 cable 120 ohm 8xE1 cable E1 T1 interface board D75S D12S D12B ...

Страница 39: ...he cable distribution plate above the lower subrack Installing and bundling the E1 cables for the supper subrack Installing and bundling the E1 cables for the lower subrack In the case of upward cabling lead the cables for the upper subrack out from the cable routing holes on the top of the cabinet pass the cables for the lower subrack to the slide rail of the upper subrack and then lead them out ...

Страница 40: ...ed on the side walls close to the rear side of the cabinet and the cables for the lower subrack are routed on the side walls close to the front side of the cabinet Cabling on the left side is taken as an example in the description below and that on the right side is the same Do not route the left E1 cables to the right side of the cabinet or conversely Cable distribution plate a a a ...

Страница 41: ...ption below and that on the right side is the same Install the cables for the boards near the side doors first and then the boards near the optical interface boards To the DDF of the equipment room Cable hole The cables for the upper subrack The cables for the middle subrack The cables for the lower subrack Cable distribution plate ...

Страница 42: ...low and that on the right side is the same Install the cables for the boards near the side doors first and then the boards near the optical interface boards To the DDF of the equipment room The cables for the upper subrack The cables for the middle subrack The cables for the lower subrack a a ...

Страница 43: ...low and that on the right side is the same Do not route the left cables to the right side of the cabinet or conversely Install the cables for the boards near the side doors first and then the boards near the optical interface boards Cables for the upper subrack Cable hole Cables for the lower subrack Cables for the middle subrack a a ...

Страница 44: ...de is the same Do not route the left cables to the right side of the cabinet or conversely Install the cables for the boards near the side doors first and then the boards near the optical interface boards Cables for the upper subrack Cables for the lower subrack Cables for the middle subrack Cable distribution plate a a ...

Страница 45: ...42 8Installing and Routing the IF Cables Interface of Boards a 48V power input interface 6 port 48V power output interface IF port ODU power switch Power input interface ...

Страница 46: ...talled on the upper subrack Connect the power board to the IF board by using the COA power cable The COA power cable is needed to affix the cable label at the two ends of the cable Bundle the remaining part of the COA power cable on the vertical column or in the cable routing area on the side of the cabinet Subrack power cables Connected to the 20A power IF jumpers which are connected to the IF ca...

Страница 47: ...le according to the type of the clock interface on the opposite equipment CLKO1 75 ohm clock output 1 CLKO2 75 ohm clock output 2 CLKI1 75 ohm clock input 1 CLKI2 75 ohm clock input 2 From 2M bit s Hz BITS To the other equipment CLK1 120 ohm clock 1 CLK2 120 ohm clock 2 SEI board ...

Страница 48: ... Network Management Cable Connect the network management cable only for the gateway NE Route the network management cable in the similar way to route the external clock cable Network management system Network management cable SAP a a ...

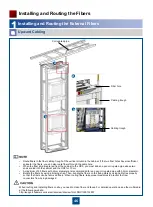
Страница 49: ...for 10 cm A maximum of 60 fibers with 2 mm diameter are recommended for an open corrugated pipe with 32 mm diameter Bundle the fibers by using a binding strap Then bundle the fibers on the fixing plate by using cable ties properly so that the fibers can be removed freely When routing fibers take proper measures to prevent the fiber connectors from being damaged Corrugated pipe Fiber hole Cabling t...

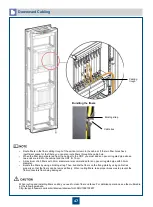
Страница 50: ...h 2 mm diameter are recommended for an open corrugated pipe with 32 mm diameter Bundle the fibers by using a binding strap Then bundle the fibers on the fixing plate by using cable ties properly so that the fibers can be removed freely When routing fibers take proper measures to prevent the fiber connectors from being damaged Binding strap Cabling trough Cable ties Bundling the fibers When routing...

Страница 51: ... PIN OUT1 IN1 DCU OUT2 IN2 OUT1 IN1 OUT IN BA2 SL16 OUT2 IN2 OUT IN BA2 SL16 OUT1 IN1 OUT2 IN2 OUT IN SL16 OUT IN COA SL16 OUT IN OUT IN COA BPA OUT IN DCU RPC02 SF64 RPC01 RPC02 DCU RPC01 SF64 BPA OUT IN SYS LINE SYS LINE SYS LINE SYS LINE OUT1 IN1 OUT2 IN2 OUT1 IN1 OUT2 IN2 BOUT BIN POUT PIN BOUT BIN POUT PIN When routing and installing fibers onsite you need to clean fiber end faces For detaile...

Страница 52: ...COA 49 Fiber Route b Routing fibers between Boards Routing fibers between the board and COA Fiber spool box Fiber spool box ...

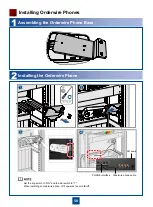
Страница 53: ...Assembling the Orderwire Phone Base 2Installing the Orderwire Phone Set the ring switch to ON and the dial switch to T When installing an orderwire phone tilt it upwards to avoid falloff PHONE interface Orderwire phone cable SEI board ...

Страница 54: ...s or articles and are placed in a protective corrugated tube or cable trough Check 8 The bending radius of the optical fibers is not less than 40 mm No protruding component exists on the routing path of the optical fibers Check 9 The optical fibers are properly arranged and bound with binding straps and do not contain any scratches Check Ensure that fixed optical attenuators have been configured a...

Страница 55: ...he PIU board Each subrack must be provided with two lines of power supply Turn on the power switch of the part A on the DC power distribution box for each subrack Check if the subrack are powered on If powered on go on turning on the power switch of the part B and then turn off the power switch of the part A Check if the subrack are powered on If powered on turn on the power switch of the part A C...

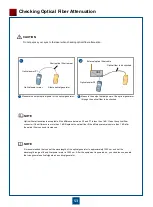
Страница 56: ...d Optical fiber attenuation is acceptable if the difference between P2 and P1 is less than 1 dB Clean the optical fiber connector if the difference is more than 1 dB Replace the optical fiber if the difference remains more than 1 dB after the optical fiber connector is cleaned It is recommended that you set the wavelength of the optical generator to approximately 1550 nm and set the wavelength ran...

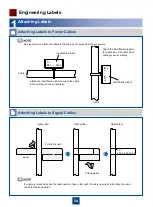
Страница 57: ...he identification label to the right side of the cable when cabling is done vertically Identification label Cable To B03 48V2 To B03 48V2 If a cable is routed vertically the label needs to face to the right If a cable is routed horizontally the label needs to face downwards To A03 33 33 33 33 Optical fiber Label Fold to the right Fold upwards Attaching Labels to Power Cables a Attaching Labels to ...

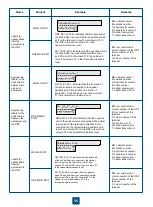
Страница 58: ...optical transmitter port A label on the loaded cabinet side that contains information about the position of the cable on the power distribution cabinet To A01 48V2 B08 To B03 48V2 To A01 A label on the power distribution cabinet side that contains information about the position of the cable on the loaded cabinet side A01 03 10 05 indicates that one end of the network cable is connected to Huawei e...

Страница 59: ... is connected to the optical receive port on the terminal in row 01 and column 01 of the ODF in row G and column 01 in the telecommunications room A01 01 05 05 R indicates that the opposite end of the optical fiber is connected to optical receive port 05 in slot 05 of subrack 01 in the cabinet in row A and column 01 in the telecommunications room To A01 01 05 ODF G01 01 01 R 05 R G01 01 05 12 T in...

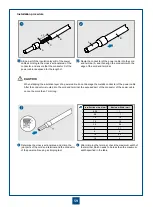
Страница 60: ...B and then maintain the OT terminal close to the insulation layer C of the power cable Installation procedure C D A B Heat shrink tubing Bare crimp terminal Insulation layer of a power cable Conductor of a power cable A B C D B C D L L1 When stripping the insulation layer of a power cable do not damage the metallic conductor of the power cable If the bare crimp terminal is not provided by Huawei c...

Страница 61: ... crimp terminal and the conductor of the power cable Then heat the heat shrink tubing using a heat gun The shapes of the crimped parts may vary according to the types of crimping dies Do not heat the heat shrink tubing for a long time to avoid damage to the insulation layer 2Assembling Cord End Terminals and Power Cables Components of a cord end terminal and a power cable Crimp pliers for the cord...

Страница 62: ...wer cable do not damage the metallic conductor of the power cable After the conductor is routed into the cord end terminal the exposed part of the conductor of the power cable cannot be more than 1 mm long A B B Determine the cross sectional area and crimp the joint parts of the cord end terminal and the conductor of the power cable using a crimping tool After crimping the terminal check the maxim...

Страница 63: ...HUAWEI TECHNOLOGIES CO LTD Huawei Industrial Base Bantian Longgang Shenzhen 518129 People s Republic of China www huawei com ...

Отзывы: