background image

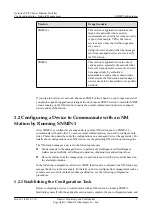
Version

Usage Scenario

SNMPv2c

This version is applicable to medium and
large-scale networks whose security
requirements are not strict or whose security
is good (for example, VPNs) but whose
services are so busy that traffic congestion
may occur.
Using informs can ensure that the messages
sent from managed devices are received by
the NM station.

SNMPv3

This version is applicable to networks of
various scales, especially the networks that
have strict requirements on security and can
be managed only by authorized
administrators, such as the scenario where
data between the NM station and managed
devices needs to be transmitted over a public
network.


If you plan to build a new network, choose an SNMP version based on your usage scenario. If
you plan to expand or upgrade an existing network, choose an SNMP version to match the SNMP
version running on the NM station to ensure the normal communication between managed
devices and the NM station.

1.2 Configuring a Device to Communicate with an NM
Station by Running SNMPv1

After SNMPv1 is configured, a managed device and an NM station can run SNMPv1 to
communicate with each other. To ensure normal communication, you need to configure both
sides. This section describes only the configurations on a managed device (the agent side). For
details about configurations on an NM station, see the pertaining NM station operation guide.

The NM station manages a device in the following manners:

l

Sends requests to the managed device to perform the GetRequest, GetNextRequest,
GetResponse, GetBulk, or SetRequest operation, obtaining data and setting values.

l

Receives alarms from the managed device and locates and rectify device faults based on
the alarm information.

In the following configuration, after basic SNMP functions are configured, the NM station can
manage the device in these manners. For details on how to configure finer management such as
accurate access control or alarm module specification, see the following configuration
procedures.

1.2.1 Establishing the Configuration Task

Before configuring a device to communicate with an NM station by running SNMPv1,
familiarize yourself with the applicable environment, complete the pre-configuration tasks, and

Quidway S2700 Series Ethernet Switches
Configuration Guide - Network Management

1 SNMP Configuration

Issue 01 (2011-07-15)

Huawei Proprietary and Confidential

Copyright © Huawei Technologies Co., Ltd.

7

Содержание Enterprise S2700 Series

Страница 1: ...Quidway S2700 Series Ethernet Switches V100R006C00 Configuration Guide Network Management Issue 01 Date 2011 07 15 HUAWEI TECHNOLOGIES CO LTD ...

Страница 2: ...be within the purchase scope or the usage scope Unless otherwise specified in the contract all statements information and recommendations in this document are provided AS IS without warranties guarantees or representations of any kind either express or implied The information in this document is subject to change without notice Every effort has been made in the preparation of this document to ensu...

Страница 3: ...ANGER Indicates a hazard with a high level of risk which if not avoided will result in death or serious injury WARNING Indicates a hazard with a medium or low level of risk which if not avoided could result in minor or moderate injury CAUTION Indicates a potentially hazardous situation which if not avoided could result in equipment damage data loss performance degradation or unexpected results TIP...

Страница 4: ...n braces and separated by vertical bars A minimum of one item or a maximum of all items can be selected x y Optional items are grouped in brackets and separated by vertical bars Several items or no item can be selected 1 n The parameter before the sign can be repeated 1 to n times A line starting with the sign is comments Change History Updates between document issues are cumulative Therefore the ...

Страница 5: ...21 1 3 5 Optional Configuring the Trap Function 21 1 3 6 Optional Configuring the Constant Interface Index Feature 24 1 3 7 Checking the Configuration 25 1 4 Configuring a Device to Communicate with an NM Station by Running SNMPv3 25 1 4 1 Establishing the Configuration Task 26 1 4 2 Configuring Basic SNMPv3 Functions 27 1 4 3 Optional Controlling the NM Station s Access to the Device 29 1 4 4 Opt...

Страница 6: ...ation 79 3 1 Introduction to HGMP 80 3 2 HGMP Features Supported by the S2700 82 3 3 Configuring Basic HGMP Functions 86 3 3 1 Establishing the Configuration Task 86 3 3 2 Configuring NDP 86 3 3 3 Configuring NTDP 88 3 3 4 Creating a Cluster 89 3 3 5 Adding a Member Switch 92 3 3 6 Optional Deleting or Quitting a Cluster 93 3 3 7 Optional Deleting a Member Switch 94 3 3 8 Checking the Configuratio...

Страница 7: ...guring the Unicast Server Client Mode 215 4 3 4 Configuring the Peer Mode 216 4 3 5 Configuring the Broadcast Mode 217 4 3 6 Configuring the Multicast Mode 218 4 3 7 Disabling the Interface From Receiving NTP Packets 219 4 3 8 Optional Setting the Maximum Number of Dynamic NTP Sessions 220 4 3 9 Checking the Configuration 220 4 4 Configuring NTP Security Mechanisms 221 4 4 1 Establishing the Confi...

Страница 8: ... 6 7 Configuring the FTP Upload Test 264 6 7 1 Establishing the Configuration Task 264 6 7 2 Configuring the FTP Upload Test Parameters 265 6 7 3 Checking the Configuration 267 6 8 Configuring the HTTP Test 268 6 8 1 Establishing the Configuration Task 268 6 8 2 Configuring HTTP Test Parameters 269 6 8 3 Checking the Configuration 270 6 9 Configuring the DNS Test 271 6 9 1 Establishing the Configu...

Страница 9: ...figuration 297 6 17 Configuring the Trap Function 297 6 17 1 Establishing the Configuration Task 297 6 17 2 Sending Trap Messages When Test Failed 298 6 17 3 Sending Trap Messages When Probes Failed 299 6 17 4 Sending Trap Messages When Probes Are Complete 300 6 17 5 Sending Trap Messages When the Transmission Delay Exceeds Thresholds 301 6 17 6 Checking the Configuration 301 6 18 Maintaining NQA ...

Страница 10: ... RMON Statistics Function on the Interface 334 7 3 3 Configuring the ethernetStatsTable 335 7 3 4 Configuring the HistoryControlTable 335 7 3 5 Configuring the EventTable 336 7 3 6 Configuring the AlarmTable 337 7 3 7 Configuring the PrialarmTable 337 7 3 8 Checking the Configuration 338 7 4 Maintaining RMON 340 7 5 Configuration Examples 340 7 5 1 Examples for Configuring RMON 340 Quidway S2700 S...

Страница 11: ... Station by Running SNMPv2c After SNMPv2c is configured a managed device and an NM station can run SNMPv2c to communicate with each other To ensure normal communication you need to configure both sides This section describes only the configurations on a managed device the agent side For details about configurations on an NM station see the pertaining NM station operation guide 1 4 Configuring a De...

Страница 12: ...nagement operations that can be performed by the NM station and allows devices to notify the NM station of device faults by sending alarms An SNMP managed network consists of three components NM station agent and managed device The NM station uses the MIB to identify and manage device objects The operations used for device management include GetRequest GetNextRequest GetResponse GetBulk SetRequest...

Страница 13: ...f numbers 1 2 1 1 Such a number string is called an Object Identifier OID A MIB tree is used to describe the hierarchy of data in a MIB that collects the definitions of variables on the managed devices A user can use a standard MIB or define a MIB based on certain standards Using a standard MIB can reduce the costs on proxy deployment and therefore reduce the costs on the entire network management...

Страница 14: ...ions SetRequest Sets the value of a variable The NM station sends the request to a managed device to adjust the status of an object on the device Trap Reports an event to the NM station 1 1 2 SNMP Features Supported by the S2700 This section compares SNMP versions in terms of their support for features and usage scenarios to provide a reference for your SNMP version selection during network deploy...

Страница 15: ...tly they help an administrator in device management Trap Traps are sent from managed devices to the NM station These traps allow an administrator to discover device faults immediately The managed devices do not require the acknowledgement from the NM station after sending traps Inform Informs are sent from managed devices to the NM station The managed devices require the acknowledgement from the N...

Страница 16: ...n modes are as follows Authentication mode l MD5 l SHA Encryption mode DES56 Error code 6 error codes supported 16 error codes supported 16 error codes supported Trap Supported Supported Supported Inform Not supported Supported Not supported GetBulk Not supported Supported Supported Table 1 4 Usage scenarios of different SNMP versions Version Usage Scenario SNMPv1 This version is applicable to sma...

Страница 17: ...Pv1 to communicate with each other To ensure normal communication you need to configure both sides This section describes only the configurations on a managed device the agent side For details about configurations on an NM station see the pertaining NM station operation guide The NM station manages a device in the following manners l Sends requests to the managed device to perform the GetRequest G...

Страница 18: ... destination address of alarm messages administrator s contact information and location and SNMP packet size 2 Optional ACL number IP address of the NM station and MIB object 3 Optional Name of the alarm sending module source address of trap messages queue length for trap messages and lifetime of trap messages 4 Optional Number of interfaces indexed by fixed numbers 1 2 2 Configuring Basic SNMPv1 ...

Страница 19: ...llowing commands as needed to configure a destination IP address for the alarms and error codes sent from the device l To configure a destination IPv4 address for the alarms and error codes sent from the device run snmp agent target host trap address udp domain ip address udp port port number public net vpn instance vpn instance name params securityname security string v1 private netmanager The de...

Страница 20: ... for a device depends on the size of a packet that the NM station can process otherwise the NM station cannot process the SNMP packets sent from the device End Follow up Procedure After the configurations are complete basic communication can be conducted between the NM station and managed device l Access control allows any NM station that uses the community name to monitor and manage all the objec...

Страница 21: ...o manage specified objects on the device skip Steps 2 3 and 4 l If some of the NM stations that use the community name need to manage specified objects on the device perform all the following steps Procedure Step 1 Run system view The system view is displayed Step 2 Run acl acl number A basic ACL is created to filter the NM station users that can manage the device Step 3 Run rule rule id deny perm...

Страница 22: ...not need to be configured in the command l If all the NM stations that use the community name need to manage specified objects on the device acl acl number does not need to be configured in the command l If some of the NM stations that use the community name need to manage specified objects on the device both mib view and acl need to be configured in the command End Follow up Procedure After the a...

Страница 23: ... l To disable one trap function of a module you need to run the undo snmp agent trap enable feature name command Step 3 Run snmp agent trap enable feature name feature name trap name trap name A trap function of a feature module is enabled This means that an alarm of a specified feature can be sent to the NM station The undo snmp agent trap enable feature name command can be used to disable a trap...

Страница 24: ...ll the existing interfaces and newly created interfaces are fixed If the system needs to restart the save command must be run to save interface configurations otherwise the interface indexes will change after the system is restarted Step 3 Run set constant ifindex max number number The maximum number of interfaces indexed by fixed numbers is set If interfaces are frequently added or deleted during...

Страница 25: ... Run the display snmp agent mib view command to check the MIB view l Run the display snmp agent sys info contact command to check the equipment administrator s contact information l Run the display snmp agent sys info location command to check the location of the device l Run the display snmp agent extend error code status command to check whether the SNMP extended error code feature is enabled l ...

Страница 26: ...t services on the network are so busy that traffic congestion may occur SNMPv2c can be deployed to ensure communication between the NM station and managed devices Pre configuration Tasks Before configuring a device to communicate with an NM station by running SNMPv2c complete the following task l Configuring a routing protocol to ensure that the switch and NM station are routable Data Preparation ...

Страница 27: ...M stations running SNMPv2c and SNMPv3 Step 4 Run snmp agent community read write community name The community name is set After the community name is set if no MIB view is configured the NM station that uses the community name has rights to access objects in the Viewdefault view 1 3 6 1 l read needs to be configured in the command if the NM station administrator needs the read permission in a spec...

Страница 28: ...s are as follows l The default destination UDP port number is 162 In some special cases for example port mirroring is configured to prevent a well known port from being attacked the parameter udp port can be used to specify a non well known UDP port number This ensures normal communication between the NM station and managed device l If the alarms sent from the managed device to the NM station need...

Страница 29: ...anage specified objects of the device follow the procedure described in Controlling the NM Station s Access to the Device l To allow a specified module on the managed device to report alarms to the NM station follow the procedure described in Configuring the Trap FunctionConfiguring the Trap Function l If the NM station and managed device are both Huawei products follow the procedure described in ...

Страница 30: ...cts in the Viewdefault view 1 3 6 1 l If a few MIB objects on a device or some objects in the current MIB view do not or no longer need to be managed by the NM station excluded needs to be specified in the related command to exclude these MIB objects l If a few MIB objects on the device or some objects in the current MIB view need to be managed by the NM station included needs to be specified in t...

Страница 31: ...k adjustment you need to change the IP address of the NM station in the ACL Otherwise the NM station cannot access the device 1 3 4 Optional Enabling the SNMP Extended Error Code Function This section describes how to enable the extended SNMP error code function when both the NM station and managed device are Huawei products After this function is enabled more types of error codes are provided to ...

Страница 32: ...basic SNMPv2c functions If traps are used follow the procedure described in Configuring trap parameters if informs are used follow the procedure described in Configuring inform parameters Configuring trap parameters 1 Run snmp agent trap source interface type interface number The source interface for trap messages is specified After the source interface is specified its IP address becomes the sour...

Страница 33: ...et If the network is unstable you need to specify the number of inform retransmissions and allowable maximum number of informs to be acknowledged when you set a timeout period for waiting for Inform ACK messages By default the timeout period for waiting for Inform ACK messages is 15 seconds and the number of inform retransmissions is 3 Setting the number of inform retransmissions to a value smalle...

Страница 34: ...vice may have a great size and consume too many system resources Setting the maximum number of interfaces indexed by fixed numbers can prevent the interface index file from exceeding an expected size After the maximum number of interfaces indexed by fixed numbers is set the system will allocate fixed indexes to interfaces within the specified value range If the specified value is smaller than the ...

Страница 35: ...tics with the NM station being specified or not l Run the display snmp agent notification log info command to check alarm logs stored in the log buffer l Run the display snmp agent extend error code status command to check whether the SNMP extended error code feature is enabled l Run the display constant ifindex configuration command to check the constant interface index function and relevant conf...

Страница 36: ...e data between the NM station and managed devices is transmitted over a public network In this case SNMPv3 can be deployed The authentication and encryption functions provided by SNMPv3 ensure the security of data sending and normal communication between the NM station and managed devices Pre configuration Tasks Before configuring a device to communicate with an NM station by running SNMPv3 comple...

Страница 37: ...twork is vulnerable to attacks authentication or privacy can be configured in the command to enable data authentication or encryption The available authentication and encryption modes are as follows l No authentication and no encryption authentication and privacy are not configured in the command This mode is applicable to secure networks managed by a specified administrator l Authentication witho...

Страница 38: ...2 In some special cases for example port mirroring is configured to prevent a well known port from being attacked the parameter udp port can be used to specify a non well known UDP port number This ensures normal communication between the NM station and managed device l If the alarms sent from the managed device to the NM station need to be transmitted over a public network the parameter public ne...

Страница 39: ... required follow directions below to configure the managed device l To allow a specified NM station in an SNMPv3 user group to manage specified objects of the device follow the procedure described in Controlling the NM Station s Access to the Device l To allow a specified module on the managed device to report alarms to the NM station follow the procedure described in Configuring the Trap Function...

Страница 40: ...tree A MIB view is created and manageable MIB objects are specified By default an NM station has rights to access the objects in the Viewdefault view 1 3 6 1 l If a few MIB objects on the device or some objects in the current MIB view do not or no longer need to be managed by the NM station excluded needs to be specified in the command to exclude these MIB objects l If a few MIB objects on the dev...

Страница 41: ...umber does not need to be configured in the command l If some of the NM stations that are in the same SNMPv3 user group need to manage specified objects on the device both the MIB view and ACL need to be configured in the command End Follow up Procedure After the access rights are configured especially after the IP address of the NM station is specified if the IP address changes for example the NM...

Страница 42: ...Run snmp agent trap enable feature name feature name trap name trap name A trap function of a feature module is enabled This means that an alarm of a specified feature can be sent to the NM station The undo snmp agent trap enable feature name command can be used to disable a trap function of a module Step 4 Run snmp agent trap source interface type interface number The source interface for trap me...

Страница 43: ...m needs to restart the save command must be run to save interface configurations otherwise the interface indexes will change after the system is restarted Step 3 Run set constant ifindex max number number The maximum number of interfaces indexed by fixed numbers is set If interfaces are frequently added or deleted during system operation the interface index file stored in the device may have a gre...

Страница 44: ...acl number command to check the rules in the specified ACL l Run the display snmp agent mib view command to check the MIB view l Run the display snmp agent sys info contact command to check the equipment administrator s contact information l Run the display snmp agent sys info location command to check the location of the device l Run the display snmp agent extend error code status command to chec...

Страница 45: ...ontact information needs to be configured on the switch This allows the NMS administrator to contact the equipment administrator quickly if a fault occurs Figure 1 4 Networking diagram for configuring a device to communicate with an NM station by using SNMPv1 Switch 1 1 1 1 24 1 1 1 2 24 NMS2 IP Network NMS1 1 1 2 1 24 GE0 0 1 VLANIF100 Configuration Roadmap The configuration roadmap is as follows...

Страница 46: ...age every MIB object except HGMP on the switch Quidway snmp agent mib view excluded allexthgmp 1 3 6 1 4 1 2011 6 7 Configure a community name to allow NMS2 to manage the objects in the MIB view Quidway snmp agent community write adminnms2 mib view allexthgmp acl 2001 Step 5 Configure the trap function Quidway snmp agent target host trap address udp domain 1 1 1 2 params securityname 1 1 3 1 Quidw...

Страница 47: ...arm is generated run the display trapbuffer command to view the details Quidway display trapbuffer Trapping buffer configuration and contents enabled Allowed max buffer size 1024 Actual buffer size 256 Channel number 3 Channel name trapbuffer Dropped messages 0 Overwritten messages 0 Current messages 98 Oct 11 2010 18 57 59 RouterA DS 4 DATASYNC_CFGCHANGE OID 1 3 6 1 4 1 2011 5 25 191 3 1 configur...

Страница 48: ... configure a device to communicate with an NM station by using SNMPv2c and how to specify the MIB objects that can be managed by the NM station Networking Requirements As shown in Figure 1 5 two NM stations NMS1 and NMS2 and the switch are connected across a public network According to the network planning NMS2 can manage every MIB object except HGMP on the switch and NMS1 does not manage the swit...

Страница 49: ... switch 6 Configure NMS2 Data Preparation To complete the configuration you need the following data l SNMP version l Community name l ACL number l IP address of the NM station l Equipment administrator s contact information Procedure Step 1 Configure available routes between the switch and the NM stations Details for the configuration procedure are not provided here Step 2 Enable the SNMP agent Qu...

Страница 50: ...geout 12 Step 6 Configure the equipment administrator s contact information Quidway snmp agent sys info contact call Operator at 010 12345678 Step 7 Configure NMS2 For details on how to configure NMS2 see the relevant NMS configuration guide Step 8 Verify the configuration After the configurations are complete run the following commands to verify that the configurations have taken effect Check inf...

Страница 51: ...he contact person for this managed node call Operator at 010 12345678 End Configuration Files Configuration file of the switch vlan batch 100 acl number 2001 rule 5 permit source 1 1 1 2 0 rule 6 deny source 1 1 1 1 0 interface Vlanif100 ip address 1 1 2 1 255 255 255 0 interface GigabitEthernet0 0 1 port hybrid pvid vlan 100 port hybrid untagged vlan 100 ospf 1 area 0 0 0 0 network 1 1 2 0 0 0 0 ...

Страница 52: ...etween NMS2 and the switch needs to be encrypted and the NMS administrator needs to be authenticated because the data has to travel across the public network Equipment administrator s contact information needs to be configured on the switch This allows the NMS administrator to contact the equipment administrator quickly if a fault occurs Figure 1 6 Networking diagram for configuring a device to co...

Страница 53: ...low NMS2 to manage and disallow NMS1 from managing the switch Quidway acl 2001 Quidway acl basic 2001 rule 5 permit source 1 1 1 2 0 0 0 0 Quidway acl basic 2001 rule 6 deny source 1 1 1 1 0 0 0 0 Quidway acl basic 2001 quit Configure a MIB view Quidway snmp agent mib view included testview iso Configure an SNMPv3 user group and add a user to the group and configure authentication for the NMS admi...

Страница 54: ...ation about the user Quidway display snmp agent usm user User name testuser Engine ID 000007DB7F00000100004C3F active Group name testgroup Check the configured ACL Quidway display acl 2001 Basic ACL 2001 2 rules Acl s step is 5 rule 5 permit source 1 1 1 2 0 rule 6 deny source 1 1 1 1 0 Check the MIB view Quidway display snmp agent mib view viewname testview View name testview MIB Subtree iso Subt...

Страница 55: ... 1 1 0 interface Vlanif100 ip address 1 1 2 1 255 255 255 0 interface GigabitEthernet0 0 1 port hybrid pvid vlan 100 port hybrid untagged vlan 100 interface LoopBack0 ip address 1 1 3 1 255 255 255 255 ospf 1 area 0 0 0 0 network 1 1 2 0 0 0 0 255 network 1 1 3 1 0 0 0 0 snmp agent snmp agent local engineid 000007DB7FFFFFFF000004A7 snmp agent sys info contact call Operator at 010 12345678 snmp age...

Страница 56: ...escribes the usage scenarios of the LLDP feature and TLV types supported by the S2700 2 3 Configuring LLDP This section describes how to configure LLDP 2 4 Maintaining LLDP This section describes how to clear LLDP statistics and monitor LLDP status 2 5 Configuration Examples This section provides LLDP configuration examples Quidway S2700 Series Ethernet Switches Configuration Guide Network Managem...

Страница 57: ...guration conflicts The Layer 2 discovery protocol precisely discovers the interfaces on each device and obtains connection information between devices In addition it displays the paths between clients switches routers application servers and network servers The Layer 2 information helps you quickly know the device topology detect configuration conflicts between devices and locate network faults Th...

Страница 58: ...ion port description system capability and management address LLDP Agent An LLDP agent manages LLDP operations for an interface The LLDP agent performs the following operations l Maintains information in the LLDP local system MIB l Obtains and sends LLDP local system MIB information to neighbor devices when the status of the local device status changes If the local device status keeps unchanged th...

Страница 59: ...he bridge MAC address of the neighbor device l LLDP Ethertype indicates the LLDP packet type If a packet contains this field it is an LLDP packet and it is sent to the LLDP module The value of this field is 0x88CC l LLDPDU indicates the LLDP data unit It is the major content of an LLDP packet l FCS indicates the Frame Check Sequence LLDPDU in the LLDP packet contains the Layer 2 information discov...

Страница 60: ...ly connected so each interface has only one neighbor As shown in Figure 2 4 SwitchA is directly connected to SwitchB and ME Each interface on SwitchA and SwitchB has only one neighbor Figure 2 4 Each interface has only one neighbor Internet Switch A Switch B ME NMS The network where an interface has multiple neighbors The interfaces between two switches are connected through an unknown network so ...

Страница 61: ...tion is configured As shown in Figure 2 6 a link aggregation group is configured between the switches Each interface in the link aggregation group has only one neighbor Figure 2 6 Link aggregation is configured on the network SwitchA SwitchB Enterprise User Enterprise User Network NMS Eth Trunk Quidway S2700 Series Ethernet Switches Configuration Guide Network Management 2 LLDP Configuration Issue...

Страница 62: ...ystem Name TLV Device name l Organizationally Specific TLV defined in 802 1 Type Description Port VLAN TLV VLAN ID of an interface Port protocol VLAN TLV Protocol VLAN ID of an interface VLAN Name TLV VLAN name Protocol identity TLV Protocol types supported by an interface l Organizationally Specific TLV defined in 802 3 Type Description Link Aggregation TLV Whether a port supports link aggregatio...

Страница 63: ...ower via MDI TLV Power capability of the device By default LLDP advertises all types of TLVs except the Location Identification TLV 2 3 Configuring LLDP This section describes how to configure LLDP 2 3 1 Establishing the Configuration Task Applicable Environment The LLDP function on network devices allows the NMS to obtain device capabilities device topology management addresses device identificat...

Страница 64: ...on on an interface 6 Optional Delay to send neighbor change traps to the NMS 2 3 2 Enabling Global LLDP After LLDP is enabled on the switch and its neighbors the switch and its neighbors obtain status information of each other by exchanging LLDP packets The NMS obtains Layer 2 connection status from the switch for network topology analysis Procedure Step 1 Run system view The system view is displa...

Страница 65: ...un the lldp enable command in the views of these interfaces NOTE l On an Eth Trunk LLDP can only be enabled on member interfaces The interfaces enabled with LLDP and not enabled with LLDP can exist in the same Eth Trunk l LLDP can be enabled and disabled only on the physical interfaces such as Ethernet GE and XGE interfaces Before enabling or disabling LLDP on an interface ensure that LLDP has bee...

Страница 66: ...The devices send and receive device information by using these TLVs The TLVs that can be encapsulated in an LLDP packet include basic TLVs organizationally specific TLVs and TLVs related to media endpoint discovery MED Prerequisite l LLDP has been enabled globally l LLDP has been enabled on the interfaces Context To enable an interface to send the 802 3 Power via MDI TLV run the lldp tlv enable do...

Страница 67: ...ther types of LLDP MED TLVs only after specifying the LLDP MED Capabilities TLV To disable the LLDP MED Capabilities TLV you must disable the other types of LLDP MED TLVs first To disable the MAC PHY Configuration Status TLVs you must disable the LLDP MED Capabilities TLV first l The 802 3 MAC PHY Configuration Status TLVs are advertised automatically after the LLDP MED Capabilities TLV is adverti...

Страница 68: ...prevent the device from frequently sending traps to the NMS A delay suppresses the network topology flapping The LLDP transmission delay should be set properly and adjusted according to network loads l A long delay reduces the LLDP packet interaction frequency and thus saves system resource However if the delay is too long the device cannot notify neighbors of its status in time and the NMS cannot...

Страница 69: ...re enable LLDP on an interface There is a delay before LLDP is re enabled on an interface The delay suppresses the topology flapping of the neighbors caused by the frequent LLDP status changes The delay to re enable the LLDP function on an interface must be set properly l A great value of the delay prevents network topology flapping However if the value is too large the device cannot notify neighb...

Страница 70: ...e value of hold ranges from 2 to 10 however when the value of hold x interval is greater than 65535 the hold value is invalid Step 5 Run lldp restart delay delay The delay to re enable LLDP on an interface is set The default value is 2 in seconds If LLDP is disabled on an interface the system re enables LLDP for the interface after a delay Step 6 Run lldp trap interval interval The delay to send n...

Страница 71: ...re Step 1 Run system view The system view is displayed Step 2 Run snmp agent trap enable feature name lldptrap The LLDP trap function is enabled By default the LLDP trap function is disabled on the S2700 End 2 3 8 Checking the Configuration Prerequisite All configurations are complete Procedure l Run the display lldp local interface interface type interface number command to view local LLDP status...

Страница 72: ...k devices the NMS can obtain the network topology The following example describes how to configure LLDP on the devices that have a single neighbor Networking Requirements As shown in Figure 2 7 SwitchA is directly connected to SwitchB and media endpoint ME The NMS needs to obtain Layer 2 information about SwitchA SwitchB and ME By using the Layer 2 information a network administrator can know the ...

Страница 73: ...paration To complete the configuration you need the following data l Management address 10 10 10 1 for SwitchA and management address 10 10 10 2 for SwitchB Procedure Step 1 Enable global LLDP on SwitchA and SwitchB Configure SwitchA Quidway system view Quidway sysname SwitchA SwitchA lldp enable Configure SwitchB Quidway system view Quidway sysname SwitchB SwitchB lldp enable Step 2 Enable Switch...

Страница 74: ...assis ID 00e0 fc33 0011 System name SwitchA System description Quidway Huawei Versatile Routing Platform Software VRP R Software Version 5 70 S2700 V200R006C00 Copyright c 2003 2010 Huawei Technologies Co Ltd System capabilities supported bridge System capabilities enabled bridge LLDP Up time 2009 2 13 18 31 37 MED system information Device class Network Connectivity MED inventory information of m...

Страница 75: ...tity STP RSTP MSTP LACP EthOAM CFM Auto negotiation supported Yes Auto negotiation enabled Yes OperMau speed 100 duplex Full Power port class PD PSE power supported No PSE power enabled No PSE pairs control ability No Power pairs Unknown Port power classification Unknown Link aggregation supported Yes Link aggregation enabled No Aggregation port ID 0 Maximum frame Size 1600 MED port information Me...

Страница 76: ...PSE power enabled No PSE pairs control ability No Power pairs Unknown Port power classification Unknown Link aggregation supported Yes Link aggregation enabled No Aggregation port ID 0 Maximum frame Size 1600 MED Device information Device class Network Connectivity HardwareRev LE01MCUA VER A FirmwareRev NC SoftwareRev Version 5 70 V200R006C00 SerialNum NA Manufacturer name HUAWEI TECH CO LTD Model...

Страница 77: ...bors Networking Requirements As shown in Figure 2 8 SwitchA SwitchB and SwitchC are connected through an unknown network The unknown network is not managed by the NMS but can transparently transmit LLDP packets The NMS needs to obtain Layer 2 information about SwitchA SwitchB and SwitchC By using the Layer 2 information a network administrator can know the detailed network topology information and...

Страница 78: ...witchA SwitchB and SwitchC to process LLDP BPDUs 3 Configure management addresses for SwitchA SwitchB and SwitchC Data Preparation To complete the configuration you need the following data l Management addresses for SwitchA SwitchB and SwitchC Procedure Step 1 Enable global LLDP on SwitchA SwitchB and SwitchC Configure SwitchA Quidway system view Quidway sysname SwitchA SwitchA lldp enable Configu...

Страница 79: ...ew the neighbor information of SwitchA SwitchA display lldp neighbor interface ethernet 0 0 1 Ethernet0 0 1 has 2 neighbors Neighbor index 1 Chassis type macAddress Chassis ID 00e0 fc33 0012 Port ID type interfaceName Port ID Ethernet0 0 1 Port description HUAWEI Quidway Series Ethernet0 0 1 Interface System name SwitchB System description Quidway Huawei Versatile Routing Platform Software VRP R S...

Страница 80: ...Port Available power value 0 Neighbor index 2 Chassis type macAddress Chassis ID 00e0 fc33 0013 Port ID type interfaceName Port ID Ethernet0 0 1 Port description HUAWEI Quidway Series Ethernet0 0 1 Interface System name SwitchC System description Quidway Huawei Versatile Routing Platform Software VRP R Software Version 5 70 S2700 Copyright c 2003 2010 Huawei Technologies Co Ltd System capabilities...

Страница 81: ...riority 0 Media policy Dscp 0 Power Type Unknown PoE PSE power source Unknown Port PSE Priority Unknown Port Available power value 0 l View the configurations on SwitchB Same as information about SwitchA l View the configurations on SwitchC Same as information about SwitchA End Configuration Files l Configuration file of SwitchA sysname SwitchA bpdu enable lldp enable lldp management address 10 10...

Страница 82: ...an Eth Trunk The NMS needs to obtain the Layer 2 information between the Switches By using the Layer 2 information a network administrator can know the detailed topology information and configuration errors on the devices outside the unknown network These requirements can be met by configuring LLDP on SwitchA and SwitchB The NMS has reachable routes to SwitchA and SwitchB and SNMP parameters are s...

Страница 83: ...ort ethernet 0 0 1 SwitchA Eth Trunk1 trunkport ethernet 0 0 2 SwitchA Eth Trunk1 trunkport ethernet 0 0 3 SwitchA Eth Trunk1 port link type trunk SwitchA Eth Trunk1 port trunk allow pass vlan 100 SwitchA Eth Trunk1 quit Configure SwitchB Same as the configurations on SwitchA Step 2 Enable global LLDP on SwitchA and SwitchB Configure SwitchA SwitchA lldp enable Configure SwitchB Same as the config...

Страница 84: ...ilities supported bridge System capabilities enabled bridge LLDP Up time 2010 2 13 18 31 37 MED system information Device class Network Connectivity MED inventory information of master board HardwareRev VER B FirmwareRev NA SoftwareRev Version 5 70 V200R006C00 SerialNum NA Manufacturer name HUAWEI TECH CO LTD Model name NA Asset tracking identifier NA System configuration LLDP Status enabled defau...

Страница 85: ... supported Yes Link aggregation enabled No Aggregation port ID 1 Maximum frame Size 1600 MED port information Media policy type Unknown Unknown Policy Yes VLAN tagged No Media policy VlanID 0 Media policy L2 priority 0 Media policy Dscp 0 Power Type Unknown PoE PSE power source Unknown Port PSE Priority Unknown Port Available power value 0 Interface Ethernet0 0 2 LLDP Enable Status enabled default...

Страница 86: ... HUAWEI Quidway Series Ethernet0 0 3 Interface Port And Protocol vlan ID PPVID don t supported Port VLAN ID PVID 1 VLAN Name of VLAN 1 VLAN1 Protocol identity STP RSTP MSTP LACP EthOAM CFM Auto negotiation supported Yes Auto negotiation enabled Yes OperMau speed 100 duplex Full Power port class PD PSE power supported No PSE power enabled No PSE pairs control ability No Power pairs Unknown Port pow...

Страница 87: ... bpdu enable lldp enable interface Eth Trunk1 port link type trunk port trunk allow pass vlan 100 interface Ethernet0 0 1 eth trunk 1 interface Ethernet0 0 2 eth trunk 1 interface Ethernet0 0 3 eth trunk 1 lldp management address 10 10 10 1 return l Configuration file of SwitchB sysname SwitchB interface Vlanif1 ip address 10 10 10 2 255 255 255 0 bpdu enable vlan batch 100 lldp enable interface E...

Страница 88: ...thernet0 0 3 eth trunk 1 lldp management address 10 10 10 2 return Quidway S2700 Series Ethernet Switches Configuration Guide Network Management 2 LLDP Configuration Issue 01 2011 07 15 Huawei Proprietary and Confidential Copyright Huawei Technologies Co Ltd 78 ...

Страница 89: ... features supported by the S2700 3 3 Configuring Basic HGMP Functions This section describes how to configure basic HGMP functions to create or manage a cluster 3 4 Configuring Advanced HGMP Functions This section describes how to configure advanced HGMP functions to simplify the management and maintenance of a basic cluster 3 5 Maintaining HGMP This section describes how to clear the statistics o...

Страница 90: ...es The Huawei Group Management Protocol HGMP is developed to manage a group of Ethernet switches By running HGMP you can appoint a switch as the administrator in a cluster to perform integrated management and configurations over other switches added to the cluster This simplifies maintenance and engineering In addition all the switches in a cluster share one public IP address to communicate with o...

Страница 91: ...outer Administrator Member1 Member2 Member3 Member4 Host DSLAM Cluster1 Administrator administrator switch Member member switch Quidway S2700 Series Ethernet Switches Configuration Guide Network Management 3 HGMP Configuration Issue 01 2011 07 15 Huawei Proprietary and Confidential Copyright Huawei Technologies Co Ltd 81 ...

Страница 92: ...tocol NDP packets are used to collect information about the directly connected neighbors including the device model software version hardware version connection interface member number private IP address used for communication within a cluster and hardware platform NOTE Any device that supports HGMP does not forward NDP packets An NDP table is created to store information about neighbors Quidway S...

Страница 93: ...a public IP address to the administrator switch l A member switches is the member device in a cluster The member switch is managed by the administrator switch that acts as an agent Therefore the public IP address is not required for a member switch l A candidate switch is a device that has the cluster function but does not join any cluster l A standby switch is the backup administrator switch in a...

Страница 94: ...inds of IP address user name and password are configured the command cannot be performed l Member switches download specified files from the FTP server and then set them as the default files for the next startup l To avoid congestion you can set the maximum number of member switches that concurrently download files from the FTP server Batch Restart HGMP can perform batch restart over a specified g...

Страница 95: ...you need to disable NDP or NTDP on unrelated interfaces As a result less packets are transmitted and the topology of the cluster is stable l On the administrator switch disable NDP or NDTP on unrelated interfaces in the cluster l After you disable NDP on unrelated interfaces in the cluster NDP packets of the interfaces are not sent to the administrator switch l After you disable NTDP on unrelated ...

Страница 96: ...Preparation To configure basic HGMP functions you need the following data No Data 1 Range of private IP addresses used in the cluster 2 Cluster name 3 Medium access control MAC address of the member switch 4 Optional Aging time of NDP packets and interval for sending NDP packets 5 Optional Range of topology collection hop delay and interface delay in forwarding NTDP topology request packets interv...

Страница 97: ... The interface view is displayed Run ndp enable NDP is enabled on the interface l Optional Setting the aging time of NDP packets Do as follows on the administrator switch and member switches 1 Run system view The system view is displayed 2 Run ndp timer aging aging time The aging time of NDP packets is set By default the aging time of NDP packets is set to 180 seconds The aging time of NDP packets...

Страница 98: ...y default NTDP is enabled in the system view l Enabling NTDP on an interface 1 Run system view The system view is displayed 2 Run interface interface type interface number The interface view is displayed 3 Run ntdp enable NTDP is enabled on the interface l Optional Configuring the range of topology collection 1 Run system view The system view is displayed 2 Run ntdp hop max hop value The range of ...

Страница 99: ...nformation is not collected regularly l Optional Enabling topology collection 1 Run the following command in the user view ntdp explore Topology collection is enabled You can run this command to collect topology information at any time End 3 3 4 Creating a Cluster To perform unified management over switches you must first create a cluster and add switches to be managed to the cluster Procedure l C...

Страница 100: ... cluster is automatically deleted If you change the ID of the management VLAN or delete the management VLAN and its corresponding VLANIF interface on a member switch the member switch automatically quits the cluster l Enabling the cluster function Do as follows on the administrator switch and member switches 1 Run system view The system view is displayed 2 Run cluster enable The cluster function i...

Страница 101: ...igured and the cluster is created This command can only be run on the administrator switch and the switch that does not join any cluster Creating a cluster automatically These steps need to be configured only on the administrator switch or on the switch which will be the administrator in a created HGMP cluster In this mode the administrator switch prompts you whether to add all the existing candid...

Страница 102: ...address of the member switch Do as follows only on the administrator switch 1 Run system view The system view is displayed 2 Run cluster The cluster view is displayed 3 Run add member member number mac address mac address password password A member switch is added l Adding a member switch automatically In this mode the administrator switch prompts you whether to add all the existing candidate swit...

Страница 103: ...eed to use a cluster to manage a switch you can delete the switch or configure the switch to quit the cluster Procedure l Deleting a cluster Do as follows on the administrator switch 1 Run system view The system view is displayed 2 Run cluster The cluster view is displayed 3 Run undo build A cluster is deleted After the command is run on an administrator switch except the mngvlanid and ip pool com...

Страница 104: ...ified cluster NOTE When you run the undo administrator address command on member switches the member switch temporarily exits from the cluster whereas the administrator switch does not delete the member switch To delete a member switch from the HGMP cluster run the delete member command End 3 3 7 Optional Deleting a Member Switch If you do not need to use a cluster to manage a switch in a manageme...

Страница 105: ...didate switches l Run the display cluster members member number verbose to check information about member switches End Example If the NDP neighbor can be normally established you can run the display ndp command to check information about the MAC addresses of all the neighboring stations and the number of the interface on the neighboring station that is connected to the local interface Quidway disp...

Страница 106: ...list The device list of NTDP MAC HOP IP PLATFORM 0004 0004 0004 2 S2700 0003 0003 0003 1 S2700 0002 0002 0002 1 S2700 0001 0001 0001 0 S2700 If the cluster is established successfully you can run the display cluster command to view information about the HGMP cluster to which the device belongs such as the cluster name and ID of the management VLAN HUAWEI_0 Quidway display cluster Cluster name HUAW...

Страница 107: ... with the applicable environment complete the pre configuration tasks and obtain the required data This can help you complete the configuration task quickly and accurately Applicable Environment To optimize the performance parameters of the established cluster you can configure advanced HGMP functions to facilitate the management and maintenance of the HGMP cluster and better manage member switche...

Страница 108: ... of the cluster Procedure l Configure the interval for sending handshake packets Do as follows on the administrator switch 1 Run system view The system view is displayed 2 Run cluster The cluster view is displayed 3 Run timer interval The interval for sending handshake packets is set By default the interval for sending handshake packets is 10 seconds This interval must be equal to or less than one...

Страница 109: ...ster discagingtime disconnect aging time The aging time of member switches is set By default no aging time is set It indicates that the Disconnecting state of member switches is not aged l Configure a multicast MAC address for the cluster Do as follows on the administrator switch 1 Run system view The system view is displayed 2 Run cluster The cluster view is displayed 3 Run cluster multimac mac a...

Страница 110: ... The system view is displayed 2 Run cluster The cluster view is displayed 3 Run ftp server ip address A public FTP server is configured for the cluster NOTE The member switches in a cluster can communicate with the FTP server in either of the following modes l Non NAT There must be reachable routes between member switches and FTP server l NAT The cluster ftp nat enable command must be run in the c...

Страница 111: ...that are configured through Steps 3 to 6 by accessing the administrator switch Steps 3 to 6 are optional and are not listed in sequence By default no public server and host is configured for a cluster End 3 4 3 Managing Switches in a Cluster Through HGMP You can use commands to configure the following features for member switches of an HGMP cluster in batches batch distribution batch restart incre...

Страница 112: ...nd If Step 3 is performed the IP address user name and password configured in Step 3 are used by default IP addresses used in batch distribution are private IP addresses used in the cluster l Configuring the batch restart function Do as follows on the administrator switch 1 Run system view The system view is displayed 2 Run cluster The cluster view is displayed 3 Optional Run cluster member reboot...

Страница 113: ...ogies and types of the new device and old device are the same l Configuring Communication Between Huawei Devices and Non Huawei Devices Do as follows on the administrator switch 1 Run system view The system view is displayed 2 Run cluster The cluster view is displayed 3 Run cluster packet extend enable Communication Between Huawei Devices and Non Huawei Devices is enabled To configure the manageme...

Страница 114: ...all command To check the list of incremental configuration commands that is currently edited run the display increment command command l Synchronizing configuration files Do as follows on the administrator switch 1 Run system view The system view is displayed 2 Run cluster The cluster view is displayed 3 Run increment config synchronization group by device type device type ip ip address to ip addr...

Страница 115: ...k the cluster topology l Run the display increment command to check the incremental configuration command l Run the display increment synchronization result to check whether configuration files of member switches are synchronized to the FTP server l Run the display member getfile state to check whether member switches successfully obtain configuration files version files or patch files l Run the d...

Страница 116: ..._3 Member 3 00e0 da1c 4c00 GigabitEthernet0 0 2 GigabitEthernet0 0 1 HUAWEI_2 Member 2 00e0 875b 8f00 GigabitEthernet0 0 2 GigabitEthernet0 0 1 HUAWEI_1 Member 1 00e0 0f68 6f00 GigabitEthernet0 0 2 GigabitEthernet0 0 1 HUAWEI_4 Member 4 00e0 9f7e 0b00 Run the display increment command command and you can check the incremental configuration of the cluster including the number and contents of the in...

Страница 117: ...isplay member reboot state command and you can view that success is displayed Quidway display member reboot state The result of member switches rebooting SN Device MacAddress IPAddress Result 1 S2700 0002 0002 0002 10 0 0 2 success 2 S2700 0003 0003 0003 10 0 0 3 success If the current configurations are successfully saved on member switches run the display member save state command and you can vi...

Страница 118: ...tatus of the HGMP cluster Context In routine maintenance you can run the following commands in any view to display the operation stauts of HGMP Procedure l Run the display ndp to check the NDP configuration in the system view l Run the display ntdp to check the global NTDP configuration l Run the display cluster to check information about the HGMP cluster to which the device belongs l Run the disp...

Страница 119: ...NTDP debugging l Run the debugging cluster all event handshake member mrc nat packet state command or debugging cluster packet handshake mrc verbose command to enable cluster debugging End 3 6 HGMP Configuration Examples This section provides several configuration examples of HGMP 3 6 1 Example for Configuring Basic HGMP Functions for a Cluster Networking Requirements As shown in Figure 3 3 a carr...

Страница 120: ...0003 0003 Member 3 0004 0004 0004 Configuration Roadmap The configuration roadmap is as follows 1 Create a management VLAN on all devices Enable NDP and NTDP to ensure that each device can detect the topology structure of the network through NTDP 2 Choose the administrator switch and then create a cluster named HUAWEI on the administrator switch 3 Add all the devices that support HGMP in the Layer...

Страница 121: ...2 Administrator 1 Ethernet0 0 2 port link type trunk Administrator 1 Ethernet0 0 2 port trunk allow pass vlan 10 Administrator 1 Ethernet0 0 2 quit Administrator 1 interface ethernet 0 0 3 Administrator 1 Ethernet0 0 3 port link type trunk Administrator 1 Ethernet0 0 3 port trunk allow pass vlan 10 Administrator 1 Ethernet0 0 3 quit Administrator 1 interface vlanif 10 Administrator 1 Vlanif10 quit...

Страница 122: ...ndp enable Member 1 interface ethernet 0 0 1 Member 1 Ethernet0 0 1 ndp enable Member 1 Ethernet0 0 1 quit Member 1 interface ethernet 0 0 2 Member 1 Ethernet0 0 2 ndp enable Member 1 Ethernet0 0 2 quit Configure member switch 2 Member 2 ndp enable Member 2 interface ethernet 0 0 1 Member 2 Ethernet0 0 1 ndp enable Member 2 Ethernet0 0 1 quit Configure member switch 3 Member 3 ndp enable Member 3 ...

Страница 123: ... 1 Member 1 ntdp enable Member 1 ntdp timer 10 Member 1 ntdp hop 3 Member 1 interface ethernet 0 0 1 Member 1 Ethernet0 0 1 ntdp enable Member 1 Ethernet0 0 1 quit Member 1 interface ethernet 0 0 2 Member 1 Ethernet0 0 2 ntdp enable Member 1 Ethernet0 0 2 quit Configure member switch 2 Member 2 ntdp enable Member 2 ntdp timer 10 Member 2 ntdp hop 3 Member 2 interface ethernet 0 0 1 Member 2 Ethern...

Страница 124: ...rough NTDP and you can find the MAC address and types of related devices Administrator 1 ntdp explore Administrator 1 system view Administrator 1 display ntdp device list The device list of NTDP MAC HOP IP PLATFORM 0004 0004 0004 2 S2700 0003 0003 0003 1 S2700 0002 0002 0002 1 S2700 0001 0001 0001 0 S2700 Step 5 Create a cluster NOTE Following steps can be performed only on the administrator switc...

Страница 125: ...rator switch l Take the mode of automatically adding member switches as an example To add member switches manually see Adding a Member Switch Add all candidate switches to the cluster HUAWEI_0 Administrator 1 cluster auto build Collecting candidate list please wait Candidate list Name Hop MAC Address DeviceType Member 1 1 0002 0002 0002 S2700 Member 2 1 0003 0003 0003 S2700 Member 3 2 0004 0004 00...

Страница 126: ...oute static 0 0 0 0 0 1 0 0 2 NOTE You can also run a routing protocol Step 9 Configure public servers and hosts of the cluster Configure an FTP server HUAWEI_0 Administrator 1 cluster HUAWEI_0 Administrator 1 cluster cluster ftp nat enable HUAWEI_0 Administrator 1 cluster ftp server 2 0 0 1 Configure a SFTP server HUAWEI_0 Administrator 1 cluster sftp server 2 0 0 2 Configure a Simple Network Man...

Страница 127: ... enable ndp enable interface Ethernet0 0 2 port link type trunk port trunk allow pass vlan 10 ntdp enable ndp enable interface Ethernet0 0 3 port link type trunk port trunk allow pass vlan 10 cluster mngvlanid 10 ip pool 10 0 0 1 255 0 0 0 build HUAWEI cluster ftp nat enable ftp server 2 0 0 1 sftp server 2 0 0 2 logging host 4 0 0 1 snmp host 3 0 0 1 ip route static 0 0 0 0 0 0 0 0 1 0 0 2 return...

Страница 128: ...1 port link type trunk port trunk allow pass vlan 10 ntdp enable ndp enable cluster mngvlanid 10 administrator address 0001 0001 0001 name HUAWEI return l Configuration file of Member 3 sysname Member 3 vlan batch 10 cluster enable ntdp enable ntdp hop 3 ntdp timer 10 ndp enable interface Vlanif10 interface Ethernet0 0 1 port link type trunk port trunk allow pass vlan 10 ntdp enable ndp enable clu...

Страница 129: ...n example where the NAT mode is adopted Member 3 accesses the FTP server 2 0 0 1 8 out of the cluster and devices out of the cluster access the FTP server Member 2 in the cluster Figure 3 4 Networking diagram of configuring the interconnection of FTP servers and devices in and out of the HGMP cluster in NAT Mode IP MPLS core FTP Server 2 0 0 1 8 SFTP Server 2 0 0 2 8 NM station 3 0 0 1 8 Log stati...

Страница 130: ...NIF 10 that is 1 0 0 1 8 and a reachable route between VLANIF 10 and the FTP server l Address pool of the cluster that is 10 0 0 0 8 l IP address of the administrator switch used in the cluster that is 10 0 0 1 8 l Member 2 serving as the FTP server in the cluster with the member ID being 2 Procedure Step 1 Configure a management VLAN Create VLAN 10 on the device and add interfaces of the administ...

Страница 131: ... Ethernet0 0 1 quit Member 2 interface vlanif 10 Member 2 Vlanif10 quit Configure member switch 3 Quidway system view Quidway sysname Member 3 Member 3 vlan 10 Member 3 vlan10 quit Member 3 interface ethernet 0 0 1 Member 3 Ethernet0 0 1 port link type trunk Member 3 Ethernet0 0 1 port trunk allow pass vlan 10 Member 3 Ethernet0 0 1 quit Member 3 interface vlanif 10 Member 3 Vlanif10 quit Step 2 C...

Страница 132: ...ts Error 0 Neighbor 1 Aging Time 5 s MAC Address 0003 0003 0003 Port Name Ethernet0 0 1 Software Version Version 5 70 V200R006C00 Device Name Member 2 Port Duplex FULL Product Ver S2700 Step 3 Configure NTDP On devices enable NTDP in the system view and on the interface and configure the interval and range for NTDP to collect topologies to 10 minutes and 3 hops respectively Configure the administr...

Страница 133: ...e the administrator switch Administrator 1 cluster enable Administrator 1 cluster Administrator 1 cluster mngvlanid 10 Administrator 1 cluster quit Configure member switch 1 Member 1 cluster enable Member 1 cluster Member 1 cluster mngvlanid 10 Member 1 cluster quit Configure member switch 2 Member 2 cluster enable Member 2 cluster Member 2 cluster mngvlanid 10 Member 2 cluster quit Configure memb...

Страница 134: ... Handshake timer 10 sec Handshake hold time 60 sec IP pool 10 0 0 1 8 No logging host configured No SNMP host configured No FTP server configured No SFTP server configured cluster member ftp timeout 300 sec default Cluster SNMP NAT capability enabled Cluster FTP NAT capability disabled There are 1 member s in the cluster and 0 of them are down On the administrator switch check information about ca...

Страница 135: ...ss 1 0 0 1 8 HUAWEI_0 Administrator 1 Vlanif10 quit After the previous configuration you can find that the interface on the administrator switch is in the Up state HUAWEI_0 Administrator 1 display interface Vlanif 10 Vlanif10 current state UP Line protocol current state UP Description HUAWEI Quidway Series Vlanif10 Interface Route Port The MTU is 1500 Internet Address is 1 0 0 1 8 Internet Address...

Страница 136: ... hgmp 331 Password required for hgmp Enter password 230 User logged in ftp l A device out of the cluster accesses the FTP server in the cluster in NAT mode Configure an FTP server on Member 2 The configuration details see Configuration Files and are not mentioned here Calculate the port number reserved for the FTP protocol of a member switch in the cluster The member ID of Member 2 is 2 Using the ...

Страница 137: ...erface Ethernet0 0 3 port link type trunk port trunk allow pass vlan 10 cluster mngvlanid 10 ip pool 10 0 0 1 255 0 0 0 build HUAWEI cluster ftp nat enable ftp server 2 0 0 1 sftp server 2 0 0 2 logging host 4 0 0 1 snmp host 3 0 0 1 ip route static 0 0 0 0 0 0 0 0 1 0 0 2 return l Configuration file of Member 1 sysname Member 1 vlan batch 10 cluster enable ntdp enable ntdp hop 5 ntdp timer 10 ndp...

Страница 138: ...ype trunk port trunk allow pass vlan 10 ntdp enable ndp enable cluster mngvlanid 10 administrator address 0001 0001 0001 name HUAWEI return l Configuration file of Member 3 sysname Member 3 vlan batch 10 cluster enable ntdp enable ntdp hop 5 ntdp timer 10 ndp enable interface Vlanif10 interface Ethernet0 0 1 port link type trunk port trunk allow pass vlan 10 ntdp enable ndp enable cluster mngvlani...

Страница 139: ...Non NAT mode is adopted Member 3 accesses the FTP server 2 0 0 1 8 out of the cluster and devices out of the cluster access the FTP server Member 2 in the cluster Figure 3 5 Networking diagram of configuring the interconnection of FTP servers and devices in and out of the HGMP cluster in non NAT mode IP MPLS core FTP Server 2 0 0 1 8 SFTP Server 2 0 0 2 8 NM station 3 0 0 1 8 Log station 4 0 0 1 8...

Страница 140: ...n the FTP client program on the PC and create an FTP connection with the member switch Context To complete the configuration you need the following data l Management VLAN ID of the cluster that is 10 l IP address of VLANIF 10 that is 1 0 0 1 8 and a reachable route between VLANIF 10 and the FTP server l Address pool of the cluster that is 10 0 0 0 8 l IP address of the administrator switch used in...

Страница 141: ...iew Quidway sysname Member 2 Member 2 vlan 10 Member 2 vlan10 quit Member 2 interface ethernet 0 0 1 Member 2 Ethernet0 0 1 port link type trunk Member 2 Ethernet0 0 1 port trunk allow pass vlan 10 Member 2 Ethernet0 0 1 quit Member 2 interface vlanif 10 Member 2 Vlanif10 quit Configure member switch 3 Quidway system view Quidway sysname Member 3 Member 3 vlan 10 Member 3 vlan10 quit Member 3 inte...

Страница 142: ...on 5 70 V200R006C00 Device Name Member 1 Port Duplex FULL Product Ver S2700 Interface Ethernet0 0 2 Status Enabled Packets Sent 6 Packets Received 16 Packets Error 0 Neighbor 1 Aging Time 5 s MAC Address 0003 0003 0003 Port Name Ethernet0 0 1 Software Version Version 5 70 V200R006C00 Device Name Member 2 Port Duplex FULL Product Ver S2700 Step 3 Configure NTDP On devices enable NTDP in the system ...

Страница 143: ...Hop Delay 200 ms Port Delay 20 ms Total time for last collection 0 ms Step 4 Enable the cluster function and set the management VLAN Configure the administrator switch Administrator 1 cluster enable Administrator 1 cluster Administrator 1 cluster mngvlanid 10 Administrator 1 cluster quit Configure member switch 1 Member 1 cluster enable Member 1 cluster Member 1 cluster mngvlanid 10 Member 1 clust...

Страница 144: ...WEI Role Administrator switch management vlan id 10 Cluster multicast MAC address 0180 c200 000a default Cluster auto join disabled Handshake timer 10 sec Handshake hold time 60 sec IP pool 10 0 0 1 8 No logging host configured No SNMP host configured No FTP server configured No SFTP server configured cluster member ftp timeout 300 sec default Cluster SNMP NAT capability enabled Cluster FTP NAT ca...

Страница 145: ...dministrator switch Assign an IP address to VLANIF 10 HUAWEI_0 Administrator 1 interface vlanif 10 HUAWEI_0 Administrator 1 Vlanif10 ip address 1 0 0 1 8 HUAWEI_0 Administrator 1 Vlanif10 quit After the previous configuration you can find that the interface on the administrator switch is in the Up state HUAWEI_0 Administrator 1 display interface Vlanif 10 Vlanif10 current state UP Line protocol cu...

Страница 146: ...FTP server on the corresponding member switch Member 2 The configuration details see Configuration Files and are not mentioned here Run the FTP client program on the PC and set up an FTP connection with Member 2 in non NAT mode NOTE Devices out of the cluster access the FTP server in the cluster in non NAT mode The IP address of the FTP server is that of the management VLANIF interface on the memb...

Страница 147: ...batch 10 cluster enable ntdp enable ntdp hop 5 ntdp timer 10 ndp enable interface Vlanif10 interface Ethernet0 0 1 port link type trunk port trunk allow pass vlan 10 ntdp enable ndp enable interface Ethernet0 0 2 port link type trunk port trunk allow pass vlan 10 ntdp enable ndp enable cluster mngvlanid 10 administrator address 0001 0001 0001 name HUAWEI ip route static 2 0 0 0 255 0 0 0 10 0 0 1 ...

Страница 148: ...id 10 ip route static 2 0 0 0 255 0 0 0 10 0 0 1 return 3 6 4 Example for Configuring Devices in the HGMP Cluster to Access the Outside SNMP Host in NAT Mode Networking Requirements As shown in Figure 3 6 all the Layer 2 switches belong to the same cluster Administrator 1 is the administrator switch of the cluster and other switches are member switches The member ID of Member 2 is 2 and the member...

Страница 149: ...ice MAC Address Device MAC Address Administrator 1 0001 0001 0001 Member 1 0002 0002 0002 Member 2 0003 0003 0003 Member 3 0004 0004 0004 Configuration Roadmap The configuration roadmap is as follows 1 Create a cluster and configure basic HGMP functions for the cluster according to the steps described in Example for Configuring Basic HGMP Functions for a Cluster 2 Enable SNMP NAT on the administra...

Страница 150: ...Administrator 1 Ethernet0 0 2 port link type trunk Administrator 1 Ethernet0 0 2 port trunk allow pass vlan 10 Administrator 1 Ethernet0 0 2 quit Administrator 1 interface ethernet 0 0 3 Administrator 1 Ethernet0 0 3 port link type trunk Administrator 1 Ethernet0 0 3 port trunk allow pass vlan 10 Administrator 1 Ethernet0 0 3 quit Administrator 1 interface vlanif 10 Administrator 1 Vlanif10 quit C...

Страница 151: ...ndp enable Member 1 interface ethernet 0 0 1 Member 1 Ethernet0 0 1 ndp enable Member 1 Ethernet0 0 1 quit Member 1 interface ethernet 0 0 2 Member 1 Ethernet0 0 2 ndp enable Member 1 Ethernet0 0 2 quit Configure member switch 2 Member 2 ndp enable Member 2 interface ethernet 0 0 1 Member 2 Ethernet0 0 1 ndp enable Member 2 Ethernet0 0 1 quit Configure member switch 3 Member 3 ndp enable Member 3 ...

Страница 152: ... 1 Member 1 ntdp enable Member 1 ntdp timer 10 Member 1 ntdp hop 3 Member 1 interface ethernet 0 0 1 Member 1 Ethernet0 0 1 ntdp enable Member 1 Ethernet0 0 1 quit Member 1 interface ethernet 0 0 2 Member 1 Ethernet0 0 2 ntdp enable Member 1 Ethernet0 0 2 quit Configure member switch 2 Member 2 ntdp enable Member 2 ntdp timer 10 Member 2 ntdp hop 3 Member 2 interface ethernet 0 0 1 Member 2 Ethern...

Страница 153: ...rough NTDP and you can find the MAC address and types of related devices Administrator 1 ntdp explore Administrator 1 system view Administrator 1 display ntdp device list The device list of NTDP MAC HOP IP PLATFORM 0004 0004 0004 2 S2700 0003 0003 0003 1 S2700 0002 0002 0002 1 S2700 0001 0001 0001 0 S2700 Step 5 Create a cluster NOTE Following steps can be performed only on the administrator switc...

Страница 154: ...rator switch l Take the mode of automatically adding member switches as an example To add member switches manually see Adding a Member Switch Add all candidate switches to the cluster HUAWEI_0 Administrator 1 cluster auto build Collecting candidate list please wait Candidate list Name Hop MAC Address DeviceType Member 1 1 0002 0002 0002 S2700 Member 2 1 0003 0003 0003 S2700 Member 3 2 0004 0004 00...

Страница 155: ...oute static 0 0 0 0 0 1 0 0 2 NOTE You can also run a routing protocol Step 9 Configure public servers and hosts of the cluster Configure an FTP server HUAWEI_0 Administrator 1 cluster HUAWEI_0 Administrator 1 cluster cluster ftp nat enable HUAWEI_0 Administrator 1 cluster ftp server 2 0 0 1 Configure a SFTP server HUAWEI_0 Administrator 1 cluster sftp server 2 0 0 2 Configure a Simple Network Man...

Страница 156: ... enable ndp enable interface Ethernet0 0 2 port link type trunk port trunk allow pass vlan 10 ntdp enable ndp enable interface Ethernet0 0 3 port link type trunk port trunk allow pass vlan 10 cluster mngvlanid 10 ip pool 10 0 0 1 255 0 0 0 build HUAWEI cluster ftp nat enable ftp server 2 0 0 1 sftp server 2 0 0 2 logging host 4 0 0 1 snmp host 3 0 0 1 ip route static 0 0 0 0 0 0 0 0 1 0 0 2 return...

Страница 157: ...nterface Vlanif10 interface Ethernet0 0 1 port link type trunk port trunk allow pass vlan 10 ntdp enable ndp enable cluster mngvlanid 10 administrator address 0001 0001 0001 name HUAWEI return l Configuration file of Member 3 sysname Member 3 vlan batch 10 cluster enable ntdp enable ntdp hop 5 ntdp timer 10 ndp enable interface Vlanif10 interface Ethernet0 0 1 port link type trunk port trunk allow...

Страница 158: ...hes The member ID of Member 2 is 2 and the member ID of Member 3 is 3 When Member 1 Member 2 and Member 3 are required to send packets to the SNMP host out of the cluster a connection can be set up between the SNMP host and member switches in NAT or non NAT mode NOTE In this configuration example where the non NAT mode is adopted Member 3 accesses the SNMP host 3 0 0 1 8 Quidway S2700 Series Ether...

Страница 159: ...admap The configuration roadmap is as follows 1 Create a cluster and configure basic HGMP functions for the cluster according to the steps described in Example for Configuring Basic HGMP Functions for a Cluster 2 Disable SNMP NAT on the administrator switch The function is enabled by default NOTE Related configurations of cluster NAT must be performed on the administrator switch 3 Configure routes...

Страница 160: ...hernet0 0 2 port trunk allow pass vlan 10 Administrator 1 Ethernet0 0 2 quit Administrator 1 interface ethernet 0 0 3 Administrator 1 Ethernet0 0 3 port link type trunk Administrator 1 Ethernet0 0 3 port trunk allow pass vlan 10 Administrator 1 Ethernet0 0 3 quit Administrator 1 interface vlanif 10 Administrator 1 Vlanif10 quit Configure member switch 1 Quidway system view Quidway sysname Member 1...

Страница 161: ...thernet0 0 1 quit Member 1 interface ethernet 0 0 2 Member 1 Ethernet0 0 2 ndp enable Member 1 Ethernet0 0 2 quit Configure member switch 2 Member 2 ndp enable Member 2 interface ethernet 0 0 1 Member 2 Ethernet0 0 1 ndp enable Member 2 Ethernet0 0 1 quit Configure member switch 3 Member 3 ndp enable Member 3 interface ethernet 0 0 1 Member 3 Ethernet0 0 1 ndp enable Member 3 Ethernet0 0 1 quit Af...

Страница 162: ...mber 1 ntdp hop 3 Member 1 interface ethernet 0 0 1 Member 1 Ethernet0 0 1 ntdp enable Member 1 Ethernet0 0 1 quit Member 1 interface ethernet 0 0 2 Member 1 Ethernet0 0 2 ntdp enable Member 1 Ethernet0 0 2 quit Configure member switch 2 Member 2 ntdp enable Member 2 ntdp timer 10 Member 2 ntdp hop 3 Member 2 interface ethernet 0 0 1 Member 2 Ethernet0 0 1 ntdp enable Member 2 Ethernet0 0 1 quit C...

Страница 163: ...DP and you can find the MAC address and types of related devices Administrator 1 ntdp explore Administrator 1 system view Administrator 1 display ntdp device list The device list of NTDP MAC HOP IP PLATFORM 0004 0004 0004 2 S2700 0003 0003 0003 1 S2700 0002 0002 0002 1 S2700 0001 0001 0001 0 S2700 Step 5 Create a cluster NOTE Following steps can be performed only on the administrator switch On the...

Страница 164: ...rator switch l Take the mode of automatically adding member switches as an example To add member switches manually see Adding a Member Switch Add all candidate switches to the cluster HUAWEI_0 Administrator 1 cluster auto build Collecting candidate list please wait Candidate list Name Hop MAC Address DeviceType Member 1 1 0002 0002 0002 S2700 Member 2 1 0003 0003 0003 S2700 Member 3 2 0004 0004 00...

Страница 165: ...oute static 0 0 0 0 0 1 0 0 2 NOTE You can also run a routing protocol Step 9 Configure public servers and hosts of the cluster Configure an FTP server HUAWEI_0 Administrator 1 cluster HUAWEI_0 Administrator 1 cluster cluster ftp nat enable HUAWEI_0 Administrator 1 cluster ftp server 2 0 0 1 Configure a SFTP server HUAWEI_0 Administrator 1 cluster sftp server 2 0 0 2 Configure a Simple Network Man...

Страница 166: ...s see Example for Configuring the Incremental Configuration Function for an HGMP Cluster Step 12 Configure the SNMP agent function on member switches Configure member switch 1 HUAWEI_1 Member 1 snmp agent target host trap address udp domain 3 0 0 1 params securityname cluster Configure member switch 2 HUAWEI_2 Member 2 snmp agent target host trap address udp domain 3 0 0 1 params securityname clus...

Страница 167: ... 0 0 1 snmp host 3 0 0 1 ip route static 0 0 0 0 0 0 0 0 1 0 0 2 return l Configuration file of Member 1 sysname Member 1 vlan batch 10 cluster enable ntdp enable ntdp hop 5 ntdp timer 10 ndp enable interface Vlanif10 interface Ethernet0 0 1 port link type trunk port trunk allow pass vlan 10 ntdp enable ndp enable interface Ethernet0 0 2 port link type trunk port trunk allow pass vlan 10 ntdp enab...

Страница 168: ...rap address udp domain 3 0 0 1 params securityname cluster return l Configuration file of Member 3 sysname Member 3 vlan batch 10 cluster enable ntdp enable ntdp hop 5 ntdp timer 10 ndp enable interface Vlanif10 interface Ethernet0 0 1 port link type trunk port trunk allow pass vlan 10 ntdp enable ndp enable cluster mngvlanid 10 administrator address 0001 0001 0001 name HUAWEI ip route static 3 0 ...

Страница 169: ...guring the batch distribution function for an HGMP cluster IP MPLS core FTP Server 2 0 0 1 8 SFTP Server 2 0 0 2 8 NM station 3 0 0 1 8 Log station 4 0 0 1 8 Administrator 1 10 0 0 1 8 Member 1 Member 2 Member 3 10 0 0 4 8 Ethernet0 0 1 Ethernet0 0 2 Ethernet0 0 1 Ethernet0 0 2 Ethernet0 0 1 Ethernet0 0 1 Cluster Ethernet0 0 3 Ethernet0 0 1 1 0 0 2 8 Device MAC Address Device MAC Address Administr...

Страница 170: ...er 2 being 2 and member ID of Member 3 being 3 Procedure Step 1 Configure a management VLAN Create VLAN 10 on the device and add interfaces of the administrator switch and member switches to VLAN 10 Configure the administrator switch Quidway system view Quidway sysname Administrator 1 Administrator 1 vlan 10 Administrator 1 vlan10 quit Administrator 1 interface ethernet 0 0 1 Administrator 1 Ether...

Страница 171: ... 3 Ethernet0 0 1 port trunk allow pass vlan 10 Member 3 Ethernet0 0 1 quit Member 3 interface vlanif 10 Member 3 Vlanif10 quit Step 2 Configure NDP On switches enable NDP in the system view and on an interface Configure the administrator switch Administrator 1 ndp enable Administrator 1 interface ethernet 0 0 1 Administrator 1 Ethernet0 0 1 ndp enable Administrator 1 Ethernet0 0 1 quit Administrat...

Страница 172: ...ble NTDP in the system view and on the interface and configure the interval and range for NTDP to collect topologies to 10 minutes and 3 hops respectively Configure the administrator switch Administrator 1 ntdp enable Administrator 1 ntdp timer 10 Administrator 1 ntdp hop 3 Administrator 1 interface ethernet 0 0 1 Administrator 1 Ethernet0 0 1 ntdp enable Administrator 1 Ethernet0 0 1 quit Adminis...

Страница 173: ...ember 1 cluster enable Member 1 cluster Member 1 cluster mngvlanid 10 Member 1 cluster quit Configure member switch 2 Member 2 cluster enable Member 2 cluster Member 2 cluster mngvlanid 10 Member 2 cluster quit Configure member switch 3 Member 3 cluster enable Member 3 cluster Member 3 cluster mngvlanid 10 Member 3 cluster quit After the topology collection function is enabled manually on the admi...

Страница 174: ... timeout 300 sec default Cluster SNMP NAT capability enabled Cluster FTP NAT capability disabled There are 1 member s in the cluster and 0 of them are down On the administrator switch check information about candidate switches you can find all the candidate switches and their types HUAWEI_0 Administrator 1 cluster display cluster candidates MAC HOP IP PLATFORM 0004 0004 0004 2 S2700 0003 0003 0003...

Страница 175: ...10 Vlanif10 current state UP Line protocol current state UP Description HUAWEI Quidway Series Vlanif10 Interface Route Port The MTU is 1500 Internet Address is 1 0 0 1 8 Internet Address is 10 0 0 1 8 Cluster IP Sending Frames Format is PKTFMT_ETHNT_2 Hardware address is 0001 0001 0001 Input bandwidth utilization Output bandwidth utilization Step 8 Configure a static route on the administrator swi...

Страница 176: ...guration file vrpcfg hgmp zip Step 11 Verify the configuration Run the display member getfile stat command on the administrator switch to check whether member switches successfully obtain the configuration files system software and patch files and you can view that success is displayed HUAWEI_0 Administrator 1 display member getfile stat The status of member switchs getting file SN Device MacAddre...

Страница 177: ...runk allow pass vlan 10 ntdp enable ndp enable interface Ethernet0 0 2 port link type trunk port trunk allow pass vlan 10 ntdp enable ndp enable interface Ethernet0 0 3 port link type trunk port trunk allow pass vlan 10 cluster mngvlanid 10 ip pool 10 0 0 1 255 0 0 0 build HUAWEI cluster ftp nat enable ftp server 2 0 0 1 sftp server 2 0 0 2 logging host 4 0 0 1 snmp host 3 0 0 1 ip route static 0 ...

Страница 178: ... enable interface Vlanif10 interface Ethernet0 0 1 port link type trunk port trunk allow pass vlan 10 ntdp enable ndp enable cluster mngvlanid 10 administrator address 0001 0001 0001 name HUAWEI return l Configuration file of Member 3 sysname Member 3 vlan batch 10 cluster enable ntdp enable ntdp hop 5 ntdp timer 10 ndp enable interface Vlanif10 interface Ethernet0 0 1 port link type trunk port tr...

Страница 179: ...ing diagram of configuring the batch restart function for an HGMP cluster IP MPLS core FTP Server 2 0 0 1 8 SFTP Server 2 0 0 2 8 NM station 3 0 0 1 8 Log station 4 0 0 1 8 Administrator 1 10 0 0 1 8 Member 1 Member 2 Member 3 10 0 0 4 8 Ethernet0 0 1 Ethernet0 0 2 Ethernet0 0 1 Ethernet0 0 2 Ethernet0 0 1 Ethernet0 0 1 Cluster Ethernet0 0 3 Ethernet0 0 1 1 0 0 2 8 Device MAC Address Device MAC Ad...

Страница 180: ...r 1 Ethernet0 0 1 port trunk allow pass vlan 10 Administrator 1 Ethernet0 0 1 quit Administrator 1 interface ethernet 0 0 2 Administrator 1 Ethernet0 0 2 port link type trunk Administrator 1 Ethernet0 0 2 port trunk allow pass vlan 10 Administrator 1 Ethernet0 0 2 quit Administrator 1 interface ethernet 0 0 3 Administrator 1 Ethernet0 0 3 port link type trunk Administrator 1 Ethernet0 0 3 port tru...

Страница 181: ...e ethernet 0 0 2 Administrator 1 Ethernet0 0 2 ndp enable Administrator 1 Ethernet0 0 2 quit Configure member switch 1 Member 1 ndp enable Member 1 interface ethernet 0 0 1 Member 1 Ethernet0 0 1 ndp enable Member 1 Ethernet0 0 1 quit Member 1 interface ethernet 0 0 2 Member 1 Ethernet0 0 2 ndp enable Member 1 Ethernet0 0 2 quit Configure member switch 2 Member 2 ndp enable Member 2 interface ethe...

Страница 182: ...tor 1 interface ethernet 0 0 2 Administrator 1 Ethernet0 0 2 ntdp enable Administrator 1 Ethernet0 0 2 quit Configure member switch 1 Member 1 ntdp enable Member 1 ntdp timer 10 Member 1 ntdp hop 3 Member 1 interface ethernet 0 0 1 Member 1 Ethernet0 0 1 ntdp enable Member 1 Ethernet0 0 1 quit Member 1 interface ethernet 0 0 2 Member 1 Ethernet0 0 2 ntdp enable Member 1 Ethernet0 0 2 quit Configur...

Страница 183: ...he administrator switch check the device information collected through NTDP and you can find the MAC address and types of related devices Administrator 1 ntdp explore Administrator 1 system view Administrator 1 display ntdp device list The device list of NTDP MAC HOP IP PLATFORM 0004 0004 0004 2 S2700 0003 0003 0003 1 S2700 0002 0002 0002 1 S2700 0001 0001 0001 0 S2700 Step 5 Create a cluster NOTE...

Страница 184: ...can be performed only on the administrator switch l Take the mode of automatically adding member switches as an example To add member switches manually see Adding a Member Switch Add all candidate switches to the cluster HUAWEI_0 Administrator 1 cluster auto build Collecting candidate list please wait Candidate list Name Hop MAC Address DeviceType Member 1 1 0002 0002 0002 S2700 Member 2 1 0003 00...

Страница 185: ...s or hosts HUAWEI_0 Administrator 1 ip route static 0 0 0 0 0 1 0 0 2 NOTE You can also run a routing protocol Step 9 Configure public servers and hosts of the cluster Configure an FTP server HUAWEI_0 Administrator 1 cluster HUAWEI_0 Administrator 1 cluster cluster ftp nat enable HUAWEI_0 Administrator 1 cluster ftp server 2 0 0 1 Configure a SFTP server HUAWEI_0 Administrator 1 cluster sftp serve...

Страница 186: ...er switches and you can view that success is displayed which indicates that the specified member switches are restarted successfully HUAWEI_2 Member 2 display member reboot stat The result of member switchs rebooting SN Device MacAddress IPAddress Result 1 S2700 0003 0003 0003 10 0 0 3 success 2 S2700 0004 0004 0004 10 0 0 4 success End Configuration Files l Configuration file of Administrator 1 s...

Страница 187: ...allow pass vlan 10 ntdp enable ndp enable interface Ethernet0 0 2 port link type trunk port trunk allow pass vlan 10 ntdp enable ndp enable cluster mngvlanid 10 administrator address 0001 0001 0001 name HUAWEI return l Configuration file of Member 2 sysname Member 2 vlan batch 10 cluster enable ntdp enable ntdp hop 3 ntdp timer 10 ndp enable interface Vlanif10 interface Ethernet0 0 1 port link typ...

Страница 188: ...Cluster Networking Requirements As shown in Figure 3 10 all the Layer 2 switches belong to the same cluster Administrator 1 is the administrator switch of the cluster and other switches are member switches The member ID of Member 2 is 2 and the member ID of Member 3 is 3 To configure VLAN 100 to VLAN 200 on Member 2 and Member 3 and a static route with its next hop address being the administrator ...

Страница 189: ...3 0003 0003 Member 3 0004 0004 0004 Configuration Roadmap The configuration roadmap is as follows 1 Create a cluster according to the steps described in 3 6 1 Example for Configuring Basic HGMP Functions for a Cluster 2 Edit the list of incremental configurations command on the administrator switch 3 Deliver the list of incremental configuration commands to the specified member switch Data Prepara...

Страница 190: ...Administrator 1 Ethernet0 0 3 port trunk allow pass vlan 10 Administrator 1 Ethernet0 0 3 quit Administrator 1 interface vlanif 10 Administrator 1 Vlanif10 quit Configure member switch 1 Quidway system view Quidway sysname Member 1 Member 1 vlan 10 Member 1 vlan10 quit Member 1 interface ethernet 0 0 1 Member 1 Ethernet0 0 1 port link type trunk Member 1 Ethernet0 0 1 port trunk allow pass vlan 10...

Страница 191: ... 1 ndp enable Member 2 Ethernet0 0 1 quit Configure member switch 3 Member 3 ndp enable Member 3 interface ethernet 0 0 1 Member 3 Ethernet0 0 1 ndp enable Member 3 Ethernet0 0 1 quit After the previous configuration you can find that NDP on the administrator is in the Enable state the host name of the neighboring node is Device Name and the name of the interface connecting the neighboring node an...

Страница 192: ...2 ntdp enable Member 2 ntdp timer 10 Member 2 ntdp hop 3 Member 2 interface ethernet 0 0 1 Member 2 Ethernet0 0 1 ntdp enable Member 2 Ethernet0 0 1 quit Configure member switch 3 Member 3 ntdp enable Member 3 ntdp timer 10 Member 3 ntdp hop 3 Member 3 interface ethernet 0 0 1 Member 3 Ethernet0 0 1 ntdp enable Member 3 Ethernet0 0 1 quit After the previous configuration globally check the NTDP co...

Страница 193: ...n be performed only on the administrator switch On the administrator switch set the range of IP addresses that can be assigned to the cluster to 10 0 0 0 8 in which the IP address assigned to the administrator switch is 10 0 0 1 8 Administrator 1 cluster Administrator 1 cluster ip pool 10 0 0 1 8 Create a cluster named HUAWEI on the administrator switch Administrator 1 cluster build HUAWEI HUAWEI_...

Страница 194: ...ter auto build is complete Added 3 member s into the cluster successfully After the previous configuration check information about the administrator switch and member switches in the cluster on the administrator switch You can find that all the member switches are added to the cluster and in the Up state HUAWEI_0 Administrator 1 cluster display cluster members The list of cluster member SN Device ...

Страница 195: ...nfigure a log host HUAWEI_0 Administrator 1 cluster logging host 4 0 0 1 After the previous configuration check information about the cluster to which the administrator switch belongs You can find that the public log host SNMP host FTP server and SFTP server are configured successfully HUAWEI_0 Administrator 1 cluster display cluster Cluster name HUAWEI Role Administrator switch management vlan id...

Страница 196: ...livered to the specified member switch and you can view that success is displayed HUAWEI_0 Administrator 1 display cluster increment result The result of member switch executing increment commands SN Device MacAddress IpAddress Result CommandId 2 S2700 0003 0003 0003 10 0 0 3 success 3 S2700 0004 0004 0004 10 0 0 4 success End Configuration Files l Configuration file of Administrator 1 sysname Adm...

Страница 197: ...rnet0 0 2 port link type trunk port trunk allow pass vlan 10 ntdp enable ndp enable cluster mngvlanid 10 administrator address 0001 0001 0001 name HUAWEI return l Configuration file of Member 2 sysname Member 2 vlan batch 10 cluster enable ntdp enable ntdp hop 3 ntdp timer 10 ndp enable interface Vlanif10 interface Ethernet0 0 1 port link type trunk port trunk allow pass vlan 10 ntdp enable ndp en...

Страница 198: ...rking Requirements As shown in Figure 3 11 all the Layer 2 switches belong to the same cluster Administrator 1 is the administrator switch of the cluster and other switches are member switches The member ID of Member 2 is 2 and the member ID of Member 3 is 3 To synchronize the configuration files of all member switches to the FTP server as required you can configure the configuration synchronizati...

Страница 199: ...map is as follows 1 Create a cluster according to the steps described in 3 6 1 Example for Configuring Basic HGMP Functions for a Cluster 2 3 6 2 Example for Configuring the Interconnection of FTP Servers and Devices in and out of the HGMP Cluster in NAT Mode NOTE l Configure the interconnection of FTP servers and devices in and out of the HGMP cluster in NAT or non NAT mode The following takes th...

Страница 200: ...t link type trunk Administrator 1 Ethernet0 0 2 port trunk allow pass vlan 10 Administrator 1 Ethernet0 0 2 quit Administrator 1 interface ethernet 0 0 3 Administrator 1 Ethernet0 0 3 port link type trunk Administrator 1 Ethernet0 0 3 port trunk allow pass vlan 10 Administrator 1 Ethernet0 0 3 quit Administrator 1 interface vlanif 10 Administrator 1 Vlanif10 quit Configure member switch 1 Quidway ...

Страница 201: ...net0 0 1 ndp enable Member 1 Ethernet0 0 1 quit Member 1 interface ethernet 0 0 2 Member 1 Ethernet0 0 2 ndp enable Member 1 Ethernet0 0 2 quit Configure member switch 2 Member 2 ndp enable Member 2 interface ethernet 0 0 1 Member 2 Ethernet0 0 1 ndp enable Member 2 Ethernet0 0 1 quit Configure member switch 3 Member 3 ndp enable Member 3 interface ethernet 0 0 1 Member 3 Ethernet0 0 1 ndp enable ...

Страница 202: ...mer 10 Member 1 ntdp hop 3 Member 1 interface ethernet 0 0 1 Member 1 Ethernet0 0 1 ntdp enable Member 1 Ethernet0 0 1 quit Member 1 interface ethernet 0 0 2 Member 1 Ethernet0 0 2 ntdp enable Member 1 Ethernet0 0 2 quit Configure member switch 2 Member 2 ntdp enable Member 2 ntdp timer 10 Member 2 ntdp hop 3 Member 2 interface ethernet 0 0 1 Member 2 Ethernet0 0 1 ntdp enable Member 2 Ethernet0 0...

Страница 203: ...DP and you can find the MAC address and types of related devices Administrator 1 ntdp explore Administrator 1 system view Administrator 1 display ntdp device list The device list of NTDP MAC HOP IP PLATFORM 0004 0004 0004 2 S2700 0003 0003 0003 1 S2700 0002 0002 0002 1 S2700 0001 0001 0001 0 S2700 Step 5 Create a cluster NOTE Following steps can be performed only on the administrator switch On the...

Страница 204: ...rator switch l Take the mode of automatically adding member switches as an example To add member switches manually see Adding a Member Switch Add all candidate switches to the cluster HUAWEI_0 Administrator 1 cluster auto build Collecting candidate list please wait Candidate list Name Hop MAC Address DeviceType Member 1 1 0002 0002 0002 S2700 Member 2 1 0003 0003 0003 S2700 Member 3 2 0004 0004 00...

Страница 205: ...oute static 0 0 0 0 0 1 0 0 2 NOTE You can also run a routing protocol Step 9 Configure public servers and hosts of the cluster Configure an FTP server HUAWEI_0 Administrator 1 cluster HUAWEI_0 Administrator 1 cluster cluster ftp nat enable HUAWEI_0 Administrator 1 cluster ftp server 2 0 0 1 Configure a SFTP server HUAWEI_0 Administrator 1 cluster sftp server 2 0 0 2 Configure a Simple Network Man...

Страница 206: ...t success is displayed HUAWEi_0 Administrator 1 display increment synchronization result The result of member switchs synchronization SN Device MacAddress IpAddress result 1 S2700 0002 0002 0002 10 0 0 2 success 2 S2700 0003 0003 0003 10 0 0 3 success 3 S2700 0004 0004 0004 10 0 0 4 success On the FTP server you can view that the names of configuration files are the MAC address of member switches ...

Страница 207: ... port trunk allow pass vlan 10 ntdp enable ndp enable interface Ethernet0 0 2 port link type trunk port trunk allow pass vlan 10 ntdp enable ndp enable cluster mngvlanid 10 administrator address 0001 0001 0001 name HUAWEI return l Configuration file of Member 2 sysname Member 2 FTP server enable vlan batch 10 cluster enable ntdp enable ntdp hop 5 ntdp timer 10 ndp enable interface Vlanif10 interfa...

Страница 208: ...ministrator 1 is the administrator switch of the cluster and other switches are member switches The member ID of Member 2 is 2 and the member ID of Member 3 is 3 Disable NDP and NTDP on the interfaces of all the member switches that do not need NDP or NTDP To perform the action and improve the security of the cluster you can configure security features for the HGMP cluster NOTE After NDP or NTDP i...

Страница 209: ... 0002 0002 0002 Member 2 0003 0003 0003 Member 3 0004 0004 0004 Configuration Roadmap The configuration roadmap is as follows 1 Create a cluster according to the steps described in 3 6 1 Example for Configuring Basic HGMP Functions for a Cluster 2 On the administrator switch disable NDP and NTDP on unrelated interfaces of member switches Data Preparation To complete the configuration you need the ...

Страница 210: ...istrator 1 Ethernet0 0 3 port trunk allow pass vlan 10 Administrator 1 Ethernet0 0 3 quit Administrator 1 interface vlanif 10 Administrator 1 Vlanif10 quit Configure member switch 1 Quidway system view Quidway sysname Member 1 Member 1 vlan 10 Member 1 vlan10 quit Member 1 interface ethernet 0 0 1 Member 1 Ethernet0 0 1 port link type trunk Member 1 Ethernet0 0 1 port trunk allow pass vlan 10 Memb...

Страница 211: ... 1 ndp enable Member 2 Ethernet0 0 1 quit Configure member switch 3 Member 3 ndp enable Member 3 interface ethernet 0 0 1 Member 3 Ethernet0 0 1 ndp enable Member 3 Ethernet0 0 1 quit After the previous configuration you can find that NDP on the administrator is in the Enable state the host name of the neighboring node is Device Name and the name of the interface connecting the neighboring node an...

Страница 212: ...2 ntdp enable Member 2 ntdp timer 10 Member 2 ntdp hop 3 Member 2 interface ethernet 0 0 1 Member 2 Ethernet0 0 1 ntdp enable Member 2 Ethernet0 0 1 quit Configure member switch 3 Member 3 ntdp enable Member 3 ntdp timer 10 Member 3 ntdp hop 3 Member 3 interface ethernet 0 0 1 Member 3 Ethernet0 0 1 ntdp enable Member 3 Ethernet0 0 1 quit After the previous configuration globally check the NTDP co...

Страница 213: ...n be performed only on the administrator switch On the administrator switch set the range of IP addresses that can be assigned to the cluster to 10 0 0 0 8 in which the IP address assigned to the administrator switch is 10 0 0 1 8 Administrator 1 cluster Administrator 1 cluster ip pool 10 0 0 1 8 Create a cluster named HUAWEI on the administrator switch Administrator 1 cluster build HUAWEI HUAWEI_...

Страница 214: ...ter auto build is complete Added 3 member s into the cluster successfully After the previous configuration check information about the administrator switch and member switches in the cluster on the administrator switch You can find that all the member switches are added to the cluster and in the Up state HUAWEI_0 Administrator 1 cluster display cluster members The list of cluster member SN Device ...

Страница 215: ...ement Protocol SNMP host HUAWEI_0 Administrator 1 cluster snmp host 3 0 0 1 Configure a log host HUAWEI_0 Administrator 1 cluster logging host 4 0 0 1 After the previous configuration check information about the cluster to which the administrator switch belongs You can find that the public log host SNMP host FTP server and SFTP server are configured successfully HUAWEI_0 Administrator 1 cluster di...

Страница 216: ...700 0002 0002 0002 10 0 0 2 success HUAWEI_0 Administrator 1 display member interface state ntdp The result of member switches executed disable member interface command SN Device MacAddress IpAddress result 3 S2700 0004 0004 0004 10 0 0 4 success 2 S2700 0003 0003 0003 10 0 0 3 success 1 S2700 0002 0002 0002 10 0 0 2 success End Configuration Files l Configuration file of Administrator 1 sysname A...

Страница 217: ...nk port trunk allow pass vlan 10 ntdp enable ndp enable cluster mngvlanid 10 administrator address 0001 0001 0001 name HUAWEI return l Configuration file of Member 2 sysname Member 2 vlan batch 10 cluster enable ntdp enable ntdp hop 3 ntdp timer 10 ndp enable interface Vlanif10 interface Ethernet0 0 1 port link type trunk port trunk allow pass vlan 10 ntdp enable ndp enable cluster mngvlanid 10 ad...

Страница 218: ...thernet0 0 1 port link type trunk port trunk allow pass vlan 10 ntdp enable ndp enable cluster mngvlanid 10 administrator address 0001 0001 0001 name HUAWEI return Quidway S2700 Series Ethernet Switches Configuration Guide Network Management 3 HGMP Configuration Issue 01 2011 07 15 Huawei Proprietary and Confidential Copyright Huawei Technologies Co Ltd 208 ...

Страница 219: ...unctions including the NTP operating modes 4 4 Configuring NTP Security Mechanisms This section describes how to configure NTP security mechanisms to guarantee reliable clock synchronization on networks demanding high security 4 5 Maintaining NTP This section describes how to debug NTP through the debugging command in case of an NTP operation fault 4 6 Configuration Examples This section provides ...

Страница 220: ... event Systems have to take the same clock for reference to ensure a proper sequence of implementation l Incremental backup between the backup server and clients Clocks on the backup server and clients should be synchronized When all the devices on a network need to be synchronized it is almost impossible for an administrator to manually change the system clock by executing command lines This is b...

Страница 221: ...d at 10 00 03 The process of synchronizing system clocks is as follows 1 Switch A sends an NTP packet to Switch B The packet carries the originating timestamp when it leaves Switch A which is 10 00 00 am T1 2 When the NTP packet reaches Switch B Switch B adds its receiving timestamp to the NTP packet which is 11 00 01 am T2 3 When the NTP packet leaves Switch B Switch B adds its transmitting times...

Страница 222: ...onfigure only the client The server needs to be configured with only one NTP primary clock Note that the client can be synchronized to the server but the server cannot be synchronized to the client After the configuration 1 The client sends a synchronization request packet to the server with the mode field being set to 3 The value 3 indicates the client mode 2 Upon receiving the request packet the...

Страница 223: ...ed to configure both the server and the client After the configurations l The server periodically sends clock synchronization packets to the multicast address 224 0 1 1 l The client senses multicast packets from the server l After receiving the first multicast packet to estimate the network delay the client enables a temporary server client model for exchanging messages with the remote server l Th...

Страница 224: ... Server client mode IP address of the server l Peer mode IP address of the symmetric passive end l Broadcast mode interfaces to send and receive broadcast NTP packets and the maximum sessions set up dynamically on the client l Multicast mode IP address of the multicast group the TTL value of the multicast packets the interfaces to send and receive the multicast packets and the maximum number of th...

Страница 225: ... this IP address If the source interface to send NTP packets is specified on the server the IP address of the server configured on the client should be the same otherwise the client cannot process NTP packets sent from the server and clock synchronization fails Procedure l Configuring the NTP Client Do as follows on the switch functioning as a client 1 Run system view The system view is displayed ...

Страница 226: ...wise the client cannot process NTP packets sent from the server and clock synchronization fails End 4 3 4 Configuring the Peer Mode This part describes how to configure the NTP peer mode In this mode clocks on the two peers synchronize with each other Each side can send the clock synchronization request message to the peer and reply the clock synchronization request message from the peer Procedure...

Страница 227: ...address of the NTP peer configured on the symmetric passive end should be the same otherwise the passive end cannot process NTP packets sent from the active end and clock synchronization fails End 4 3 5 Configuring the Broadcast Mode This part describes how to configure the NTP broadcast mode on the LAN to synchronize clocks on the LAN Procedure l Configuring an NTP Broadcast Server Do as follows ...

Страница 228: ... Step 2 is optional By default a maximum of 100 NTP sessions can be set up dynamically After the configurations the local switch senses the broadcast NTP packets sent from the server and synchronizes the local clock Running the ntp service max dynamic sessions command does not affect the existence of NTP sessions When the number of the sessions reaches or exceeds the maximum the new session cannot...

Страница 229: ...vlanif vlan id The interface that receives NTP multicast packets is specified 5 Run ntp service multicast client ip address The local switch is set to be an NTP multicast client Step 2 is optional By default up to 100 NTP sessions can be set up dynamically After the configurations the local switch senses the multicast NTP packets sent from the server and synchronizes the local clock Running the nt...

Страница 230: ...ting the Maximum Number of Dynamic NTP Sessions Context Do as follows on the S2700 that functions as a client Procedure Step 1 Run system view The system view is displayed Step 2 Run ntp service max dynamic sessions number The maximum number of dynamic NTP sessions is set End 4 3 9 Checking the Configuration After basic NTP functions are configured you can view the configuration Prerequisite The c...

Страница 231: ...ource master 2 source peer 3 selected 4 candidate 5 configured 6 vpn instance Run the display ntp service trace command to view the summary information on each passing NTP server when tracing from the local device to the reference clock source Quidway display ntp service trace server 127 0 0 1 stratum 5 offset 0 024099 synch distance 0 06337 server 171 1 1 2 stratum 4 offset 0 028786 synch distanc...

Страница 232: ... l NTP authentication NTP authentication is required in some networks with high security demands The configuration of NTP authentication involves configuring NTP authentication on both the client and the server During the configuration of NTP authentication pay attention to the following rules Configure NTP authentication on both the client and the server otherwise the authentication does not take...

Страница 233: ...cket with the access authority in descending order from peer server synchronization to query The first matched authority takes effect Context Do as follows on the switch Procedure Step 1 Run system view The system view is displayed Step 2 Run ntp service access peer query server synchronization acl number Access authority for the NTP service on the local switch is configured You can configure the ...

Страница 234: ...ss the network Authentication prevents the modification of NTP message data from malicious network attacks Do as follows on the switch Procedure l Configuring NTP MD5 autentication NOTE l Configure the same authentication key on the server and client and affirm that the key is reliable otherwise NTP authentication fails l Enable NTP authentication before performing actual authentication 1 Run syst...

Страница 235: ...the server and client clocks is configured End 4 4 5 Configuring NTP Authentication in Peer Mode By configuring the authentication key ID used in the synchronization with the peer on the local end you can apply NTP authentication in peer mode Context Do as follows on the switch that functions as the symmetric active end Procedure Step 1 Run system view The system view is displayed Step 2 Run ntp s...

Страница 236: ...ion number The ID of the authentication key used by the NTP broadcast server is configured For configuring the broadcast client see Configuring the Broadcast Mode End 4 4 7 Configuring NTP Authentication in Multicast Mode By configuring the authentication key ID used in the synchronization with the NTP multicast server on the local switch you can apply NTP authentication in multicast mode Context ...

Страница 237: ... service Quidway display ntp service status clock status synchronized clock stratum 2 reference clock ID LOCAL 0 nominal frequency 60 0002 Hz actual frequency 60 0002 Hz clock precision 2 18 clock offset 0 0000 ms root delay 0 00 ms root dispersion 0 00 ms peer dispersion 10 00 ms reference time 15 51 36 259 UTC Apr 25 2010 C6179088 426490A3 Run the display ntp service sessions verbose command to ...

Страница 238: ... 6 Configuration Examples This section provides several configuration examples of NTP 4 6 1 Example for Configuring NTP Authentication in Unicast Client Server Mode Networking Requirements Figure 4 2 shows the diagram of NTP l Switch A functions as a unicast NTP server The clock of Switch A is the master clock with the stratum being 2 l Switch B functions as a unicast NTP client Its clock needs to...

Страница 239: ... You must enable NTP authentication on the client before specifying the IP address of the NTP server and authentication key to be sent to the server otherwise NTP authentication is not performed before clock synchronization l To implement authentication successfully configure both the server and the client Data Preparation To complete the configuration you need the following data l IP address of t...

Страница 240: ...view SwitchC ntp service authentication enable SwitchC ntp service authentication keyid 42 authentication mode md5 Hello SwitchC ntp service reliable authentication keyid 42 SwitchC ntp service unicast server 10 0 0 1 authentication keyid 42 Step 5 Specify the NTP server for Switch D Configure Switch B as the NTP server of Switch D SwitchD system view SwitchD ntp service authentication enable Swit...

Страница 241: ...ck of Switch C is 4 one stratum lower than the clock stratum of Switch B SwitchD display ntp service status clock status synchronized clock stratum 4 reference clock ID 10 0 0 1 nominal frequency 60 0002 Hz actual frequency 60 0002 Hz clock precision 2 18 clock offset 3 8128 ms root delay 31 26 ms root dispersion 74 20 ms peer dispersion 34 30 ms reference time 11 55 56 833 UTC Mar 2 2006 C7B15BCC...

Страница 242: ...1 0 1 0 0 0 0 255 network 10 0 0 0 0 0 0 255 ntp service authentication enable ntp service authentication keyid 42 authentication mode md5 ENC 8HX Q Q MAF4 1 ntp service reliable authentication keyid 42 ntp service unicast server 2 2 2 2 authentication keyid 42 return l Configuration file of Switch C sysname SwitchC vlan batch 111 interface Vlanif111 ip address 10 0 0 2 255 255 255 0 interface Eth...

Страница 243: ... is 2 l Switch C is the NTP server of Switch D That is Switch D is the client l Switch D is the passive peer of Switch E That is Switch E is the active end Figure 4 3 Networking diagram for configuring the NTP peer mode SwitchC SwitchE SwitchD Ethernet0 0 1 3 0 1 33 24 Ethernet0 0 1 3 0 1 31 24 Ethernet 0 01 3 0 1 32 24 Configuration Roadmap The configuration roadmap is as follows 1 Configure the ...

Страница 244: ...D and you can see that the status of the clock is synchronized This means that the synchronization is complete The stratum of the clock of Switch D is 3 one stratum lower than the clock stratum of Switch C SwitchD display ntp service status clock status synchronized clock stratum 3 reference clock ID 3 0 1 31 nominal frequency 64 0029 Hz actual frequency 64 0029 Hz clock precision 2 7 clock offset...

Страница 245: ... of Switch C sysname SwitchC vlan batch 100 interface Vlanif100 ip address 3 0 1 31 255 255 255 0 interface Ethernet0 0 1 port hybrid pvid vlan 100 port hybrid untagged vlan 100 ntp service refclock master 2 return l Configuration file of Switch D sysname SwitchD vlan batch 100 interface Vlanif100 ip address 3 0 1 32 255 255 255 0 interface Ethernet0 0 1 port hybrid pvid vlan 100 port hybrid untag...

Страница 246: ...he broadcast packets l NTP authentication needs to be enabled Figure 4 4 Networking diagram for configuring the NTP broadcast mode Ethernet 0 0 1 VLANIF20 1 0 1 11 24 SwitchA SwitchF SwitchC SwitchD VLANIF20 1 0 1 2 24 VLANIF10 3 0 1 2 24 Ethernet0 0 1 VLANIF10 3 0 1 31 24 3 0 1 32 24 Ethernet 0 0 1 Ethernet 0 0 2 Ethernet0 0 1 VLANIF10 Configuration Roadmap The configuration roadmap is as follows...

Страница 247: ...hD interface vlanif 10 SwitchD Vlanif10 ip address 3 0 1 32 24 SwitchD Vlanif10 quit Configure the IP address of the VLANIF interface on Switch F SwitchF system view SwitchF vlan 10 SwitchF Vlan10 quit SwitchF interface ethernet 0 0 2 SwitchF Ethernet0 0 2 port hybrid pvid vlan 10 SwitchF Ethernet0 0 2 port hybrid untagged vlan 10 SwitchF Ethernet0 0 2 quit SwitchF interface vlanif 10 SwitchF Vlan...

Страница 248: ...mode md5 Hello SwitchD ntp service reliable authentication keyid 16 Configure Switch D as the NTP broadcast client and configure Switch D to listen to NTP broadcast packets through VLANIF10 SwitchD interface vlanif 10 SwitchD vlanif10 ntp service broadcast client SwitchD vlanif10 quit After the configurations the clock of Switch D is synchronized with the clock of Switch C Step 5 Configure Switch ...

Страница 249: ...t client interface Ethernet0 0 1 port hybrid pvid vlan 20 port hybrid untagged vlan 20 ospf 1 area 0 0 0 0 network 1 0 1 0 0 0 0 255 ntp service authentication enable ntp service authentication keyid 16 authentication mode md5 ENC 8HX Q Q MAF4 1 ntp service reliable authentication keyid 16 return Configuration file of Switch C sysname SwitchC vlan batch 10 interface Vlanif10 ip address 3 0 1 31 25...

Страница 250: ... hybrid untagged vlan 10 ospf 1 area 0 0 0 0 network 1 0 1 0 0 0 0 255 network 3 0 1 0 0 0 0 255 return 4 6 4 Example for Configuring the Common NTP Multicast Mode Networking Requirements As shown in Figure 4 5 l Switch C and Switch D are on the same network segment Switch A is on another network segment Switch F connects the two network segments l As the NTP multicast server Switch C uses the loc...

Страница 251: ...e the IP address of each interface according to Figure 4 5 Configure the IP address of the VLANIF interface on Switch C SwitchC system view SwitchC vlan 10 SwitchC Vlan10 quit SwitchC interface ethernet 0 0 1 SwitchC Ethernet0 0 1 port hybrid pvid vlan 10 SwitchC Ethernet0 0 1 port hybrid untagged vlan 10 SwitchC Ethernet0 0 1 quit SwitchC interface vlanif 10 SwitchC Vlanif10 ip address 3 0 1 31 2...

Страница 252: ...20 SwitchA Ethernet0 0 1 quit SwitchA interface vlanif 20 SwitchA vlanif20 ip address 1 0 1 11 24 SwitchA vlanif20 quit Step 2 Configure the routes between them are reachable The configuration procedure is not mentioned Step 3 Configure the NTP multicast server Configure the clock of Switch C as the NTP master clock with the stratum being 2 SwitchC system view SwitchC ntp service refclock master 2...

Страница 253: ...C SwitchD display ntp service status clock status synchronized clock stratum 3 reference clock ID 3 0 1 31 nominal frequency 60 0002 Hz actual frequency 60 0002 Hz clock precision 2 18 clock offset 0 66 ms root delay 24 47 ms root dispersion 208 39 ms peer dispersion 9 63 ms reference time 17 03 32 022 UTC Apr 25 2005 C61734FD 800303C0 End Configuration Files l Configuration file of Switch A sysna...

Страница 254: ...ch F sysname SwitchF vlan batch 10 20 interface Vlanif10 ip address 3 0 1 2 255 255 255 0 interface Vlanif20 ip address 1 0 1 2 255 255 255 0 interface Ethernet0 0 1 port hybrid pvid vlan 20 port hybrid untagged vlan 20 interface Ethernet0 0 2 port hybrid pvid vlan 10 port hybrid untagged vlan 10 ospf 1 area 0 0 0 0 network 1 0 1 0 0 0 0 255 network 3 0 1 0 0 0 0 255 return Quidway S2700 Series Et...

Страница 255: ...nd the destination Tracert is helpful in testing network reachability and locating the fault on the network 5 3 Performing Ping and Tracert Operations This section describes the execution of the ping and tracert commands 5 4 Debugging Ping and Tracert This section describes how to locate faults through ICMP messages 5 5 Configuration Examples This section provides a configuration example of ping a...

Страница 256: ...ck an ICMP Echo Reply message and measuring the interval between sending the ICMP Echo Request message and receiving the ICMP Echo Reply message Figure 5 2 Format of ICMP Echo Request and Echo Reply messages Data Checksum Code Type Identifier Sequence number 15 7 23 31 0 Figure 5 2 shows the format of ICMP Echo Request and Echo Reply messages The length of the Data field is a variable You can spec...

Страница 257: ... port number in the UDP datagram by 1 respectively and then sends out the UDP datagram again 4 Perform Step 2 and Step 3 the log host receives the UDP datagram from the S2700 5 After receiving the UDP datagram from the S2700 the log host finds that the destination is itself It begins to process the datagram The log host tries to find the upper layer protocol corresponding to the destination UDP po...

Страница 258: ...Step 1 Run ping ip a source ip address c count d f h ttl value i interface type interface number m time n p pattern q r s packetsize t timeout tos tos value v host Network connectivity is tested Only some of the parameters are specified in the preceding ping command For details on more parameters refer to the Quidway S2700 Series Ethernet Switches Command Reference The output of the ping command i...

Страница 259: ... specified in the preceding tracert command For details on more parameters refer to the Quidway S2700 Series Ethernet Switches Command Reference The output of the tracert command displays a list of gateways traversed between the source and the destination hosts Quidway tracert 18 26 0 115 traceroute to 18 26 0 115 18 26 0 115 max hops 30 packet length 40 1 128 3 112 1 128 3 112 1 0 ms 0 ms 0 ms 2 ...

Страница 260: ...te which device fails End 5 5 Configuration Examples This section provides a configuration example of ping and tracert operations 5 5 1 Example for Performing Ping and Tracert Operations Networking Requirements As shown in Figure 5 4 after configuring Switch A you check the link between Switch A and the log host If Switch A and the log host are disconnected you cannot know which device fails becau...

Страница 261: ...ping 3 1 1 2 PING 3 1 1 2 56 data bytes press CTRL_C to break Request time out Request time out Request time out Request time out Request time out 3 1 1 2 ping statistics 5 packet s transmitted 0 packet s received 100 00 packet loss The display on Switch A shows that the log host is unreachable which indicates that a fault occurs on some link segment between Switch A and the log host Step 2 Run th...

Страница 262: ...ure that Switch A and the log host can communicate properly End Configuration Files None Quidway S2700 Series Ethernet Switches Configuration Guide Network Management 5 Ping and Tracert Issue 01 2011 07 15 Huawei Proprietary and Confidential Copyright Huawei Technologies Co Ltd 252 ...

Страница 263: ...igure an Internet Control Message Protocol ICMP test to check the IP network connectivity 6 6 Configuring the FTP Download Test This section describes how to configure a File Transfer Protocol FTP download test to check the FTP download performance 6 7 Configuring the FTP Upload Test This section describes how to configure an FTP upload test to check the FTP upload performance 6 8 Configuring the ...

Страница 264: ...awei devices 6 15 Configuring Universal NQA Test Parameters This section describes how to set and use universal parameters for NQA test instances 6 16 Configuring Round Trip Delay Thresholds This section describes how to set a round trip delay transmission threshold in an NQA test instance 6 17 Configuring the Trap Function This section describes how to configure the trap function in an NQA test i...

Страница 265: ... locating faults on a network 6 2 Comparisons Between NQA and Ping This part describes the differences between NQA and Ping tests NQA is the extension and enhancement of Ping By sending an Internet Control Message Protocol ICMP Echo Request packet from the local and expecting an ICMP Echo Reply packet from the specified destination the Ping program can test the round trip time RTT of an ICMP packe...

Страница 266: ...from the clients As shown in Figure 6 2 the NQA server responds to the test request packet received from the client through the monitoring function Figure 6 2 Relationship between the NQA client and the NQA server NQA Client NQA Server IP MPLS Network You can create multiple TCP or UDP monitoring services on an NQA server Each monitoring service corresponds to a specific destination address and a ...

Страница 267: ...A tests can be performed normally l Supports test task scheduling Implements the scheduling of test tasks to decrease the concurrent tasks on the device Supports the configuration of different start time and end time for a single test Supports three modes of starting tests immediate timely and delayed Supports several modes of ending tests automatic immediate timely delayed and ending the test whe...

Страница 268: ...e triggered based on the preset events 6 5 Configuring the ICMP Test This section describes how to configure an Internet Control Message Protocol ICMP test to check the IP network connectivity 6 5 1 Establishing the Configuration Task Before configuring an ICMP test familiarize yourself with the applicable environment complete the pre configuration tasks and obtain the required data This can help ...

Страница 269: ...ends test packets run the source interface interface type interface number command l To configure the source IP address run the source address ipv4 ip address command source address ipv4 ip address equals the a option in the ping command l To configure the size packet header excluded of the Echo Request packet run the datasize size command datasize size equals the s option in the ping command l To...

Страница 270: ...lifetime seconds second hh mm ss command The test instance is started at a specified time l To perform the NQA test after a certain delay period run the start delay seconds second hh mm ss end at yyyy mm dd hh mm ss delay seconds second hh mm ss lifetime seconds second hh mm ss command The test instance is started after a certain delay End 6 5 3 Checking the Configuration After configuring the ICM...

Страница 271: ...ile Transfer Protocol FTP download test to check the FTP download performance 6 6 1 Establishing the Configuration Task Before configuring an FTP download test familiarize yourself with the applicable environment complete the pre configuration tasks and obtain the required data This can help you complete the configuration task quickly and accurately Applicable Environment In an FTP download test t...

Страница 272: ...stance view is displayed Step 3 Run test type ftp The test type is set to FTP Step 4 Run destination address ipv4 ip address The destination IP address is configured Step 5 Optional Perform the following as required to configure other parameters of the FTP Download test For detailed parameter configurations see the chapter Configuring Universal NQA Test Parameters l To configure the source IP addr...

Страница 273: ... mm dd hh mm ss delay seconds second hh mm ss lifetime seconds second hh mm ss command The test instance is started immediately l To perform the NQA test at the specified time run the start at yyyy mm dd hh mm ss end at yyyy mm dd hh mm ss delay seconds second hh mm ss lifetime seconds second hh mm ss command The test instance is started at a specified time l To perform the NQA test after a certai...

Страница 274: ...in Max Average 656 656 656 Average RTT 380 Lost packet ratio 0 6 7 Configuring the FTP Upload Test This section describes how to configure an FTP upload test to check the FTP upload performance 6 7 1 Establishing the Configuration Task Before configuring an FTP upload test familiarize yourself with the applicable environment complete the pre configuration tasks and obtain the required data This ca...

Страница 275: ... uploaded file 6 Start mode and end mode of the test 6 7 2 Configuring the FTP Upload Test Parameters This part describes how to set parameters for the FTP upload test Context Do as follows on the NQA client FTP client Procedure Step 1 Run system view The system view is displayed Step 2 Run nqa test instance admin name test name An NQA test instance is created and the test instance view is display...

Страница 276: ...fied the system searches for the file in the current path If the specified file name does not exist a file is created according to the specified file name and the size of the file is set to 1 MB l The file name cannot contain characters such as but the file path can contain these characters l The file name can contain the extension name but cannot contain the extension name only such as txt l To u...

Страница 277: ...ault the command output contains the records about only the last five tests Procedure Step 1 Run the display nqa results command to view the test results on the NQA client End Example Run the display nqa results command If the test is successful the following is displayed l CtrlConnTime l DataConnTime l SumTime Quidway display nqa results NQA entry admin ftp testflag is inactive testtype is ftp 1 ...

Страница 278: ...It is the time taken by the client to set up a TCP connection with an HTTP server through three way handshake l Transaction time It is a period from the time the client sends the Get or Post packets to an HTTP server to the time the Echo packet sent by the client reaches the HTTP server Pre configuration Tasks Before configuring the HTTP test complete the following tasks l Configuring the HTTP ser...

Страница 279: ... l To configure the source port run the source port port numbercommand l To configure the destination port run the destination port port number command l To configure the percentage of the failed NQA HTTP tests run the fail percent percent command l To configure the NQA test packet to be sent without searching the routing table run the sendpacket passroute command Step 6 Run http operation get pos...

Страница 280: ...d 6 8 3 Checking the Configuration After configuring the HTTP test you can view the test result Prerequisite The configurations of the HTTP Test function are complete Context NOTE NQA test results cannot be displayed automatically on a terminal You must run the display nqa results command to view test results By the default the command output contains the records about only the last five tests Pro...

Страница 281: ...ks and obtain the required data This can help you complete the configuration task quickly and accurately Applicable Environment The DNS test is performed to obtain the speed at which the specified domain name is resolved to an IP address Pre configuration Tasks Before configuring the DNS test complete the following tasks l Configuring the DNS server l Configuring routes between the NQA client and ...

Страница 282: ...d Select the start mode as required because the start command has several forms l To perform the NQA test immediately run the start now end at yyyy mm dd hh mm ss delay seconds second hh mm ss lifetime seconds second hh mm ss command The test instance is started immediately l To perform the NQA test at the specified time run the start at yyyy mm dd hh mm ss end at yyyy mm dd hh mm ss delay seconds...

Страница 283: ...cess RTD OverThresholds number 0 Attempts number 1 Drop operation number 0 Disconnect operation number 0 Operation timeout number 0 System busy operation number 0 Connection fail number 0 Operation sequence errors number 0 RTT Stats errors number 0 Destination ip address 10 82 55 191 Min Max Average Completion Time 4 4 4 Sum Square Sum Completion Time 4 16 Last Good Probe Time 2010 06 21 15 40 12 ...

Страница 284: ...ion port of the packet 4 Start and end modes of a test 6 10 2 Configuring Parameters for a Traceroute Test This part describes how to configure parameters for a traceroute test Context Do as follows on the NQA client Procedure Step 1 Run system view The system view is displayed Step 2 Run nqa test instance admin name test name An NQA test instance is created and the test instance view is displayed...

Страница 285: ... immediately l To start the NQA test at the specified time run the start at yyyy mm dd hh mm ss end at yyyy mm dd hh mm ss delay seconds second hh mm ss lifetime seconds second hh mm ss command The test instance is started at a specified time l To start the NQA test after a certain delay run the start delay seconds second hh mm ss end at yyyy mm dd hh mm ss delay seconds second hh mm ss lifetime s...

Страница 286: ...ress 10 112 58 3 Lost packet ratio 0 6 11 Configuring the SNMP Query Test This section describes how to configure a Simple Network Management Protocol SNMP query test to check the communications between the host and SNMP agent 6 11 1 Establishing the Configuration Task Before configuring an SNMP query test familiarize yourself with the applicable environment complete the pre configuration tasks an...

Страница 287: ...ress that is the IP address of the SNMP agent is configured NOTE The SNMP function must be enabled on the destination host otherwise the destination host fails to receive Echo packets Step 5 Optional Perform the following as required to configure other parameters for the SNMP test For detailed parameter configurations see the chapter Configuring Universal NQA Test Parameters l To configure the sou...

Страница 288: ...tarted after a certain delay End 6 11 3 Checking the Configuration After configuring the SNMP query test you can view the test result Prerequisite The configurations of the SNMP Query Test function are complete Context NOTE NQA test results cannot be displayed automatically on a terminal You must run the display nqa results command to view test results By the default the command output contains th...

Страница 289: ... Environment To obtain the time for the specified port to respond to a TCP connection request you can create an NQA TCP test instance Pre configuration Tasks Before configuring the TCP test configure reachable routes between the NQA client and the TCP server Data Preparation To configure the TCP test you need the following data No Data 1 Administrator name and test name 2 IP address and port numbe...

Страница 290: ...tep 2 Run nqa test instance admin name test name An NQA test instance is created and the test instance view is displayed Step 3 Run test type tcp The test type is set to TCP Step 4 Run destination address ipv4 ip address The destination IP address is configured Step 5 To configure the destination port number run the destination port port numbercommand Step 6 Optional Perform the following as requi...

Страница 291: ...ter a certain delay period run the start delay seconds second hh mm ss end at yyyy mm dd hh mm ss delay seconds second hh mm ss lifetime seconds second hh mm ss command The test instance is started after a certain delay The differences between the TCP Public tests and the TCP Private tests are as follows l The TCP Public tests do not require the destination port to be configured on the client Conn...

Страница 292: ...0 Run the display nqa server command the status of the NQA server is displayed Quidway display nqa server NQA Server Max 100 NQA Server Num 1 NQA Concurrent TCP Server 1 NQA Concurrent UDP Server 0 nqa server tcpconnect 10 112 58 3 2000 ACTIVE 6 13 Configuring the UDP Test This section describes how to configure a User Datagram Protocol UDP test to check the responding speed of a UDP port 6 13 1 E...

Страница 293: ...must be identical with those configured on the client Context Do as follows on the NQA server UDP server Procedure Step 1 Run system view The system view is displayed Step 2 Run nqa server udpecho ip address port number The UDP monitoring service is configured Note that the IP address and port number monitored by the server should be consistent with those configured on the client End 6 13 3 Config...

Страница 294: ...QA tests run the fail percent percent command l To configure the NQA test packets to be sent without searching the routing table run the sendpacket passroute command Step 7 Run start The NQA test is started Select the start mode as required because the start command has several forms l To perform the NQA test immediately run the start now end at yyyy mm dd hh mm ss delay seconds second hh mm ss li...

Страница 295: ... 3 Completion success RTD OverThresholds number 0 Attempts number 1 Drop operation number 0 Disconnect operation number 0 Operation timeout number 0 System busy operation number 0 Connection fail number 0 Operation sequence errors number 0 RTT Stats errors number 0 Destination ip address 10 2 1 2 Min Max Average Completion Time 32 109 67 Sum Square Sum Completion Time 203 16749 Last Good Probe Tim...

Страница 296: ...of packets to be sent consecutively Through this setting certain traffic can be simulated within a certain period For example if you set 3000 UDP packets to be sent at an interval of 20 milliseconds Then in one minute G 711 traffic is simulated NOTE To improve the test accuracy you can configure the Network Time Protocol NTP on both the client and the server Pre configuration Tasks Before configur...

Страница 297: ...s how to configure the client of the jitter test Context NOTE The system supports the collection of the statistics about the maximum uni directional transmission delay Do as follows on the NQA client Jitter client Procedure Step 1 Run system view The system view is displayed Step 2 Optional To configure the version number of Jitter packets run the nqa jitter tag version version number command in t...

Страница 298: ...tion of the UDP packets The system sends multiple test packets for each test to make the statistics more accurate The more test packets are sent the more accurate the statistics and analysis are This process however is time consuming NOTE The number of the Jitter tests depends on the probe count command The number of test packets sent during each test depends on the jitter packetnum command During...

Страница 299: ...contains the records about only the last five tests Procedure l Run the display nqa results test instance admin name test name command to view the test results on the NQA client l Run the display nqa server command to view the information about the NQA server End Example Run the display nqa results command If the test is successful the following is displayed Quidway display nqa results test instan...

Страница 300: ...mplete the configuration task quickly and accurately Applicable Environment NQA supports not only the configuration of the parameters for various types of tests but also the configuration of universal options of a test group Commonly the default configurations of the universal parameters are adopted Pre configuration Tasks Before configuring universal NQA parameters create NQA tests correctly 6 15...

Страница 301: ...nation URL address is set for the NQA test instance NOTE The destination URL address can be configured for DNS and HTTP test instances l Run destination port port number The destination port number is set for the NQA test instance NOTE The destination port number can be configured only for UDP Jitter TCP Trace FTP and HTTP test instances l Run dns server ipv4 ip address The DNS server address is c...

Страница 302: ...user name is set for the FTP test instance NOTE The user name can be configured only for the FTP test instance l Run http operation get post The test type is set for the HTTP test instance NOTE The operation type can be configured only for the HTTP test instance l Run http url deststring verstring The relative file path and version are configured for the HTTP test instance NOTE The relative file p...

Страница 303: ...DNS test instance l Run set df Packet fragmentation is prohibited NOTE This function can be configured only for the Trace test instances l Run send trap all owd ds owd sd probefailure rtd testcomplete testfailure The condition for triggering the trap message is configured l Run source address ipv4 ip address The source IP address is set for the NQA test instance l Run source interface interface ty...

Страница 304: ...cert livetime first ttl first ttl max ttl max ttl The lifetime is set for the Trace test instance NOTE This parameter can be configured only for Trace test instance l Run vpn instance vpn instance name The VPN instance name is configured for the NQA test instance NOTE This parameter cannot be configured for DNS test instance l Run vpn instance vpn instance name The VPN instance name is configured ...

Страница 305: ...f with the applicable environment complete the pre configuration tasks and obtain the required data This can help you complete the configuration task quickly and accurately Applicable Environment If the round trip transmission delay threshold is configured for a NQA test instance the NQA test result will contain the statistics on the test packets that exceed the set threshold This provides the bas...

Страница 306: ...min name test name An NQA test instance is created and the NQA instance view is displayed Step 3 Run test type test type The test type is configured Step 4 Run destination address ipv4 ip address The destination IP address is configured Step 5 Optional Run destination port port number The destination port number is configured Step 6 Run threshold rtd rtd value The round trip transmission delay thr...

Страница 307: ...he NMS in case of transmission success or transmission failure 6 17 1 Establishing the Configuration Task Before configuring the trap function familiarize yourself with the applicable environment complete the pre configuration tasks and obtain the required data This can help you complete the configuration task quickly and accurately Applicable Environment Trap messages are generated regardless of ...

Страница 308: ...s Trap messages carry information such as destination IP address operation status destination IP address of the test packet minimum RTT maximum RTT and total RTT number of sent probe packets number of received packets RTT square sum and time of the last successful probe Pre configuration Tasks Before configuring the trap function complete the following tasks l Configuring routes between the NQA cl...

Страница 309: ...es times The number of test failures that trigger sending a trap message is configured By default a trap message is sent for each test failure End 6 17 3 Sending Trap Messages When Probes Failed A trap message is sent to the NMS when the NQA test fails Procedure Step 1 Run system view The system view is displayed Step 2 Run nqa test instance admin name test name An NQA test instance is created and...

Страница 310: ...when the NQA test is complete Context Do as follows on the NQA client Procedure Step 1 Run system view The system view is displayed Step 2 Run nqa test instance admin name test name An NQA test instance is created and the test instance view is displayed Step 3 Run test type jitter The test type is configured Step 4 Run destination address ipv4 ip address The destination IP address is configured St...

Страница 311: ...ed Step 4 Run destination address ipv4 ip address The destination IP address is configured Step 5 Optional Run destination port port number The destination port number is configured Step 6 Run send trap rtd Sending trap messages when the transmission delay exceeds the threshold is enabled By default the trap function is disabled End 6 17 6 Checking the Configuration After the trap function is enab...

Страница 312: ...2 BaseTrapProbableCause 70144 BaseTrapEventType 5 EntPhysicalContainedIn 1677721 6 EntPhysicalName SRU slot 9 RelativeResource ReasonDescription MPU9 6 18 Maintaining NQA This section describes how to maintain an NQA test instance You can restart the test instance clear the statistics on the test result to maintain a test instance 6 18 1 Restarting NQA Test Instances If a test instance fails you c...

Страница 313: ...r the NQA test instance view Step 3 Run the clear records command in the NQA view to clear history statistics on NQA tests and test results End 6 18 3 Debugging NQA This part describes how to debug test instances Prerequisite When a fault occurs run the following debugging command in the user view to debug NQA and locate the fault Context CAUTION Debugging affects the performance of the system So ...

Страница 314: ...oute between the local end Switch A and the specified destination end Switch B is reachable and check the RTT of a test packet Data Preparation To complete the configuration you need the following data l Host address of Switch B Procedure Step 1 Create a VLAN and add interfaces to the VLAN Configure Switch A Quidway system view Quidway sysname SwitchA SwitchA vlan 10 SwitchA Vlan10 quit SwitchA in...

Страница 315: ... inactive testtype is icmp 1 Test 1 result The test is finished Send operation times 3 Receive response times 3 Completion success RTD OverThresholds number 0 Attempts number 1 Drop operation number 0 Disconnect operation number 0 Operation timeout number 0 System busy operation number 0 Connection fail number 0 Operation sequence errors number 0 RTT Stats errors number 0 Destination ip address 10...

Страница 316: ...1 VLANIF10 10 1 1 1 24 Ethernet0 0 1 VLANIF10 10 1 1 2 24 FTP Client Configuration Roadmap The configuration roadmap is as follows 1 Configure Switch A as the NQA client 2 Create and perform the FTP test on Switch A to check whether a connection between Switch A and the FTP server can be set up and to check the time for downloading a file from the FTP server Data Preparation To complete the config...

Страница 317: ...itchA nqa admin ftp display nqa results test instance admin ftp NQA entry admin ftp testflag is inactive testtype is ftp 1 Test 1 result The test is finished SendProbe 1 ResponseProbe 1 Completion success RTD OverThresholds number 0 MessageBodyOctetsSum 448 Stats errors number 0 Operation timeout number 0 System busy operation number 0 Drop operation number 0 Disconnect operation number 0 CtrlConn...

Страница 318: ... configuring the FTP upload test SwitchA SwitchB Ethernet 0 0 1 VLANIF10 10 1 1 1 24 Ethernet 0 0 1 VLANIF20 10 2 1 1 24 FTP Client SwitchC Ethernet 0 0 2 VLANIF10 10 1 1 2 24 Ethernet 0 0 2 VLANIF20 10 2 1 2 24 FTP Server Configuration Roadmap The configuration roadmap is as follows 1 Configure Switch A as the NQA client and the FTP client Create and perform the FTP test on Switch A to check whet...

Страница 319: ...a admin ftp ftp password hello SwitchA nqa admin ftp ftp filename nqa ftp test txt SwitchA nqa admin ftp ftp filesize 10 Step 4 Perform the test SwitchA nqa admin ftp start now Step 5 Verify the test result Verify the NQA test result on Switch A SwitchA nqa admin ftp display nqa results test instance admin ftp NQA entry admin ftp testflag is inactive testtype is ftp 1 Test 1 result The test is fin...

Страница 320: ...1 2 return l Configuration file of Switch B sysname SwitchB vlan batch 10 20 interface Vlanif10 ip address 10 1 1 2 255 255 255 0 interface Vlanif20 ip address 10 2 1 1 255 255 255 0 interface Ethernet0 0 1 port hybrid pvid vlan 10 port hybrid untagged vlan 10 interface Ethernet0 0 2 port hybrid pvid vlan 20 port hybrid untagged vlan 20 return l Configuration file of Switch C sysname SwitchC FTP s...

Страница 321: ... Configure the Switch as the NQA client 2 Create and perform the HTTP test on the Switch to check whether the a connection between the Switch and the HTTP server can be set up and to check the time for transferring a file between them Data Preparation To complete the configuration you need the following data l Host address of the HTTP server l HTTP operation type Procedure Step 1 Configure reachab...

Страница 322: ... Sum Min Max 11 3 4 RTT Sum Min Max Avg 18 5 7 6 DNSServerTimeout 0 TCPConnectTimeout 0 TransactionTimeout 0 Lost packet ratio 0 End Configuration Files Configuration file of Switch sysname quidway vlan batch 10 interface Vlanif10 ip address 10 1 1 1 255 255 255 0 interface Ethernet0 0 1 port hybrid pvid vlan 10 port hybrid untagged vlan 10 nqa test instance admin http test type http destination a...

Страница 323: ...tween Switch A and the DNS server between Switch A and the host to be accessed and between the DNS server and the host to be accessed The configuration details are not mentioned here Step 2 Create an NQA DNS test Quidway system view Quidway dns server 10 3 1 1 Quidway nqa test instance admin dns Quidway nqa admin dns test type dns Quidway nqa admin dns dns server ipv4 10 3 1 1 Quidway nqa admin dn...

Страница 324: ...0 0 1 port hybrid pvid vlan 100 port hybrid untagged vlan 100 nqa test instance admin dns test type dns destination address url server com dns server ipv4 10 3 1 1 ip route static 10 3 1 0 255 255 255 0 10 1 1 2 return 6 19 6 Example for Configuring the Traceroute Test Networking Requirements As shown in Figure 6 8 The traceroute test is used to check the IP address of the VLANIF 110 interface of ...

Страница 325: ...play nqa results test instance admin trace NQA entry admin trace testflag is inactive testtype is trace 1 Test 1 result The test is finished Completion success Attempts number 1 Disconnect operation number 0 Operation timeout number 0 System busy operation number 0 Connection fail number 0 Operation sequence errors number 0 RTT Stats errors number 0 Drop operation number 0 Last good path Time 2006...

Страница 326: ...5 0 interface Vlanif110 ip address 10 2 1 1 255 255 255 0 interface Ethernet0 0 1 port hybrid pvid vlan 100 port hybrid untagged vlan 100 interface Ethernet0 0 2 port hybrid pvid vlan 110 port hybrid untagged vlan 110 return l Configuration file of Switch C sysname SwitchC vlan batch 110 interface Vlanif110 ip address 10 2 1 2 255 255 255 0 interface Ethernet0 0 1 port hybrid pvid vlan 110 port hy...

Страница 327: ...dure Step 1 Configure reachable routes between Switch A and Switch B between Switch A and Switch C and between Switch B and Switch C The configuration details are not mentioned here Step 2 Enable SNMP agent on Switch C SwitchC system view SwitchC snmp agent Step 3 Create an SNMP query test on Switch A SwitchA system view SwitchA nqa test instance admin snmp SwitchA nqa admin snmp test type snmp Sw...

Страница 328: ...stance admin snmp test type snmp destination address ipv4 10 2 1 2 ip route static 10 2 1 0 255 255 255 0 10 1 1 2 return l Configuration file of Switch B sysname SwitchB vlan batch 100 110 interface Vlanif100 ip address 10 1 1 2 255 255 255 0 interface Vlanif110 ip address 10 2 1 1 255 255 255 0 interface Ethernet0 0 1 port hybrid pvid vlan 100 port hybrid untagged vlan 100 interface Ethernet0 0 ...

Страница 329: ... client and configure Switch C as the NQA server 2 Configure the monitoring port number on the NQA server and create an NQA TCP test on the NQA client Data Preparation To complete the configuration you need the following data l Host address of the server l Port number used to monitor the TCP service on the server Procedure Step 1 Configure reachable routes between Switch A and Switch B between Swi...

Страница 330: ... errors number 0 Destination ip address 10 2 1 2 Min Max Average Completion Time 46 63 52 Sum Square Sum Completion Time 156 8294 Last Good Probe Time 2006 8 5 15 53 17 8 Lost packet ratio 0 End Configuration Files l Configuration file of Switch A sysname SwitchA vlan batch 100 interface Vlanif100 ip address 10 1 1 1 255 255 255 0 interface Ethernet0 0 1 port hybrid pvid vlan 100 port hybrid untag...

Страница 331: ...re 6 11 Networking diagram for configuring the UDP test NQA Server SwitchA Ethernet 0 0 1 VLANIF100 10 1 1 1 24 VLANIF100 10 1 1 2 24 VLANIF110 10 2 1 2 24 VLANIF110 10 2 1 1 24 Ethernet 0 0 1 Ethernet 0 0 1 Ethernet 0 0 2 SwitchB SwitchC Configuration Roadmap 1 Configure Switch A as the NQA client and configure Switch C as the NQA server 2 Configure the monitoring port number on the NQA server an...

Страница 332: ... is finished Send operation times 3 Receive response times 3 Completion success RTD OverThresholds number 0 Attempts number 1 Drop operation number 0 Disconnect operation number 0 Operation timeout number 0 System busy operation number 0 Connection fail number 0 Operation sequence errors number 0 RTT Stats errors number 0 Destination ip address 10 2 1 2 Min Max Average Completion Time 32 109 67 Su...

Страница 333: ...ng the Jitter Test Networking Requirements As shown in Figure 6 12 the NQA Jitter test needs to be used to obtain the jitter time of transmitting a packet from Switch A to Switch C Switch A and Switch C synchronize the clock from Switch B so that the test precision is improved NOTE For information about clock synchronization see NTP in the Quidway S2700 Series Ethernet Switches Feature Description...

Страница 334: ...witchA nqa admin jitter destination address ipv4 10 2 1 2 SwitchA nqa admin jitter destination port 9000 Step 4 Perform the test SwitchA nqa admin jitter start now Step 5 Verify the test result SwitchA nqa admin jitter display nqa results test instance admin jitter NQA entry admin jitter testflag is inactive testtype is jitter 1 Test 1 result The test is finished SendProbe 60 ResponseProbe 60 Comp...

Страница 335: ...ation port 9000 ip route static 10 2 1 0 255 255 255 0 10 1 1 2 return l Configuration file of Switch B sysname SwitchB vlan batch 100 110 interface Vlanif100 ip address 10 1 1 2 255 255 255 0 interface Vlanif110 ip address 10 2 1 1 255 255 255 0 interface Ethernet0 0 1 port hybrid pvid vlan 100 port hybrid untagged vlan 100 interface Ethernet0 0 2 port hybrid pvid vlan 110 port hybrid untagged vl...

Страница 336: ... message received by the NMS Figure 6 13 Network diagram for configuring the NQA threshold NQA Server NM Station Ethernet0 0 1 VLANIF120 10 1 1 1 24 Ethernet0 0 1 VLANIF120 10 1 1 2 24 Ethernet0 0 1 VLANIF130 30 1 1 2 24 Ethernet0 0 2 VLANIF130 30 1 1 1 24 Ethernet0 0 2 20 1 1 2 24 SwitchA SwitchB SwitchC VLANIF110 20 1 1 1 24 NOTE For the information about clock synchronization see NTP in the Qui...

Страница 337: ...hA nqa admin jitter quit Step 5 Configure the function of sending trap messages to the NMS SwitchA snmp agent trap enable SwitchA snmp agent sys info version v2c SwitchA snmp agent target host trap address udp domain 20 1 1 2 params securityname public v2c Step 6 Perform the test SwitchA nqa test instance admin jitter SwitchA nqa admin jitter start now SwitchA nqa admin jitter quit SwitchA quit St...

Страница 338: ...TDTHRESHOLD OID 1 3 6 1 4 1 2011 5 25 111 6 16 NQA entry RTD over threshold OwnerIndex admin TestName jitter Jul 9 00 28 34 2009 Quidway NQA 4 SDTHRESHOLD OID 1 3 6 1 4 1 2011 5 25 111 6 17 NQA entry OWD SD over threshold OwnerIndex admin TestName jitter Jul 9 00 28 34 2009 Quidway NQA 4 DSTHRESHOLD OID 1 3 6 1 4 1 2011 5 25 111 6 18 NQA entry OWD DS over threshold OwnerIndex admin TestName jitter...

Страница 339: ...hernet0 0 1 port hybrid pvid vlan 120 port hybrid untagged vlan 120 interface Ethernet0 0 2 port hybrid pvid vlan 130 port hybrid untagged vlan 130 ospf 1 area 0 0 0 1 network 10 1 1 0 0 0 0 255 network 30 1 1 0 0 0 0 255 return l Configuration file of Switch C sysname SwitchC vlan batch 130 interface Vlanif130 ip address 30 1 1 2 255 255 255 0 interface Ethernet0 0 1 port hybrid pvid vlan 130 por...

Страница 340: ...s section describes how to monitor the network status and traffic through RMON 7 4 Maintaining RMON When an RMON operation fault occurs you can run the debuggingcommand in the user view to locate the fault and analyze its cause 7 5 Configuration Examples This section provides several configuration examples of RMON and RMON2 Quidway S2700 Series Ethernet Switches Configuration Guide Network Managem...

Страница 341: ...ity The NM Station uses the basic SNMP commands for exchanging data with the RMON agent and collecting the network management information This process is restricted by device resources and hence the NM Station collects only information on four groups alarm event history and statistics and not the complete information on the RMON MIB Currently the S2700 implements the monitoring and statistics coll...

Страница 342: ...threshold No more events will be generated until the sampled data in the opposite direction crosses the threshold The S2700 does not apply this mechanism because it will not generate the alarms for a long period For the S2700 the alarms are re generated if the smapling value turns to the noraml threshold The alarm group contains one table alarmTable l Event group An event group stores all the even...

Страница 343: ...mplete the pre configuration tasks and obtain the required data This can help you complete the configuration task quickly and accurately Applicable Environment To monitor network status and collect traffic statistics on a network segment you can configure RMON Enabling the RMON function does not need any special requirement You can enable it in advance or configure it when you suspect that the tra...

Страница 344: ...nterface where traffic statistics are collected If the traffic statistics function is not enabled on the interface statistics values of in both ethernetStatsTable and HistoryControlTable are 0 Context Do as follows on the switch on which traffic statistics should be collected Procedure Step 1 Run system view The system view is displayed Step 2 Run interface ethernet gigabitethernet interface numbe...

Страница 345: ...ly and save the statistics to etherHistoryTable for future use Context The history data management supports the setting of sampling sampling interval and saving quantity for the traffic passing through a specified port RMON periodically collects statistics of the port and saves them to etherHistoryTable for future reference As recommended by the RMON specifications each monitored interface should ...

Страница 346: ...o as follows on the switch that is monitored The RMON event management module is responsible for adding events to the corresponding rows in the eventTable and defining the methods of processing events l log sending only logs l log trap sending both logs and trap messages to the NM Station l none marking that no event occurs l trap sending trap messages to the NM Station Procedure Step 1 Run system...

Страница 347: ...lower limit is configured an alarm is triggered once the alarm condition is satisfied At this time the status of alarm recording is VALID If an incorrect alarm variable is configured for example an inexistent OID is specified the status of alarm recording is undercreation and no alarm is generated Do as follows on the switch that is monitored Procedure Step 1 Run system view The system view is dis...

Страница 348: ...le an alarm does not occur even if the alarm conditions are satisfied The alarm record is in the undercreation state rather than in the VALID state If either the alarm upper limit event or the alarm lower limit event is configured the alarm is triggered once the conditions for an alarm are satisfied The alarm record is in the VALID state End 7 3 8 Checking the Configuration After configuring RMON ...

Страница 349: ...mmand to display the RMON history Quidway display rmon history History control entry 1 owned by Test300 is VALID Samples interface Ethernet0 0 1 ifEntry 402653698 Sampling interval 30 sec with 10 buckets max Last Sampling time 0days 00h 09m 43s Latest sampled values octets 645 packets 7 broadcast packets 7 multicast packets 0 undersize packets 6 oversize packets 0 fragments packets 0 jabbers packe...

Страница 350: ...S2700 SeriesEthernet Switches Debugging Reference Perform the configuration in the user view Procedure l Run the debugging rmon to enable RMON debugging End 7 5 Configuration Examples This section provides several configuration examples of RMON and RMON2 7 5 1 Examples for Configuring RMON Networking Requirements Ethernet0 0 1 on the Switch belongs to a VLAN As shown in Figure 7 1 it is required t...

Страница 351: ...ata l Threshold for triggering alarms l Community name for communicating with the NMS Configuration Procedure 1 Configure reachable routes between the Switch and the NMSs The configuration procedure is not mentioned 2 Enable the statistics function Enable the RMON statistics function on the interface Switch system view Switch interface ethernet 0 0 1 Switch Ethernet0 0 1 rmon statistics enable Con...

Страница 352: ...s max Last Sampling time 0days 01h 56m 21s Latest sampled values octets 11385 packets 0 broadcast packets 0 multicast packets 9 undersize packets 0 oversize packets 0 fragments packets 0 jabbers packets 0 CRC alignment errors 0 collisions 0 Dropped packet 0 utilization 0 History record Record No 1 Sample time 1days 07h 37m 29s octets 11182 packets 0 broadcast packets 0 multicast packets 8 undersiz...

Страница 353: ...1 30 absolute rising threshold 50000 2 falling threshold 100 1 owner User01 Display the alarms Switch display rmon alarm 2 Alarm table 2 owned by User01 is VALID Samples absolute value 1 3 6 1 2 1 16 1 1 1 7 1 etherStatsMulticastPkts 1 Sampling interval 30 sec Rising threshold 50000 linked with event 2 Falling threshold 100 linked with event 1 When startup enables risingOrFallingAlarm Latest value...

Страница 354: ...ute rising threshold 10000 2 falling threshold 100 1 owner User01 rmon alarm 2 1 3 6 1 2 1 16 1 1 1 7 1 30 absolute rising threshold 50000 2 falling threshold 100 1 owner User01 rmon alarm 3 1 3 6 1 2 1 2 2 1 12 898 30 absolute rising threshold 1000 2 falling threshold 10 1 owner User01 return Quidway S2700 Series Ethernet Switches Configuration Guide Network Management 7 RMON Configuration Issue ...

Отзывы: