background image

4.

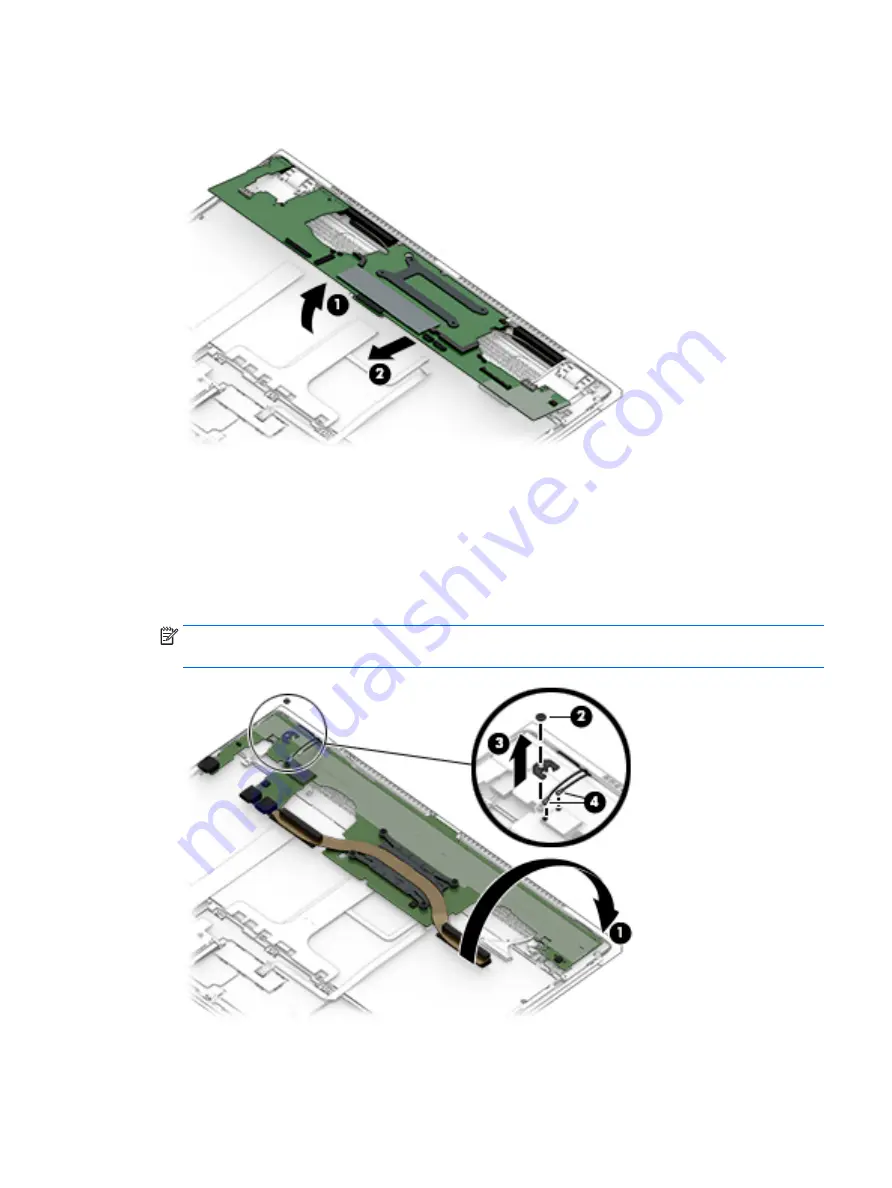
Slide the system board (2) forward until the rear edge of the system board is clear of the keyboard/
top cover.

5.

Swing the front edge of the system board (1) up and back until the system board rests upside down on the 
keyboard/top cover.

6.

Remove the Phillips M2.0×1.8 screw (2) that secures the WLAN module bracket to the system board.

7.

Remove the WLAN module bracket (3).

The WLAN module bracket is available using spare part number L07401-001.

8.

Disconnect the WLAN antenna cables (4) from the WLAN module built onto the system board.

NOTE:

The #1/white WLAN antenna cable connects to the WLAN module "#1/Main" terminal. The #2/ 

black WLAN antenna cable connects to the WLAN module "#2/Aux" terminal.

9.

Remove the system board.

Component replacement procedures

43

Содержание Spectre 13

Страница 1: ...HP Spectre 13 Laptop PC Maintenance and Service Guide IMPORTANT This document is intended for HP authorized service providers only ...

Страница 2: ... services are set forth in the express warranty statements accompanying such products and services Nothing herein should be construed as constituting an additional warranty HP shall not be liable for technical or editorial errors or omissions contained herein First Edition October 2017 Document Part Number 937953 001 Product notice This guide describes features that are common to most models Some ...

Страница 3: ...w another hard surface such as an adjoining optional printer or a soft surface such as pillows or rugs or clothing to block airflow Also do not allow the AC adapter to contact the skin or a soft surface such as pillows or rugs or clothing during operation The device and the AC adapter comply with the user accessible surface temperature limits defined by the International Standard for Safety of Inf...

Страница 4: ...iv Safety warning notice ...

Страница 5: ...omponents 15 Miscellaneous parts 22 4 Removal and replacement preliminary requirements 24 Tools required 24 Service considerations 24 Plastic parts 24 Cables and connectors 25 Drive handling 25 Grounding guidelines 26 Electrostatic discharge damage 26 Packaging and transporting guidelines 27 Workstation guidelines 27 5 Removal and replacement procedures 29 Component replacement procedures 29 Botto...

Страница 6: ... Backing up restoring and recovering 58 Creating recovery media and backups 58 Using HP Recovery media select products only 58 Using Windows tools 59 Using the HP Cloud Recovery Download Tool select products only 60 Restore and recovery 60 Recovering using HP Recovery Manager 60 What you need to know before you get started 60 Using the HP Recovery partition select products only 61 Using HP Recover...

Страница 7: ...Index 66 vii ...

Страница 8: ...viii ...

Страница 9: ...ush glass multitouch enabled MSFT HDR streaming capable Memory System memory built into system board Support for LPDDR3 2133 dual channel system memory Support for up to 16 GB of system memory in the following configurations 16384 MB 16384 MB 256 MB 32 4 4 pieces 8192 MB 256 MB 16 4 4 pieces Storage Support for the following solid state drives 1 TB M 2 2280 SATA 3 DS PCIe NVMe solid state drive wi...

Страница 10: ...2 0 through a 3rd party dongle High bandwidth Digital Content Protection HDCP 2 2 through a 3rd party dongle HP Sleep Charge Keyboard pointing devices Full size backlit island style keyboard in ceramic white or dark ash silver finishes TouchPad requirements Image sensor ClickPad with glass surface MultiTouch gestures enabled Support for Modern TrackPad gestures Taps enabled as default Power requir...

Страница 11: ...Category Description Operating system continued For India market Windows 10 Home Plus EM SL IPPP Serviceability End user replaceable part AC adapter 3 ...

Страница 12: ...manager in the taskbar search box and then select the Device Manager app A list displays all the devices installed on your computer For information about system hardware components and the system BIOS version number press fn esc select products only Locating software To find out what software is installed on your computer Select the Start button or Right click the Start button and then select Apps...

Страница 13: ...e that has a USB Type C connector providing DisplayPort output NOTE Cables and or adapters purchased separately may be required 3 USB Type C Thunderbolt ports Connects and charges a USB device that has a Type C connector such as a cell phone camera activity tracker or smartwatch and provides high speed data transfer or Connects to various USB video HDMI and LAN devices NOTE Cables and or adapters ...

Страница 14: ... a headset For additional safety information refer to the Regulatory Safety and Environmental Notices To access this guide Select the Start button select HP Help and Support and then select HP Documentation NOTE When a device is connected to the jack the computer speakers are disabled 6 Chapter 2 Getting to know your computer ...

Страница 15: ...tead of a password logon NOTE Camera functions vary depending on the camera hardware and software installed on your product The antennas are not visible from the outside of the computer and antenna location varies For optimal transmission keep the areas immediately around the antennas free from obstructions For wireless regulatory notices see the section of the Regulatory Safety and Environmental ...

Страница 16: ... your finger gestures to move the pointer or activate items on the screen 2 Left TouchPad button Functions like the left button on an external mouse 3 Right TouchPad button Functions like the right button on an external mouse 8 Chapter 2 Getting to know your computer ...

Страница 17: ... shuts off power to the display and other unneeded components Off The computer is off or in Hibernation Hibernation is a power saving state that uses the least amount of power 2 Caps lock light On Caps lock is on which switches the key input to all capital letters 3 Mute light On Computer sound is off Off Computer sound is on Keyboard area 9 ...

Страница 18: ...rnation press the button briefly to exit Hibernation CAUTION Pressing and holding down the power button results in the loss of unsaved information If the computer has stopped responding and shutdown procedures are ineffective press and hold the power button down for at least 5 seconds to turn off the computer To learn more about your power settings see your power options Right click the Power icon...

Страница 19: ...xecutes specific functions when pressed in combination with another key 3 Windows key Opens the Start menu NOTE Pressing the Windows key again will close the Start menu 4 Action keys Execute frequently used system functions NOTE On select products the f5 action key turns the keyboard backlight feature off or on Keyboard area 11 ...

Страница 20: ...w to cool internal components NOTE The computer fan starts up automatically to cool internal components and prevent overheating It is normal for the internal fan to cycle on and off during routine operation 12 Chapter 2 Getting to know your computer ...

Страница 21: ...TE HP continually improves and changes product parts For complete and current information on supported parts for your computer go to http partsurfer hp com select your country or region and then follow the on screen instructions 13 ...

Страница 22: ...s important information to identify your computer When contacting support you may be asked for the serial number the product number or the model number Locate this information before you contact support Your service label will resemble one of the examples shown below Refer to the illustration that most closely matches the service label on your computer Component 1 HP product name select products o...

Страница 23: ...reen display top cover assembly includes display panel cable and wireless antenna cables Equipped with a UHD display assembly an infrared HD webcam and a top cover in ceramic white finish for use in all countries and regions except Japan 941839 001 Computer components 15 ...

Страница 24: ...with a FHD display assembly an non infrared HD webcam and a top cover in ceramic white finish for use only in Japan L04822 001 Equipped with a FHD display assembly an non infrared HD webcam and a top cover in dark ash silver finish 941836 001 2 Keyboard with backlight includes backlight cable and keyboard cable In ceramic white finish For use in Canada L04544 DB1 For use in the Czech Republic and ...

Страница 25: ...543 131 For use in Russia L04543 251 For use in Saudi Arabia L04543 171 For use in South Korea L04543 AD1 For use in Spain L04543 071 For use in Switzerland L04543 BG1 For use in Taiwan L04543 AB1 For use in Thailand L04543 281 For use in Turkey L04543 141 For use in the United Kingdom L04543 031 For use in the United States L04543 001 For use in Canada 941837 DB1 For use in Denmark Finland and No...

Страница 26: ...D1 For use in Spain 941835 071 For use in Switzerland 941835 BG1 For use in Taiwan 941835 AB1 For use in Thailand 941835 281 For use in the United Kingdom 941835 031 For use in the United States 941835 001 For use in Belgium 941838 A41 For use in Canada 941838 DB1 For use in the Czech Republic and Slovakia 941838 FL1 For use in Denmark Finland and Norway 941838 DH1 For use in France 941838 051 For...

Страница 27: ...H1 For use in France 941834 051 For use in Germany 941834 041 For use in Greece 941834 151 For use in Hungary 941834 211 For use in Israel 941834 BB1 For use in Italy 941834 061 For use in Latin America 941834 161 For use in the Netherlands 941834 B31 For use in Portugal 941834 131 For use in Russia 941834 251 For use in Saudi Arabia 941834 171 For use in South Korea 941834 AD1 For use in Spain 94...

Страница 28: ... the United States 941836 001 Keyboard Screw Kit not illustrated includes 54 keyboard screws L04545 001 Speakers include cables 2a Left speaker includes cable and double sided adhesive 941847 001 2b Right speaker includes cable and double sided adhesive 941848 001 3a Thermal sensor board does not include cable 941845 001 3b Thermal sensor board cable 941846 001 4a Audio jack board does not include...

Страница 29: ... 620 graphics subsystem with UMA video memory 8 GB of system memory and a non Windows operating system 941821 001 WLAN module bracket not illustrated L07401 001 Fans include cables 7a Left fan 941827 001 7b Right fan 941828 001 8a TouchPad does not include cable In ceramic white finish 941832 001 In dark ash silver finish 941831 001 8b TouchPad cable includes double sided adhesive 941833 001 9a So...

Страница 30: ...02 For use in the United Kingdom 914723 002 For use in the United States 854702 004 In dark ash silver finish For use in Australia 914724 001 For use in Europe and South Korea 854703 001 For use in India 914726 001 For use in the People s Republic of China 914725 001 For use in the United Kingdom 914723 001 For use in the United States 854702 001 HP 13 3 in sleeve In black finish 940099 001 In gra...

Страница 31: ... the United Kingdom 213351 017 In dark ash silver finish For use in Australia 213356 013 For use in Denmark 213353 013 For use in Europe 213350 014 For use in India 404827 008 For use in Israel 398063 008 For use in Japan 349756 006 For use in North America 213349 015 For use in the People s Republic of China 286497 013 For use in South Africa 361240 007 For use in Switzerland 213354 013 For use i...

Страница 32: ...rations that you must keep in mind during disassembly and assembly procedures NOTE As you remove each subassembly from the computer place the subassembly and all accompanying screws away from the work area to prevent damage Plastic parts CAUTION Using excessive force during disassembly and reassembly can damage plastic parts Use care when handling the plastic parts Apply pressure only at the point...

Страница 33: ...ese precautions Before removing or inserting a drive shut down the computer If you are unsure whether the computer is off or in Hibernation turn the computer on and then shut it down through the operating system Before handling a drive be sure that you are discharged of static electricity While handling a drive avoid touching the connector Before removing a diskette drive or optical drive be sure ...

Страница 34: ...s Keep components in their electrostatic safe containers until you are ready to install them Before touching an electronic component discharge static electricity by using the guidelines described in this section Avoid touching pins leads and circuitry Handle electronic components as little as possible If you remove a component place it in an electrostatic safe container The following table shows h...

Страница 35: ... to ground and that proper materials are selected to avoid static charging When grounding is not possible use an ionizer to dissipate electric charges Workstation guidelines Follow these grounding workstation guidelines Cover the workstation with approved static shielding material Use a wrist strap connected to a properly grounded work surface and use properly grounded tools and equipment Use cond...

Страница 36: ... the operator and ground To be effective the conductive must be worn in contact with the skin The following grounding equipment is recommended to prevent electrostatic damage Antistatic tape Antistatic smocks aprons and sleeve protectors Conductive bins and other assembly or soldering aids Nonconductive foam Conductive computerop workstations with ground cords of one megohm resistance Static dissi...

Страница 37: ...uter or void the warranty Component replacement procedures NOTE Details about your computer including model serial number product key and length of warranty are on the service tag at the bottom of your computer See Labels on page 14 for details NOTE HP continually improves and changes product parts For complete and current information on supported parts for your computer go to http partsurfer hp c...

Страница 38: ...xternal devices connected to the computer 3 Disconnect the power from the computer by first unplugging the power cord from the AC outlet and then unplugging the AC adapter from the computer Remove the bottom cover 1 Remove the computer rubber feet 1 The rubber feet are included in the Rubber Foot Kit spare part numbers 941830 001 in ceramic white finish and 941829 001 in dark ash silver finish 2 R...

Страница 39: ...over each time the bottom cover is removed Replacement thermal material is included with the bottom cover and solid state drive spare part kits Replacement thermal material is used on the solid state drive 1 and the bottom cover section 2 that services it Reverse this procedure to install the bottom cover Component replacement procedures 31 ...

Страница 40: ...and then unplugging the AC adapter from the computer 4 Remove the bottom cover see Bottom cover on page 30 Remove the battery 1 Remove the thermal shielding material 1 that secures the solid state drive to the battery 2 Release the zero insertion force ZIF connector 2 to which the battery cable is connected and then disconnect the battery cable from the system board 3 Detach the battery cable 3 fr...

Страница 41: ...puter on and then shut it down through the operating system 2 Disconnect all external devices connected to the computer 3 Disconnect the power from the computer by first unplugging the power cord from the AC outlet and then unplugging the AC adapter from the computer 4 Remove the bottom cover see Bottom cover on page 30 5 Disconnect the battery cable from the system board see Battery on page 32 Re...

Страница 42: ...adapter from the computer 4 Remove the bottom cover see Bottom cover on page 30 5 Disconnect the battery cable from the system board see Battery on page 32 Remove the audio jack board cable 1 Release the ZIF connector 1 to which the audio jack board cable is connected and then disconnect the audio jack board cable from the system board 2 Release the ZIF connector 2 to which the audio jack board ca...

Страница 43: ... on page 32 5 Remove the solid state drive see Solid state drive on page 33 Remove the solid state drive connector board 1 Release the ZIF connector 1 to which the solid state drive connector board cable is connected and then disconnect the solid state drive connector board cable from the system board 2 Detach the solid state drive connector board cable 2 from the keyboard top cover The solid stat...

Страница 44: ...r board upside down b Release the ZIF connector 1 to which the solid state drive connector board cable is connected and then disconnect the solid state drive connector board cable 2 from the solid state drive connector board The solid state drive connector board cable is available using spare part number 941842 001 Reverse this procedure to install the solid state drive connector board 36 Chapter ...

Страница 45: ...n unplugging the AC adapter from the computer 4 Remove the bottom cover see Bottom cover on page 30 5 Remove the battery see Battery on page 32 Remove the TouchPad cable 1 Release the ZIF connector 1 to which TouchPad cable is connected and then disconnect the TouchPad cable from the system board 2 Release the ZIF connector 2 to which TouchPad cable is connected and then disconnect the TouchPad ca...

Страница 46: ...hen unplugging the AC adapter from the computer 4 Remove the bottom cover see Bottom cover on page 30 5 Remove the battery see Battery on page 32 6 Remove the solid state drive see Solid state drive on page 33 7 Remove the solid state drive connector board and brackets see Solid state drive connector board on page 35 Remove the TouchPad 1 Release the ZIF connector 1 to which TouchPad cable is conn...

Страница 47: ...hrough the operating system 2 Disconnect all external devices connected to the computer 3 Disconnect the power from the computer by first unplugging the power cord from the AC outlet and then unplugging the AC adapter from the computer 4 Remove the bottom cover see Bottom cover on page 30 5 Disconnect the battery cable from the system board see Battery on page 32 Remove the right fan 1 Disconnect ...

Страница 48: ...cables 1 from the connectors on the system board 2 Remove the two Phillips M2 0 3 2 screws 2 that secure the left fan to the keyboard top cover 3 Remove the left fan 3 Reverse this procedure to reassemble and install the fans 40 Chapter 5 Removal and replacement procedures ...

Страница 49: ...Intel UHD 620 graphics subsystem with UMA video memory 8 GB of system memory and the Windows 10 operating system 941821 601 Equipped with an Intel Core i5 8250U 1 60 GHz turbo up to 3 40 GHz quad core processor 2133 MHz 6 0 MB L3 cache 15 W an Intel UHD 620 graphics subsystem with UMA video memory 8 GB of system memory and a non Windows operating system 941821 001 Before removing the system board ...

Страница 50: ...rd ZIF connector cable 2 Remove the three Phillips M2 0 3 2 screws that secure the system board to the keyboard top cover 3 Lift the front edge of the system board 1 until it rests at an angle 42 Chapter 5 Removal and replacement procedures ...

Страница 51: ...w 2 that secures the WLAN module bracket to the system board 7 Remove the WLAN module bracket 3 The WLAN module bracket is available using spare part number L07401 001 8 Disconnect the WLAN antenna cables 4 from the WLAN module built onto the system board NOTE The 1 white WLAN antenna cable connects to the WLAN module 1 Main terminal The 2 black WLAN antenna cable connects to the WLAN module 2 Aux...

Страница 52: ...t the power from the computer by first unplugging the power cord from the AC outlet and then unplugging the AC adapter from the computer 3 Disconnect all external devices from the computer 4 Remove the bottom cover see Bottom cover on page 30 and then remove the following components a Battery see Battery on page 32 b Fans see Fans on page 39 c System board see System board on page 41 Remove the he...

Страница 53: ... AD1 For use in Denmark Finland and Norway L04544 DH1 For use in Spain L04544 071 For use in France L04544 051 For use in Switzerland L04544 BG1 For use in Germany L04544 041 For use in Taiwan L04544 AB1 For use in Japan L04544 291 For use in Thailand L04544 281 For use in Latin America L04544 161 For use in Turkey L04544 141 For use in the Netherlands L04544 B31 For use in the United Kingdom L045...

Страница 54: ...he computer by first unplugging the power cord from the AC outlet and then unplugging the AC adapter from the computer 4 Remove the bottom cover see Bottom cover on page 30 and then remove the following components a Battery see Battery on page 32 b Fans see Fans on page 39 c System board see System board on page 41 Remove the keyboard 1 Detach the solid state drive connector board cable 1 from the...

Страница 55: ... keyboard with double sided adhesive 5 Remove the 54 Phillips M1 2 3 0 keyboard retention screws from the locations indicated in the illustration below The keyboard retention screws are available in the Keyboard Screw Kit spare part number L04545 001 Component replacement procedures 47 ...

Страница 56: ...6 Remove the keyboard Reverse this procedure to install the keyboard 48 Chapter 5 Removal and replacement procedures ...

Страница 57: ...computer by first unplugging the power cord from the AC outlet and then unplugging the AC adapter from the computer 3 Disconnect all external devices from the computer 4 Remove the bottom cover see Bottom cover on page 30 and then remove the following components a Battery see Battery on page 32 b Fans see Fans on page 39 c System board see System board on page 41 Remove the speakers Detach the lef...

Страница 58: ...nplugging the AC adapter from the computer 2 Disconnect all external devices from the computer 3 Remove the bottom cover see Bottom cover on page 30 and then remove the following components a Battery see Battery on page 32 b Fans see Fans on page 39 c System board see System board on page 41 Remove the thermal sensor board 1 Remove the two Phillips M2 0 3 2 screws 1 that secure the thermal sensor ...

Страница 59: ... is connected and then disconnect the thermal sensor board cable 2 from the thermal sensor board The thermal sensor board cable is available using spare part number 941846 001 Reverse this procedure to install the thermal sensor board Component replacement procedures 51 ...

Страница 60: ...all external devices from the computer 3 Remove the bottom cover see Bottom cover on page 30 and then remove the following components a Battery see Battery on page 32 b Fans see Fans on page 39 c System board see System board on page 41 d Left speaker see Speakers on page 49 Remove the audio jack board 1 Remove the Phillips M2 0 3 2 screw 1 that secures the audio jack board to the keyboard top cov...

Страница 61: ...e on the HP website Most BIOS updates on the HP website are packaged in compressed files called SoftPaqs Some download packages contain a file named Readme txt which contains information regarding installing and troubleshooting the file Determining the BIOS version To decide whether you need to update Setup Utility BIOS first determine the BIOS version on your computer To reveal the BIOS version i...

Страница 62: ...y the most recent BIOS update and compare it to the BIOS version currently installed on your computer If the update is more recent than your BIOS version make a note of the date name or other identifier You may need this information to locate the update later after it has been downloaded to your hard drive b Follow the on screen instructions to download your selection to the hard drive Make a note...

Страница 63: ...port to help determine how to correct the problem NOTE To start diagnostics on a convertible computer your computer must be in notebook mode and you must use the keyboard attached To start HP PC Hardware Diagnostics UEFI follow these steps 1 Turn on or restart the computer and quickly press esc 2 Press f2 The BIOS searches three places for the diagnostic tools in the following order a Connected US...

Страница 64: ...est UEFI version 1 Go to http www hp com go techcenter pcdiags The HP PC Diagnostics home page is displayed 2 In the HP PC Hardware Diagnostics section select the Download link and then select Run Download any version of UEFI for a specific product 1 Go to http www hp com support 2 Select Get software and drivers 3 Enter the product name or number 4 Select your computer and then select your operat...

Страница 65: ...Nonoperating 20 C to 60 C 4 F to 140 F Relative humidity noncondensing Operating 10 to 90 Nonoperating 5 to 95 Maximum altitude unpressurized Operating 15 m to 3 048 m 50 ft to 10 000 ft Nonoperating 15 m to 12 192 m 50 ft to 40 000 ft NOTE Applicable product safety standards specify thermal limits for plastic surfaces The device operates well within this range of temperatures 57 ...

Страница 66: ...n replaced For information on creating recovery media see Using HP Recovery media select products only on page 58 For information on the recovery options that are available using the recovery media see Using Windows tools on page 59 Use Windows tools to create system restore points and create backups of personal information See Using Windows tools on page 59 NOTE If storage is 32 GB or less Micros...

Страница 67: ...ort on an external device such as a USB hub If you cannot create DVD media yourself you can obtain recovery discs for your computer from HP You can find contact information on the HP website Go to http www hp com support select your country or region and follow the on screen instructions Be sure that the computer is connected to AC power before you begin creating the recovery media The creation pr...

Страница 68: ...products only or use the HP Recovery media For more information see Recovering using HP Recovery Manager on page 60 If you have not already created recovery media see Using HP Recovery media select products only on page 58 On select products if you want to recover the computer s original factory partition and content or if you have replaced the hard drive you can use the Factory Reset option of HP...

Страница 69: ...grams that were installed at the factory Factory Reset Restores the computer to its original factory state by deleting all information from the hard drive and re creating the partitions Then it reinstalls the operating system and the software that was installed at the factory The HP Recovery partition select products only allows System Recovery only Using the HP Recovery partition select products ...

Страница 70: ...oards attached Turn on or restart the computer or tablet quickly press esc and then press f9 for boot options For tablets without keyboards Turn on or restart the tablet and then quickly hold down the volume up button then select f9 or Turn on or restart the tablet and then quickly hold down the volume down button then select f9 3 Select the optical drive or USB flash drive from which you want to ...

Страница 71: ... approved by an acceptable accredited agency responsible for evaluation in the country or region where the power cord set will be used The power cord sets must have a minimum current capacity of 10 amps and a nominal voltage rating of 125 or 250 V AC as required by the power system of each country or region The appliance coupler must meet the mechanical configuration of an EN 60 320 IEC 320 Standa...

Страница 72: ...ble cord and wall plug must bear a T mark and registration number in accordance with the Japanese Dentori Law The flexible cord must be Type VCT or VCTF 3 conductor 1 00 mm conductor size The wall plug must be a two pole grounding type with a Japanese Industrial Standard C8303 7 A 125 V configuration 4 The flexible cord must be Type RVV 3 conductor 0 75 mm conductor size Power cord set fittings ap...

Страница 73: ...he battery in general household waste Follow the local laws and regulations in your area for battery disposal HP encourages customers to recycle used electronic hardware HP original print cartridges and rechargeable batteries For more information about recycling programs see the HP Web site at http www hp com recycle 65 ...

Страница 74: ...isplay assembly spare part numbers 15 display components 7 display panel product description 1 drives precautions 25 preventing damage 25 duck head adapter spare part numbers 22 E electrostatic discharge 26 equipment guidelines 28 esc key 11 F fan removal 39 spare part numbers 21 39 fn key 11 G graphics product description 1 grounding guidelines 26 guidelines equipment 28 grounding 26 packaging 27...

Страница 75: ...3 solid state drive 1 storage 1 video 1 wireless 2 product name 1 R rear panel components 5 recover options 60 recovery discs 59 62 HP Recovery Manager 60 media 62 starting 61 supported discs 59 system 60 USB flash drive 62 using HP Recovery media 59 recovery media creating using HP Recovery Manager 59 using 58 recovery partition removing 62 right fan removal 39 spare part number 21 39 right speak...

Страница 76: ... 21 38 zone 8 TouchPad cable removal 37 spare part number 21 37 38 transporting guidelines 27 U USB Type C adapter spare part numbers 22 USB Type C power connector and port 5 USB Type C Thunderbolt port 5 V vents 12 video product description 1 W Windows system restore point 58 59 Windows key 11 Windows tools using 59 wireless product description 2 WLAN antennas 7 WLAN module bracket removal 43 spa...

Отзывы: