


Removal and replacement procedures 28
2.
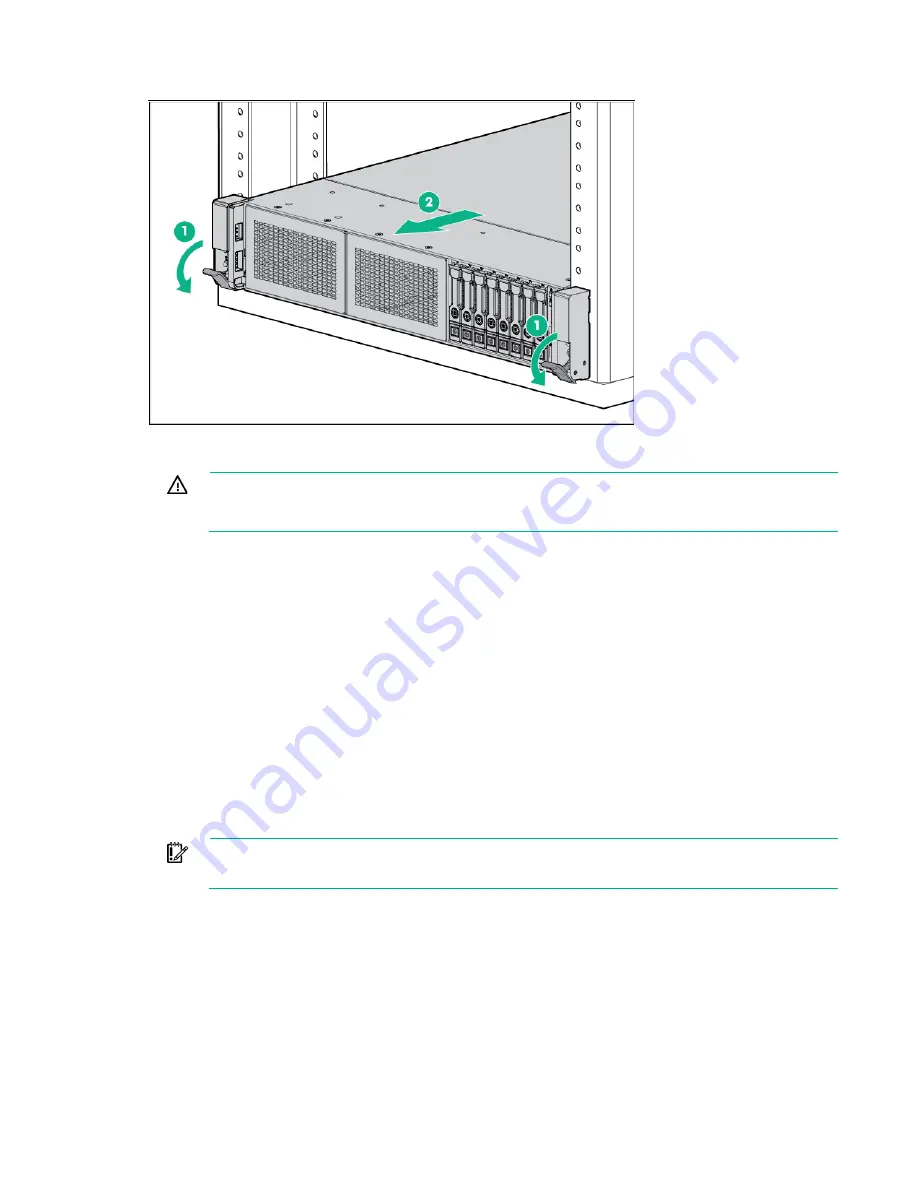
Extend the server from the rack.
3.
After performing the installation or maintenance procedure, slide the server back into the rack, and
then press the server firmly into the rack to secure it in place.
WARNING:
To reduce the risk of personal injury, be careful when pressing the server
rail-release latches and sliding the server into the rack. The sliding rails could pinch your
fingers.
Remove the server from the rack
To remove the server from a Hewlett Packard Enterprise, Compaq branded, Telco, or third-party rack:
1.
Power down the server (on page
2.
Extend the server from the rack (on page
3.
Disconnect the cabling and remove the server from the rack. For more information, refer to the
documentation that ships with the rack mounting option.
4.
Place the server on a sturdy, level surface.
Access the product rear panel
Opening the cable management arm
IMPORTANT:
The cable management arm is not supported with the friction rail kit.
Содержание ProLiant DL380 Gen9
Страница 13: ...Customer self repair 13 ...
Страница 14: ...Customer self repair 14 ...
Страница 15: ...Customer self repair 15 ...
Страница 26: ...Illustrated parts catalog 26 ...
Страница 100: ...Cabling 100 o Connect to the x2 SATA port and optical disk drive connector o Connect to a PCI expansion board ...
Страница 101: ...Cabling 101 o Connect to a PCI expansion board and the 12 LFF drive backplane o Connect to an HPE 12G SAS Expander Card ...
Страница 103: ...Cabling 103 o Connect to a PCI expansion board o Connect to a PCI expansion board and the 12 LFF drive backplane ...
Страница 106: ...Cabling 106 o Connect to a PCI expansion board ...
Страница 107: ...Cabling 107 o Connect to an HPE 12G SAS Expander Card Bay 2 installation ...
Страница 110: ...Cabling 110 8SFF drive cage installed in bay 1 Connect using the 8SFF drive cage power cable 776399 001 ...
Страница 112: ...Cabling 112 Drive bay 1 is empty Connect using the NVMe power cable 776392 001 ...
Страница 125: ...Cabling 125 12LFF configuration Connect the two 12LFF Mini SAS cables to the P840ar controller ...
Страница 129: ...Cabling 129 x4 SATA connector Connect the 2 SFF drive bay power cable ...
Страница 131: ...Cabling 131 Secondary PCI riser cage ...


