
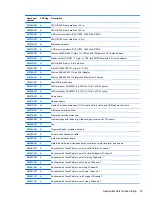

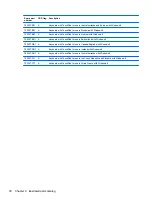
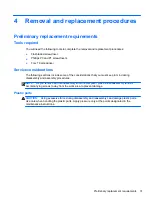


Before removing the WLAN module, follow these steps:
1.
Shut down the computer. If you are unsure whether the computer is off or in Hibernation, turn
the computer on, and then shut it down through the operating system.
2.
Disconnect all external devices connected to the computer.
3.
Disconnect the power from the computer by first unplugging the power cord from the AC outlet,
and then unplugging the AC adapter from the computer.
4.
5.
).
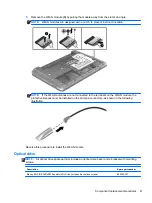
Remove the WLAN module:
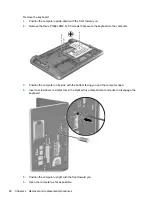
1.
Position the computer upside-down with the battery bay away from you.
2.
Locate and remove the mylar protector glued to the base enclosure (see bottom parts
location
Bottom parts location on page 39
) to access the WLAN card.
3.
Disconnect the WLAN antenna cables
(1)
from the terminals on the WLAN module.
NOTE:
The WLAN antenna cable labeled “1” connects to the WLAN module “Main” terminal
labeled “1”. The WLAN antenna cable labeled “2” connects to the WLAN module “Aux” terminal
labeled “2”. If the computer is equipped with an 802.11a/b/g/n WLAN module, the yellow WLAN
antenna cable connects to the middle terminal on the WLAN module.
4.
Remove the two Phillips PM2.0×3.0 screws
(2)
that secure the WLAN module to the computer.
(The edge of the module opposite the slot rises away from the computer.)
40
Chapter 4 Removal and replacement procedures
Содержание ProBook 4545s
Страница 1: ...HP ProBook 4545s Notebook PC Maintenance and Service Guide ...
Страница 4: ...iv Safety warning notice ...
Страница 16: ...Buttons speakers and fingerprint reader select models only 8 Chapter 2 External Component Identification ...
Страница 91: ...Reverse the process to install the display hinges Component replacement procedures 83 ...