background image

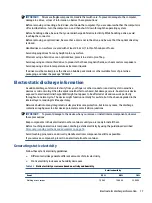
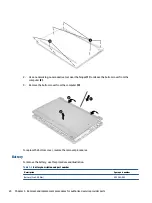
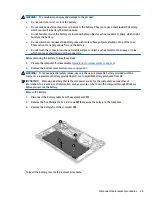
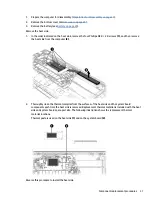
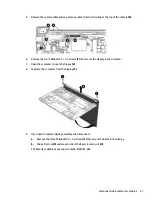
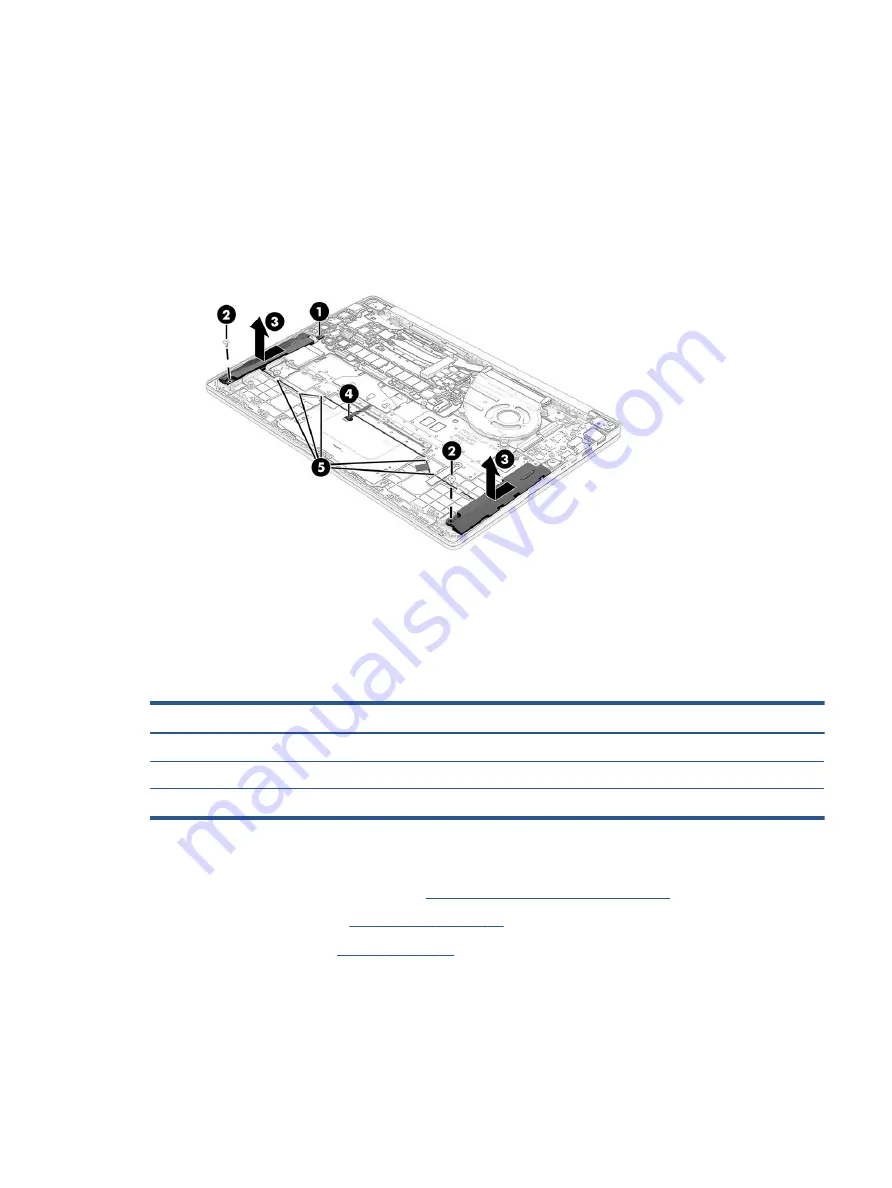
Remove the speakers:

1.

Disconnect the speaker cable from the system board (1).

2.

Remove the Phillips M2.0 × 5.0 screw (2) that secures each speaker to the computer.

3.

Lift the bottom of the speakers up, and then pull the speaker toward the front to remove the tab on top 
of the speaker from the slot that holds it in place (3).

4.

Disconnect the cable from the ZIF connector on the touchpad (4).

5.

Remove the cable from the clips located between the speakers under the battery (5).

Reverse this procedure to install the speakers.

Touchpad

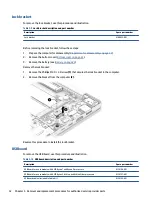
To remove the touchpad, use this procedure and illustration.

Table 5-5

  Touchpad description and part number

Description

Spare part number

Touchpad (includes rubber and protective tape)

M41141-001

Touchpad cable (included in Cable Kit)

M34155-001

Touchpad support bracket (included in Bracket Kit)

M12524-001

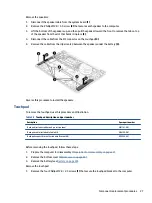
Before removing the touchpad, follow these steps:

1.

Prepare the computer for disassembly (

Preparation for disassembly on page 23

).

2.

Remove the bottom cover (

Bottom cover on page 23

).

3.

Remove the battery (see 

Battery on page 24

).

Remove the touchpad:

1.

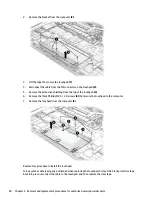
Remove the four Phillips M2.0 × 2.5 screws (1) that secure the touchpad bracket to the computer.

Component replacement procedures

27

Содержание Pro c645 Chromebook

Страница 1: ...Maintenance and Service Guide SUMMARY This guide provides information about spare parts removal and replacement of parts security backing up and more ...

Страница 2: ...products and services are set forth in the express warranty statements accompanying such products and services Nothing herein should be construed as constituting an additional warranty HP shall not be liable for technical or editorial errors or omissions contained herein First Edition December 2020 Document Part Number M40787 001 Product notice This guide describes features that are common to most...

Страница 3: ...ct the computer air vents Use the computer only on a hard flat surface Do not allow another hard surface such as an adjoining optional printer or a soft surface such as pillows or rugs or clothing to block airflow Also do not allow the AC adapter to come into contact with the skin or a soft surface such as pillows or rugs or clothing during operation The computer and the AC adapter comply with the...

Страница 4: ...iv Safety warning notice ...

Страница 5: ...6 Service considerations 16 Plastic parts 16 Cables and connectors 16 Drive handling 16 Electrostatic discharge information 17 Generating static electricity 17 Preventing electrostatic damage to equipment 18 Personal grounding methods and equipment 18 Grounding the work area 19 Recommended materials and equipment 19 Cleaning your computer 20 Enabling HP Easy Clean select products only 20 Removing ...

Страница 6: ...ng and recovering 45 Backing up 45 Resetting 45 Recovering 45 Installing the Chromebook Recovery Utility 46 Creating recovery media 46 Recovering the Chrome operating system 46 Setting up your computer after a reset or recovery 47 Erasing and reformatting the recovery media 47 7 Specifications 48 Computer specifications 48 35 6 cm 14 0 in display specifications 48 8 Statement of memory volatility ...

Страница 7: ...Requirements for specific countries and regions 56 10 Recycling 58 Index 59 vii ...

Страница 8: ...viii ...

Страница 9: ...r 3050C with Radeon Vega Graphics 2 3 GHz up to 3 2 GHz 2 cores 5 MB cache 15 W Graphics Internal graphics Radeon Vega 10 Graphics Ryzen 7 processor Radeon Vega 8 Graphics Ryzen 5 processor Radeon Vega 3 Graphics Ryzen 3 Athlon processor Radeon Vega Graphics Athlon Silver processor Display 35 6 cm 14 0 in WLED antiglare eDP narrow bezel nontouch Full high definition FHD 1920 1080 UWVA 250 nits Hig...

Страница 10: ...USB Type C Audio out headphone audio in microphone combo jack 2 USB 3 2 Gen 2 Type C right and left side support charging power delivery video and data 2 USB 3 1 Gen 1 Type A right and left side Keyboard pointing devices Keyboard Textured island style with fingerprint sensor Textured island style without fingerprint sensor Island style 3 coat paint backlit fingerprint sensor Island style 3 coat pa...

Страница 11: ...Table 1 1 Product components and their descriptions continued Category Description Serviceability End user replaceable parts AC adapter 3 ...

Страница 12: ... Press in on the card and then remove it from the memory card reader 2 Audio out headphone Audio in microphone combo jack Connects optional powered stereo speakers headphones earbuds a headset or a television audio cable Also connects an optional headset microphone This jack does not support optional standalone microphones WARNING To reduce the risk of personal injury adjust the volume before putt...

Страница 13: ...e a standard USB Type A charging cable or cable adapter purchased separately when charging a small external device Left Use the illustration and table to identify the components on the left side of the computer Table 2 2 Left side components and their descriptions Component Description 1 USB SuperSpeed port Connects a USB device provides high speed data transfer and for select products charges sma...

Страница 14: ...e battery is fully charged Amber The AC adapter is connected and the battery is charging Blinking white The battery has an error Off The battery is not charging 5 Security cable slot Attaches an optional security cable to the computer NOTE The security cable is designed to act as a deterrent but it might not prevent the computer from being mishandled or stolen Display Use the illustration and tabl...

Страница 15: ... cover to block the camera s view To use the camera slide the camera privacy cover in the opposite direction to reveal the lens NOTE If you have both front facing and rear facing cameras when one camera lens is revealed and ready to use the other is concealed The antennas are not visible from the outside of the computer For optimal transmission keep the areas immediately around the antennas free f...

Страница 16: ...and fingerprint reader and their descriptions Component Description 1 Speakers Produce sound 2 Power key When the computer is off press the key briefly to turn on the computer When the computer is on press and hold the power key for at least 3 seconds to turn off the computer IMPORTANT Pressing and holding down the power key results in the loss of unsaved information If the computer has stopped re...

Страница 17: ...he fingerprint reader Special keys Use the illustration and table to locate the special keys The search button is located on the left side of the keyboard Table 2 6 Special keys and their descriptions Component Description 1 esc key Activates certain computer functions when pressed in combination with other keys such as tab or shift 2 Search key Opens a search box 3 Action keys Execute frequently ...

Страница 18: ...vice label will resemble one of the following examples Refer to the illustration that most closely matches the service label on your computer Table 2 7 Service label components Component 1 HP product name 2 Model number 3 Warranty period 4 Product ID 5 Serial number Table 2 8 Service label components Component 1 HP product name 2 Product ID 3 Serial number 4 Warranty period Regulatory labels Provi...

Страница 19: ...TE HP continually improves and changes product parts For complete and current information about supported parts for your computer go to http partsurfer hp com select your country or region and then follow the on screen instructions NOTE Details about your computer including model serial number product key and length of warranty are on the service tag at the bottom of your computer Computer major c...

Страница 20: ...C processor 16 GB of system memory no eMMC memory models with a fingerprint sensor M31746 001 AMD Ryzen 5 3500C processor 8 GB of system memory no eMMC memory models with a fingerprint sensor M31747 001 AMD Ryzen 3 3250C 8 GB of system memory and 64 GB of eMMC memory models with a fingerprint sensor M31749 001 AMD Ryzen 3 3250C 8 GB of system memory no eMMC memory models with a fingerprint sensor ...

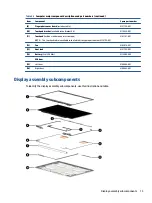
Страница 21: ...1 Touchpad includes rubber and protective tape NOTE The touchpad cable is available in the Cable Kit as spare part number M34155 001 M41141 001 12 Fan M02014 001 13 Heat sink M31753 001 14 Battery 3 cell 58 Whr M12585 005 USB door 15 Left door M00444 001 16 Right door M00445 001 Display assembly subcomponents To identify the display assembly subcomponents use this illustration and table Display as...

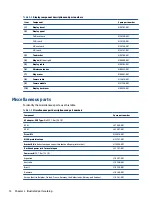
Страница 22: ...1 Miscellaneous parts To identify the miscellaneous parts use this table Table 3 3 Miscellaneous part descriptions and part numbers Component Spare part number AC adapter USB Type C nPFC 1 8 m 5 9 ft 65 W L67440 001 45 W L43407 001 Screw Kit M35074 001 WLAN protective tape M31757 001 Bracket Kit includes touchpad support bracket and fingerprint bracket M12524 001 Duck head power cord for use in Ja...

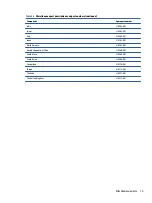
Страница 23: ...er India L19363 001 Israel L19362 001 Italy L19364 001 Japan L19365 001 North America L19367 001 People s Republic of China L19368 001 South Africa L19369 001 South Korea L19366 001 Switzerland L19370 001 Taiwan L19372 001 Thailand L19371 001 The United Kingdom L19373 001 Miscellaneous parts 15 ...

Страница 24: ...rts Using excessive force during disassembly and reassembly can damage plastic parts Cables and connectors Handle cables with extreme care to avoid damage IMPORTANT When servicing the computer be sure that cables are placed in their proper locations during the reassembly process Improper cable placement can damage the computer Apply only the tension required to unseat or seat the cables during rem...

Страница 25: ...troy static sensitive devices or microcircuitry Often the spark is neither felt nor heard but damage occurs An electronic device exposed to electrostatic discharge ESD might not appear to be affected at all and can work perfectly throughout a normal cycle The device might function normally for a while but it has been degraded in the internal layers reducing its life expectancy Networks built into ...

Страница 26: ...nductive or approved containers or packaging Keep electrostatic sensitive parts in their containers until they arrive at static free stations Place items on a grounded surface before removing them from their container Always be properly grounded when touching a sensitive component or assembly Avoid contact with pins leads or circuitry Place reusable electrostatic sensitive parts from assemblies in...

Страница 27: ...c safe materials when fixtures must directly contact dissipative surfaces Keep the work area free of nonconductive materials such as ordinary plastic assembly aids and polystyrene foam Use conductive field service tools such as cutters screwdrivers and vacuums Avoid contact with pins leads or circuitry Recommended materials and equipment HP recommends certain materials and equipment to prevent sta...

Страница 28: ...21 for guidelines to help prevent the spread of harmful bacteria and viruses Removing dirt and debris from your computer Here are the recommended steps to clean dirt and debris from your computer For computers with wood veneer see Caring for wood veneer select products only on page 22 1 Wear disposable gloves made of latex or nitrile gloves if you are latex sensitive when cleaning the surfaces 2 T...

Страница 29: ...ive when cleaning the surfaces 2 Turn off your device and unplug the power cord and other connected external devices Remove any installed batteries from items such as wireless keyboards CAUTION To prevent electric shock or damage to components never clean a product while it is turned on or plugged in 3 Moisten a microfiber cloth with a mixture of 70 isopropyl alcohol and 30 water The cloth should ...

Страница 30: ...rt and debris you can also clean the surfaces with a disinfectant See Cleaning your computer with a disinfectant on page 21 for sanitizing guidelines to help prevent the spread of harmful bacteria and viruses Packaging and transporting guidelines Follow these grounding guidelines when packaging and transporting equipment To avoid hand contact transport products in static safe tubes bags or boxes P...

Страница 31: ...he parts described in this chapter Make special note of each screw size and location during removal and replacement Preparation for disassembly To remove and replace computer components use these procedures See Removal and replacement procedures preliminary requirements on page 16 for initial safety procedures 1 Turn off the computer If you are unsure whether the computer is off or in Hibernation ...

Страница 32: ... the computer 3 To replace the bottom cover reverse the removal procedures Battery To remove the battery use this procedure and illustration Table 5 2 Battery description and part number Description Spare part number Battery 3 cell 58 Whr M12585 005 24 Chapter 5 Removal and replacement procedures for authorized service provider parts ...

Страница 33: ...efore removing the battery follow these steps 1 Prepare the computer for disassembly Preparation for disassembly on page 23 2 Remove the bottom cover Bottom cover on page 23 WARNING To reduce potential safety issues use only the user replaceable battery provided with the computer a replacement battery provided by HP or a compatible battery purchased from HP IMPORTANT Removing a battery that is the...

Страница 34: ...ecures the drive to the computer 2 Pull the drive away from the socket to remove it 2 To install the solid state drive reverse the removal procedures NOTE Solid state drives are designed with a notch to prevent incorrect insertion Speakers To remove the speakers use this procedure and illustration Table 5 4 Speaker description and part number Description Spare part number Speaker Kit M00436 001 Be...

Страница 35: ...ll the speakers Touchpad To remove the touchpad use this procedure and illustration Table 5 5 Touchpad description and part number Description Spare part number Touchpad includes rubber and protective tape M41141 001 Touchpad cable included in Cable Kit M34155 001 Touchpad support bracket included in Bracket Kit M12524 001 Before removing the touchpad follow these steps 1 Prepare the computer for ...

Страница 36: ...Phillips M2 0 2 0 screws 4 that secure the touchpad to the computer 7 Remove the touchpad from the computer 5 Reverse this procedure to install the touchpad To be sure the cable is properly positioned when replacing the touchpad first put the black protective tape back into place reconnect the cable to the touchpad and then replace the clear tape 28 Chapter 5 Removal and replacement procedures for...

Страница 37: ...ottom cover Bottom cover on page 23 3 Remove the battery see Battery on page 24 Remove the fingerprint sensor board 1 Remove the Phillips M2 0 2 0 screw 1 that secures the fingerprint sensor bracket 2 Lift the bottom of the bracket up and then pull bracket toward front and out from under lip at the top of the bracket 2 3 Disconnect the cable from the ZIF connector on the system board 3 and then pe...

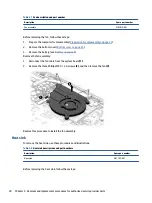
Страница 38: ...24 Remove the fan assembly 1 Disconnect the fan cable from the system board 1 2 Remove the three Phillips M2 0 3 0 screws 2 and then remove the fan 3 Reverse this procedure to install the fan assembly Heat sink To remove the heat sink use these procedures and illustrations Table 5 8 Heat sink descriptions and part numbers Description Spare part number Heat sink M31753 001 Before removing the heat ...

Страница 39: ...the heat sink from the computer 2 2 Thoroughly clean the thermal material from the surfaces of the heat sink and the system board components each time the heat sink is removed Replacement thermal material is included with the heat sink and system board spare part kits The following illustration shows the replacement thermal material locations Thermal paste is used on the heat sink 1 and on the sys...

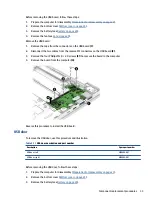
Страница 40: ... Remove the Phillips M2 0 3 0 screw 1 that secures the lock bracket to the computer 2 Remove the bracket from the computer 2 Reverse this procedure to install the lock bracket USB board To remove the USB board use this procedure and illustration Table 5 10 USB board description and part number Description Spare part number USB board for use in models with AMD Ryzen 7 and Ryzen 5 processors M34156 ...

Страница 41: ...emove the four Phillips M2 0 2 0 screws 3 that secure the board to the computer 4 Remove the board from the computer 4 Reverse this procedure to install the USB board USB door To remove the USB door use this procedure and illustration Table 5 11 USB door description and part number Description Spare part number USB door left M00444 001 USB door right M00445 001 Before removing the USB door follow ...

Страница 42: ...nsor M31748 001 AMD Ryzen 5 3500C processor 16 GB of system memory and 64 GB of eMMC memory models with a fingerprint sensor M31751 001 AMD Ryzen 5 3500C processor 8 GB of system memory and 64 GB of eMMC memory models with a fingerprint sensor M31750 001 AMD Ryzen 5 3500C processor 16 GB of system memory no eMMC memory models with a fingerprint sensor M31746 001 AMD Ryzen 5 3500C processor 8 GB of...

Страница 43: ...on for disassembly on page 23 2 Remove the bottom cover Bottom cover on page 23 3 Remove the battery see Battery on page 24 4 Remove the fan see Fan on page 29 Remove the system board 1 Disconnect the following cables from the system board Antenna cables from integrated WLAN module 1 Camera cable 2 Display cable 3 USB board cables ZIF from USB board 4 Keyboard backlight cable ZIF 5 select products...

Страница 44: ...mbly Preparation for disassembly on page 23 2 Remove the bottom cover Bottom cover on page 23 3 Remove the battery see Battery on page 24 4 Remove the heat sink see Heat sink on page 30 Remove the display assembly 1 Remove the plastic that covers the integrated WLAN module 1 and then disconnect the antennas from the module 2 2 Disconnect the camera cable 3 3 Disconnect the display cable 4 4 Remove...

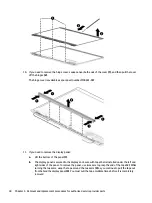
Страница 45: ... 7 Open the computer to open the hinges 2 8 Separate the computer from the display 3 9 If you need to replace display assembly subcomponents a Remove the three Phillips M2 0 3 0 screws 1 that secure the bezel to the display b Slide a flat tool 2 under each side of the bezel to remove it 3 The bezel is available as spare part number M00701 001 Component replacement procedures 37 ...

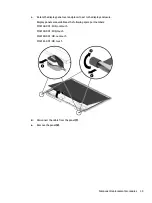
Страница 46: ...lay panel is secured to the display enclosure with tape that is installed under the left and right sides of the panel To remove the panel use tweezers to grasp the end of the tape 2 While turning the tweezers wrap the tape around the tweezers 3 as you continue to pull the tape out from behind the display panel 4 You must pull the tape multiple times before it is completely removed 38 Chapter 5 Rem...

Страница 47: ...lay enclosure Display panels are available as the following spare part numbers M34158 001 FHD nontouch M34159 001 FHD touch M34160 001 HD nontouch M34161 001 HD touch d Disconnect the cable from the panel 1 e Remove the panel 2 Component replacement procedures 39 ...

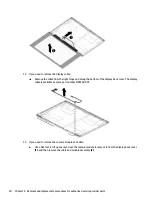
Страница 48: ...cable is available as spare part number M00702 001 13 If you need to remove the camera module and cable a Use a flat tool to lift up evenly across the camera module to remove it from the display back cover 1 and then remove the cable and module assembly 2 40 Chapter 5 Removal and replacement procedures for authorized service provider parts ...

Страница 49: ...rt number M31758 001 The camera cable is available as spare part number M12614 001 14 If you need to remove the hinges from the display a Remove the two Phillips broadhead M2 5 2 5 screws 1 from each hinge b Remove the hinges from the display 2 The display hinges are available as spare part number M00440 001 Component replacement procedures 41 ...

Страница 50: ...isplay a Remove the four Phillips broadhead M2 0 2 5 screws 1 from the bracket b Remove the bracket from the display 2 The bracket is available as spare part number M00700 001 42 Chapter 5 Removal and replacement procedures for authorized service provider parts ...

Страница 51: ...he second table provides the country codes Table 5 13 Keyboard with top cover descriptions and part numbers Description Spare part number Keyboard with top cover backlit with fingerprint sensor M31759 xx1 Keyboard with top cover backlit without fingerprint sensor M31760 xx1 Keyboard with top cover not backlit without fingerprint sensor M31761 xx1 Keyboard with top cover not backlit with fingerprin...

Страница 52: ...ch Republic Slovakia FL1 Japan 291 Taiwan AB1 Denmark Finland and Norway DH1 The Netherlands B31 Thailand 281 French Canada DB1 Northern Africa FP1 Turkey 141 France 051 Portugal 131 Ukraine BD1 Germany 041 Romania 271 United Kingdom 031 Greece 151 Russia 251 United States 001 Hungary 211 Saudi Arabia 171 44 Chapter 5 Removal and replacement procedures for authorized service provider parts ...

Страница 53: ...ttings You restarted your computer and it still doesn t work properly You want to change the owner of your computer To reset your computer 1 Under the Settings menu select Advanced 2 In the Powerwash section select Powerwash 3 Select Restart 4 In the window that appears select Powerwash and then select Continue 5 Follow the on screen instructions to reset your computer and sign in with your Google...

Страница 54: ...eb Store search for chrome recovery select Chromebook Recovery Utility from the Apps list and follow the on screen instructions Creating recovery media You can use recovery media to recover the original operating system and software programs that were installed at the factory To create recovery media 1 Turn on a computer that has internet access NOTE You must have administrative rights to the comp...

Страница 55: ...pport google com Erasing and reformatting the recovery media When you create recovery media the USB flash drive or SD memory card is formatted as a recovery tool After recovery you must erase the recovery media to reuse your storage device Follow these steps to use the Chromebook Recovery Utility to erase the recovery media 1 Select the Launcher icon and then select All Apps 2 In the apps window s...

Страница 56: ... kg 3 4 lb Input power Operating voltage and current 19 5 V dc 3 33 A 65 W 19 5 V dc 2 31 A 45 W Temperature Operating 5 C to 35 C 41 F to 95 F Nonoperating 20 C to 60 C 4 F to 140 F Relative humidity noncondensing Operating 10 to 90 Nonoperating 5 to 95 Maximum altitude unpressurized Operating 15 m to 3 048 m 50 ft to 10 000 ft Nonoperating 15 m to 12 192 m 50 ft to 40 000 ft NOTE Applicable prod...

Страница 57: ...tive diagonal size 35 6 cm 14 0 in Resolution 1920 1080 FHD 1368 766 HD Surface treatment Antiglare Brightness 250 nits Viewing angle UWVA FHD panels SVA HD panels Backlight WLED Display panel interface eDP 35 6 cm 14 0 in display specifications 49 ...

Страница 58: ...steps in this chapter Current BIOS steps Use these instructions to restore nonvolatile memory 1 Follow these steps to restore the nonvolatile memory that can contain personal data Restoring or reprogramming nonvolatile memory that does not store personal data is neither necessary nor recommended a Turn on or restart the computer and then quickly press esc NOTE If the system has a BIOS administrato...

Страница 59: ...t least 24 hours 2 Complete one of the following Remove and retain the storage drive or Clear the drive contents by using a third party utility designed to erase data from an SSD or Clear the contents of the drive by using the following BIOS Setup Secure Erase command option steps If you clear data using Secure Erase you cannot recover it a Turn on or restart the computer and then quickly press es...

Страница 60: ... changing the Windows date time This memory is not write protected Controller NIC EEPROM 64 KB not customer accessible No Yes Stores NIC configuration and NIC firmware NIC EEPROM is programmed using a utility from the NIC vendor that can be run from DOS A utility must be used to write data to this memory and is available from the NIC vendor Writing data to this ROM in an inappropriate manner will ...

Страница 61: ...for updating the firmware Only firmware updates digitally signed by Intel can be applied using this utility Bluetooth flash select products only 2 megabits No Yes Stores Bluetooth configuration and firmware Bluetooth flash is programmed at the factory Tools for writing data to this memory are not publicly available but can be obtained from the silicon vendor A utility must be used for writing data...

Страница 62: ...diagnostics The UEFI BIOS provides functionality beyond that of the legacy BIOS In addition the UEFI BIOS works to initialize the computer s hardware before loading and executing the OS the runtime environment allows the loading and execution of software programs from storage devices to provide more functionality such as advanced hardware diagnostics with the ability to display more detailed syste...

Страница 63: ...ear or delete all Secure Boot Keys a Turn on or restart the computer and then quickly press esc b Select the Security menu select Secure Boot Configuration and then follow the on screen instructions c At the Secure Boot Configuration window select Secure Boot select Clear Secure Boot Keys and then follow the on screen instructions to continue Using HP Sure Start select products only Select compute...

Страница 64: ...t be approved by an acceptable accredited agency responsible for evaluation in the country or region where the power cord set will be used The power cord sets must have a minimum current capacity of 10 A and a nominal voltage rating of 125 V ac or 250 V ac as required by the power system of each country or region The appliance coupler must meet the mechanical configuration of an EN 60 320 IEC 320 ...

Страница 65: ...le cord and wall plug must bear a T mark and registration number in accordance with the Japanese Dentori Law The flexible cord must be Type VCTF three conductor 0 75 mm or 1 25 mm conductor size The wall plug must be a two pole grounding type with a Japanese Industrial Standard C8303 7 A 125 V ac configuration 4 The flexible cord must be Type RVV three conductor 0 75 mm conductor size Power cord s...

Страница 66: ...in general household waste Follow the local laws and regulations in your area for battery disposal HP encourages customers to recycle used electronic hardware HP original print cartridges and rechargeable batteries For more information about recycling programs see the HP website at http www hp com recycle 58 Chapter 10 Recycling ...

Страница 67: ...ver illustrated 13 spare part number 13 display bezel illustrated 13 spare part number 13 display cable illustrated 13 spare part number 13 display panel illustrated 13 spare part number 13 E electrostatic discharge ESD 16 17 preventing damage 16 17 18 esc key identifying 9 F fan illustrated 11 removal 29 spare part number 11 29 fingerprint reader identifying 8 fingerprint sensor board removal 29 ...

Страница 68: ...ty cable slot identifying 6 serial number computer 9 service labels locating 9 slots security cable 6 solid state drive removal and replacement 26 spare part country codes 43 speaker illustrated 11 removal 26 spare part number 11 spare part numbers 26 speakers identifying 8 specifications computer 48 display 48 hard drive 48 static electricity 16 17 system board illustrated 11 removal 34 spare par...

Отзывы: