System support brackets
NOTE:
The system support brackets are not spared.
IMPORTANT:
Make special note of each screw and screw lock size and location during removal
and replacement
Before removing the system support brackets, follow these steps:
1.
Shut down the computer.
2.
Disconnect all external devices connected to the computer.
3.
Disconnect the power from the computer by first unplugging the power cord from the AC outlet and then
unplugging the AC adapter from the computer.
4.
Remove the battery (see
), and then remove the following components:
▲
Hinge covers (see
).
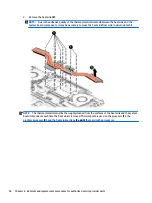
Remove the system support brackets:
1.
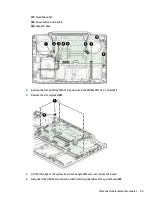
Disconnect the power connector cable from the system board (1).
2.
Remove the power connector cable from the routing path and clips (2).
NOTE:
The power connector cable is routed through the left side system support bracket.
3.
Remove the seven Phillips PM2.0×5.7 and two Phillips PM2.4×7.2 screws (3) that secure the brackets to
the computer.
46
Chapter 6 Removal and replacement procedures for authorized service provider parts
Содержание OMEN 15-ce100
Страница 1: ...OMEN by HP 15 Notebook PC Maintenance and Service Guide ...
Страница 4: ...iv Important Notice about Customer Self Repair Parts ...
Страница 6: ...vi Safety warning notice ...
Страница 10: ...x ...
Страница 65: ...Reverse this procedure to install the heat sink Component replacement procedures 55 ...


