ENWW
Printing jobs 59
5
If the job is a multi-sheet job, make sure that the image placement is the same for all
the job sheets.
6
Check for color values. Compare a previous print or a proof, if available. To increase
and decrease color values, access Color Match tab or Job LUT in the
Job Properties
window.
7
Check image integrity, full ink coverage, right sheet sequence, and same image
placement for all jobs.
8
If changes other than Job Properties are required (for example, wrong image, typos,
and so on), notify the supervisor or customer.
9
Print a second proof and evaluate it.
10
If there is a time delay between proof approval by the customer and the actual full run,
print one proof immediately before the beginning of the full run print to make certain it
matches the approved proof.
Stage 3: Printing the full run
1
If the control panel print mode selector is set on Continuous, the job is unloaded at the
end of the print run and the next job in the Print Queue starts the print process. If the
control panel print mode selector is set on Step, the next job in the Print Queue is
moved to the top of the Print Queue and appears in the currently printed job field. The
machine state changes to Ready.
2
Make certain the required substrate type for the subsequent job is loaded on the
press.
3
Print a proof.
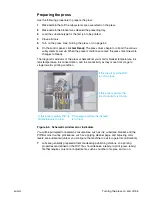
Figure 6-10. Cross-run registration
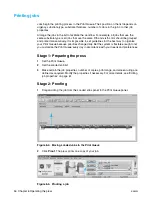
Figure 6-11. Print mode selector
Distance from leading
edge to image is
equal throughout the
run
Distance from left
margin to image is
equal throughout
the run
Содержание Indigo press 3050
Страница 1: ...HP Indigo press 3050 User guide English version ...
Страница 2: ...hp indigo press 3050 user guide ...
Страница 13: ...12 Chapter 1 Preface ENWW ...
Страница 23: ...22 Chapter 2 Getting started ENWW ...
Страница 41: ...40 Chapter 4 HP Indigo press 3050 basics ENWW Figure 4 5 Related topics ...
Страница 53: ...52 Chapter 5 The main windows ENWW ...
Страница 83: ...82 Chapter 6 Operating the press ENWW ...
Страница 91: ...90 Chapter 7 Operator routines ENWW Figure 7 7 Inner front wall O O O O ...
Страница 99: ...98 Chapter 7 Operator routines ENWW ...
Страница 131: ...130 Chapter 9 Blanket ENWW 6 Click Next Figure 9 22 First transfer Wizard define the correct pressure here Rear Front ...
Страница 136: ...ENWW 135 10PIP This chapter contains the following sections z Overview z Replacing the PIP ...
Страница 189: ...188 Chapter 11 Paper transport ENWW ...
Страница 190: ...ENWW 189 12Impression drum This chapter contains the following sections z Overview z Replacing the impression paper ...
Страница 212: ...ENWW 211 15Scorotron This chapter contains the following sections z Overview z Scorotron maintenance procedures ...
Страница 219: ...218 Chapter 15 Scorotron ENWW ...
Страница 254: ...ENWW 253 17Pre transfer erase PTE This chapter contains the following sections z Overview z Cleaning the PTE cover ...
Страница 257: ...256 Chapter 17 Pre transfer erase PTE ENWW ...
Страница 271: ...270 Chapter 19 Chiller ENWW ...
Страница 272: ...ENWW 271 20Long term shutdown This chapter contains the following section z Long term shutdown ...
Страница 287: ...286 Appendix B Service and support ENWW ...


