ENWW
Adjusting the BID engage and disengage angle 237
Correcting an inkless spot on the leading edge
Use the BID engage calibration to change an inkless spot in the 25 mm (1 inch) strip at
the leading edge.
Note
Make sure that the spot appears in the specified area. If there is more than one spot, adjusting
the BID engage angle will not solve the problem.
Use the following procedure to correct an inkless spot on the leading edge:
1
On the
Adjustments
menu, click
BID Engage
. The BID Engage Calibration wizard
opens.
2
Select the
Leading Edge
check box.
3
Click
. Two copies of the leading edge test job are printed. Select the first copy.
4
Identify the missing color.
5
Analyze the print and note the value of the shorter bar of the missing color. Add 3 to
the read value.
6
In the
Analyze
window, enter the sum value in the appropriate color field.
7
Click
. Two copies of the BID engage calibration verification are printed.
8
Click
Finish
.
9
Print the CATP job and inspect it. If the inkless spot has not disappeared, repeat steps
1 through 4.
10
In the
Analyze
window, increase the value in the appropriate text box by 6.
11
Click
to print the verification BID engage calibration job. Click
Finish
.
12
Print the CATP job and inspect the print. Add 10 to the color bar value and repeat the
procedure.
13
If the problem is not resolved, contact your customer engineer.
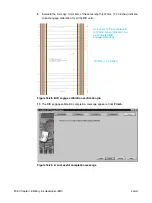
Figure 16-30. An inkless spot at the leading edge
10 mm (0.39 inch)
Leading edge
Trailing edge
25 mm (1 inch)
Remove an
inkless spot in this
area
Содержание Indigo press 3050
Страница 1: ...HP Indigo press 3050 User guide English version ...
Страница 2: ...hp indigo press 3050 user guide ...
Страница 13: ...12 Chapter 1 Preface ENWW ...
Страница 23: ...22 Chapter 2 Getting started ENWW ...
Страница 41: ...40 Chapter 4 HP Indigo press 3050 basics ENWW Figure 4 5 Related topics ...
Страница 53: ...52 Chapter 5 The main windows ENWW ...
Страница 83: ...82 Chapter 6 Operating the press ENWW ...
Страница 91: ...90 Chapter 7 Operator routines ENWW Figure 7 7 Inner front wall O O O O ...
Страница 99: ...98 Chapter 7 Operator routines ENWW ...
Страница 131: ...130 Chapter 9 Blanket ENWW 6 Click Next Figure 9 22 First transfer Wizard define the correct pressure here Rear Front ...
Страница 136: ...ENWW 135 10PIP This chapter contains the following sections z Overview z Replacing the PIP ...
Страница 189: ...188 Chapter 11 Paper transport ENWW ...
Страница 190: ...ENWW 189 12Impression drum This chapter contains the following sections z Overview z Replacing the impression paper ...
Страница 212: ...ENWW 211 15Scorotron This chapter contains the following sections z Overview z Scorotron maintenance procedures ...
Страница 219: ...218 Chapter 15 Scorotron ENWW ...
Страница 254: ...ENWW 253 17Pre transfer erase PTE This chapter contains the following sections z Overview z Cleaning the PTE cover ...
Страница 257: ...256 Chapter 17 Pre transfer erase PTE ENWW ...
Страница 271: ...270 Chapter 19 Chiller ENWW ...
Страница 272: ...ENWW 271 20Long term shutdown This chapter contains the following section z Long term shutdown ...
Страница 287: ...286 Appendix B Service and support ENWW ...


