


ENWW
Reusing the BID unit 229
2
Remove the new BID from the box and container (Figure 16-17). Do not throw the
container or box away. They will be used to return an old BID.
3
Open the sealed bag containing the new BID.
4
Install the new BID in the press.
5
Insert the old BID in the specially provided bag. Seal the bag.
6
Insert the bag in the container.
Note
Attach a printed sample if available, showing the problem.
7
Fill the BID Return Feedback Form and attach it with the BID.
8
Insert the container in the box.
9
Return the box to HP Indigo using the Return Materials Application (RMA) procedure.
Reusing the BID unit
Store the BID unit for future use when you replace an ink.
Storing the BID unit
1
Perform the BID removal procedure. See ‘Removing the BID unit’ on page 222.
2
Place the BID unit on the BID stand and use a 3-mm Allen key to rotate the developer
roller clockwise, as viewed from the front of the BID unit.
3
If a BID washer is available, use it to clean the BID. If not, use a lint-free wipe soaked
in imaging oil to wipe the surface of the developer roller and the squeegee roller. Keep
rotating the rollers until the surfaces of both the rollers are clean.
4
Wrap the BID unit in a sealed plastic bag.
5
Place the unit on a BID stand (or on the specially designed BID holder provided with
new BID units).
Reinstalling a BID unit
1
Remove the BID unit from the sealed plastic bag.
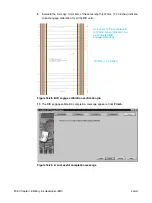
Figure 16-18. Cleaning the developer roller
Developer roller
Squeegee roller
Insert an Allen key here and
turn clockwise
Содержание Indigo press 3050
Страница 1: ...HP Indigo press 3050 User guide English version ...
Страница 2: ...hp indigo press 3050 user guide ...
Страница 13: ...12 Chapter 1 Preface ENWW ...
Страница 23: ...22 Chapter 2 Getting started ENWW ...
Страница 41: ...40 Chapter 4 HP Indigo press 3050 basics ENWW Figure 4 5 Related topics ...
Страница 53: ...52 Chapter 5 The main windows ENWW ...
Страница 83: ...82 Chapter 6 Operating the press ENWW ...
Страница 91: ...90 Chapter 7 Operator routines ENWW Figure 7 7 Inner front wall O O O O ...
Страница 99: ...98 Chapter 7 Operator routines ENWW ...
Страница 131: ...130 Chapter 9 Blanket ENWW 6 Click Next Figure 9 22 First transfer Wizard define the correct pressure here Rear Front ...
Страница 136: ...ENWW 135 10PIP This chapter contains the following sections z Overview z Replacing the PIP ...
Страница 189: ...188 Chapter 11 Paper transport ENWW ...
Страница 190: ...ENWW 189 12Impression drum This chapter contains the following sections z Overview z Replacing the impression paper ...
Страница 212: ...ENWW 211 15Scorotron This chapter contains the following sections z Overview z Scorotron maintenance procedures ...
Страница 219: ...218 Chapter 15 Scorotron ENWW ...
Страница 254: ...ENWW 253 17Pre transfer erase PTE This chapter contains the following sections z Overview z Cleaning the PTE cover ...
Страница 257: ...256 Chapter 17 Pre transfer erase PTE ENWW ...
Страница 271: ...270 Chapter 19 Chiller ENWW ...
Страница 272: ...ENWW 271 20Long term shutdown This chapter contains the following section z Long term shutdown ...
Страница 287: ...286 Appendix B Service and support ENWW ...