339
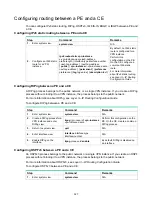
Step Command
Remarks
3.
Associate the loopback
interface with a VPN
instance.
ip binding vpn-instance
vpn-instance-name
By default, the interface is
associated with no VPN
instance.
4.
Configure an IPv6 address
for the loopback interface.
For configuration details, see
Layer
3—IP Services Configuration Guide
.
By default, no IPv6 address is
configured for the loopback
interface.
Redistributing the loopback interface address
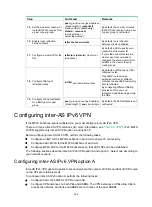
Step Command
Remarks
1.
Enter system view.
system-view
N/A
2.
Enter BGP instance view.
bgp
as-number
[
instance
instance-name
]
N/A
3.
Enter BGP-VPN instance
view.
ip vpn-instance
vpn-instance-name
N/A
4.
Enter BGP-VPN IPv6
unicast address family
view.
address-family ipv6
[
unicast
] N/A
5.
Redistribute direct routes
into BGP (including the
loopback interface
address).
import-route direct
By default, no direct routes are
redistributed into BGP.
Creating a sham link
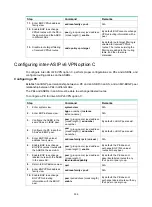
Step Command
Remarks
1.
Enter system view.
system-view
N/A
2.
Enter OSPFv3 view.
ospfv3
[
process-id
|
vpn-instance
vpn-instance-name
] *
N/A
3.
Enter OSPFv3 area view.
area
area-id
N/A
4.
Configure an OSPFv3
sham link.
sham-link
source-ipv6-address
destination-ipv6-address
[
cost
cost-value
|
dead
dead-interval
|
hello
hello-interval
|
instance
instance-id
|
ipsec-profile
profile-name
|
retransmit
retrans-interval
|
trans-delay
delay
] *
By default, no sham links exist.
Configuring BGP AS number substitution and
SoO attribute
When CEs at different sites have the same AS number, configure the BGP AS number substitution
feature to avoid route loss.
When a PE uses different interfaces to connect different CEs in a site, the BGP AS number
substitution feature introduces a routing loop. To remove the routing loop, configure the SoO attribute
on the PE.


