background image

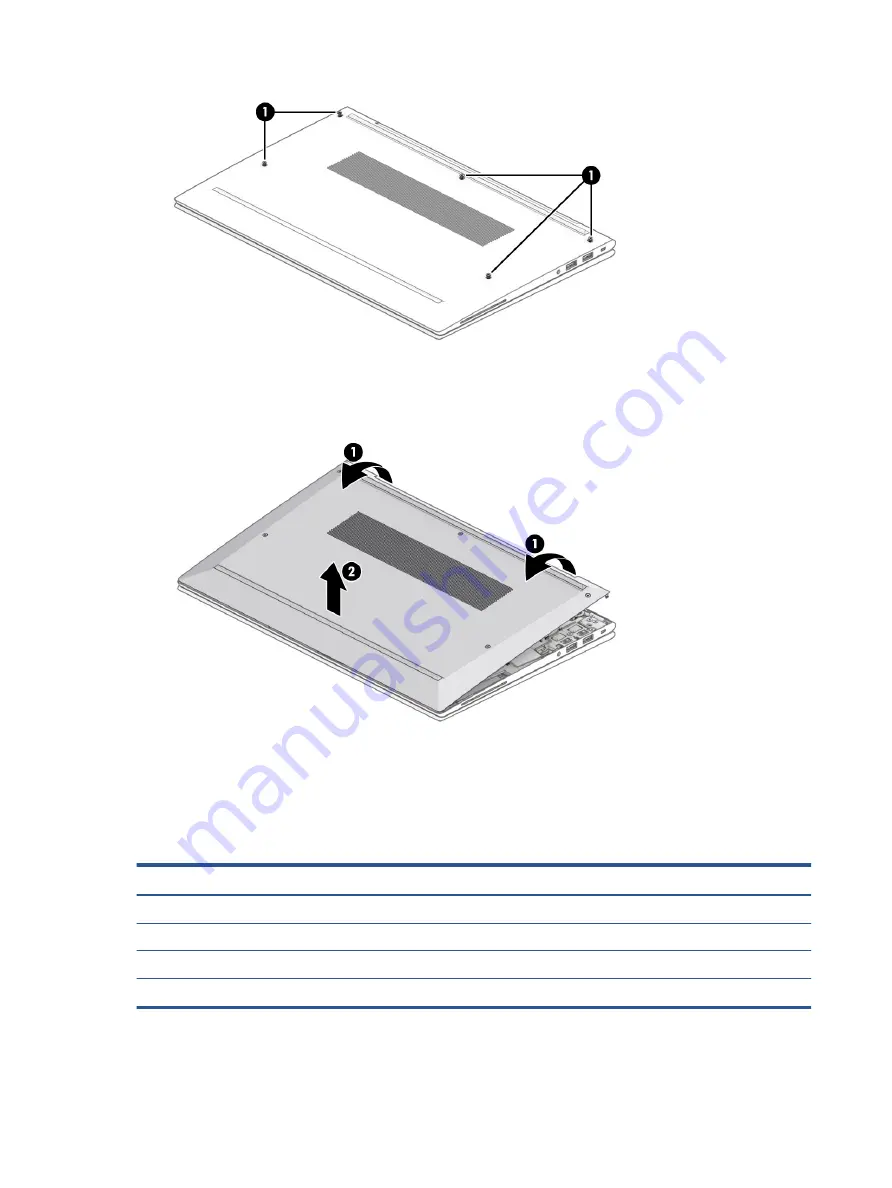
2.

Starting near the hinges, use a nonmarking, nonconductive tool to release the edges of the bottom 
cover from the computer (1).

3.

Remove the bottom cover from the computer (2).

To replace the bottom cover, reverse the removal procedures.

Memory modules

To remove the memory modules, use this procedure and illustration.

Table 5-2

  Memory module descriptions and part numbers

Description

Spare part number

16 GB, DDR4-3200

L67710-001

8 GB, DDR4-3200

L46598-001

4 GB, DDR4-3200

L83673-001

Memory module cover (included in Bracket Kit)

M08556-001

Before removing the memory, follow these steps:

34

Chapter 5   Removal and replacement procedures for Customer Self-Repair parts

Содержание EliteBook 845 G7

Страница 1: ...Maintenance and Service Guide SUMMARY This guide provides information about spare parts removal and replacement of parts security backing up and more ...

Страница 2: ...not be liable for technical or editorial errors or omissions contained herein First Edition August 2020 Document Part Number M06492 001 Product notice This guide describes features that are common to most models Some features may not be available on your computer Not all features are available in all editions or versions of Windows Systems may require upgraded and or separately purchased hardware ...

Страница 3: ...ts that should be accessed by only an authorized service provider IMPORTANT See Removal and replacement procedures for Customer Self Repair parts for details Accessing parts described in Removal and replacement procedures for authorized service provider parts can damage the computer or void your warranty iii ...

Страница 4: ...iv Important notice about Customer Self Repair parts ...

Страница 5: ...uct the computer air vents Use the computer only on a hard flat surface Do not allow another hard surface such as an adjoining optional printer or a soft surface such as pillows or rugs or clothing to block airflow Also do not allow the AC adapter to come into contact with the skin or a soft surface such as pillows or rugs or clothing during operation The computer and the AC adapter comply with th...

Страница 6: ...vi Safety warning notice ...

Страница 7: ...assembly subcomponents 19 Cable Kit 21 Bracket Kit 22 Plastics Kit 22 Miscellaneous parts 23 4 Removal and replacement procedures preliminary requirements 28 Tools required 28 Service considerations 28 Plastic parts 28 Cables and connectors 28 Drive handling 28 Workstation guidelines 29 Electrostatic discharge information 29 Generating static electricity 30 Preventing electrostatic damage to equip...

Страница 8: ...RTC battery 45 Speakers 46 Card reader board 47 Power connector cable 48 USB board 49 Fingerprint reader board 50 Touchpad 51 NFC module 53 Fan 53 Heat sink 54 System board 56 Display assembly 59 Keyboard with top cover 75 7 Computer Setup BIOS TPM and HP Sure Start 76 Using Computer Setup 76 Navigating and selecting in Computer Setup 76 Restoring factory settings in Computer Setup 76 Updating the...

Страница 9: ...ect products only 82 9 Using HP PC Hardware Diagnostics 83 Downloading the HP PC Hardware Diagnostics Windows from the Microsoft Store 83 Customizing Remote HP PC Hardware Diagnostics UEFI settings 83 10 Specifications 84 Computer specifications 84 35 6 cm 14 0 in display specifications 85 Solid state drive specifications 85 Solid state drive specifications SATA 3 86 11 Statement of memory volatil...

Страница 10: ...x ...

Страница 11: ... 120W G2 Max resolution 4 K 60 Hz DisplayPort 1 and 4 K 60 Hz DisplayPort 2 and FHD 60 Hz Type C output port using a Type C to DisplayPort adapter Display 35 6 cm 14 0 in full high definition FHD 1920 1080 narrow bezel UWVA antiglare bent supports privacy filter nontouch 250 nits 45 CG eDP no camera 250 nits 45 CG eDP HD camera 250 nits 45 CG eDP HD IR camera 250 nits 45 CG eDP no camera WWAN 250 ...

Страница 12: ...rophone multi array including rear facing camera Camera HD RGB 720p Camera HD RGB 720p IR infrared Camera privacy cover Supports WDR Wide Dynamic Range Support for models without a camera RJ 45 network jack No direct Ethernet support available via accessories The following support S4 S5 wake on LAN via out of band and S0 S0ix S4 S5 MPAT via out of band HP USB C Mini Dock HP USB C A Universal Dock ...

Страница 13: ...anels WWAN cards are compatible with a programmable removable eSIM Supports WWAN after market option Ports HDMI 2 0 Audio out headphone audio in microphone combo jack 2 USB 3 1 Gen 2 Type C with alt mode USB 3 1 Gen 1 port USB 3 1 Gen 1 charging port AC Smart Pin adapter plug 4 5 mm Sensors Ambient light sensor ALS Hall sensor Keyboard pointing devices HP Premium Keyboard Backlit spill resistant H...

Страница 14: ...ed firmware protection HP Hardware Root of Trust Sure Start Gen6 Operating system Windows 10 Home 64 Windows 10 Home 64 Advanced Windows 10 Home 64 Advanced Single Language Windows 10 Home 64 Chinese Market CPPP Windows 10 Home 64 High End Chinese Market CPPP Windows 10 Home 64 Plus Windows 10 Home 64 Plus Single Language Windows 10 Home 64 Plus Single Language Africa Market PPP Windows 10 Home 64...

Страница 15: ...indows 10 Pro 64 StF MSNA Strategic FreeDOS 3 0 Restore media Windows 10 Driver DVD Windows 10 Driver USB Windows 10 Professional 64 bit OS DVD Certified Microsoft WHQL Tested and documented Windows 10 Enterprise 64 LTSC 1809 available only by request Web only support Windows 10 Enterprise 64 Serviceability End user replaceable parts AC adapter Memory module Solid state drive WLAN module WWAN modu...

Страница 16: ...e purchasing a SIM card follow these instructions to determine the correct SIM card size for your computer 1 Go to http www hp com support and then search for your computer by product name or number 2 Select Product Information 3 Refer to the listed options to determine which card to purchase 2 USB Type C power connector and Thunderbolt ports 2 with HP Sleep and Charge Connect an AC adapter that h...

Страница 17: ...stration and table to identify the components on the left side of the computer Table 2 2 Left side components and their descriptions Component Description 1 Security cable slot Attaches an optional security cable to the computer NOTE The security cable is designed to act as a deterrent but it might not prevent the computer from being mishandled or stolen 2 USB SuperSpeed port with HP Sleep and Cha...

Страница 18: ... speakers are disabled 5 Smart card reader Supports optional smart cards Display The computer display can include essential components such as speakers antennas cameras and microphones Table 2 3 Display components and their descriptions Component Description 1 WWAN antennas select products only Send and receive wireless signals to communicate with wireless wide area networks WWANs 2 WLAN antennas ...

Страница 19: ...ther is concealed The antennas are not visible from the outside of the computer For optimal transmission keep the areas immediately around the antennas free from obstructions For wireless regulatory notices see the section of the Regulatory Safety and Environmental Notices that applies to your country or region To access this guide Type HP Documentation in the taskbar search box and then select HP...

Страница 20: ...tick button Functions like the right button on an external mouse 4 Touchpad zone Reads your finger gestures to move the pointer or activate items on the screen 5 Near Field Communications NFC tapping area and antenna select products only Allows you to wirelessly share information when you tap it with an NFC enabled device Lights Use the illustration and table to identify the lights on the computer...

Страница 21: ...e microphone is on 6 Power light On The computer is on Blinking select products only The computer is in the Sleep state a power saving state The computer shuts off power to the display and other unnecessary components Off Depending on your computer model the computer is off in Hibernation or in Sleep Hibernation is the power saving state that uses the least amount of power Button speakers and fing...

Страница 22: ...l for the internal fan to cycle on and off during routine operation 3 Power button When the computer is off press the button briefly to turn on the computer When the computer is on press the button briefly to initiate Sleep When the computer is in the Sleep state press the button briefly to exit Sleep select products only When the computer is in Hibernation press the button briefly to exit Hiberna...

Страница 23: ...e registered by the fingerprint reader Special keys Use the illustration and table to identify the special keys Table 2 7 Special keys and their descriptions Component Description 1 esc key Displays system information when pressed in combination with the fn key 2 fn key Executes frequently used system functions when pressed in combination with another key Such key combinations are called hot keys ...

Страница 24: ... information If the computer has stopped responding and shutdown procedures are ineffective press and hold the power button down for at least 4 seconds to turn off the computer To learn more about your power settings see your power options Right click the Power icon and then select Power Options Hot keys select products only A hot key is the combination of the fn key and another key Use the table ...

Страница 25: ...e computer Labels can be in paper form or imprinted on the product IMPORTANT Check the following locations for the labels described in this section the bottom of the computer inside the battery bay under the service door on the back of the display or on the bottom of a tablet kickstand Service label Provides important information to identify your computer When contacting support you might be asked...

Страница 26: ...arranty period Regulatory label s Provide s regulatory information about the computer Wireless certification label s Provide s information about optional wireless devices and the approval markings for the countries or regions in which the devices have been approved for use 16 Chapter 2 Components ...

Страница 27: ...TE HP continually improves and changes product parts For complete and current information about supported parts for your computer go to http partsurfer hp com select your country or region and then follow the on screen instructions NOTE Details about your computer including model serial number product key and length of warranty are on the service tag at the bottom of your computer Computer major c...

Страница 28: ... 6 RTC battery L13694 001 7 NFC module NOTE The NFC module cable is available in the Cable Kit as spare part number M07101 001 M07214 001 8 Speakers left and right M07107 001 9 USB board NOTE The USB board cable is available in the Cable Kit as spare part number M07101 001 M27456 001 10 System board includes integrated processor NOTE All system board spare part kits include replacement thermal mat...

Страница 29: ... 512 GB PCIe value L85364 001 256 GB PCIe TLC L85350 001 256 GB PCIe TLC self encrypting drive SED M07245 001 256 GB PCIe value L85354 001 128 GB SATA 3 TLC L85346 001 18 Solid state drive cover included in Bracket Kit M08556 001 19 Memory modules DDR4 PC 3200 16 GB L67710 001 8 GB L46598 001 4 GB L83673 001 20 Memory cover included in Bracket Kit M08556 001 21 WWAN module Intel XMM 7360 LTE Advan...

Страница 30: ... models with a microphone module no camera M07100 001 2 Display panel 1000 nits ambient light sensor M08711 001 250 nits models with WWAN M07092 001 250 nits models without WWAN IR camera Touch on Panel TOP M07094 001 400 nits models without WWAN IR camera ambient light sensor M07093 001 LCD Support Kit not illustrated M25066 001 3 Hinge cover included in Hinge Kit M07104 001 4 Camera module RGB c...

Страница 31: ...M07099 001 Models without WWAN 400 nit panel M07097 001 Models without WWAN 250 nit panel M07096 001 Models with WWAN 250 nit panel M07098 001 Second ambient light sensor not illustrated M07213 001 Second ambient light sensor to display panel cable included in Cable Kit not illustrated M07101 001 Second ambient light sensor to hub board cable included in Cable Kit not illustrated M07101 001 Cable ...

Страница 32: ...able Camera microphone module to hub board cable Bracket Kit To identify the Bracket Kit components use this illustration and table Table 3 4 Bracket Kit component descriptions and part numbers Item Component Spare part number Bracket Kit includes M08556 001 1 Memory cover 2 Solid state drive cover 3 USB bracket 4 Fingerprint reader bracket SIM tray not illustrated Plastics Kit To identify the Pla...

Страница 33: ... this table Table 3 6 Miscellaneous part descriptions and part numbers Component Spare part number AC adapters 230 W PFC slim 7 4 mm 925141 850 65 W nPFC SMART 3 pin 4 5 mm 710412 001 65 W nPFC SMART 4 5 mm EM 913691 850 65 W nPFC USB C straight 1 8 m L04650 850 65 W nPFC USB C RC 1 8 m L32392 001 65 W nPFC USB C 1 8 m L67440 001 65 W nPFC USB C travel adapter L21487 001 45 W nPFC SMART RC 4 5 mm ...

Страница 34: ...15938 002 Stereo USB headset 840340 001 USB C to RJ 45 adapter 855560 001 USB C to USB A hub 916838 001 Cable USB C male to USB C male 1 m L65253 001 Lock HP nano lock 918431 001 HP Sure Key Cable Lock L65088 001 Mouse HP USB laser 674318 001 HP Comfort Grip Wireless Mouse 691922 001 HP USB Travel Mouse 757770 001 HP Bluetooth Travel Mouse L62043 001 Power adapter duckhead C5NS South Korea L50818 ...

Страница 35: ...19366 001 Switzerland L19370 001 Taiwan L19372 001 Thailand L19371 001 The United Kingdom L19373 001 Power cord C5 conventional 1 8 m Argentina L19357 002 Australia L19358 002 Brazil L19359 002 Denmark L19360 002 Europe Austria Belgium Finland France Germany the Netherlands Norway and Sweden L19361 002 India L19363 002 Israel L19362 002 Italy L19364 002 Japan L19365 002 North America L19367 002 Pe...

Страница 36: ...e s Republic of China 286496 024 South Africa 187487 012 South Korea 231216 015 Switzerland 150304 015 Taiwan 393312 008 United Kingdom 100613 021 Power cord C5 1 0 m premium Argentina L30811 001 Australia L22327 001 Brazil L30812 001 Denmark L22322 001 Europe Austria Belgium Finland France Germany the Netherlands Norway and Sweden L22321 001 India L22624 001 Israel L22323 001 Italy L30813 001 Jap...

Страница 37: ...ina L36815 001 Australia L36816 001 Brazil L44789 001 Denmark L36817 001 Europe Austria Belgium Finland France Germany the Netherlands Norway and Sweden L36818 001 India L36820 001 Israel L36819 001 Italy L44788 001 North America L36822 001 People s Republic of China L36823 001 South Africa L36824 001 Switzerland L36825 001 Taiwan L36827 001 Thailand L36826 001 United Kingdom L36828 001 Miscellane...

Страница 38: ...rts Using excessive force during disassembly and reassembly can damage plastic parts Cables and connectors Handle cables with extreme care to avoid damage IMPORTANT When servicing the computer be sure that cables are placed in their proper locations during the reassembly process Improper cable placement can damage the computer Apply only the tension required to unseat or seat the cables during rem...

Страница 39: ...ion with approved static shielding material Use a wrist strap connected to a properly grounded work surface and use properly grounded tools and equipment Use conductive field service tools such as cutters screw drivers and vacuums When fixtures must directly contact dissipative surfaces use fixtures made only of static safe materials Keep the work area free of nonconductive materials such as ordin...

Страница 40: ...000 V 6 000 V 2 000 V Removing DIPs from vinyl tray Removing DIPs from polystyrene foam Removing bubble pack from PCB printed circuit board Packing PCBs in foam lined box 2 000 V 3 500 V 7 000 V 5 000 V 4 000 V 5 000 V 20 000 V 11 000 V 11 500 V 14 500 V 26 500 V 21 000 V Multiple electric components can be packaged together in plastic tubes trays or polystyrene foam NOTE As little as 700 V can de...

Страница 41: ...ing the work area To prevent static damage at the work area follow these precautions Cover the work surface with approved static dissipative material Provide a wrist strap connected to the work surface and properly grounded tools and equipment Use static dissipative mats foot straps or air ionizers to give added protection Handle electrostatic sensitive components parts and assemblies by the case ...

Страница 42: ...s and assemblies with conductive or approved containers or packaging Keep ESD sensitive parts in their containers until the parts arrive at static free workstations Place items on a grounded surface before removing items from their containers Always be properly grounded when touching a component or assembly Store reusable ESD sensitive parts from assemblies in protective packaging or nonconductive...

Страница 43: ...en instructions You must remove replace or loosen as many as 8 screws when you service Customer Self Repair parts Make special note of each screw size and location during removal and replacement Preparation for disassembly To prepare to disassemble the computer use these steps See Removal and replacement procedures preliminary requirements on page 28 for initial safety procedures 1 Turn off the co...

Страница 44: ...res Memory modules To remove the memory modules use this procedure and illustration Table 5 2 Memory module descriptions and part numbers Description Spare part number 16 GB DDR4 3200 L67710 001 8 GB DDR4 3200 L46598 001 4 GB DDR4 3200 L83673 001 Memory module cover included in Bracket Kit M08556 001 Before removing the memory follow these steps 34 Chapter 5 Removal and replacement procedures for ...

Страница 45: ...over on page 33 3 Disconnect the battery cable from the system board see Battery on page 43 If you are replacing a memory module remove the existing memory module 1 Use the tab 1 to lift the cover off the memory modules 2 The cover is held in place by clips on the system board Component replacement procedures 35 ...

Страница 46: ...nly Do not touch the components on the memory module To protect a memory module after removal place it in an electrostatic safe container To install a memory module 1 Align the notched edge of the module with the tab in the slot 1 and then press the module into the slot at an angle until it is seated 2 2 Press down on the module until the side retention clips snap into place 3 36 Chapter 5 Removal...

Страница 47: ...ly with a wireless module authorized for use in the computer by the governmental agency that regulates wireless devices in your country or region If you replace the module and then receive a warning message remove the module to restore device functionality and then contact technical support Before removing the WLAN module follow these steps 1 Prepare the computer for disassembly Preparation for di...

Страница 48: ...ack WLAN antenna cable connects to the WLAN module 1 Aux terminal 3 If the WLAN antenna is not connected to the terminal on the WLAN module install a protective sleeve on the antenna connector as shown in the following illustration Reverse this procedure to install the WLAN module WWAN module To remove the WWAN module use this procedure and illustration 38 Chapter 5 Removal and replacement procedu...

Страница 49: ...le follow these steps 1 Prepare the computer for disassembly Preparation for disassembly on page 33 2 Remove the bottom cover Bottom cover on page 33 3 Disconnect the battery cable from the system board see Battery on page 43 Remove the WWAN module 1 Disconnect the WWAN antenna cables 1 from the terminals on the WWAN module 2 Remove the Phillips M2 0 2 0 screw 2 that secures the WWAN module to the...

Страница 50: ... 002 512 GB PCIe TLC self encrypting drive SED L85368 002 512 GB PCIe value L85364 002 256 GB PCIe TLC L85350 002 256 GB PCIe TLC self encrypting drive SED M07245 002 256 GB PCIe value L85354 002 128 GB SATA 3 TLC L85346 002 Solid state drive cover included in Bracket Kit M08556 001 Before removing the solid state drive follow these steps 1 Prepare the computer for disassembly Preparation for disa...

Страница 51: ...solid state drive 2 The cover is held in place by clips on the system board 1 Remove the Phillips M2 0 2 5 screw 1 that secures the drive to the computer 2 Pull the drive away from the socket to remove it 2 Component replacement procedures 41 ...

Страница 52: ...e system board near the sides of the solid state drive To install the solid state drive reverse the removal procedures NOTE Solid state drives are designed with a notch to prevent incorrect insertion 42 Chapter 5 Removal and replacement procedures for Customer Self Repair parts ...

Страница 53: ...r hp com select your country or region and then follow the on screen instructions You must remove replace or loosen as many as 53 screws when you service the parts described in this chapter Make special note of each screw size and location during removal and replacement Preparation for disassembly To remove and replace computer components use these procedures See Removal and replacement procedures...

Страница 54: ... 1 Prepare the computer for disassembly Preparation for disassembly on page 33 2 Remove the bottom cover Bottom cover on page 33 WARNING To reduce potential safety issues use only the user replaceable battery provided with the computer a replacement battery provided by HP or a compatible battery purchased from HP IMPORTANT Removing a battery that is the sole power source for the computer can cause...

Страница 55: ...nd part number Description Spare part number RTC battery L13694 001 Before removing the RTC battery follow these steps 1 Prepare the computer for disassembly Preparation for disassembly on page 33 2 Remove the bottom cover Bottom cover on page 33 3 Remove the battery see Battery on page 43 Remove the RTC battery 1 Disconnect the battery cable from the system board 1 Component replacement procedure...

Страница 56: ...ing the speakers follow these steps 1 Prepare the computer for disassembly Preparation for disassembly on page 33 2 Remove the bottom cover Bottom cover on page 33 3 Disconnect the battery cable from the system board see Battery on page 43 Remove the speakers 1 Disconnect the speaker cable from the system board 1 2 Remove the cable between the speakers from the clips along the bottom of the batter...

Страница 57: ...able Kit M07101 001 Before removing the card reader board follow these steps 1 Prepare the computer for disassembly Preparation for disassembly on page 33 2 Remove the bottom cover Bottom cover on page 33 3 Remove the battery see Battery on page 43 4 Remove the left speaker see Speakers on page 46 Remove the card reader board 1 Disconnect the cable from the reverse ZIF connector on the card reader...

Страница 58: ...ving the power connector cable follow these steps 1 Prepare the computer for disassembly Preparation for disassembly on page 33 2 Remove the bottom cover Bottom cover on page 33 3 Disconnect the battery see Battery on page 43 Remove the power connector cable 1 Disconnect the cable from the system board 1 and then remove the cable from the clip 2 Remove the Phillips M2 0 4 0 screw 2 that secures th...

Страница 59: ...08556 001 Before removing the USB board follow these steps 1 Prepare the computer for disassembly Preparation for disassembly on page 33 2 Remove the bottom cover Bottom cover on page 33 3 Disconnect the battery cable from the system board see Battery on page 43 Remove the USB board 1 Disconnect the smaller cable from the USB board 1 2 Disconnect the larger cable from the ZIF connector on the USB ...

Страница 60: ...racket included in Bracket Kit M08556 001 Before removing the fingerprint reader board follow these steps 1 Prepare the computer for disassembly Preparation for disassembly on page 33 2 Remove the bottom cover Bottom cover on page 33 3 Remove the battery see Battery on page 43 Remove the fingerprint reader board 1 Remove the Phillips M2 0 2 0 screw 1 that secures the fingerprint reader bracket to ...

Страница 61: ...follow these steps 1 Prepare the computer for disassembly Preparation for disassembly on page 33 2 Remove the bottom cover Bottom cover on page 33 3 Remove the battery see Battery on page 43 Remove the touchpad 1 Disconnect the system board cable from the ZIF connector on the touchpad 1 2 Disconnect the middle cable from the ZIF connector on the touchpad 2 3 Disconnect the touchpad button board ca...

Страница 62: ...NFC module 1 8 Peel the system board cable from the side of the touchpad 2 9 Remove the five Phillips M1 6 1 8 screws 3 that secure the touchpad to the computer 10 Remove the touchpad from the computer 4 Reverse this procedure to install the touchpad 52 Chapter 6 Removal and replacement procedures for authorized service provider parts ...

Страница 63: ...ge 33 2 Remove the bottom cover Bottom cover on page 33 3 Remove the battery see Battery on page 43 Remove the NFC module 1 Disconnect the system board cable from the ZIF connector on the NFC module 1 2 Disconnect the touchpad cable from the reverse ZIF connector on the NFC module 2 3 Use a tool to release the module 3 and then remove the module from the computer 4 The module is secured with adhes...

Страница 64: ...cables from the clips on the side of the fan 1 2 Disconnect the fan cable from the system board 2 3 Loosen the three Phillips captive screws 3 that secure the fan to the computer and then remove the fan from the computer 4 Reverse this procedure to install the fan assembly Heat sink To remove the heat sink use these procedures and illustrations Table 6 11 Heat sink descriptions and part numbers De...

Страница 65: ...er on page 33 3 Disconnect the battery cable from the system board see Battery on page 43 Remove the heat sink 1 In the order indicated on the heat sink loosen the four captive Phillips screws 1 that secure the heat sink to the computer 2 Remove the heat sink from the computer 2 Component replacement procedures 55 ...

Страница 66: ...ons and part numbers Description Spare part number System board includes processor All system boards use the following part numbers xxxxxx 001 Non Windows operating system xxxxxx 601 Windows 10 operating system System board with integrated AMD Ryzen 7 PRO 4750U processor M22244 xx1 System board with integrated AMD Ryzen 5 PRO 4650U processor M22243 xx1 System board with integrated AMD Ryzen 3 PRO ...

Страница 67: ... system board 1 Disconnect the following cables from the system board Power connector cable 1 Camera cable 2 Antenna cables from the WWAN module select products only 3 Antenna cables from the WLAN module 4 Larger USB cable from the USB board ZIF 5 Speaker cable 6 Small USB cable from the USB board 7 Display cable 8 Keyboard cable ZIF 9 Card reader cable ZIF 10 Touchpad cable ZIF 11 Keyboard backli...

Страница 68: ...bracket 2 The plastic bracket is available in the Plastics Kit as spare part number M07215 001 3 Remove the two Phillips M2 0 4 0 screws 1 and the three Phillips M2 0 2 0 screws 2 that secure the system board to the computer 58 Chapter 6 Removal and replacement procedures for authorized service provider parts ...

Страница 69: ...Display assembly To remove and disassemble the display assembly use these procedures and illustrations Full hinge up displays are not available as spare parts Spare parts for displays are available only at the subcomponent level Before removing the display panel follow these steps 1 Prepare the computer for disassembly Preparation for disassembly on page 33 2 Remove the bottom cover Bottom cover o...

Страница 70: ...a cables from the WWAN module 3 and then remove the cables from the clip 4 3 Disconnect the antenna cables from the WLAN module 5 and disconnect the left display cable 6 and then remove the cables from the clips along the side of the fan 7 4 Remove the six Phillips M2 5 4 0 screws 1 that secure the display assembly to the computer 5 Rotate the display to open the hinges 2 60 Chapter 6 Removal and ...

Страница 71: ...emove the bezel from the display 4 Bezels are available as the following spare part numbers NOTE When replacing the bezel be sure that the replacement bezel matches the original bezel M07163 001 IR camera and ambient light sensor M07164 001 IR camera M07165 001 RGB camera and ambient light sensor M07166 001 RGB camera M07100 001 Microphone module only no camera module Component replacement procedu...

Страница 72: ...splay 3 d Note the location of all cables hidden by the hinge cover so that you can be sure to properly route the cables during reassembly The hinge cover is available in the Hinge Kit as spare part number M07104 001 9 If you need to remove the hinges from the display enclosure a Remove the three Phillips M2 0 10 0 screws 1 from each hinge b Remove the hinges from the display 2 62 Chapter 6 Remova...

Страница 73: ...cing the display panel b The display panel is secured to the display enclosure with tape that is installed under the left and right sides of the panel To remove the panel use tweezers to grasp the end of the tape 1 While turning the tweezers wrap the tape around the tweezers 2 as you continue to pull the tape out from behind the display panel 3 You must pull the tape multiple times before it is co...

Страница 74: ...rs M08711 001 1000 nit panel M07094 001 250 nit panel Touch on Panel TOP M07092 001 250 nit panel M07093 001 400 nit panel d Lift the tape from the connector on the display panel 1 rotate the locking lever 2 and then disconnect the cable from the panel 3 64 Chapter 6 Removal and replacement procedures for authorized service provider parts ...

Страница 75: ... of the adhesive strips 1 b Starting near the bottom of the inside of the display back cover 2 install the adhesive strips on both the left and right sides by aligning them with the groove on the edge of cover 3 c Peel the protective layer from the top of the adhesive strips 4 d Install the previously selected alignment tools onto the upper left and right corners of the display rear cover 5 Compon...

Страница 76: ...are positioned up against the insides of the alignment tools The double sided adhesive strips are available as spare part number M14479 001 f Remove the alignment tool g Replace the bezel by pressing along the bottom sides and then top of the bezel to snap it into place 66 Chapter 6 Removal and replacement procedures for authorized service provider parts ...

Страница 77: ...sition the computer upside down on a table j Leave the computer upside down on the table for 20 minutes to allow the adhesive to set k Position the computer upright on a table l Leave the computer upright on the table for 10 minutes to be sure the panel sits correctly in the display Component replacement procedures 67 ...

Страница 78: ...rom the ZIF connector 1 on the hub board b Disconnect the camera cable from the ZIF connector 2 on the hub board c Disconnect the smaller cables from the reverse ZIF connectors on the hub board 3 4 d Use a tool 5 to release the board from the display rear cover 6 The hub board is available as spare part number M07211 001 in models with an IR camera and M07210 001 in models with an RGB camera or mi...

Страница 79: ...om the computer 3 The ambient light sensor is available as spare part number M07212 001 14 If you need to remove the second ambient light sensor from the display disconnect the cables from the ZIF connectors on the board 1 and then remove the sensor from the computer 2 The second ambient light sensor is available as spare part number M07213 001 Component replacement procedures 69 ...

Страница 80: ... you need to remove the camera module Use a tool 1 to lift up evenly across the module and peel the module up from the display back cover 2 and then disconnect the cable from the reverse ZIF connector on the module 3 The camera module is available as spare part number M07216 001 for RGB cameras and M08549 001 for IR cameras NOTE For installation note that the cable routes under the camera module b...

Страница 81: ...n remove the cable 3 The display panel cable is available as spare part number M07203 001 18 If you need to remove the camera cable disconnect the cable from the ZIF connector on the hub board 1 and then peel the cable off the inside of the display back cover to remove it 2 The camera cable is available in the Cable Kit as spare part number M07101 001 Component replacement procedures 71 ...

Страница 82: ... and then remove the antennas and cables 4 20 If you need to remove the WWAN antenna cables peel the antennas off the inside of the display back cover 1 remove the cables from the clips in the back 2 and near the hinge on the display back cover 3 and then remove the antennas and cables 4 72 Chapter 6 Removal and replacement procedures for authorized service provider parts ...

Страница 83: ...m the ZIF connectors on the ambient light sensor board 1 and hub board 2 and then peel the cable off the inside of the display back cover to remove it 3 The ambient light sensor cable is available in the Cable Kit as spare part number M07101 001 Component replacement procedures 73 ...

Страница 84: ...M07101 001 Display back covers are available as the following spare part numbers M07098 001 Models with WWAN 250 nits M07099 001 Models with WWAN 400 nits M07096 001 Models without WWAN 250 nits M07097 001 Models without WWAN 400 nits 23 Use the following illustration to determine proper cable routing The WWAN antenna cables and display cable route through the right hinge 1 The WLAN antenna cables...

Страница 85: ... in privacy models M15208 xx1 Table 6 14 Spare part country codes For use in country or region Spare part number For use in country or region Spare part number For use in country or region Spare part number Belgium A41 Hungary 211 Saudi Arabia 171 Brazil 201 Iceland DD1 Slovenia BA1 Bulgaria 261 India D61 South Korea AD1 Chile 161 Israel BB1 Spain 071 Czech Republic Slovakia FL1 Italy 061 Switzerl...

Страница 86: ...r use a pointing device to select the item To scroll up and down select the up arrow or the down arrow in the upper right corner of the screen or use the up arrow key or the down arrow key on the keyboard To close open dialog boxes and return to the main Computer Setup screen press esc and then follow the on screen instructions To exit Computer Setup choose one of the following methods To exit Com...

Страница 87: ...Setup 1 Start Computer Setup See Using Computer Setup on page 76 2 Select Main and then select System Information 3 To exit Computer Setup menus without saving your changes select Main select Ignore Changes and Exit and then select Yes NOTE If you are using arrow keys to highlight your choice you must then press enter To check for later BIOS versions see Preparing for a BIOS update on page 77 Prep...

Страница 88: ...ctions that are displayed on the screen after the download is complete If no instructions are displayed follow these steps 1 Type file in the taskbar search box and then select File Explorer 2 Select your hard drive designation The hard drive designation is typically Local Disk C 3 Using the hard drive path you recorded earlier open the folder that contains the update 4 Double click the file that ...

Страница 89: ...uter Setup See Using Computer Setup on page 76 2 Select Security select TPM Embedded Security and then follow the on screen instructions Using HP Sure Start select products only Select computer models are configured with HP Sure Start a technology that monitors the computer s BIOS for attacks or corruption If the BIOS becomes corrupted or is attacked HP Sure Start automatically restores the BIOS t...

Страница 90: ...age is 32 GB or less Microsoft System Restore is disabled by default Using the HP Cloud Recovery Download Tool to create recovery media select products only You can use the HP Cloud Recovery Download Tool to create HP Recovery media on a bootable USB flash drive For details Go to http www hp com support search for HP Cloud Recovery and then select the result that matches the type of computer that ...

Страница 91: ...reated on a bootable USB flash drive using the HP Cloud Recovery Download Tool For details see Using the HP Cloud Recovery Download Tool to create recovery media select products only on page 80 NOTE If you cannot create recovery media yourself contact support to obtain recovery discs Go to http www hp com support select your country or region and then follow the on screen instructions To recover y...

Страница 92: ...n follow the on screen instructions Using HP Sure Recover select products only Select computer models are configured with HP Sure Recover a PC OS recovery solution built into the hardware and software HP Sure Recover can fully restore the HP OS image without installed recovery software Using HP Sure Recover an administrator or user can restore the system and install Latest version of the operating...

Страница 93: ...rform several customizations Set a schedule for running diagnostics unattended You can also start diagnostics immediately in interactive mode by selecting Execute Remote HP PC Hardware Diagnostics Set the location for downloading the diagnostic tools This feature provides access to the tools from the HP website or from a server that has been preconfigured for use Your computer does not require the...

Страница 94: ...ght 250 nits nontouch or touch 19 2 mm 0 76 in Weight 400 nit nontouch panel 1 41 kg 3 1 lbs 250 nit touch panel 1 55 kg 3 41 lbs Input power Operating voltage and current 19 5 V dc 2 31 A 45 W 19 5 V dc 3 33 A 65 W Temperature Operating 5 C to 35 C 41 F to 95 F Nonoperating 20 C to 60 C 4 F to 140 F Relative humidity noncondensing Operating 10 to 90 Nonoperating 5 to 95 Maximum altitude unpressur...

Страница 95: ...specifications 256 GB 512 GB 1 TB Dimensions Height 1 0 mm 1 0 mm 1 0 mm Length 50 8 mm 50 8 mm 50 8 mm Width 28 9 mm 28 9 mm 28 9 mm Weight 10 g 10 g 10 g Interface type PCIe PCIe PCIe Ready time maximum to not busy 1 0 ms 1 0 ms 1 0 ms Access times logical 0 1 ms 0 1 ms 0 1 ms Transfer rate Sequential read up to 2150 MB s up to 2150 MB s up to 2150 MB s Random read Up to 300 000 IOPs Up to 300 0...

Страница 96: ...ons for your solid state drive Table 10 4 Solid state drive specifications 128 GB Dimensions Height 1 35 mm Weight 10 g Interface type SATA 3 Ready time maximum to not busy 1 0 ms Access times logical 0 1 ms Transfer rate up to 540 MB s Total logical sectors 234 441 648 Operating temperature 0 C to 70 C 32 F to 158 F 1 GB 1 billion bytes when referring to hard drive storage capacity Actual accessi...

Страница 97: ...ase before beginning steps in this chapter Current BIOS steps Use these instructions to restore nonvolatile memory 1 Follow these steps to restore the nonvolatile memory that can contain personal data Restoring or reprogramming nonvolatile memory that does not store personal data is neither necessary nor recommended a Turn on or restart the computer and then quickly press esc NOTE If the system ha...

Страница 98: ...hours 2 Complete one of the following Remove and retain the storage drive or Clear the drive contents by using a third party utility designed to erase data from an SSD or Clear the contents of the drive by using the following BIOS Setup Secure Erase command option steps If you clear data using Secure Erase you cannot recover it a Turn on or restart the computer and then quickly press esc b Select ...

Страница 99: ...OS or by changing the Windows date time This memory is not write protected Controller NIC EEPROM 64 KB not customer accessible No Yes Stores NIC configuration and NIC firmware NIC EEPROM is programmed using a utility from the NIC vendor that can be run from DOS A utility must be used to write data to this memory and is available from the NIC vendor Writing data to this ROM in an inappropriate mann...

Страница 100: ...ting the firmware Only firmware updates digitally signed by Intel can be applied using this utility Bluetooth flash select products only 2 megabits No Yes Stores Bluetooth configuration and firmware Bluetooth flash is programmed at the factory Tools for writing data to this memory are not publicly available but can be obtained from the silicon vendor A utility must be used for writing data to this...

Страница 101: ...em diagnostics The UEFI BIOS provides functionality beyond that of the legacy BIOS In addition the UEFI BIOS works to initialize the computer s hardware before loading and executing the OS the runtime environment allows the loading and execution of software programs from storage devices to provide more functionality such as advanced hardware diagnostics with the ability to display more detailed sy...

Страница 102: ...ar or delete all Secure Boot Keys a Turn on or restart the computer and then quickly press esc b Select the Security menu select Secure Boot Configuration and then follow the on screen instructions c At the Secure Boot Configuration window select Secure Boot select Clear Secure Boot Keys and then follow the on screen instructions to continue Using HP Sure Start select products only Select computer...

Страница 103: ...wer cord sets must be approved by an acceptable accredited agency responsible for evaluation in the country or region where the power cord set will be used The power cord sets must have a minimum current capacity of 10 A and a nominal voltage rating of 125 V ac or 250 V ac as required by the power system of each country or region The appliance coupler must meet the mechanical configuration of an E...

Страница 104: ...ance coupler flexible cord and wall plug must bear a T mark and registration number in accordance with the Japanese Dentori Law The flexible cord must be Type VCTF 3 conductor 0 75 mm or 1 25 mm conductor size The wall plug must be a two pole grounding type with a Japanese Industrial Standard C8303 7 A 125 V ac configuration 4 The flexible cord must be Type RVV 3 conductor 0 75 mm conductor size P...

Страница 105: ...he battery in general household waste Follow the local laws and regulations in your area for battery disposal HP encourages customers to recycle used electronic hardware HP original print cartridges and rechargeable batteries For more information about recycling programs see the HP website at http www hp com recycle 95 ...

Страница 106: ... 84 85 display assembly subcomponents 19 display back cover illustrated 19 spare part number 19 display bezel illustrated 19 spare part number 19 display cable illustrated 19 spare part number 19 display components 8 display panel illustrated 19 spare part number 19 docks spare part numbers 23 E electrostatic discharge ESD 28 29 preventing damage 28 29 30 esc key identifying keys esc 13 F fan remo...

Страница 107: ...orts 3 sensors 3 product name and number computer 15 programmable key identifying 14 R recovery 80 discs 81 media 81 USB flash drive 81 recovery media 80 creating using HP Cloud Recovery Download Tool 80 creating using Windows tools 80 regulatory information regulatory label 15 wireless certification labels 15 Remote HP PC Hardware Diagnostics UEFI settings customizing 83 removal and replacement p...

Страница 108: ...identifying 12 W Windows backup 80 recovery media 80 system restore point 80 Windows key idenitfying 13 Windows tools using 80 wireless antennas illustrated 19 spare part number 19 wireless antennas identifying 8 wireless certification label 15 WLAN antennas identifying 8 WLAN device 15 WLAN label 15 WLAN module removal 37 spare part numbers 37 workstation guidelines 28 29 WWAn antennas identifyin...

Отзывы: