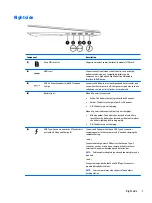
Left side
Component
Description
(1)
Security cable slot
Attaches an optional security cable to the computer.
NOTE:
The security cable is designed to act as a deterrent, but
it may not prevent the computer from being mishandled or
stolen.
(2)
Vent
Enables airflow to cool internal components.
NOTE:
The computer fan starts up automatically to cool
internal components and prevent overheating. It is normal for
the internal fan to cycle on and off during routine operation.
(3)
USB 3.x SuperSpeed port with HP Sleep and
Charge
Connects a USB device, provides high-speed data transfer, and
even when the computer is off, charges most products such as a
cell phone, camera, activity tracker, or smartwatch.
(4)
Audio-out (headphone)/Audio-in (microphone)
combo jack
Connects optional powered stereo speakers, headphones,
earbuds, a headset, or a television audio cable. Also connects an
optional headset microphone. This jack does not support
optional standalone microphones.
WARNING!
To reduce the risk of personal injury, adjust the
volume before putting on headphones, earbuds, or a headset.
For additional safety information, refer to the Regulatory,
Safety, and Environmental Notices.
To access this guide:
1.
Type
support
in the taskbar search box, and then select
the HP Support Assistant app.
‒
or –
Click the question mark icon in the taskbar.
2.
Select My PC, select the Specifications tab, and then
select User Guides.
NOTE:
When a device is connected to the jack, the computer
speakers are disabled.
8
Chapter 2 External component identification
Содержание EliteBook 1040 G4
Страница 4: ...iv Safety warning notice ...
Страница 8: ...viii ...
Страница 29: ...Item Component Spare part number 1 Display panel see Display assembly on page 48 Computer major components 21 ...
Страница 35: ...Component Spare part number For use in India 914726 001 Screw kit L02258 001 Miscellaneous parts 27 ...
Страница 45: ...Reverse this procedure to install the front speakers Component replacement procedures 37 ...
Страница 57: ...Reverse this procedure to install the display assembly Component replacement procedures 49 ...


