background image

Installing Hardware Options 

HP ProLiant DL360 Generation 3 Server Setup and Installation Guide 

2-11


HP CONFIDENTIAL


Writer: Richard O. Heath File Name: c-ch2 Installing Hardware Options.doc 

Codename: Ertl Part Number: 293974-001 Last Saved On: 10/16/02 1:34 PM 

Inserting an Expansion Board into the PCI Riser Board Assembly 

To install an expansion board: 


CAUTION:

  Do not discard the expansion slot cover. If the PCI expansion board is 

removed in the future, the expansion slot cover must be reinstalled to maintain 
proper cooling. 


CAUTION:

  When installing an expansion board with a mezzanine board attached, 

remove the bracket between the two boards. 


NOTE:

  The PCI slots only accept 3.3 volt or universal PCI expansion boards. Expansion 

boards that are 5 volt cannot be used in this server. 

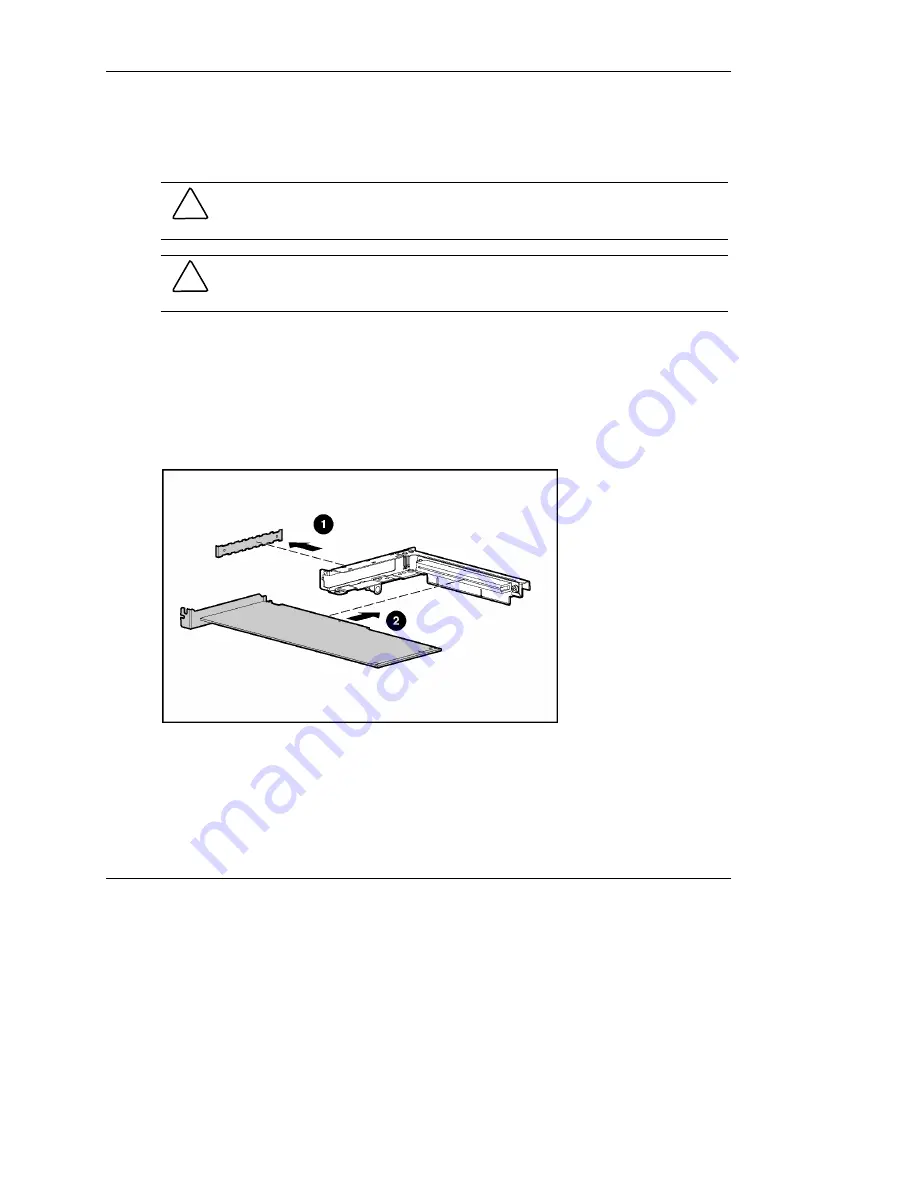
1. 

Remove the expansion slot cover from the PCI riser board assembly (1). 

2. 

Align the expansion board with the guiding groove. 

3. 

Slide the expansion board into the slot until the board seats firmly (2).  


Figure 2-6:  Installing an expansion board into the PCI 
riser board 

Содержание DL360 - ProLiant - Photon

Страница 1: ...Richard O Heath File Name a frnt doc Codename Ertl Part Number 293974 001 Last Saved On 10 11 02 11 12 AM HP ProLiant DL360 Generation 3 Server Setup and Installation Guide September 2002 First Edition Part Number 293974 001 ...

Страница 2: ...he U S and other countries Hewlett Packard Company shall not be liable for technical or editorial errors or omissions contained herein The information in this document is provided as is without warranty of any kind and is subject to change without notice The warranties for HP products are set forth in the express limited warranty statements accompanying such products Nothing herein should be const...

Страница 3: ...s in Text xi Related Documents xii Getting Help xii HP Technical Support xii HP Website xiii HP Authorized Reseller xiii Reader s Comments xiii Chapter 1 Planning the Server Installation HP ProLiant DL360 Generation 3 Server Features 1 1 Server Installation Overview 1 1 Optimum Environment 1 3 Space and Airflow Requirements 1 3 Temperature Requirements 1 4 Power Requirements 1 4 Grounding Requirem...

Страница 4: ...lug Hard Drives 2 15 Installing a Second Processor and Processor Power Module PPM 2 16 Installing a Hot Plug Redundant Power Supply 2 19 Hot Plug Power Supply Setup 2 19 Converting Hot Plug Power Supply Bay 2 2 20 Installing a Hot Plug Redundant Power Supply 2 22 Hot Plug DC Power Supply Wiring Setup 2 23 Installing the Battery Backed Write Cache Enabler 2 25 Chapter 3 Server Installation Server I...

Страница 5: ...Utility 4 6 Enterprise Diagnostics LX32 Utility 4 7 Option ROM Configuration for Smart Arrays 4 7 Automatic Server Recovery 4 8 Power On Self Test 4 8 System Firmware Update 4 8 Auto Configuration Process 4 9 Boot Options 4 9 System Maintenance Menu 4 9 Integrated Management Log 4 10 Embedded NIC Configuration 4 10 Integrated Lights Out Setup 4 10 Appendix A Regulatory Compliance Notices Regulator...

Страница 6: ...on A 7 Battery Replacement Notice A 7 Power Cords A 8 Mouse Compliance Statement A 9 Appendix B Electrostatic Discharge Preventing Electrostatic Damage B 1 Grounding Methods B 2 Appendix C Server Error Messages Appendix D Troubleshooting When the Server Does Not Start D 2 Diagnosis Steps D 4 Problems After Initial Startup D 9 Other Information Resources D 13 Appendix E LEDs Switches and Jumpers St...

Страница 7: ...umber 293974 001 Last Saved On 10 11 02 11 12 AM Clearing and Resetting System Password Settings E 9 Clearing and Resetting System Configuration Settings E 9 Setting the NIC Operating Mode E 10 Appendix F Server Specifications Operating and Performance Specifications for the ProLiant DL360 Generation 3 ServerF 1 Appendix G Battery Battery Replacement G 1 Index ...

Страница 8: ...ce This guide is intended for anyone configuring an HP ProLiant DL360 Generation 3 server A moderate level of server based knowledge and experience is assumed Important Safety Information Before installing this product read the Important Safety Information document provided Symbols on Equipment The following symbols may be placed on equipment to indicate the presence of potentially hazardous condi...

Страница 9: ...le indicates a network interface connection WARNING To reduce the risk of electric shock fire or damage to the equipment do not plug telephone or telecommunications connectors into this receptacle This symbol indicates the presence of a hot surface or hot component If this surface is contacted the potential for injury exists WARNING To reduce the risk of injury from a hot component allow the surfa...

Страница 10: ...r in multiple rack installations Only one component is extended at a time A rack may become unstable if more than one component is extended for any reason Symbols in Text These symbols may be found in the text of this guide They have the following meanings WARNING Text set off in this manner indicates that failure to follow directions in the warning could result in bodily harm or loss of life CAUT...

Страница 11: ...om servers proliant manage HP ProLiant DL360 Generation 3 Server High Density Deployment white paper For general online reference and specifications refer to www hp com servers proliant Getting Help If you have a problem and have exhausted the information in this guide you can get further information and other help in the following locations HP Technical Support In North America call the HP Techni...

Страница 12: ...ation on this product as well as the latest drivers and flash ROM images go to www hp com HP Authorized Reseller For the name of your nearest HP authorized reseller In the United States call 1 800 345 1518 In Canada call 1 800 263 5868 Elsewhere refer to www hp com for locations and telephone numbers Reader s Comments HP welcomes your comments on this guide Please send your comments and suggestion...

Страница 13: ...rver Features For a list of features which are standard on the HP ProLiant DL360 Generation 3 server refer to www compaq com products servers proliantdl360 A generation identifier G3 located on the front of the server indicates the model of the server purchased The generation identifier is required to accurately identify the model for service and support Server Installation Overview The following ...

Страница 14: ...curate settings can seriously degrade system performance 5 Set internal switches if necessary For detailed information on relevant switches refer to Appendix E LEDs Switches and Jumpers 6 Use the rack template to identify the proper location for server installation Refer to Measuring with the Template in Chapter 3 Server Installation 7 Install the universal rack rails Refer to Installing the Unive...

Страница 15: ...the back of the rack to the rear of another rack or row of racks The servers draw in cool air through the rack front door and expel warm air through the rack rear door Therefore the front and rear rack doors must be adequately ventilated to allow ambient room air to enter the front of the cabinet and warm air to escape from the rear of the cabinet IMPORTANT Do not block the ventilation openings Co...

Страница 16: ...oling that can lead to thermal damage Temperature Requirements To ensure continued safe and reliable equipment operation install or locate the system in a well ventilated climate controlled environment The HP maximum recommended ambient operating temperature TMRA for most server products is 35 C 95 F The temperature in the room where the rack is located must not exceed 35 C 95 F Power Requirements...

Страница 17: ...In Canada install the equipment in accordance with Canadian Standards Association CSA C22 1 Canadian Electrical Code In all other countries the installation must follow any regional or national electrical wiring codes such as the International Electrotechnical Commission IEC 364 parts 1 through 7 Furthermore ensure that all power distribution devices used in the installation such as branch wiring ...

Страница 18: ...e attached to the rack for single rack installation The racks are coupled together in multiple rack installations WARNING When installing the server in a telco rack ensure that the rack frame is adequately secured to the top and bottom of the building structure WARNING To reduce the risk of personal injury or equipment damage at least two people are needed to safely unload the rack from the pallet...

Страница 19: ... the server from power fluctuations and temporary interruptions with a regulating uninterruptible power supply UPS This device protects the hardware from damage caused by power surges and voltage spikes and keeps the system in operation during a power failure CAUTION Do not operate the server for long periods without the access panel Operating the server without the access panel results in imprope...

Страница 20: ...ant DL360 Generation 3 servers For additional instructions refer to the installation documentation shipped with each option kit the hardware installation and configuration poster shipped with the server and the labels attached to the inside of the server access panel To streamline the installation process read the installation instructions for all of the hardware options and identify similar steps...

Страница 21: ...urfaces allow the internal system components to cool before touching them CAUTION Before removing the server access panel be sure that the server is powered down and that the power cord is disconnected from the server or the electrical outlet CAUTION Electrostatic discharge can damage electronic components Be sure you are properly grounded before beginning any installation procedure To remove the ...

Страница 22: ...edures requiring access to internal components it is recommended that all server data be backed up to avoid loss b Press the unit identification button on the server front panel 1 An LED illuminates blue on the server front and rear panels c Press the server Power On Standby button 2 to power down the server The Power On Off LED 2 turns from green to amber indicating standby mode Figure 2 1 Activa...

Страница 23: ...access panel Refer to the Removing the Access Panel section earlier in this chapter 3 If the server has a universal rail solution a Disconnect the power cord and cables from the server rear panel including cables extending from expansion boards moving from left to right b Loosen the server thumbscrews securing the cable tray to the universal rack rail and to the server 1 and remove the cable tray ...

Страница 24: ... in the rack 1 d Grasp the front panel thumbscrews and extend the server from the rack The cables remain clamped in the cable tray The rail release latches engage automatically e Press in and hold the rail release latches 2 f Holding the rail release latches extend the server until the latches clear the rack g Pull the server completely out of the rack and set it on a flat level surface 3 Figure 2...

Страница 25: ... ch2 Installing Hardware Options doc Codename Ertl Part Number 293974 001 Last Saved On 10 16 02 1 34 PM Identifying System Board Components Use the following figure and table to locate the system board and to identify the system board connectors and components for option installation or service events Figure 2 4 Identifying system board components ...

Страница 26: ...t Power Supply PCI install switch bank SW1 7 Fan board connector 16 PCI riser board slot 2 connector 8 SCSI board connector 17 System maintenance switch SW2 9 Optical device floppy board signal connector Installing Additional Memory Server memory can be expanded by installing Double Data Rate Synchronous DRAM DDR SDRAM The system supports up to four PC2100 ECC registered DDR SDRAM Dual Inline Memo...

Страница 27: ...rsely affect data integrity Refer to www compaq com quickspecs for DIMM option kits CAUTION Electrostatic discharge can damage electronic components Be sure you are properly grounded before beginning any installation procedure Refer to Appendix B Electrostatic Discharge for more information To install a DIMM onto the system board 1 Access internal server components Refer to Accessing Internal Serv...

Страница 28: ... Expansion Board The expansion board and PCI riser board assembly must be removed to replace an expansion board CAUTION To avoid damaging the system or expansion boards remove all AC power cords before installing or removing an expansion board When the front panel power switch is in the Off position auxiliary power is still connected to the PCI expansion slot and may damage the card 1 Access inter...

Страница 29: ...ions doc Codename Ertl Part Number 293974 001 Last Saved On 10 16 02 1 34 PM 3 Loosen the PCI riser board thumbscrew 1 4 Lift the front of the assembly slightly 2 and then pull it out of the server chassis PCI support slot 3 Figure 2 5 Removing the PCI riser board assembly and expansion board from PCI expansion board slot 1 5 Remove expansion board from PCI riser board assembly ...

Страница 30: ... board is removed in the future the expansion slot cover must be reinstalled to maintain proper cooling CAUTION When installing an expansion board with a mezzanine board attached remove the bracket between the two boards NOTE The PCI slots only accept 3 3 volt or universal PCI expansion boards Expansion boards that are 5 volt cannot be used in this server 1 Remove the expansion slot cover from the...

Страница 31: ...ot of the PCI riser board assembly 4 Install the PCI riser board assembly a Lay the PCI riser board assembly in the chassis b Insert the rear edge of the assembly into the PCI support slot 1 c Press down firmly above the expansion slot until the assembly is seated in the expansion slot 2 IMPORTANT The server does not power up if the PCI riser board assembly is not properly seated d Tighten the PCI...

Страница 32: ...tl Part Number 293974 001 Last Saved On 10 16 02 1 34 PM Installing or Replacing an Optical Device To install the optical device drive 1 Push the optical device ejector button 1 to eject the optical drive 2 NOTE Access to the ejector button is intentionally restricted Push the ejector button with a small flat object such as a key or pen to eject optical drive Figure 2 8 Ejecting the optical drive ...

Страница 33: ...p and Installation Guide HP CONFIDENTIAL Writer Richard O Heath File Name c ch2 Installing Hardware Options doc Codename Ertl Part Number 293974 001 Last Saved On 10 16 02 1 34 PM 2 Install the optical device drive in the empty bay Figure 2 9 Installing an optical device drive ...

Страница 34: ... PM Installing Hot Plug Hard Drives To install a hot plug hard drive IMPORTANT The ProLiant DL360 Generation 3 server supports HP universal U320 drives only The Compaq branded Ultra3 or HP branded U160 hot plug drives are not supported NOTE If installed remove the hard drive blank from the server 1 Slide the hard drive into the open bay 1 2 Close the drive latch to secure the hard drive into the s...

Страница 35: ...l a second processor and PPM 1 Unlatch the heatsink retaining clips 1 2 Unlatch the processor socket locking lever 2 IMPORTANT The processor assembly is designed to fit one way into the socket Carefully align the processor base with the processor socket until the processor fits securely in the socket CAUTION Processor 2 is oriented 180 degrees from processor 1 To prevent damage to the hardware pro...

Страница 36: ... c ch2 Installing Hardware Options doc Codename Ertl Part Number 293974 001 Last Saved On 10 16 02 1 34 PM 3 Install the processor into the socket 1 and close the processor socket locking lever 2 Figure 2 12 Installing the processor 4 Remove the protective covering from the new heatsink assembly Figure 2 13 Removing the heatsink protective covering ...

Страница 37: ...r heatsink assembly be sure to discard the old heatsink The heatsink is not reusable 5 Install the heatsink with the adhesive side down 1 CAUTION Before closing the heatsink retaining clip be sure that the processor socket locking lever is closed Do not force the lever closed it should close without resistance Forcing the lever closed may result in damage to the processor socket requiring replacem...

Страница 38: ... number may look different but are functionally equivalent Installing a Hot Plug Redundant Power Supply NOTE Only one PCI slot is supported when the server utilizes two hot plug redundant power supplies Use this section to install a hot plug redundant power supply Hot Plug Power Supply Setup The server can be configured with a single hot plug AC or DC power supply or two hot plug AC or two hot plu...

Страница 39: ...er to the following section and to the documentation that shipped with the server Converting Hot Plug Power Supply Bay 2 WARNING To reduce the risk of personal injury from hot surfaces allow the power supply or power supply blank to cool before touching it CAUTION To prevent improper cooling and thermal damage do not operate the server unless all bays are populated with either a component or a bla...

Страница 40: ...art Number 293974 001 Last Saved On 10 16 02 1 34 PM 3 Loosen the thumbscrew 1 and remove the power supply blank 2 Figure 2 16 Removing the power supply blank 4 Install the PCI blank in the chassis by inserting the rear tab of the PCI blank into the opening on the chassis 1 then lowering the PCI blank into position 2 and then tighten the thumbscrew 3 Figure 2 17 Installing the PCI blank on the cha...

Страница 41: ...pendix E LEDs Switches and Jumpers 7 Replace the access panel on the server install the server in a rack and power up the server Refer to documentation that shipped with the server Installing a Hot Plug Redundant Power Supply IMPORTANT This procedure assumes the server was previously configured for redundant hot plug power supplies 1 If replacing an existing power supply eject the power supply by ...

Страница 42: ...ver chassis and then out away from the rack rail 2 Slide the redundant power supply into the power supply bay until it snaps into place Figure 2 19 Installing the hot plug redundant power supply Hot Plug DC Power Supply Wiring Setup If a hot plug DC power supply has been installed verify the following 1 Be sure that the free end of the DC power cord is connected to a PDU or other suitable DC power...

Страница 43: ...table earth ground Figure 2 20 Verifying Redundant DC Power Supply PDU wiring 3 If a hot plug AC power supply has been installed connect the power cord to the power source 4 Connect the power cord to the power supply 5 Be sure that the power supply LED is illuminated green 6 Be sure that the front panel external health LED is illuminated green 7 If removed earlier reattach the cable retractor to t...

Страница 44: ...t Saved On 10 16 02 1 34 PM Installing the Battery Backed Write Cache Enabler 1 Access internal server components Refer to the Accessing Internal Server Components section earlier in this chapter 2 Align the arrows on top of the battery module with the spool location marks on the chassis 1 Slide the battery module onto the spools and slide towards rear of chassis to lock 2 Figure 2 21 Installing t...

Страница 45: ...5i memory connector on the system board 2 4 Route the battery module cable through the battery backed write cache cable clip on the system board 3 NOTE If necessary remove the PCI riser board assembly to access the cable clip Refer to Removing an Expansion Board in this chapter for more information Figure 2 22 Routing and connecting the battery backed write cache enabler cable PCI riser board 1 re...

Страница 46: ...ed rack complete the procedures described in the following subsections Measuring with the Template IMPORTANT Determine the server s place in the rack before starting installation of the universal rack rails Refer to the Rack Builder report that was printed during planning of the rack configuration IMPORTANT The template is two sided front and back and printed with arrows that show where items will...

Страница 47: ... rack or at the top of a previously mounted component secure the front side of the template against the front of the rack by pressing the two push tabs Match the hole pattern on the template with the holes on the vertical rails of the rack Figure 3 1 Measuring with the template 2 Align the template so that the sides of the template are squared up with the sides of the rack Tick marks on the rack s...

Страница 48: ... installation 5 Repeat steps 1 through 4 with the back of the template on the rear of the rack 6 After marking the front and rear of the rack remove the template from the rack Attach the universal rack rails to the rack Refer to the Installing the Universal Rack Rails section in this chapter Installing the Universal Rack Rails To install the universal rack rails to the rack 1 Measure with the temp...

Страница 49: ...nt of the rack 4 Insert the front tabs of the universal rack rail into the rack Figure 3 3 Aligning and inserting the universal rack rail 5 Compress the universal rail rack toward the front of the rack until the rear tabs are aligned with the inner holes at the back of the rack NOTE Adjust the depth of the rack rail to match the rack model by using the rack depth indicators on the rail 6 Insert th...

Страница 50: ...ltiple servers starting from the bottom of the rack CAUTION Always mount the heaviest item on the bottom of the rack and work from the bottom to the top To install the server into the rack 1 Align the rear end of the fixed server rails 1 with the front end of the universal rack rails 2 WARNING The rail release latches can pinch your fingertips 2 Press the rail release latches and slowly slide the ...

Страница 51: ...allel to the floor when sliding the fixed server rails into the rack rails Tilting the server can damage the rails 3 Insert the server into the rack Be sure that the fixed server rails slide inside the universal rack rails 4 Slide the server fully into the rack 5 Tighten the thumbscrews on the front panel by turning them clockwise to secure the server to the rack 6 At the rear of the rack fasten t...

Страница 52: ...and secure the cable tray to the server and rack rail by tightening the server and the fixed rail locking bracket thumbscrews 2 NOTE There are two thumbscrews located on the cable tray rail bracket The fixed rail locking bracket thumbscrew located farthest away from the server and the sliding rail cable tray thumbscrew located closest to the server The cable tray assembly comes standard with the f...

Страница 53: ...Attach the rail cable strap 1 and tighten the thumbscrew 2 Figure 3 6 Attaching the rail cable strap cable tray and server removed for clarity Connecting the Peripheral Device Cables and Power Cord WARNING To reduce the risk of electrical shock or fire do not plug telecommunications telephone connectors into the Network Interface Controller NIC connectors Use the following figure and table to iden...

Страница 54: ...M Figure 3 7 Rear panel connectors on the server Table 3 1 Rear Panel Connectors Location Connector 1 PCI expansion board slot 1 2 Video port 3 Dual USB ports 4 PCI expansion board slot 2 5 Hot plug power supply 1 6 iLO management port 7 Dual 10 100 1000 NIC ports 8 Serial port 9 Mouse connector 10 Keyboard connector 11 Unit Identification button LED CAUTION Cable the power cord last or electrical...

Страница 55: ...n doc Codename Ertl Part Number 293974 001 Last Saved On 10 11 02 11 19 AM Securing the Cables in the Cable Tray After attaching the cable tray and cable support bracket and connecting the peripheral devices and power cord secure all cabling To secure the cables in the cable tray 1 Open the cable straps Figure 3 8 Opening the cable straps cables removed for clarity ...

Страница 56: ...ion doc Codename Ertl Part Number 293974 001 Last Saved On 10 11 02 11 19 AM 2 Install cables Attach the power cord last 3 Starting with the peripheral device cables on the left route all of the cables and cords into the cable straps as shown in Figure 3 9 4 After all the cables are routed close the cable straps Figure 3 9 Closing the cable clamp on routed cables ...

Страница 57: ...talled in a Compaq branded rack Powering Up the Server The server is ready to be powered up after connecting the cables to the server and installing it in the rack To power up the server 1 Press the Power On Off switch 2 Confirm a successful power on sequence by ensuring that the Power On Off LED is illuminated green or amber Refer to Appendix E LEDs Switches and Jumpers After the server has succe...

Страница 58: ...g other hardware options as part of the server installation be sure to follow all procedures as defined in Chapter 2 Installing Hardware Options 1 Power up the server Refer to Powering Up the Server earlier in this chapter IMPORTANT SmartStart and the ROM Based Setup Utility RBSU can be used to configure certain system features Step 2 applies only to users who choose to configure their servers wit...

Страница 59: ...afety feature Plug the power cord into a grounded earthed electrical outlet that is easily accessible at all times Disconnect power from the server by unplugging the power cord from either the electrical outlet or the server Do not place anything on power cords or cables Arrange them so that no one can accidentally step on or trip over them Do not pull on a cord or cable When unplugging the cord f...

Страница 60: ...gistering the Server Registering the Server For server registration information refer to the Server Setup and Management pack that ships with the server or register the HP server online at www hp com servers proliant manage If configuring the server with SmartStart use the Server Profile Diskette to register after performing the configuration Simply follow the instructions on the HP website and in...

Страница 61: ...ilable in all countries where HP has a direct or indirect service presence Service can be ordered from and directly provided by an HP authorized service reseller In the United States service can be requested by calling 1 800 562 6672 In the United States HP makes all of the arrangements for complete rack system installation by qualified Guaranteed Service Providers An order form with pricing infor...

Страница 62: ...y RBSU performs a wide range of configuration activities including Configuring system devices and installed options Viewing system information Selecting the operating system Selecting the primary boot controller For information on RBSU not found in this guide refer to the ROM Based Setup Utility User Guide found in the Documentation CD Redundant ROM Support The user can upgrade or configure the RO...

Страница 63: ...ROM in the Advanced Options menu of RBSU 3 Select one of the ROM banks as the system ROM 4 Press the Enter key 5 Press the Esc key to exit the current menu or press the F10 key to exit RBSU 6 Restart the server When the server boots the system identifies whether the current ROM bank is corrupt If a corrupt ROM is detected the system boots from the backup ROM and alerts the user through Power On Se...

Страница 64: ...lashes both system ROM images At the successful completion of this process a sequence of ascending audible beeps is generated If the flash is not successful a sequence of descending audible beeps is generated 5 After successful completion of this process a Power down the server b Remove the ROMPaq diskette c Power up the server as usual If the ROMPaq upgrade procedure was unsuccessful power down t...

Страница 65: ...you to Install major server operating systems using packaged product CDs Install the latest optimized drivers Create and copy standard server configuration scripts using the Scripting Toolkit and Configuration Replication Utility Test server hardware using the new Enterprise Diagnostics LX32 Utility Update the latest system or option ROM using the ROM Update Utility Access software drivers directl...

Страница 66: ...The Autorun Menu enables the user to Install the latest Support Packs Create software diskettes for selected software SmartStart Scripting Toolkit The SmartStart Scripting Toolkit is a set of MS DOS based utilities that enable the user to configure and deploy servers in a customized predictable and unattended manner These utilities provide scripted server and array replication for mass server depl...

Страница 67: ...umentation in the right frame A list of Insight Manager 7 documentation will display IMPORTANT Insight Manager must be installed and used to benefit from the Prefailure Warranty on processors hard drives and memory modules Survey Utility Survey Utility is an online information gathering agent for Microsoft Windows Novell NetWare and Linux operating systems that collects critical hardware and softw...

Страница 68: ...e SmartStart CD or downloaded from www compaq com support files Option ROM Configuration for Smart Arrays Before installing an operating system you can use the Option ROM Configuration for Arrays ORCA utility to create the first logical drive and assign RAID levels The utility provides support for the following functions Configuring one or more logical drives using physical drives on one or more S...

Страница 69: ...rver within a predetermined amount of time after the system stops responding The Insight Manager console notifies the user in the event of an ASR restart The user can disable ASR from the Insight Manager console IMPORTANT The System Management driver must be installed for ASR to function Power On Self Test POST is a series of diagnostic tests that checks firmware and assemblies to ensure that the ...

Страница 70: ... primary boot controller execute RBSU by pressing the F9 key After the settings are selected according to the users preference exit RBSU and reboot the server For more information on this process refer to Chapter 3 of the ROM Based Setup Utility User Guide Boot Options After the auto configuration process completes or after the server reboots upon exit from RBSU the POST sequence runs and then the...

Страница 71: ...er For Linux IML Viewer Application For Netware IML Viewer Application For more information refer to the Servers Troubleshooting Guide on the Documentation CD or the Management CD in the ProLiant Essentials Foundation Pack Embedded NIC Configuration The dual embedded Network Interface Controllers NICs that ship with this server are Broadcom 10 100 1000 Ethernet NICs with Wake On Lan WOL support an...

Страница 72: ...marketing name or model number for the HP ProLiant DL360 Generation 3 server Federal Communications Commission Notice Part 15 of the Federal Communications Commission FCC Rules and Regulations has established Radio Frequency RF emission limits to provide an interference free radio frequency spectrum Many electronic devices including computers generate RF energy incidental to their intended functio...

Страница 73: ...n of this equipment in a residential area is likely to cause harmful interference in which case the user will be required to correct the interference at personal expense Class B Equipment This equipment has been tested and found to comply with the limits for a Class B digital device pursuant to Part 15 of the FCC Rules These limits are designed to provide reasonable protection against harmful inte...

Страница 74: ...g this server contact Hewlett Packard Company P O Box 692000 Mail Stop 530113 Houston Texas 77269 2000 or call 1 800 652 6672 For continuous quality improvement calls may be recorded or monitored For questions regarding this FCC declaration contact Hewlett Packard Company P O Box 692000 Mail Stop 510101 Houston Texas 77269 2000 or call 281 514 3333 To identify this product refer to the part series...

Страница 75: ...ents of the Canadian Interference Causing Equipment Regulations Cet appareil numérique de la classe B respecte toutes les exigences du Règlement sur le matériel brouilleur du Canada European Union Notice Products bearing the CE marking comply with the EMC Directive 89 336 EEC and the Low Voltage Directive 73 23 EEC issued by the Commission of the European Community and if this product has telecomm...

Страница 76: ...950 Product Safety Japanese Notice Taiwanese Notice Laser Devices All HP systems equipped with a laser device comply with safety standards including International Electrotechnical Commission IEC 825 With specific regard to the laser the equipment complies with laser product performance standards set by government agencies as a Class 1 laser product The product does not emit hazardous light the bea...

Страница 77: ...orized service technicians to repair the laser device Compliance with CDRH Regulations The Center for Devices and Radiological Health CDRH of the U S Food and Drug Administration implemented regulations for laser products on August 2 1976 These regulations apply to laser products manufactured from August 1 1976 Compliance is mandatory for products marketed in the United States Compliance with Inte...

Страница 78: ...Output Power Less than 0 2 mW or 10 869 W m 2 sr 1 Polarization Circular 0 25 Numerical Aperture 0 45 inches 0 04 inches Battery Replacement Notice This server is provided with an internal Lithium battery or battery pack There is a danger of explosion and risk of personal injury if the battery is incorrectly replaced or mistreated Replacement is to be done by an HP authorized service provider usin...

Страница 79: ...proper disposal please use the public collection system or return them to HP an authorized HP Partner or their agents Power Cords The power cord set included in the server meets the requirements for use in the country where the server was purchased If this server is to be used in another country purchase a power cord that is approved for use in that country The power cord must be rated for the pro...

Страница 80: ...ce Notices doc Codename Ertl Part Number 293974 001 Last Saved On 10 11 02 11 20 AM Mouse Compliance Statement This device complies with Part 15 of the FCC Rules Operation is subject to the following two conditions 1 this device may not cause harmful interference and 2 this device must accept any interference received including interference that may cause undesired operation ...

Страница 81: ...y from a finger or other conductor may damage system boards or other static sensitive devices This type of damage may reduce the life expectancy of the device Preventing Electrostatic Damage To prevent electrostatic damage Avoid hand contact by transporting and storing products in static safe containers Keep electrostatic sensitive parts in their containers until they arrive at static free worksta...

Страница 82: ...ter chassis Wrist straps are flexible straps with a minimum of 1 megaohm 10 percent resistance in the ground cords To provide proper grounding wear the strap snug against the skin Use heel straps toe straps or boot straps at standing workstations Wear the straps on both feet when standing on conductive floors or dissipating floor mats Use conductive field service tools Use a portable field service...

Страница 83: ...IAL Writer Richard O Heath File Name h appc Server Error Messages doc Codename Ertl Part Number 293974 001 Last Saved On 10 11 02 11 36 AM C Server Error Messages For a complete listing of error messages refer to the Servers Troubleshooting Guide also included on the documentation CD ...

Страница 84: ...x includes the following topics When the Server Does Not Start Step by step instructions are provided on what to try and where to go for help with the most common problems encountered during initial Power On Self Test POST A successful startup requires the server to complete this test each time it is powered up before the server can load the operating system and start running software applications...

Страница 85: ...duals who are knowledgeable about the procedures precautions and hazards associated with equipment containing hazardous energy circuits When the server does not start 1 Be sure that the server and monitor are plugged into a working outlet 2 Be sure that the power source is working properly Confirm status using the Power On Standby LED Refer to System Board LEDs in Appendix E for the location and s...

Страница 86: ... is powered up under normal operation The system has powered up successfully if a The front panel Power On Standby LED illuminates green b The fans start up c The monitor displays messages regarding server initialization in the following sequence Video initialization The initialization screen is displayed Processor initialization Memory test Memory initialization Diskette drive SCSI devices if app...

Страница 87: ...teps Question The Next Step Question 1 Is the front panel Power On Standby LED on illuminated solid green or flashing If no go to Table D 2 and then continue to Question 2 if the problem is not solved If yes continue to Question 4 Question 2 Is the front panel Internal Health LED red If no go to Table D 2 and then continue to Question 3 if the problem is not solved If yes continue to Question 4 Qu...

Страница 88: ...D 1 Diagnosis Steps continued Question The Next Step Question 4 Is anything visible on the monitor If no go to Table D 3 If yes video is available for diagnosis Determine the next action by observing POST progress and error messages Refer to the Servers Troubleshooting Guide for a complete description of each POST error message NOTE If the server attempts to load the operating system go to Problem...

Страница 89: ...upply has failed or is not connected 1 Be sure the power cables are fully connected 2 Press the power button 3 Confirm the power source is functioning Refer to the Servers Troubleshooting Guide for further options 4 Reconnect the power button cable to the system board Refer to Chapter 2 Installing Hardware Options for the location of the power button connector 5 Power down the server Reseat all ex...

Страница 90: ...t Step Video may not be properly connected Switches may not be correctly set on the system board If an optional video board was installed the monitor cable may not be correctly connected The monitor may be connected to the wrong video connector Expansion boards or DIMMs may not be properly connected or seated 1 Confirm that the monitor has power and that the monitor cable is securely connected If ...

Страница 91: ...Next Step 6 Listen for audible indicators such as a series of beeps A series of beeps indicates the presence of a POST error message Refer to the Servers Troubleshooting Guide for a complete listing of possible POST error messages 7 Monitor the diagnostic LEDs on the system board for failure conditions 8 Refer to the Servers Troubleshooting Guide for more information on video problems If these ste...

Страница 92: ...ation on supported operating systems refer to Appendix F Server Specifications or go to www compaq com products servers platforms NOTE If the server is rebooting repeatedly be sure that the system is not restarting due to an ASR power up caused by another problem Review Insight Manager for notification of this event Refer to the Servers Troubleshooting Guide for more information Refer to the Serve...

Страница 93: ...sed Setup Utility RBSU 2 Set defaults and exit the utility 3 Rerun RBSU to confirm the system configuration Refer to Chapter 4 Server Configuration and Utilities or refer to the ROM Based Setup Utility User Guide for complete instructions on the use of RBSU The optical drive diskette drive assembly is either not installed or is not properly connected 1 Power down the server 2 Ensure that the optic...

Страница 94: ...o reinstall first run the System Erase Utility Refer to the Servers Troubleshooting Guide CAUTION The System Erase Utility causes the loss of all configuration information as well as loss of existing data on all connected hard drives Read System Erase Utility and the associated cautionary statements in the Servers Troubleshooting Guide before performing this operation Server cannot load operating ...

Страница 95: ...ystem Refer to the documentation provided with the hardware Remove the new hardware Problem was encountered with hardware added to a system with a factory installed operating system The factory installed operating system software installation must be completed before adding new hardware to the system Be sure that all instructions provided in the HP Factory Installed Operating System Software Insta...

Страница 96: ... document It includes general hardware and software troubleshooting information for all HP ProLiant servers a complete list of error messages along with an explanation of probable cause and a list of appropriate measures This guide ships with the server HP ProLiant DL360 Generation 3 Server Maintenance and Service Guide This resource provides a complete list of all replacement parts available alon...

Страница 97: ...4 001 Last Saved On 10 11 02 11 23 AM E LEDs Switches and Jumpers Status Indicators The HP ProLiant DL360 Generation 3 server contains the following sets of LED indicators which indicate the status of hardware components and settings Front panel LED indicators Rear panel LED indicators System board LEDs Use the following sections to determine the location and status of LEDs on the server ...

Страница 98: ...identify and describe the location and function of the LEDs Figure E 1 Identifying the front panel LED indicators Table E 1 Identifying the Front Panel LED Indicators Location LED Status 1 Unit Identification LED button Blue Activated Blinking System remotely managed Off Deactivated 2 Internal health LED Red System critical Refer to system board LEDs to identify component in critical state Amber S...

Страница 99: ... If power is off view the rear panel RJ 45 LEDs 5 NIC 2 link activity LED Green Network link Blinking Network link and activity Off No link to network If power is off view the rear panel RJ 45 LEDs 6 Power On Standby button system power LED Amber System shut down but power still applied Green System on Off Power cord not attached or power supply failure Rear Panel LED Indicators The server rear pa...

Страница 100: ...umber 293974 001 Last Saved On 10 11 02 11 23 AM Table E 2 Rear Panel LED Indicators Location LED Status 1 iLO link On Link Off No Link 2 iLO activity On Activity Off No activity Blinking Activity 3 10 100 1000 NIC 1 On Link Off No Link Blinking Activity 4 10 100 1000 NIC 2 On Link Off No Link Blinking Activity 5 Rear unit identification LED switch Blue Activated Off Deactivated Blinking Remote in...

Страница 101: ...stem Board LEDs The system board contains various LEDs which display current conditions of the server These are identified in the illustration and table below Figure E 3 Locating the system board LEDs and switches Table E 3 System Board LEDs and Switches Item Description 1 Interlock LED 2 System debug LEDs 8 total 3 DIMM error LEDs 4 total 4 PPM 1 error LED 5 CPU 1 error LED 6 CPU 2 error LED 7 Ov...

Страница 102: ... the server must be reconfigured to recognize these changes If the system configuration is incorrect the server may not work properly and you may receive error messages on the screen IMPORTANT Reserved switches are provided for use by HP authorized service providers only and should not be changed from the indicated default settings Refer to Figure E 3 and Table E 3 for location on the system board...

Страница 103: ...Off No function On Override iLO security enabled S2 Configuration lock Off Off System configuration can be changed On System configuration is locked S3 Reserved Off Reserved S4 Floppy disable Off Off Disable floppy boot On Override RBSU setting and enable floppy boot S5 Password override Off Off Honor RBSU password setting On Override RBSU setting and override password prompts S6 Reset configurati...

Страница 104: ...inside of the server access panel for the proper switch settings The following table shows the shipping configuration of SW1 Table E 5 Hot Plug Redundant Power Supply PCI Install Switch SW1 Settings Position Function Default Description S1 Reserved Off Reserved S2 Reserved Off Reserved S3 Reserved Off Reserved S4 Identify PCI slot or Hot Plug Redundant Power Supply support Off Off Normal PCI slot ...

Страница 105: ... prepared to clear the system password 1 Power down the server 2 Set the switch at position 5 to the On position 3 Restart the server and wait for confirmation 4 Power down the server 5 Set the switch at position 5 to the default Off position 6 Restart the server The password is cleared Clearing and Resetting System Configuration Settings It may be necessary at some time to clear and reset system ...

Страница 106: ...ppe LEDs Switches and Jumpers doc Codename Ertl Part Number 293974 001 Last Saved On 10 11 02 11 23 AM NOTE For complete instructions on how to use RBSU refer to Chapter 4 Setting the NIC Operating Mode The NIC operating modes do not have to be set because the controllers automatically differentiate between the 10 Mbit 100 Mbit and 1 GB environments ...

Страница 107: ...Specifications for the ProLiant DL360 Generation 3 Server Table F 1 Operating and Performance Specifications Specifications Dimensions Height 4 32 cm 1 70 in Depth 69 22 cm 27 25 in Width 42 62 cm 16 78 in Weight maximum 16 78 kg 37 lb Weight no drives installed 12 47 kg 27 5 lb Input requirements Rated input voltage 100 VAC to 240 VAC Rated input frequency 50 Hz to 60 Hz Rated input current 3 8 A...

Страница 108: ...wer supply output Rated steady state power 325 W Maximum peak power 325 W Temperature range Operating See note 10 C to 35 C 50 F to 95 F Shipping See note 40 C to 70 C 40 F to 158 F Relative humidity noncondensing Operating See note 10 to 90 Non operating See note 5 to 95 Maximum wet bulb temperature 28 C 82 4 F NOTE Operating temperature has an altitude derating of 1 C per 304 8 M 1 000 ft No dir...

Страница 109: ...ur lithium 3 V replacement batteries P N 179322 001 Battery Replacement WARNING To reduce the risk of electric shock or equipment damage Do not disable the power cord grounding plug The grounding plug is an important safety feature Plug the power cord into a grounded earthed electrical outlet that is easily accessible at all times Disconnect power from the server or other product by unplugging the...

Страница 110: ... AM 4 Remove the existing battery Figure G 1 Removing the system battery 5 Install the new battery 6 Reinstall the Battery Backed Write Cache enabler battery pack 7 Reverse the procedures performed in the Accessing Internal Server Components section in Chapter 2 Installing Hardware Options 8 Run the ROM Based Setup Utility to reconfigure the system with the new battery See Chapter 4 Server Configu...

Страница 111: ... cable tray to rack 3 7 universal rack rails to rack 3 3 audible warnings D 8 Automatic Server Recovery See ASR B batteries disposal A 8 life G 1 part number G 1 recycling or disposal A 8 replacement A 7 battery warning A 8 Battery Backed Write Cache Enabler battery module installation 2 25 cable routing 2 26 installing 2 25 beeps D 8 See also POST BIOS See ROM firmware boards See expansion boards...

Страница 112: ...ility 4 7 DIMMs installation guidelines 2 7 installation procedure 2 8 disaster recovery 4 2 disengaging the rail release latches 2 5 diskette drive troubleshooting D 10 disposal battery A 8 dissipating floor mats B 2 documentation required for installation 1 7 drivers additional information D 9 E electric shock warning D 6 D 7 electrostatic discharge overview B 1 prevention measures B 1 environme...

Страница 113: ...duct questions A 3 HP authorized reseller xiii HP Management CD 4 6 HP ProLiant DL360 Generation 3 Server Maintenance and Service Guide D 13 HP website xiii humidity server F 2 I identifying front holes for rack rail installation 3 3 system board components 2 6 Important Safety Information 1 1 important safety information document ix input requirements F 1 inserting thumbscrews front panel 3 6 Ins...

Страница 114: ...ation 3 3 measuring with the template 3 2 memory See DIMMs installation guidelines 2 7 installation procedure 2 8 modifications FCC compliance statement A 3 monitor troubleshooting D 5 mouse FCC compliance statement A 9 N Network Interface Controllers NICs configuration 4 10 LEDs activity status E 4 LEDs link status E 4 load balancing and teaming 4 10 setting the operating mode E 10 Network Teamin...

Страница 115: ...voltage rating A 8 power cycling D 2 D 9 Power On Off switch 2 3 3 12 power strips grounding requirements 1 5 load restriction 1 5 power supplies load balancing 1 5 output power F 2 power switch See Power On Off switch power up sequence POST D 3 powering up the server 3 12 Power On Self Test See POST preconfigured operating system installation instructions 3 14 problems diagnosing See troubleshoot...

Страница 116: ...e rack 1 3 temperature 1 4 resources CarePaq D 13 HP ProLiant DL360 Generation 3 Server Maintenance and Service Guide D 13 Servers Troubleshooting Guide D 13 RFI EMI connector hoods A 3 riser board See PCI riser board assembly ROM automatic upgrade 4 9 corrupted 4 2 flashing 4 3 redundant support 4 1 system firmware update 4 8 upgrading 4 8 ROM Based Setup Utility See RBSU ROMPaq disaster recovery...

Страница 117: ...3 3 12 redundant power supply PCI SW1 E 8 settings system maintenance switch SW2 E 6 system maintenance switch SW2 E 6 symbols in text xi symbols on equipment ix system board battery replacement G 1 components 2 6 LEDs E 5 safety B 1 System Erase Utility D 11 System Firmware Update 4 8 system maintenance switch SW2 settings E 6 system architecture 1 1 T Taiwanese notice A 5 technical support xii t...

Страница 118: ...w 4 1 POST 4 8 RBSU 4 1 redundant ROM support 4 1 ROMPaq 4 3 SmartStart 4 4 V ventilation rack door 1 3 video troubleshooting D 7 voltage compliance rating A 8 rated input F 1 W warnings access panel removing D 6 D 7 audible D 8 beeps D 8 electric shock 3 8 3 14 D 6 D 7 equipment damage 3 14 hazardous energy circuits D 2 hot surfaces 2 2 plugging telephone connectors into NICs 3 8 rack installatio...

Отзывы: