Appendix F
A180 Support Management Station
Loading and Booting the OS on an A180 Support Management Station
175
Loading and Booting the OS on an A180 Support Management Station
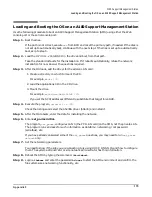
Use the following procedure to boot an A180 Support Management Station (SMS) using either the Web
console port or the serial console port:
Step 1. Boot the disk.
If the path is not correct, execute
sea
from BCH and reset the primary path, if needed. If the disk is
not set up to automatically boot, continue with the next step. If the disk is set up to automatically
boot, skip to step 5.
Step 2. Load the HPUX 11.x CoreOS CD in the drive and boot from that path.
Take the standard defaults for the installation. If it reboots automatically, refuse the network
installation for now. Answer the questions required.
Step 3. After the OS loads, add the driver for the add-on LAN card.
1. Create a directory on which to mount the CD.
For example,
mkdir /CD
.
2. Load the applications CD in the CD drive.
3. Mount the drive.
For example,
mount/dev/dsk/c0t1d0 /CD
.
If you set the SCSI addresses differently, substitute that target for cot1d0.
Step 4. Execute the program,
swinstall -s /CD
.
Check the listings and select the A5230A driver (btlan5) and install it.
Step 5. After the OS reboots, enter the data for installing the network.
Step 6. Enter set_parms initial.
The program,
set_parms
, configures LAN 0 (the PCI LAN card) on the SMS, not the private LAN.
The program runs and asks for such information as date/time, networking, root password
(serialbus), etc.
If you have already answered some of the
set_parms
questions, you may need to run
set_parms
network
only.
Step 7. Set the networking parameters.
You need to know if the site you are connecting to is using DHCP, DNS, NIS, and how to configure
them. The system administrator or site network administrator has this information.
Step 8. Reboot the SMS by typing the command,
/etc/reboot
.
Step 9. Login as
hduser
and enter the password
hd user
to start the SMS environment and confirm the
file system sizes, networking functionality, etc.
Содержание 9000 Superdome
Страница 8: ...Contents 8 ...
Страница 9: ...9 Preface ...
Страница 21: ...21 IEC 60417 IEC 335 1 ISO 3864 IEC 617 2 International Symbols ...
Страница 22: ...22 Figure 9 Superdome Declaration of Conformity Page 1 ...
Страница 23: ...23 Figure 10 Superdome Declaration of Conformity Page 2 ...
Страница 24: ...24 ...
Страница 32: ...Chapter 1 Introduction Installation Warranty 8 ...
Страница 130: ...Chapter 4 Verifying and Booting Superdome Enabling iCOD 106 ...
Страница 146: ...Chapter 6 Troubleshooting and Installation Related Tasks Installing a PCI I O Card While the Cell is Off 122 ...
Страница 154: ...Chapter 7 No Boot Disk Superdome Installations Installing the Superdome Operating System From Available Media 130 ...
Страница 172: ...Appendix A hp Server rx2600 Support Management Station Configuring the SMS 148 ...
Страница 184: ...Appendix C Superdome LAN Interconnect Diagram 160 ...
Страница 193: ...Appendix F 169 F A180 Support Management Station ...
Страница 230: ...Appendix G Connecting Multiple SPU Cabinets Connecting Cables 206 ...
Страница 256: ...Appendix H JUST Exploration Tool Error Conditions 232 ...


