background image

Table 5-7

  Memory module descriptions and part numbers

Description

Spare part number

4 GB

L10598-855

8 GB

937236-855

Before removing a memory module, follow these steps:

1.

Prepare the computer for disassembly (

Preparation for disassembly on page 26

).

2.

Remove the rubber feet (see 

Computer feet on page 26

).

3.

Remove the bottom cover (see 

Bottom cover on page 27

).

4.

Remove the battery (see 

Battery on page 28

).

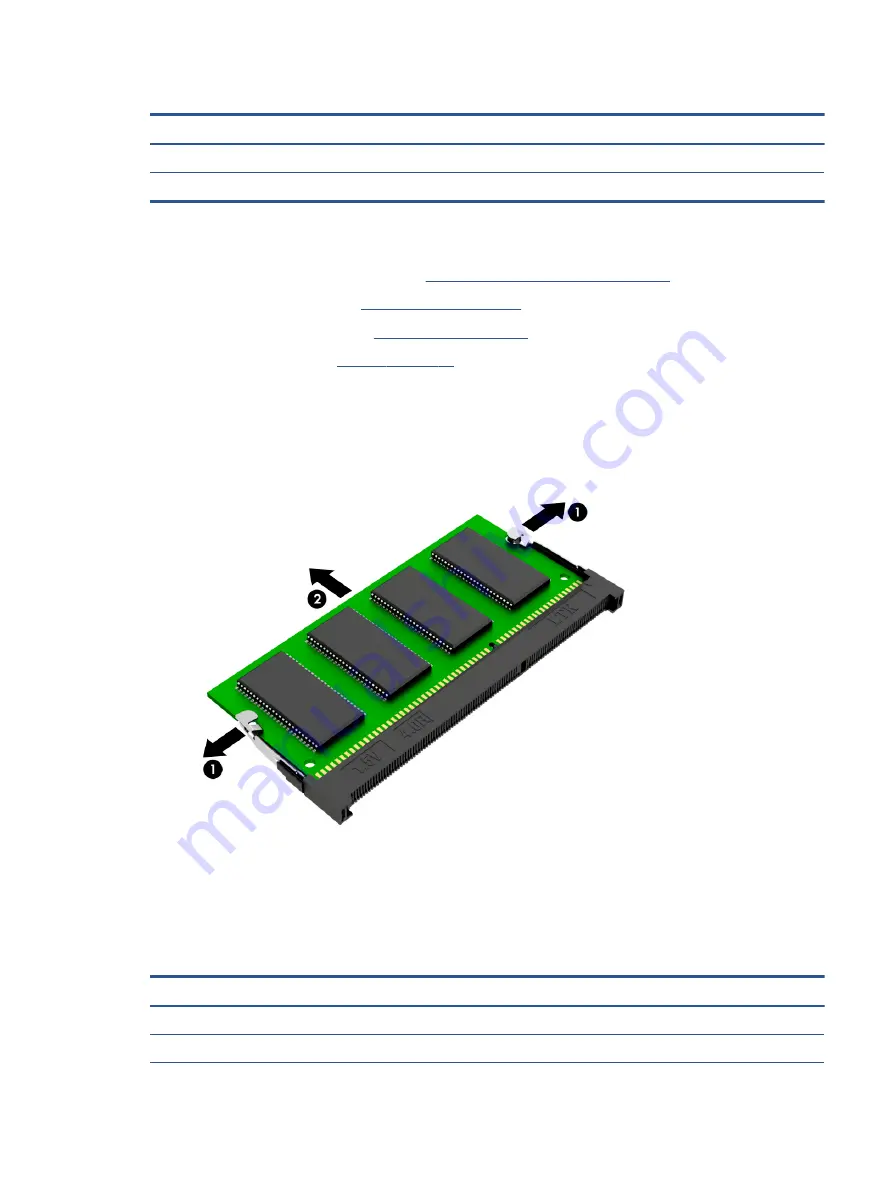
To remove a memory module:

1.

Spread the retaining tabs (1) on each side of the memory module slot to release the memory module. 
(The memory module tilts up.)

2.

Remove the memory module (2) by pulling it away from the slot at an angle.

Reverse this procedure to install a memory module.

Solid-state drive

To remove the solid-state drive, use this procedure and illustration.

Table 5-8

  Solid-state drive descriptions and part numbers

Description

Spare part number

Solid-state drive, PCIe:

1 TB

L85370-005

Component replacement procedures

35

Содержание 240 G8

Страница 1: ...Maintenance and Service Guide SUMMARY This guide provides information about spare parts removal and replacement of parts security backing up and more ...

Страница 2: ...s guide describes features that are common to most models Some features may not be available on your computer Not all features are available in all editions or versions of Windows Systems may require upgraded and or separately purchased hardware drivers software or BIOS update to take full advantage of Windows functionality Windows 10 is automatically updated which is always enabled ISP fees may a...

Страница 3: ...ct the computer air vents Use the computer only on a hard flat surface Do not allow another hard surface such as an adjoining optional printer or a soft surface such as pillows or rugs or clothing to block airflow Also do not allow the AC adapter to come into contact with the skin or a soft surface such as pillows or rugs or clothing during operation The computer and the AC adapter comply with the...

Страница 4: ...iv Safety warning notice ...

Страница 5: ...cedures preliminary requirements 21 Tools required 21 Service considerations 21 Plastic parts 21 Cables and connectors 21 Drive handling 21 Electrostatic discharge information 22 Generating static electricity 22 Preventing electrostatic damage to equipment 23 Personal grounding methods and equipment 23 Grounding the work area 24 Recommended materials and equipment 24 Packaging and transporting gui...

Страница 6: ...6 Updating the BIOS 57 Determining the BIOS version 57 Preparing for a BIOS update 57 Downloading a BIOS update 57 Installing a BIOS update 58 Changing the boot order using the f9 prompt 58 TPM BIOS settings select products only 58 Using HP Sure Start select products only 59 7 Backing up restoring and recovering 60 Backing up information and creating recovery media 60 Using Windows tools for backi...

Страница 7: ...ics UEFI 65 Using an HP PC Hardware Diagnostics UEFI hardware failure ID code 65 Starting HP PC Hardware Diagnostics UEFI 65 Downloading HP PC Hardware Diagnostics UEFI to a USB flash drive 66 Downloading the latest HP PC Hardware Diagnostics UEFI version 66 Downloading HP PC Hardware Diagnostics UEFI by product name or number select products only 66 Using Remote HP PC Hardware Diagnostics UEFI se...

Страница 8: ...11 Power cord set requirements 77 Requirements for all countries 77 Requirements for specific countries and regions 77 12 Recycling 79 Index 80 viii ...

Страница 9: ...aphics Intel Iris Plus Graphics i7 processors Intel UHD Graphics 620 i5 i3 processors Intel UHD Graphics 605 Pentium processors Intel UHD Graphics 600 Celeron processors Hybrid graphics AMD Radeon 620 graphics Panel 35 6 cm 14 0 in WLED antiglare eDP slim flat 3 0 mm 16 9 ultrawide aspect ratio narrow bezel High definition HD 1366 768 SVA Full high definition FHD 1920 1080 UWVA Memory Two memory m...

Страница 10: ...es 256 GB 128 GB PCIe NVMe M 2 solid state drives 1 TB 512 GB 512 GB 32 GB Optane memory 256 GB 256 GB 16 GB Optane memory Dual storage configurations 256 GB PCIe solid state drive 1 TB 5400 rpm hard drive 128 GB SATA 3 TLC solid state drive 1 TB 5400 rpm hard drive eMMC v5 0 64 GB Camera HP TrueVision HD Camera Indicator LED USB2 0 HD BSI sensor f2 0 720p by 30 frames per second Single digital mi...

Страница 11: ...Ports Hot plug unplug and auto detect for correct output to wide aspect vs standard aspect video auto adjust panel resolution to fit embedded panel and external monitor connected HDMI v1 4 supporting up to 1920 1080 60 Hz USB 3 2 Gen 1 Type C 2 USB 3 2 Gen 1 Type A RJ 45 network jack Audio out headphone audio in microphone combo jack AC Smart Pin adapter plug Keyboard pointing devices Keyboard Ful...

Страница 12: ...s 10 Home 64 Plus Single Language India Market PPP Windows 10 Home 64 Plus Single Language Indonesia Market PPP Windows 10 Home 64 Single Language Windows 10 Home 64 Single Language Africa Market PPP Windows 10 Home 64 Single Language APAC EM PPP Windows 10 Home 64 Single Language India Market PPP Windows 10 Home 64 Single Language Indonesia Market PPP Windows 10 Home 64 StF MSNA for Higher Educat...

Страница 13: ... Select the Start button select HP Help and Support and then select HP Documentation NOTE When a device is connected to the jack the computer speakers are disabled 2 USB SuperSpeed ports 2 Connect a USB device such as a cell phone camera activity tracker or smartwatch and provide high speed data transfer NOTE Use a standard USB Type A charging cable or cable adapter purchased separately when charg...

Страница 14: ...er or smartwatch and provides data transfer NOTE Use a standard USB Type C charging cable or cable adapter purchased separately when charging a small external device 3 Memory card reader Reads optional memory cards that enable you to store manage share or access information To insert a card 1 Hold the card label side up with connectors facing the computer 2 Insert the card into the memory card rea...

Страница 15: ...amera light On The camera is in use 3 Camera Allows you to video chat record video and record still images Some cameras also allow a facial recognition logon to Windows instead of a password logon NOTE Camera functions vary depending on the camera hardware and software installed on your product 4 Internal microphone Records sound The antennas are not visible from the outside of the computer For op...

Страница 16: ... the touchpad components Table 2 4 TouchPad components and their descriptions Component Description 1 Touchpad zone Reads your finger gestures to move the pointer or activate items on the screen 2 Left touchpad button Functions like the left button on an external mouse 3 Right touchpad button Functions like the right button on an external mouse Lights Use the illustration and table to identify the...

Страница 17: ...ock light On Caps lock is on which switches the key input to all capital letters 2 Mute light On Computer sound is off Off Computer sound is on Button vent and speakers Use the illustration and table to identify the button vent and speakers on the computer Keyboard area 9 ...

Страница 18: ...ss of unsaved information If the computer has stopped responding and shutdown procedures are ineffective press and hold the power button down for at least 4 seconds to turn off the computer To learn more about your power settings see your power options Right click the Power icon and then select Power Options 2 Vent Enables airflow to cool internal components NOTE The computer fan starts up automat...

Страница 19: ... functions when pressed in combination with another key 3 Windows key Opens the Start menu NOTE Pressing the Windows key again will close the Start menu 4 Action keys Execute frequently used system functions NOTE On select products the f5 action key turns the keyboard backlight feature off or on Bottom Use the illustration and table to identify the bottom component Bottom 11 ...

Страница 20: ...heck the following locations for the labels described in this section the bottom of the computer inside the battery bay under the service door on the back of the display or on the bottom of a tablet kickstand Service label Provides important information to identify your computer When contacting support you might be asked for the serial number the product number or the model number Locate this info...

Страница 21: ...l components Component 1 HP product name 2 Product ID 3 Serial number 4 Warranty period Regulatory labels Provide regulatory information about the computer Wireless certification labels Provide information about optional wireless devices and the approval markings for the countries or regions in which the devices have been approved for use Labels 13 ...

Страница 22: ...entify the computer major components use this illustration and table NOTE HP continually improves and changes product parts For complete and current information about supported parts for your computer go to http partsurfer hp com select your country or region and then follow the on screen instructions 14 Chapter 3 Illustrated parts catalog ...

Страница 23: ... Power connector L23188 001 8 Hard drive does not include bracket 1 TB 5400 rpm 7 mm L30422 005 500 GB 7200 rpm 7 mm 703267 005 500 GB 5400 rpm 7 mm 778186 005 9 Hard drive cable L23187 001 10 Hard drive bracket L24490 001 11 Battery 3 cell 41 Whr L11119 855 4 cell 46 Whr L71607 005 12 USB board NOTE The USB board cable is available using spare part number L23186 001 L24483 001 13 SSD board NOTE T...

Страница 24: ... processor M33066 xxx Intel Celeron N4020 processor L85887 xxx Intel Celeron N4020 processor with 64 GB of eMMC memory L85886 xxx 19 WLAN module Dual antennas Intel Wi Fi 6 AX201 NGW 802 11ax 2 2 Wi Fi Bluetooth 5 non vPro L57250 005 Realtek RTL8822BE 802 11ac 2 2 Wi Fi BT 5 0 Combo Adapter MU MIMO supported L44796 005 Single antenna Realtek RTL8821CE 802 11ac 1 1 Wi Fi BT 4 2 Combo Adapter MU MIM...

Страница 25: ...ry with a system fan L96692 001 25 For use in models with UMA graphics memory without a system fan L23190 001 26 Rubber Feet includes front and rear feet M23369 001 27 Bottom cover Dark ash silver for use in models with a 3 cell battery M23373 001 Dark ash silver for use in models with a 4 cell battery M23374 001 Asteroid silver M42492 001 Display assembly subcomponents To identify the display ass...

Страница 26: ...part number 1 Hinge cover M23371 001 2 Display bezel L24465 001 3 Raw display panel FHD antiglare UWVA M28173 001 HD antiglare WLED SVA M28174 001 4 Hinges left and right L24470 001 5 Camera module HD L23237 001 VGA L23238 001 6 Display cable 18 Chapter 3 Illustrated parts catalog ...

Страница 27: ...t for use in models without a system fan L31017 001 System board graphics pad for use in models with discrete graphics memory M03294 001 HP Backpack M03617 001 HP Smart AC adapter 45 W RC 4 5 mm nPFC nonslim 741727 001 65 W nPFC 3 pin 4 5 mm 710412 001 65 W nPFC RC 4 5 mm EM 913691 850 Power cord 3 pin black 1 0 m 3 3 ft for use in For use in Argentina L19357 001 For use in Australia L19358 001 Fo...

Страница 28: ...ued Component Spare part number For use in South Korea L19366 001 For use in Switzerland L19370 001 For use in Thailand L19371 001 For use in Taiwan L19372 001 For use in the United Kingdom L19373 001 Screw Kit M23370 001 20 Chapter 3 Illustrated parts catalog ...

Страница 29: ...work area to prevent damage Plastic parts Using excessive force during disassembly and reassembly can damage plastic parts Cables and connectors Handle cables with extreme care to avoid damage IMPORTANT When servicing the computer be sure that cables are placed in their proper locations during the reassembly process Improper cable placement can damage the computer Apply only the tension required t...

Страница 30: ...tive devices or microcircuitry Often the spark is neither felt nor heard but damage occurs An electronic device exposed to electrostatic discharge ESD might not appear to be affected at all and can work perfectly throughout a normal cycle The device might function normally for a while but it has been degraded in the internal layers reducing its life expectancy Networks built into many integrated c...

Страница 31: ...ssemblies with conductive or approved containers or packaging Keep electrostatic sensitive parts in their containers until they arrive at static free stations Place items on a grounded surface before removing them from their container Always be properly grounded when touching a sensitive component or assembly Avoid contact with pins leads or circuitry Place reusable electrostatic sensitive parts f...

Страница 32: ...when fixtures must directly contact dissipative surfaces Keep the work area free of nonconductive materials such as ordinary plastic assembly aids and polystyrene foam Use conductive field service tools such as cutters screwdrivers and vacuums Avoid contact with pins leads or circuitry Recommended materials and equipment HP recommends certain materials and equipment to prevent static electricity A...

Страница 33: ...s arrive at static free workstations Place items on a grounded surface before removing items from their containers Always be properly grounded when touching a component or assembly Store reusable ESD sensitive parts from assemblies in protective packaging or nonconductive foam Use transporters and conveyors made of antistatic belts and roller bushings Be sure that mechanized equipment used for mov...

Страница 34: ...vider only parts You must remove replace or loosen as many as 58 screws when servicing Authorized Service Provider only parts Make special note of each screw size and location during removal and replacement Preparation for disassembly To remove and replace computer components use these procedures See Removal and replacement procedures preliminary requirements on page 21 for initial safety procedur...

Страница 35: ...in those grooves when reinstalling the feet Bottom cover To remove the bottom cover use this procedure and illustration Table 5 2 Bottom cover descriptions and part numbers Description Spare part number Bottom cover dark ash silver for use in models with a 3 cell battery M23373 001 Bottom cover dark ash silver for use in models with a 4 cell battery M23374 001 Asteroid silver M42492 001 Before rem...

Страница 36: ...in plastic tool 1 to release the back cover Work your way around prying to disengage the bottom cover from the computer and then remove the cover 2 Reverse this procedure to install the bottom cover Battery To remove the battery use this procedure and illustration 28 Chapter 5 Removal and replacement procedures for authorized service provider parts ...

Страница 37: ...disassembly on page 26 2 Remove the rubber feet see Computer feet on page 26 3 Remove the bottom cover see Bottom cover on page 27 Remove the battery 1 Remove the five screws 1 securing the battery 2 Lift the top of the battery 2 and then remove the system board hook 3 Reverse this procedure to install the battery Hard drive To remove the hard drive use this procedure and illustration NOTE The har...

Страница 38: ... on page 26 2 Remove the rubber feet see Computer feet on page 26 3 Remove the bottom cover see Bottom cover on page 27 4 Remove the battery see Battery on page 28 Remove the hard drive 1 Disconnect the cable 1 from the system board and remove the cable 2 2 Lift the hard drive 3 and then remove it 4 from the computer 3 To remove the hard drive bracket pull the holder sides 1 up and away from the h...

Страница 39: ...Spare part number SSD board L24487 001 SSD bracket L24488 001 SSD cable L23397 001 Before removing the SSD board follow these steps 1 Prepare the computer for disassembly Preparation for disassembly on page 26 2 Remove the rubber feet see Computer feet on page 26 3 Remove the bottom cover see Bottom cover on page 27 4 Remove the battery see Battery on page 28 To remove the SSD board 1 Lift the ZIF...

Страница 40: ...cket remove the three Phillips M2 0 3 0 screws 1 that secure the board to the bracket and then remove the board from the bracket 2 Reverse this procedure to reassemble and install the SSD board 32 Chapter 5 Removal and replacement procedures for authorized service provider parts ...

Страница 41: ...our country or region If you replace the module and then receive a warning message remove the module to restore device functionality and then contact support Before removing the WLAN module follow these steps 1 Prepare the computer for disassembly Preparation for disassembly on page 26 2 Remove the rubber feet see Computer feet on page 26 3 Remove the bottom cover see Bottom cover on page 27 4 Rem...

Страница 42: ...s on the WLAN module the protective sleeves must be installed on the antenna connectors as shown in the following illustration Reverse this procedure to install the WLAN module Memory module To remove the memory modules use this procedure and illustration 34 Chapter 5 Removal and replacement procedures for authorized service provider parts ...

Страница 43: ...ve the battery see Battery on page 28 To remove a memory module 1 Spread the retaining tabs 1 on each side of the memory module slot to release the memory module The memory module tilts up 2 Remove the memory module 2 by pulling it away from the slot at an angle Reverse this procedure to install a memory module Solid state drive To remove the solid state drive use this procedure and illustration T...

Страница 44: ...ssembly on page 26 2 Remove the rubber feet see Computer feet on page 26 3 Remove the bottom cover see Bottom cover on page 27 4 Remove the battery see Battery on page 28 Remove the solid state drive 1 Remove the Phillips M2 0 2 0 screw 1 that secures the drive to the system board 2 Remove the drive 2 by pulling it away from the connector NOTE Solid state drives are designed with notches to preven...

Страница 45: ...ve the bottom cover see Bottom cover on page 27 4 Remove the battery see Battery on page 28 To remove the speakers 1 Disconnect the speaker cable from the system board 1 2 Remove the tape 2 securing the cable 3 Lift the speakers out of the computer 3 Reverse this procedure to install the speakers Power connector To remove the power connector use this procedure and illustration Table 5 10 Power con...

Страница 46: ...or 1 Disconnect the power connector cable 1 from the system board 2 Lift the power connector 2 to remove it Reverse this procedure to install the power connector Touchpad click board To remove the touchpad click board use this procedure and illustration Table 5 11 Touchpad click board part descriptions and part numbers Description Spare part number Touchpad click board L24486 001 Touchpad board ca...

Страница 47: ...M2 0 2 0 screws 3 that secure the touchpad click board to the computer 3 Lift the board and then slide it outward from under the clips that hold it on place to remove it 4 TIP The edge of the board sits under clips Be sure to slide the board out from under the clips to prevent damage to the board or clips Reverse this procedure to install the touchpad click board Touchpad To remove the touchpad us...

Страница 48: ...edure and illustration Table 5 13 USB board and cable descriptions and part numbers Description Spare part number USB board L24483 001 USB board cable L23186 001 Before removing the USB board follow these steps 1 Prepare the computer for disassembly Preparation for disassembly on page 26 2 Remove the rubber feet see Computer feet on page 26 3 Remove the bottom cover see Bottom cover on page 27 4 R...

Страница 49: ...emoving the fan follow these steps 1 Prepare the computer for disassembly Preparation for disassembly on page 26 2 Remove the rubber feet see Computer feet on page 26 3 Remove the bottom cover see Bottom cover on page 27 4 Remove the battery see Battery on page 28 Remove the fan 1 Disconnect the fan cable from the system board 1 2 Remove the two Phillips M2 5 5 0 screws 2 that secure the fan to th...

Страница 50: ...m boards use the following part numbers xxxxxx 001 Non Windows operating system xxxxxx 601 Windows operating system For use in models with discrete graphics Intel Core i7 1065G7 processor M23363 xxx Intel Core i5 1035G1 processor L89468 xxx Intel Core i3 1005G1 processor M13938 xxx For use in models with UMA graphics Intel Core i7 1065G7 processor M23360 xxx Intel Core i5 1035G1 processor L89470 x...

Страница 51: ...ge 28 5 Remove the fan see Fan on page 41 NOTE When replacing the system board be sure that the following components are removed from the defective system board and installed on the replacement system board WLAN module see WLAN module on page 33 Memory modules see Memory module on page 34 Solid state drive if installed see Solid state drive on page 35 Heat sink assembly see Heat sink assembly on p...

Страница 52: ...ssembly To remove the heat sink assembly use this procedure and illustration Table 5 16 Heat sink assembly description and part number Description Spare part number Heat sink for use in models with UMA graphics memory without a system fan L23190 001 Heat sink for use in models with UMA graphics memory with a system fan L96692 001 Heat sink for use in models with discrete graphics memory L96693 001...

Страница 53: ...ee Computer feet on page 26 3 Remove the bottom cover see Bottom cover on page 27 4 Remove the battery see Battery on page 28 Remove the heat sink assembly 1 Discrete graphics In the order indicated on the heat sink remove the six Phillips M2 0 2 8 screws 1 that secure the heat sink to the system board 2 Remove the heat sink 2 Component replacement procedures 45 ...

Страница 54: ...d on the integrated system board processor 1 and associated location on the heat sink 2 Thermal pads are used on specific system board components 3 and associated locations on the heat sink 4 4 UMA graphics with a fan In the order indicated on the heat sink remove the four Phillips M2 0 2 8 screws 1 that secure the heat sink to the system board 5 Remove the heat sink 2 46 Chapter 5 Removal and rep...

Страница 55: ...al is included with the heat sink and system board spare part kits Thermal paste is used on the integrated system board processor 1 and the heat sink 2 7 UMA graphics without a fan In the order indicated on the heat sink remove the four Phillips M2 0 4 0 screws 1 that secure the heat sink to the system board 8 Remove the heat sink 2 Component replacement procedures 47 ...

Страница 56: ...tall the heat sink assembly Display assembly To remove the display assembly use this procedure and illustration Table 5 17 Display assembly part descriptions and part numbers Description Spare part number Hinge cover M23371 001 Display bezel L24465 001 Webcam microphone module HD L23237 001 VGA L23238 001 Raw display panel FHD antiglare UWVA M28173 001 HD antiglare WLED SVA M28174 001 Hinges left ...

Страница 57: ...aration for disassembly on page 26 2 Remove the rubber feet see Computer feet on page 26 3 Remove the bottom cover see Bottom cover on page 27 4 Remove the battery see Battery on page 28 To remove the display assembly 1 Disconnect the display cable from the system board 1 2 Disconnect the wireless antenna cables from the WLAN module 2 3 Position the computer so it is open with the display hanging ...

Страница 58: ...e 3 and then remove the display 4 If it is necessary to replace any of the display assembly subcomponents 6 Lift the hinge cap to remove it from display 50 Chapter 5 Removal and replacement procedures for authorized service provider parts ...

Страница 59: ... Remove the display bezel 4 9 To remove the webcam microphone module a Position the display assembly with the top edge toward you b Lift the webcam module to disengage the adhesive that secures the module to the display 1 c Lift the tape from the connector 2 and then disconnect the cable 3 from the module 10 To remove the display panel Component replacement procedures 51 ...

Страница 60: ...the display panel 3 Rotate the display panel over and place it next to the display enclosure 4 TIP You must pull the tape several times to remove it b Rotate the display panel onto the keyboard 1 to gain access to the display cable connection on the back of the panel c On the back of the display panel release the adhesive strip that secures the display panel cable to the display panel and then dis...

Страница 61: ...lay panel 3 to remove it 11 To remove the display hinges a Remove the three Phillips M2 5 2 5 screw 1 from the bottom of each hinge b Remove the display hinges from the enclosure 2 Component replacement procedures 53 ...

Страница 62: ...ntenna cables from the clips 1 built into the side of the display enclosure and then peel the antennas of the display enclosure 2 to remove the antennas and cables NOTE Number of antennas and transceivers can vary 14 If replacing the display enclosure be sure that the subcomponents including the webcam microphone module the antenna receivers and all associated cables and hardware are transferred t...

Страница 63: ... Spare part number For use in country or region Spare part number Belgium A41 Israel BB1 Slovenia BA1 Bulgaria 261 Italy 061 South Korea AD1 Canada DB1 Japan 291 Spain 071 Czech Republic and Slovakia FL1 Latin America 161 Switzerland BG1 Denmark Finland and Norway DH1 The Netherlands B31 Taiwan AB1 France 051 Portugal 131 Thailand 281 Germany 041 Romania 271 Turkey 141 Greece 151 Russia 251 United...

Страница 64: ...r use a pointing device to select the item To scroll up and down select the up arrow or the down arrow in the upper right corner of the screen or use the up arrow key or the down arrow key on the keyboard To close open dialog boxes and return to the main Computer Setup screen press esc and then follow the on screen instructions To exit Computer Setup choose one of the following methods To exit Com...

Страница 65: ...Setup 1 Start Computer Setup See Using Computer Setup on page 56 2 Select Main and then select System Information 3 To exit Computer Setup menus without saving your changes select Main select Ignore Changes and Exit and then select Yes NOTE If you are using arrow keys to highlight your choice you must then press enter To check for later BIOS versions see Preparing for a BIOS update on page 57 Prep...

Страница 66: ...ctions that are displayed on the screen after the download is complete If no instructions are displayed follow these steps 1 Type file in the taskbar search box and then select File Explorer 2 Select your hard drive designation The hard drive designation is typically Local Disk C 3 Using the hard drive path you recorded earlier open the folder that contains the update 4 Double click the file that ...

Страница 67: ...uter Setup See Using Computer Setup on page 56 2 Select Security select TPM Embedded Security and then follow the on screen instructions Using HP Sure Start select products only Select computer models are configured with HP Sure Start a technology that monitors the computer s BIOS for attacks or corruption If the BIOS becomes corrupted or is attacked HP Sure Start automatically restores the BIOS t...

Страница 68: ...age is 32 GB or less Microsoft System Restore is disabled by default Using the HP Cloud Recovery Download Tool to create recovery media select products only You can use the HP Cloud Recovery Download Tool to create HP Recovery media on a bootable USB flash drive For details Go to http www hp com support search for HP Cloud Recovery and then select the result that matches the type of computer that ...

Страница 69: ...the original operating system and software programs that were installed at the factory On select products it can be created on a bootable USB flash drive using the HP Cloud Recovery Download Tool For details see Using the HP Cloud Recovery Download Tool to create recovery media select products only on page 60 NOTE If you cannot create recovery media yourself contact support to obtain recovery disc...

Страница 70: ... then follow the on screen instructions Using HP Sure Recover select products only Select computer models are configured with HP Sure Recover a PC operating system OS recovery solution built into the hardware and software HP Sure Recover can fully restore the HP OS image without installed recovery software Using HP Sure Recover an administrator or user can restore the system and install Latest ver...

Страница 71: ...failure that requires hardware replacement a 24 digit Failure ID code is generated Depending on the instructions on the screen choose one of these options If failure ID link is displayed select the link and follow the on screen instructions If instructions for calling support are displayed Follow those instructions Accessing HP PC Hardware Diagnostics Windows After HP PC Hardware Diagnostics Windo...

Страница 72: ...ool downloads to the selected location Downloading the HP PC Hardware Diagnostics Windows from the Microsoft Store You can download the HP PC Hardware Diagnostics Windows from the Microsoft Store 1 Select the Microsoft Store app on your desktop or enter Microsoft Store in the taskbar search box 2 Enter HP PC Hardware Diagnostics Windows in the Microsoft Store search box 3 Follow the on screen dire...

Страница 73: ...ou can use HP PC Hardware Diagnostics UEFI to diagnose hardware issues Using an HP PC Hardware Diagnostics UEFI hardware failure ID code When HP PC Hardware Diagnostics UEFI detects a failure that requires hardware replacement a 24 digit Failure ID code is generated For assistance in solving the problem Select Contact HP accept the HP privacy disclaimer and then use a mobile device to scan the Fai...

Страница 74: ...edure 1 Go to http www hp com go techcenter pcdiags The HP PC Diagnostics home page is displayed 2 Select Download HP Diagnostics UEFI and then select Run Downloading HP PC Hardware Diagnostics UEFI by product name or number select products only You can download HP PC Hardware Diagnostics UEFI by product name or number select products only to a USB flash drive NOTE For some products you might have...

Страница 75: ...ustomizing Remote HP PC Hardware Diagnostics UEFI settings Using the Remote HP PC Hardware Diagnostics setting in Computer Setup BIOS you can perform several customizations Set a schedule for running diagnostics unattended You can also start diagnostics immediately in interactive mode by selecting Execute Remote HP PC Hardware Diagnostics Set the location for downloading the diagnostic tools This ...

Страница 76: ... lb Hard drive 1511 g 3 35 lb SSD HDD 1519 g 5 67 lb Input power Operating voltage and current 19 5 V dc 3 33 A 65 W Temperature Operating 5 C to 35 C 41 F to 95 F Nonoperating 20 C to 60 C 4 F to 140 F Relative humidity noncondensing Operating 10 to 90 Nonoperating 5 to 95 Maximum altitude unpressurized Operating 15 m to 3 048 m 50 ft to 10 000 ft Nonoperating 15 m to 12 192 m 50 ft to 40 000 ft ...

Страница 77: ... 100 4 mm 100 6 mm Width 69 9 mm 70 1 mm Weight 115 0 g 92 0 g Interface type SATA SATA Transfer rate Synchronous maximum 300 MB s 300 MB s Security ATA security ATA security Seek times typical read including setting Single track 1 4 ms 3 ms Average read write 10 ms 13 ms Maximum 12 ms 24 ms Logical blocks 1 938 921 461 1 048 576 000 Disk rotational speed 5400 rpm 5400 rpm Operating temperature 0 ...

Страница 78: ...ential read up to 2150 MB s up to 2150 MB s up to 2150 MB s Random read Up to 300 000 IOPs Up to 300 000 IOPs Up to 300 000 IOPs Sequential write up to 1550 MB s up to 1550 MB s up to 1550 MB s Random write Up to 100 000 IOPs Up to 100 000 IOPs Up to 100 000 IOPs Total logical sectors 468 883 296 1 000 215 216 1 500 336 388 Operating temperature 0 C to 70 C 32 F to 158 F 1 GB 1 billion bytes when ...

Страница 79: ...ase before beginning steps in this chapter Current BIOS steps Use these instructions to restore nonvolatile memory 1 Follow these steps to restore the nonvolatile memory that can contain personal data Restoring or reprogramming nonvolatile memory that does not store personal data is neither necessary nor recommended a Turn on or restart the computer and then quickly press esc NOTE If the system ha...

Страница 80: ...hours 2 Complete one of the following Remove and retain the storage drive or Clear the drive contents by using a third party utility designed to erase data from an SSD or Clear the contents of the drive by using the following BIOS Setup Secure Erase command option steps If you clear data using Secure Erase you cannot recover it a Turn on or restart the computer and then quickly press esc b Select ...

Страница 81: ...OS or by changing the Windows date time This memory is not write protected Controller NIC EEPROM 64 KB not customer accessible No Yes Stores NIC configuration and NIC firmware NIC EEPROM is programmed using a utility from the NIC vendor that can be run from DOS A utility must be used to write data to this memory and is available from the NIC vendor Writing data to this ROM in an inappropriate mann...

Страница 82: ...ting the firmware Only firmware updates digitally signed by Intel can be applied using this utility Bluetooth flash select products only 2 megabits No Yes Stores Bluetooth configuration and firmware Bluetooth flash is programmed at the factory Tools for writing data to this memory are not publicly available but can be obtained from the silicon vendor A utility must be used for writing data to this...

Страница 83: ...em diagnostics The UEFI BIOS provides functionality beyond that of the legacy BIOS In addition the UEFI BIOS works to initialize the computer s hardware before loading and executing the OS the runtime environment allows the loading and execution of software programs from storage devices to provide more functionality such as advanced hardware diagnostics with the ability to display more detailed sy...

Страница 84: ...ar or delete all Secure Boot Keys a Turn on or restart the computer and then quickly press esc b Select the Security menu select Secure Boot Configuration and then follow the on screen instructions c At the Secure Boot Configuration window select Secure Boot select Clear Secure Boot Keys and then follow the on screen instructions to continue Using HP Sure Start select products only Select computer...

Страница 85: ...wer cord sets must be approved by an acceptable accredited agency responsible for evaluation in the country or region where the power cord set will be used The power cord sets must have a minimum current capacity of 10 A and a nominal voltage rating of 125 V ac or 250 V ac as required by the power system of each country or region The appliance coupler must meet the mechanical configuration of an E...

Страница 86: ...pler flexible cord and wall plug must bear a T mark and registration number in accordance with the Japanese Dentori Law The flexible cord must be Type VCTF 3 conductor 0 75 mm or 1 25 mm conductor size The wall plug must be a two pole grounding type with a Japanese Industrial Standard C8303 7 A 125 V ac configuration 4 The flexible cord must be Type RVV 3 conductor 0 75 mm conductor size Power cor...

Страница 87: ...he battery in general household waste Follow the local laws and regulations in your area for battery disposal HP encourages customers to recycle used electronic hardware HP original print cartridges and rechargeable batteries For more information about recycling programs see the HP website at http www hp com recycle 79 ...

Страница 88: ...settings 56 starting 56 computer specifications 68 connector power 5 D display assembly illustrated 14 removing 48 spare part numbers 14 display assembly subcomponents illustrated 17 removing 48 display bezel illustrated 17 48 removing 48 display cable illustrated 17 48 removing 48 display components 7 display enclosure illustrated 17 48 removing 48 display panel illustrated 17 48 product descript...

Страница 89: ...delines 21 25 pointing device product description 1 ports HDMI 5 product description 1 USB SuperSpeed 5 USB Type C 6 power button identifying 9 power connector identifying 5 illustrated 14 removing 37 power cord requirements for all countries 77 requirements for specific countries and regions 77 set requirements 77 power lights identifying 6 power requirements product description 1 processor 1 pro...

Страница 90: ...ustrated 14 top cover with keyboard 55 touchpad removing 39 spare part number 39 touchpad board illustrated 14 touchpad buttons identifying 8 touchpad click board illustrated 14 removing 38 spare part number 38 touchpad click board cable illustrated 14 touchpad zone identifying 8 TPM settings 58 transporting guidelines 21 25 traveling with the computer 12 U USB board illustrated 14 removing 40 spa...

Отзывы: