

A
B
C
D
E
F
G
H
I
J
K
L
M
N
01
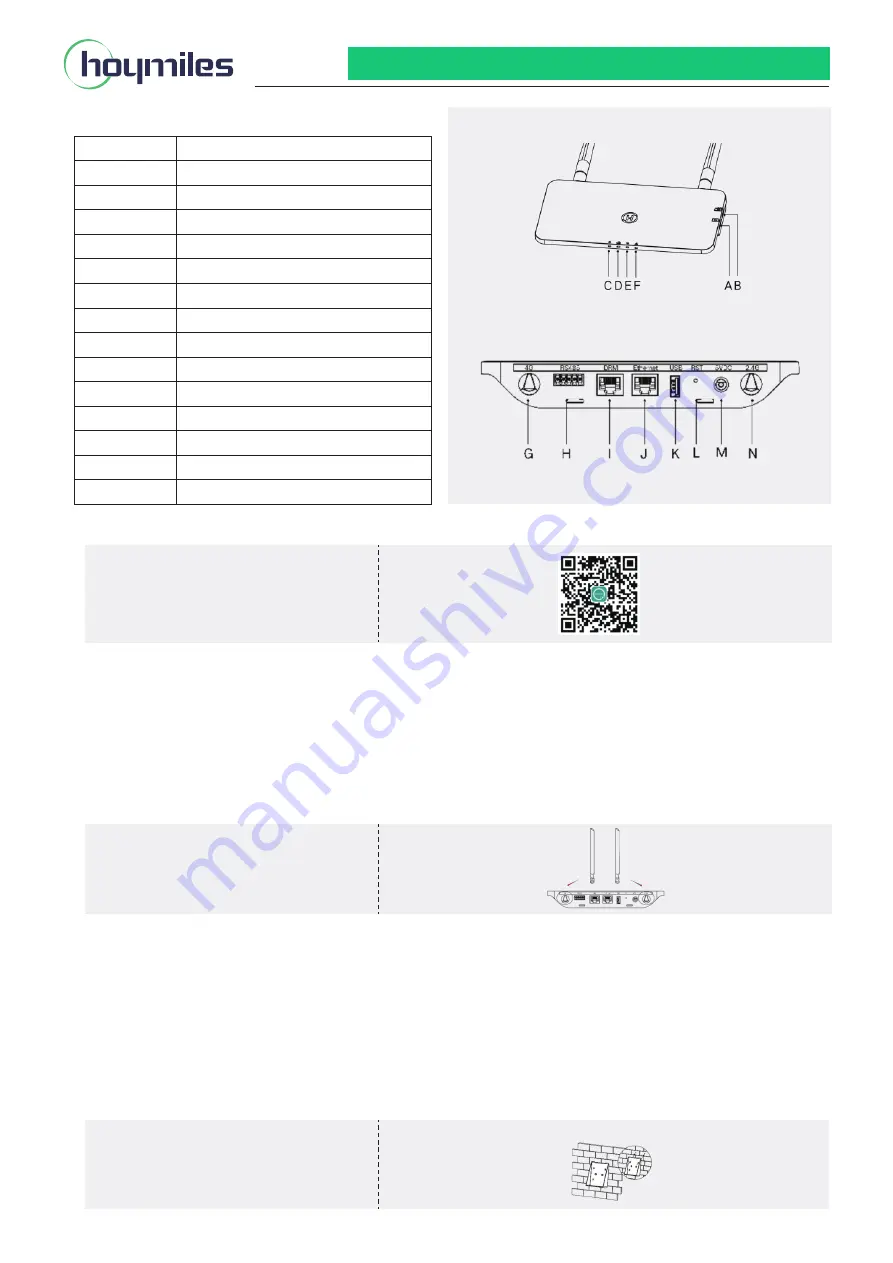
1. Interface Layout
Item
Description
SIM Card Slot
SD Card Slot
DTU Power Indicator
DTU Communication Indicator (With Server)
DTU Communication Indicator (With MI)
DTU Alarm Indicator
4G Antenna
RS485
DRM Port (For Australia only)
Ethernet Port
USB Port
Reset Bottom
Power Port
2.4G Antenna
- Screw the bracket on the wall, please
use at least two screw holes (one on
each side) to affix the bracket (M4
screws need to be prepared by installer).
3. Installation
DTU-Pro(4G) Quick Installation Guide
A)
Take the 2.4G antenna and the 4G
antenna out of the box, and screw the
antennas into the 2.4G port and 4G port.
B)
Check the box for the following items:
- Hoymiles DTU-Pro
-
One 2.4G Antenna
-
One 4G Antenna
-
Adapter
-
Bracket
-
5-Pin Plug
C)
Choose the way DTU-Pro connects to the Internet: Use
4G or Ethernet. Prepare the following items if needed:
- SIM Card (if 4G option is selected)
- Router Ethernet Cable (if Ethernet option is selected)
- Smartphone/Tablet with Hoymiles Installer App (if
Ethernet option is selected)
B)
If you select the 4G option, insert the SIM card into the SIM card slot on the side of the DTU. Press the SIM card in
until you hear a clicking sound. (If 4G option is selected.)
C)
Choose an installation location.
- Install on the top floor to increase signal strength.
- Install near the center of the PV array.
- Install at least 0.5 m above the ground and more than 0.8 m away from corners.
Note: Please do not install the DTU directly above metal or concrete to prevent signal interference.
D)
Choose the installation method.
Option 1: Mount the DTU on the wall.
A)
Download the Hoymiles Mobile Installer
App.
2. Preparation
Region: Global AP040342 REV1.2
© 2020 Hoymiles Power Electronics Inc. All rights reserved.


