background image

2

Rev. 5/8/2014

DTDU

LED Dusk-to-Dawn

Utility-grade

INSTALLATION INSTRUCTIONS

For models:

DTDU-48-LED-41-MV

This model number does not include a mounting arm, photoelectric control.

Input voltage: 120-277v 50/60Hz

Color Temperature: 4100K

Shorting Cap Included

Consult Factory for Photoelectric Control ordering and specified voltage.

Technical Specifications

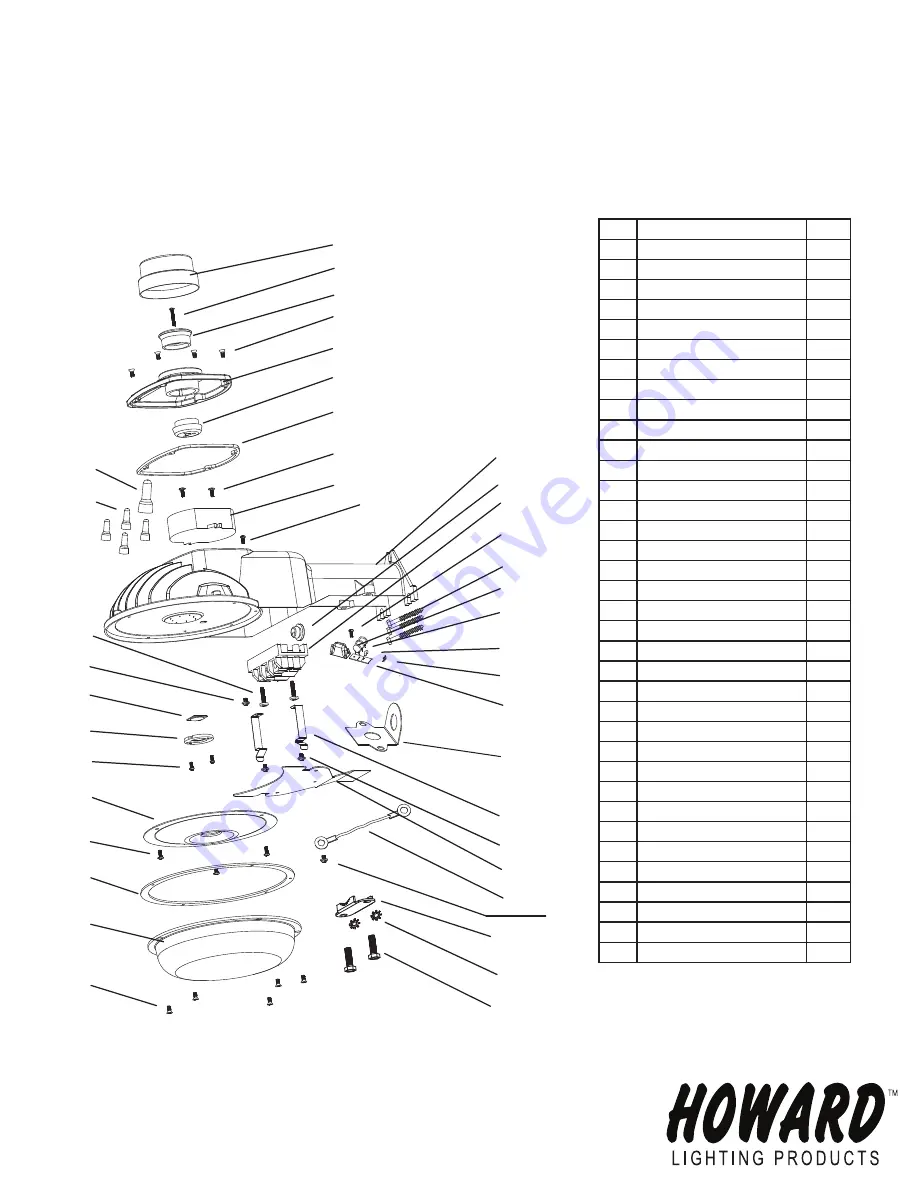
Figure 1

NO.  DESCRIPTION 

QTY

Shorting cap

1

Ball screws 

1

Photocell socket (Top) 

1

Screws

9

Top Cover

1

Photocell socket (Bottom) 1

Gasket

1

8

Screws

6

9

Driver

1

10

Screws

2

11

Housing

1

12

Water gasket

1

13

Terminal block

1

14

Lag screw

3

15

Heat shrink sleeve

1

16

MOV

3

17

Thermal fuse

1

18

Cable

3

19

PCB

1

20

Wall mount cover plate

1

21

Fitter Clamp

1

22

Stainless spring

2

23

Screw with washer

3

24

Cover plate

1

25

Tether cord

1

26

Acrylic refractor

1

27

Gasket

1

28

Refractor

1

29

Ball screws

3

30

LED cover

1

31

LED

1

32

Screw

1

33

Screw

2

34

C4 terminal

4

35

C5 terminal

1

36

Lock washer

2

1

2
3

4
5
6
7

8
9

10

11

12

13
29
14
15

16

17
18
19

21

20

22
23
24
25

23

35
34

33
32
31

30
29

28

8

27

26

4

36

8

Содержание DTDU-35LED-41-MV

Страница 1: ...um 4 feet from the ground 2 Place mounting section of fixture onto desired mounting surface mark and drill holes for mounting 3 This fixture can be mounted with three lag screws which are provided Fig 1 14 4 Install the two bottom lag screws first 5 Place the fixture on the two bottom lag screws and install the top lag screw 6 Tighten the top lag screw first and then tighten the remaining lag scre...

Страница 2: ...cell socket Top 1 Screws 9 Top Cover 1 Photocell socket Bottom 1 Gasket 1 Screws 5 Driver 1 10 Screws 2 11 Housing 1 12 Water gasket 1 13 Terminal block 1 14 Lag screw 3 15 Heat shrink sleeve 1 16 MOV 3 17 Thermal fuse 1 18 Cable 3 19 PCB 1 20 Wall mount cover plate 1 21 Fitter clamp 1 22 Stainless spring 2 23 Screw with washer 3 24 Cover plate 1 25 Tether cord 1 26 Acrylic refractor 1 27 Gasket 1...

Страница 3: ... 4 feet from the ground 2 Place mounting section of fixture onto desired mounting surface mark and drill holes for mounting 3 This fixture can be mounted with three lag screws which are provided Fig 1 14 4 Install the two bottom lag screws first 5 Place the fixture on the two bottom lag screws and install the top lag screw 6 Tighten the top lag screw first and then tighten the remaining lag screws...

Страница 4: ... 1 4 Screws 9 5 Top Cover 1 6 Photocell socket Bottom 1 7 Gasket 1 8 Screws 6 9 Driver 1 10 Screws 2 11 Housing 1 12 Water gasket 1 13 Terminal block 1 14 Lag screw 3 15 Heat shrink sleeve 1 16 MOV 3 17 Thermal fuse 1 18 Cable 3 19 PCB 1 20 Wall mount cover plate 1 21 Fitter Clamp 1 22 Stainless spring 2 23 Screw with washer 3 24 Cover plate 1 25 Tether cord 1 26 Acrylic refractor 1 27 Gasket 1 28...

Отзывы: