Chapter 15. Optional System Components
180
Hospira GemStar System Operating Manual
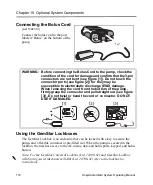
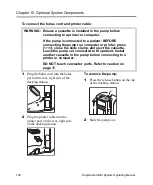
To connect the bolus cord and printer cable:
1
Plug the bolus cord into the bolus
port on the rear, right side of the
docking station.
2
Plug the printer cable into the
printer port on the rear, right side
of the docking station.
To remove the pump:
1
Press the release button on the top
of the docking station.
2
Slide the pump out.
WARNING: Ensure a cassette is installed in the pump before
connecting to a printer or computer.
If the pump is connected to a patient: BEFORE
connecting the pump to a computer or printer, press
[
STOP
], close the slide clamp, and eject the cassette.
Leave the pump set connected to the patient. Install
another cassette in the pump before connecting to a
printer or computer.
DO NOT touch connector ports. Refer to caution on
Содержание GemStar Series
Страница 9: ...Notes viii Hospira GemStar System Operating Manual ...
Страница 11: ...Chapter 1 Introduction 2 Hospira GemStar System Operating Manual GemStar Pump Layout Shown approximate size ...
Страница 27: ...Notes 18 Hospira GemStar System Operating Manual ...
Страница 67: ...Notes 58 Hospira GemStar System Operating Manual ...
Страница 77: ...Notes 68 Hospira GemStar System Operating Manual ...
Страница 87: ...Notes 78 Hospira GemStar System Operating Manual ...
Страница 95: ...Notes 86 Hospira GemStar System Operating Manual ...
Страница 103: ...Notes 94 Hospira GemStar System Operating Manual ...
Страница 165: ...Notes 156 Hospira GemStar System Operating Manual ...
Страница 173: ...Chapter 14 Operation Test 164 Hospira GemStar System Operating Manual ...
Страница 175: ...Notes 166 Hospira GemStar System Operating Manual ...
Страница 187: ...Chapter 15 Optional System Components 178 Hospira GemStar System Operating Manual A B D C I H G F E J N M K L ...
Страница 193: ...Notes 184 Hospira GemStar System Operating Manual ...
Страница 221: ...Notes 212 Hospira GemStar System Operating Manual ...


