Honeywell VX6 Скачать руководство пользователя страница 197

Examples 

177 

E-EQ-VX6RG-F 

VX6 Reference Guide 

AIM custom symbology setup is assigned in the following manner:  


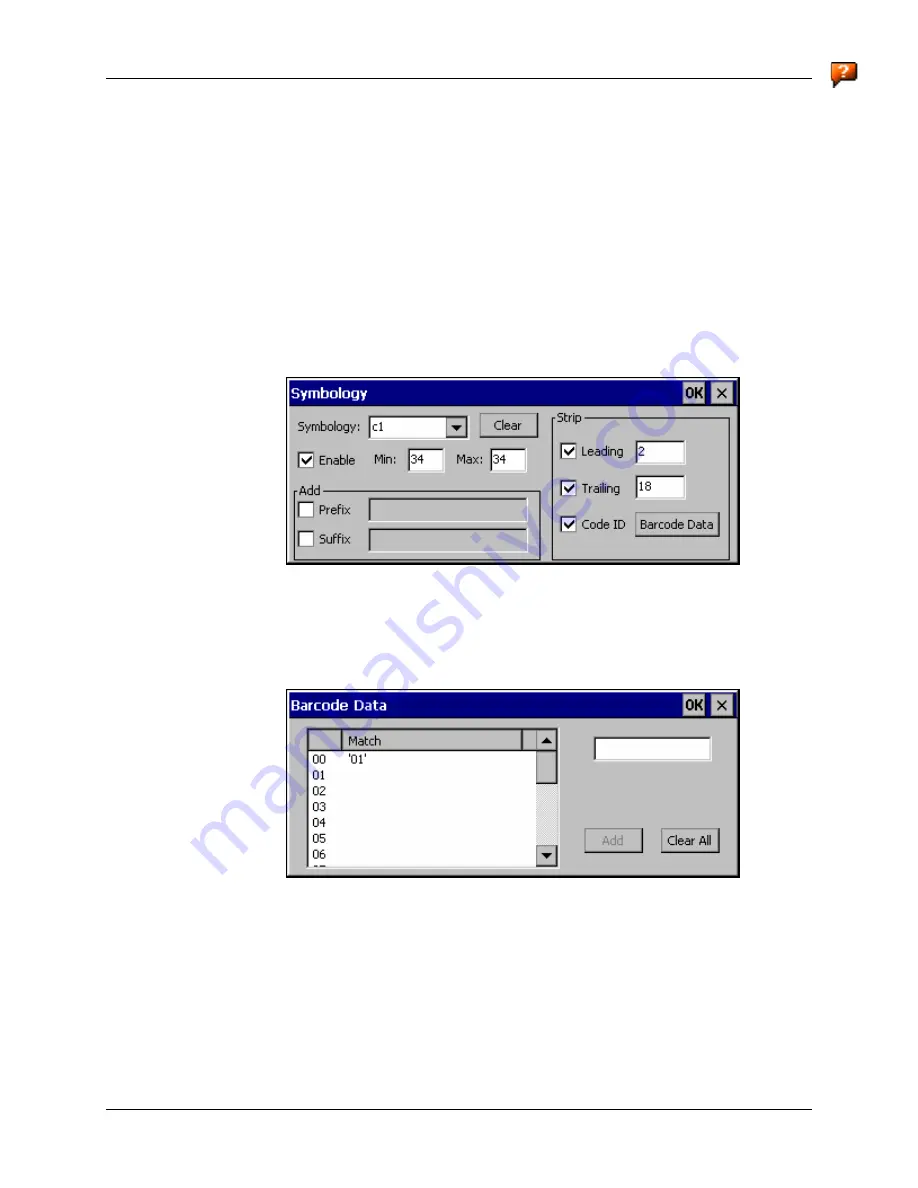
c1 min length = 34, max length = 34, strip leading 2, strip trailing 18, Code ID enabled, 
Barcode Data = “01”   


c2 min length = 26, max length = 26, strip leading 2, strip trailing 10, Code ID enabled, 
Barcode Data = “01”   


c3 min length = 24, max length = 24, strip leading 2, strip trailing 8, Code ID enabled, 
Barcode Data = “01”   


c4 min length = 20, max length = 20, strip leading 0, strip trailing 4, Code ID enabled, 
Barcode Data = “00”   

Add the AIM custom symbologies. Refer to the previous section 

Barcode – Symbology Settings 

for instruction.  


Figure 4-23  AIM Custom Setup for C1 

Click the Barcode Data button. Click the Add button.  

Add the data for the match codes.  


Figure 4-24  

Barcode Match Data for C1  

Refer to the previous section 

BarcodeData Match List

 for instruction. Scan a barcode and 

examine the result.   


Содержание VX6

Страница 1: ...VX6 Reference Guide Copyright November 2007 by LXE Inc All Rights Reserved E EQ VX6RG F ...

Страница 2: ...rks or registered trademarks of Sun Microsystems Inc in the U S or other countries and are used under license Intel and Intel XScale are trademarks or registered trademarks of Intel Corporation or its subsidiaries in the United States and other countries RAM and RAM Mount are both trademarks of National Products Inc 1205 S Orr Street Seattle WA 98108 The Cisco Square Bridge logo is a trademark of ...

Страница 3: ...ed Vehicle 12 80VDC Power Connection with updated graphic Chapter 3 System Configuration Added Bluetooth information Revised Mixer and Step 3 Check Barcode Length sections Revised Enabling GrabTime Revised Wavelink Avalanche Enabler Configuration for Avalanche Mobility Center Chapter 5 Wireless Network Configuration Updated chapter for EAP FAST support tray icon help feature etc included in latest...

Страница 4: ......

Страница 5: ...9 RS 232 Data Entry 9 Touchscreen Entry 10 Right Click 10 Input Panel Virtual Keyboard 10 Touchscreen and Mouse 11 Setup the Radio and Network 12 Setup Terminal Emulation Parameters 12 ActiveSync Initial Setup 13 USB Connection 13 Serial Connection 13 Connect 13 Radio 13 Bluetooth 14 Initial Use 14 Settings Tab Bluetooth Options 15 Report when connection lost 15 Report when reconnected 15 Report f...

Страница 6: ...s 27 Software Revisions 27 Hardware Configuration 28 System Hardware 28 Central Processing Unit 29 I O Components 29 System Memory 29 Video Subsystem 29 Power Supply 30 Uninterruptible Power Supply 30 Backup Battery 30 PCMCIA Slots 30 CF Slot 30 SD Slot 30 Bluetooth LXEZ Pairing 31 Power Modes 32 Physical Controls 33 On Off Switch 33 External Connectors 34 Scanner Serial Connector COM1 35 Pinout 3...

Страница 7: ... Extension Cable Connectors 47 Input 47 Pinout 47 Output 47 Pinout 47 Antenna Connections 48 Spread Spectrum RF Antenna Connector Pin 48 Vehicle Remote Antenna Mount 48 Internal Antenna 49 The QWERTY Keyboard 50 IBM 3270 Overlay 50 IBM 5252 Overlay 50 Key Maps 51 Custom Key Maps 51 NumLock and the VX6 51 Keyboard Backlight 51 Keyboard LEDs 52 CAPS LED 52 Secondary Keys LED 53 Control Keys 54 Gener...

Страница 8: ...tion 68 VX6 Input Power Specifications 69 Power Adapter Cable 69 CMOS Battery 70 Fuse 70 CHAPTER 3 SYSTEM CONFIGURATION 71 Introduction 71 Windows CE Operating System 71 2 4 GHz Radio Configuration 71 Warmboot 71 Coldboot 71 Installed Software 72 Software Load 72 Software Applications 72 Java Optional 73 LXE RFTerm Optional 73 AppLock 73 Wavelink Avalanche Enabler Optional 73 Desktop 75 My Compute...

Страница 9: ...ibility 87 Administrator Control 88 Bluetooth 89 Discover 90 Bluetooth Devices 91 Bluetooth Device Properties 92 Settings 93 Turn Off Bluetooth Button 93 Options 93 About 94 Easy Pairing and Auto Reconnect 95 Certificates 96 Date Time 96 Dialing 97 Display 98 Background 98 Appearance 98 Backlight 98 Input Panel 99 Internet Options 100 Windows CE NET 100 Windows CE 5 0 101 Keyboard 102 Mixer 103 Mo...

Страница 10: ...g ActiveSync 117 Prerequisites 117 VX6 and ActiveSync Partnership 117 Serial Port Transfer 117 USB Transfer 118 Connect 118 Explore 118 Disconnect 119 Serial Connection 119 USB Connection 119 Radio Connection 119 Important Information Cold Boot and Loss of Host Re connection 119 Troubleshooting 120 Create a Communication Option 121 Technical Specifications Connection Cable 122 VX6 Utilities 123 LA...

Страница 11: ...rk Configuration 134 2 4 GHz Wireless Radios 134 Ethernet Connector 134 Wavelink Avalanche Enabler Configuration 135 Briefly 135 Enabler Install Process 135 Enabler Install Process 135 Enabler Uninstall Process 135 Stop the Enabler Service 136 Update Monitoring Overview 136 Mobile Device Wireless and Network Settings 137 Enabler Configuration 138 File Menu Options 138 Avalanche Update Settings 139...

Страница 12: ...de ID 171 Step 10 Add Barcode Data 172 Step 11 Add Suffix String 172 Step 12 Add Terminating NUL 172 Step 13 Start Key Output Thread 173 Examples 174 Control Code Replacement Examples 174 Barcode Processing Examples 175 Length Based Barcode Stripping Examples 176 Screen Blanking 178 Operation 179 CHAPTER 5 WIRELESS NETWORK CONFIGURATION 181 Introduction 181 Summit Radio 182 Summit Client Utility 1...

Страница 13: ...guring for WPA 223 System Requirements 223 Installing Radio drivers 223 Checking for the Cisco PEAP Supplicant 224 Wireless Network Configuration 226 PEAP MS CHAP Authentication Configuration 229 Configuring the PEAP MS CHAP Supplicant 229 Server Authentication 231 PEAP GTC Authentication Configuration 232 Configuring the PEAP GTC Supplicant 232 Server Authentication 234 WPA LEAP 237 Cisco ACU 237...

Страница 14: ...cation AppLock 265 Setup a New Device 266 Administration Mode 267 End User Mode 267 Passwords 268 End User Switching Technique 269 Using a Stylus Tap 269 Using the Switch Key Sequence 269 Application Configuration 270 Application Panel 270 Launch Button 273 Auto At Boot 273 Auto Re Launch 274 Manual Launch 274 Allow Close 275 End User Internet Explorer EUIE 275 Security Panel 276 Password 277 Stat...

Страница 15: ...ysical Specifications 303 Environmental Specifications 304 Display Specifications 305 UPS Battery Pack Specifications 305 Radio Specifications 306 Summit CF 2 4GHz 306 PCMCIA Cisco 2 4GHz Type II 306 PCMCIA Symbol 11Mb 2 4GHz Type II 306 Bluetooth 307 APPENDIX C REFERENCE MATERIAL 309 Introduction 309 AppLock Error Messages 310 AppLock Registry Settings 319 Valid VK Codes for CE 320 ASCII Control ...

Страница 16: ... Figure 2 15 The Power Connector 45 Figure 2 16 The UPS Battery Pack Input Connector 46 Figure 2 17 The UPS Battery Pack Output Connector 46 Figure 2 18 The UPS Battery Extension Cable Input Connector 47 Figure 2 19 The UPS Battery Extension Cable Output Connector 47 Figure 2 20 2 4GHz Antennas 48 Figure 2 21 RF Antenna SS Connector 48 Figure 2 22 Internal Antenna Cables 49 Figure 2 23 QWERTY Keyb...

Страница 17: ...Slot 1 108 Figure 3 25 Compact Flash ATA Control Tab Slot 2 108 Figure 3 26 Power Properties 109 Figure 3 27 Stylus Properties Recalibration Start 112 Figure 3 28 Stylus Properties Recalibration 112 Figure 3 29 System General tab 113 Figure 3 30 System Memory 114 Figure 3 31 System Device Name 114 Figure 3 32 Volume and Sounds 115 Figure 3 33 Pinout Serial Cable for Synchronization 122 Figure 3 34...

Страница 18: ...7 SCU Diags Tab 193 Figure 5 8 SCU Global Tab 194 Figure 5 9 Sign On Screen 200 Figure 5 10 Choose Certificate 202 Figure 5 11 Default Profile 203 Figure 5 12 No Security 204 Figure 5 13 WEP Encryption 205 Figure 5 14 WEP Keys 205 Figure 5 15 LEAP Configuration 206 Figure 5 16 LEAP Credentials 207 Figure 5 17 PEAP MSCHAP 208 Figure 5 18 PEAP MSCHAP Credentials 208 Figure 5 19 PEAP MSCHAP Certifica...

Страница 19: ... 62 Select Profile 238 Figure 5 63 Login Screen 239 Figure 5 64 ACU Status Tab 239 Figure 5 65 Certificate Stores 240 Figure 5 66 View Certificate Details 240 Figure 5 67 EAP TLS Configuration 241 Figure 5 68 Authentication Settings 241 Figure 5 69 Select Certificate 242 Figure 5 70 Authentication Settings Certificate Details 242 Figure 5 71 Validate Server 243 Figure 5 72 SSID Authenticated 243 F...

Страница 20: ...cation 260 Figure 5 101 Private Key Present 261 Figure 6 1 Multi Application AppLock 264 Figure 6 2 Single Application AppLock 265 Figure 6 3 Switchpad Menu 269 Figure 6 4 Application Panel 270 Figure 6 5 Application Launch Options 273 Figure 6 6 Security Panel 276 Figure 6 7 Status Panel 277 Figure A 1 VX6 QWERTY Keyboard 279 Figure A 2 IBM 3270 Specific Keypad 284 Figure A 3 IBM 5250 Specific Ke...

Страница 21: ...n a vehicle mounted unit with a wide range of options CPU 400MHz Intel PXA255 Memory 128MB DRAM Display Indoor or Outdoor half screen display integrated Touchscreen adjustable brightness Network connectivity 2 4 Wireless LAN radio single or dual antenna Ethernet port Optional Bluetooth module Audio Speakers in front bezel audio jack for headset with microphone Storage media Compact Flash PCMCIA Se...

Страница 22: ...ter 2 Physical Description and Layout describes the function and layout of the controls and connectors on the VX6 Describes AC power and DC power connections Chapter 3 System Configuration takes you through the system setup and file structure covering all components except the 2 4GHz radio AppLock and Scanner Chapter 4 Scanner contains information on the scanner keyboard wedge active scanner port ...

Страница 23: ... in operation or commands due to software revision ATTENTION Keyword that indicates vital or pivotal information to follow Attention symbol that indicates vital or pivotal information to follow Also when marked on product means to refer to the manual or user s guide International fuse replacement symbol When marked on the product the label includes fuse ratings in volts v and amperes a for the pro...

Страница 24: ... see Chapter 3 System Configuration 8 Pair Bluetooth devices 9 Configure radio see Chapter 5 Wireless Network Configuration 10 Warmboot to ensure all registry settings are saved 11 Device is ready for use The VX6 should be mounted in an area in the vehicle where it Does not obstruct the vehicle driver s vision or safe vehicle operation Can be easily accessed by anyone seated in the driver s seat T...

Страница 25: ...cation and another Data entry affects the application running in the foreground only Note that the system administrator may have assigned a different key sequence to use when switching applications Touch Note The touch panel must be enabled Tap the taskbar icon to place the popup menu on screen Tap one of the application icons in the popup menu The selected application is brought to the foreground...

Страница 26: ...anel Cover See Following Illustrations for Detail 2 Antenna Connectors or Hole Plugs Figure 1 1 VX6 Components Top View 1 2 VX6 4 3 1 Speakers 2 Control Panel See Following Illustrations for Detail 3 2nd Indicator 4 Caps Lock Indicator Figure 1 2 VX6 Components Front View ...

Страница 27: ...e NMB 003 du Canada à n CAUTION For continues protection against risk of fire replace only with same type and rating of fuse ATTENTION Pour ne pas compromette la preotection contre les risques d incendie remplacer par un fusible de mmes types de mmes caractristques nominales ê ê é 6 7 5 4 3 2 1 1 COM1 Scanner Connector 2 COM3 Connector 3 Keyboard Mouse Connector Not Used 4 Ethernet USB Cable Conne...

Страница 28: ...tch 3 Brightness Increase 4 Brightness Decrease Figure 1 5 VX6 Control Panel SD CF ATA PCMCIA A PCMCIA B 2 1 3 1 SD Memory Card Slot 2 Compact Flash Hard Drive 3 PCMCIA Slots Figure 1 6 VX6 Access Panel Note The tethered access panel cover is not shown in the illustration above ...

Страница 29: ...ed above the corresponding key Please refer to Appendix A Key Maps for instruction on the specific keypresses to access all PC compatible keyboard functions Tethered Scanners The VX6 supports an accessory barcode label reading device Keyboard data entries can be mixed with barcode data entries Any scanner that decodes the barcode internally and outputs an RS 232 data stream may be used COM port 1 ...

Страница 30: ...h of up to 4 oz of pressure The touchscreen can be used in conjunction with the keyboard and scanner and an input output device connected to one of the VX6 s serial ports Touch the stylus to the field of the data entry form to receive the next data feed The cursor begins to flash in the field The unit is ready to accept data from either the keyboard or a device connected to a serial port Note The ...

Страница 31: ...een The mouse pointer reappears when the USB mouse is moved or clicked When a USB mouse is first attached to the VX6 the mouse pointer may not be visible However moving or clicking the mouse causes the pointer to appear When the USB mouse is unplugged the pointer may remain visible until the touchscreen is tapped If the touchscreen is used for input the mouse pointer may disappear However moving o...

Страница 32: ...From the Start Programs run LXE RFTerm or tap the RFTerm icon on the desktop 3 Select Session Configure from the application menu and select the host type that you require This will depend on the type of host system that you are going to connect to i e 3270 mainframe AS 400 5250 server or VT host 4 Enter the Host Address of the host system that you wish to connect to This may either be a DNS name ...

Страница 33: ... Allow connection with desktop computer when device is attached is checked Click OK to return to the Control Panel Note By default COM3 labeled COM2 3 is configured to use ActiveSync Pin 9 RI Please refer to Serial Port Pin 9 in Chapter 4 Scanner for details on configuring Pin 9 of the serial ports Connect Connect the correct cable to the PC the host and the VX6 the client Select Connect from the ...

Страница 34: ... be Discovered and Connected Paired The SysAdmin is familiar with the pairing function of the Bluetooth devices Figure 1 7 Bluetooth Devices Display Before Discovering Devices Initial Use 1 Select Start Settings Control Panel Bluetooth or tap the Bluetooth icon in the taskbar or on the desktop 2 Tap the Settings Tab 3 Change the Computer Friendly Name at the bottom of the Settings display The Blue...

Страница 35: ...fault Click the OK button or the X button to remove the dialog box from the screen Report failure to reconnect If the reconnect timeout 30 minutes expires a dialog box appears on the VX6 display notifying the end user the connection between one or all of the previously paired Bluetooth devices has failed This option is enabled by default Click the OK button to remove the dialog box from the screen...

Страница 36: ...name changes to Stop Tap the Stop button to cancel the Discover function at any time 4 The discovered devices are listed in the Bluetooth Devices window 5 Doubletap a Bluetooth device in the Discovered window to open the device properties menu 6 Tap Pair as Scanner to set up the VX6 to receive scanner data 7 Tap Pair as Printer to set up the VX6 to send data to the printer 8 Tap Disconnect to stop...

Страница 37: ...h devices are ignored Taskbar Icon Legend Bluetooth module is connected to one or more of the targeted Bluetooth device s VX6 is not connected to any Bluetooth device VX6 is ready to connect with any Bluetooth device VX6 is out of range of all paired Bluetooth device s Connection is inactive Note When an active paired device enters Suspend Mode is turned Off or leaves the VX6 Bluetooth scan range ...

Страница 38: ...EZ Pairing program tap Start Settings Control Panel Bluetooth or tap the Bluetooth icon on the desktop or tap the Bluetooth icon in the taskbar LnkB00440fd01020 Sample Figure 1 8 Sample Bluetooth Address Barcode Label Locate the barcode label similar to the one shown above attached to the mobile device The label is the Bluetooth address identifier for the VX6 The mobile Bluetooth scanner imager re...

Страница 39: ...ettings Control Panel Bluetooth About tab Figure 1 9 About tab and Bluetooth Address Next create a Bluetooth address barcode label for the VX6 1 The format for the barcode label is as follows Barcode type must be Code 128 FNC3 character followed by string Uppercase L lowercase n lowercase k uppercase B and then the Bluetooth address 12 hex digits no colons For example LnkB0400fd002031 Create and p...

Страница 40: ...gh low high low LED on Bluetooth Device Behavior Yellow LED blinks at 2 Hz Linking in progress Off Disconnected or unlinked Yellow LED blinks at 50 Hz Bluetooth transmission in progress Yellow LED blinks at the same rate as the paging beep 1 Hz Paging Green LED blinks once a second Disabled indication Upon startup if the scanner sounds a long tone this means the scanner has not passed its automati...

Страница 41: ...ess takes 0 3 seconds If nothing has been changed nothing is saved e g 0 seconds The registry is automatically saved every 20 minutes It is also saved every tenth time the registry settings are changed Registry settings are changed when control panel applet e g Date Time parameters are changed by the user and a warm boot was not performed afterward When you tap the Start Run then type Coldboot and...

Страница 42: ...e VX6 accessories Where two parts numbers are listed for a given part the part number ending in R is the RoHS compliant version When only one part number is listed the part is RoHS compliant unless otherwise noted VX6 Brackets Bracket U Style VX6 VX77 9000A021UBRACKET R Kit VXX U Bracket to VX6 VX7 Adapter 9000A022BRKTADPTKIT R Bracket RAM Mount VX6 VX7 9000A023BRKTRAMMOUNT R Bracket VXX RAM ball ...

Страница 43: ...sembly Kit 15 Ft Cable 9000A281ANTREMOT15RT Miscellaneous Stylus with Tethers and Sleeves 5 Pack 9000A510STYLUS Protective Film Touchscreen 10 Pack VX6 VX6A512PROTFILM Voice Recognition Accessories Headset coiled adapter cable with quick disconnect connector to a 2 5 mm audio jack A headset see below is required 9000A076CBLHEADSET1 Headset Single Band HX1A501SINGHEADSET Headset Dual Band HX1A502DU...

Страница 44: ...PWRLR12DA9F 8310A327SCNRPWRLR12DA9F R Scanner Powerscan LR Low Temp 8 Cbl 8310A332SCNRL8D9FLT above part is not RoHS compliant Scanner Powerscan LR Low Temp 12 Cbl 8310A333SCNRL12D9FLT above part is not RoHS compliant Scanner Powerscan XLR 8 Cbl WW 8320A326SCNRPWRXLR8DA9F 8320A326SCNRPWRXLR8DA9F R Scanner Powerscan XLR 12 Cbl US 8320A327SCNRPWRXLR12DA9F above part is not RoHS compliant Scanner Pow...

Страница 45: ... Only Mulit Interface 8800A002CRADLECMI Forklift Cradle Radio Charging Multi Interface 8800A003CRADLEVRCMI Forklift Cradle Charge Only Multi Interface 8800A004CRADLEVCMI US AC Power Cord 8800A051POWERCORD Universal Desktop Power Supply 90 264VAC 8800A301ACPS 9 60VDC Forklift Power Supply 8800A302DCPS Power Cable connects Power Supply to Forklift 8800A052DCPWRCABLE Cable Assembly DA9F 9 ft Cradle t...

Страница 46: ...26 Manuals and Accessories VX6 Reference Guide E EQ VX6RG F ...

Страница 47: ...software revision installed on the VX6 If no software revision is displayed during bootup the VX6 is a Platform 1 type as all Platform 2 VX6 s ship with software revision 1ED or greater Platform 2 VX6 VX6 s identified as Platform 2 by a P2 notation on the serial number decal support all features including those noted as Platform 2 specific Note If software revision 1ED or greater is installed LXE ...

Страница 48: ...B Audio Connector Serial Connector COM1 Scanner 9 pin male D Serial Connector COM3 PRINTER PC 9pin male D Any Type I II or III PCMCIA Card Keyboard Mouse Connector Not Used USB Ethernet Connector DC out 12V AC in 120 240V DC in 12 80V AC Adapter Uninterruptible Power Supply UPS DC in 12 80V CF Slot Compact Flash Hard Drive SD Slot Secure Digital Memory Card Figure 2 1 VX6 Hardware Configuration ...

Страница 49: ...Host port o USB Client port o Ethernet port One audio jack providing monaural audio output System Memory Main system memory is 128MB DRAM Note The 64MB SDRAM option has been discontinued Video Subsystem The LXE VX6 video subsystem consists of a color TFT display The video subsystem complies with the VESA VL bus standard The resolution of this display is 800 by 320 pixels This resolution complies w...

Страница 50: ...he VX6 for a minimum of 15 minutes when vehicle power is not available such as when a vehicle battery is being swapped Backup Battery The LXE VX6 has a permanent lithium battery installed to maintain time and date The backup battery is not user serviceable and should last five years with normal use before it requires replacement Note This battery should only be changed by authorized service person...

Страница 51: ...pt for the PIN or passcode Maximum encryption is 128 bit Encryption is based on the length of the user s passcode Bluetooth will simultaneously support one printer as a slave Bluetooth device and one scanner either as a slave or as a master Bluetooth device See Chapter 3 System Configuration control panel section titled Bluetooth Notes The VX6 does not have a Bluetooth managed LED The LED on the B...

Страница 52: ...the timer The VX6 exits User Idle Mode with any Primary Event The keypress or screen touch that exits User Idle Mode is sent to the operating system The VX6 then transitions to On Mode Primary Events Any key on the keypad COM1 activity Stylus touch on the touchscreen Scanner activity Power button tap USB client connection Bluetooth device reconnect disconnect message System Idle Mode The VX6 does ...

Страница 53: ...ns the VX6 Off An orderly shutdown is preformed Any open programs are closed the Windows CE operating system shuts down and then the VX6 powers off If a software lockup should occur and the VX6 is unresponsive to keyboard or touchscreen input pressing and holding the power button for several seconds forces a shutdown However the forced shutdown is not an orderly shutdown All unsaved data and any r...

Страница 54: ...code scanner COM3 labeled COM2 3 connects to a serial printer or PC with the appropriate cables The USB Ethernet connector accepts dongle cables offering a combination of the following ports o An Ethernet port o A USB Host port o A USB Client port Audio connects to a mono or stereo telephone headset microphone Other external connectors are located as follows Antenna connectors are located on the t...

Страница 55: ...following section for information on using a serial cable If COM1 is not being used for a scanner it can also be used for screen blanking when the vehicle is in motion Please see Technical Specifications Screen Blanking Cable in the following section for more details 1 5 9 6 Figure 2 3 Scanner Serial Connector COM1 Note Power the VX6 off before attaching a cable or device to the COM1 serial port P...

Страница 56: ...ner section titled Serial Port Pin 9 for more information on configuring Pin 9 1 5 9 6 Figure 2 4 Printer PC Serial Connector COM3 Note Power the VX6 off before attaching a cable or device to the COM3 serial port Pinout Pin Signal Description 1 DCD Data Carrier Detect Input 2 RXD Receive Data Input 3 TXD Transmit Data Output 4 DTR Data Terminal Ready Output 5 GND Signal Power Ground 6 DSR Data Set...

Страница 57: ... will not work RTS CTS Handshaking and the Serial Port RTS Ready to Send CTS Clear to Send DTR Data Terminal Ready DSR Data Set Ready Remote Side The device sending data to and receiving data from the VX6 through the LXE serial cable connected to the RS 232 ports on both devices LXE Serial Cable 9000A054CBLD9D9 The VX6 serial port supports four types of handshaking via the LXE serial cable None st...

Страница 58: ...ector must be left unconnected If pins 7 and 8 do not provide continuity or the cable is removed the VX6 screen remains blank Serial cable Customer built cable with the following specifications 7 1 5 8 Pinout DB9 female Function 1 Not Used 2 Not Used 3 Not Used 4 Not Used 5 Not Used 6 Not Used 7 No signal when in motion Continuity to Pin 8 when stopped 8 No signal when in motion Continuity to Pin ...

Страница 59: ...able ports with the dongle cable options The connector is shown below 1 5 10 6 11 15 Figure 2 8 VX6 USB Connector and External USB Adapter Cable Connector Note Power the VX6 off before attaching a cable or device to the Ethernet USB connector Pinout Pin Signal Description 1 USB2N_A USB D 2 Not Connected 3 Not Connected 4 RXP Receive 5 RXN Receive 6 USB2P_A USB D 7 DGND USB Power Return 8 Not Conne...

Страница 60: ...SB Host Connector 4 USB Client Connector 2 3 1 9000A071CBLD15USBETH 1 D15 Connector 2 RJ45 Connector 3 USB Host Connector Figure 2 9 VX6 Ethernet USB Dongle Cables Note Power the VX6 off before attaching a cable or device to the Ethernet USB connector The connectors and pinouts for the dongle cables are detailed below 9000A075CBLUSBHCETH is required when using ActiveSync via USB on the VX6 ...

Страница 61: ...iption 1 USB2N_A USB H D 2 Not Connected 3 USB D Power 4 RXP Receive 5 RXN Receive 6 USB2P_A USB H D 7 DGND USB H Power Return 8 USB D D 9 RJ45_45 RJ45 Pins 4 and 5 Connections 10 RJ45_78 RJ45 Pins 7 and 8 Connections 11 5V_USB_23 USB H Power Current Limited 12 USB D Power Return 13 USB D D 14 TXN Transmit 15 TXP Transmit Shell CGND Chassis Ground ...

Страница 62: ...Signal Description 1 5V_USB_23 USB Power Current Limited 2 USB2N_A USB D 3 USB2P_A USB D 4 DGND USB Power Return Shell CGND Chassis Ground USB Client Connector 1 2 3 4 1 Figure 2 12 Dongle Cable USB Client Port Pinout Pin Signal Description 1 5V_USB_23 USB Power Current Limited 2 USB2N_A USB D 3 USB2P_A USB D 4 DGND USB Power Return ...

Страница 63: ...G F VX6 Reference Guide RJ45 Connector 1 8 Figure 2 13 Dongle Cable Ethernet Port Pinout Pin Signal Description 1 TXP Transmit 2 TXN Transmit 3 RXP Receive 4 Not Connected 5 Not Connected 6 RXN Receive 7 Not Connected 8 Not Connected ...

Страница 64: ...h microphone or a stereo headset Please refer to Mixer in Chapter 3 System Configuration for information on configuring the audio port for either a mono headset with microphone or a stereo headset Figure 2 14 VX6 Audio Jack for External Speaker or Headphones Note The VX6 is not configured for standard PC speakers Pinout Pin Description 1 Microphone 2 Speaker 3 Ground ...

Страница 65: ...vides a connection point for the vehicle s chassis ground to be connected internally to the conductive chassis of the computer The VX6 internal power supply can accept DC input voltages in the range of 12 to 80 Volts 1 3 4 5 2 Figure 2 15 The Power Connector Pinout Pin Signal 1 DC Positive 2 UPS Battery Positive 3 Chassis Ground 4 UPS Battery Negative 5 DC Negative ...

Страница 66: ...re 2 16 The UPS Battery Pack Input Connector Pinout Pin Signal 1 DC Positive 2 Not used 3 Chassis Ground 4 Not used 5 DC Negative Output 1 3 4 5 2 Figure 2 17 The UPS Battery Pack Output Connector Pinout Pin Signal 1 DC Positive 2 UPS Battery Positive 3 Chassis Ground 4 UPS Battery Negative 5 DC Negative ...

Страница 67: ...attery Extension Cable Input Connector Pinout Pin Signal 1 DC Positive 2 UPS Battery Positive 3 Chassis Ground 4 UPS Battery Negative 5 DC Negative Output 1 3 4 5 2 Figure 2 19 The UPS Battery Extension Cable Output Connector Pinout Pin Signal 1 DC Positive 2 UPS Battery Positive 3 Chassis Ground 4 UPS Battery Negative 5 DC Negative ...

Страница 68: ...enna 2 Antenna Connector Figure 2 20 2 4GHz Antennas Spread Spectrum RF Antenna Connector Pin VX6 s ordered with an external antenna option have either one or two antenna connectors located on top of the unit VX6 s ordered with the internal antenna option do not have an external antenna connector Figure 2 21 RF Antenna SS Connector Vehicle Remote Antenna Mount The external antenna or antennas can ...

Страница 69: ...de Internal Antenna If the internal antenna option is ordered an antenna is mounted on the inside of the user access panel cover Figure 2 22 Internal Antenna Cables The internal antenna assembly has two antenna cables which are attached to the radio card ...

Страница 70: ...RTY Keyboard Standard IBM 3270 Overlay ESC SHIFT 2ND ALT SP F1 F2 F3 F4 F5 F6 F7 F8 F9 CAPS BREAK R S B C M N A D F G H J K L S V X Z F10 BKLT INS BKSP E I O P R T U W Y CTRL _ Home END ENTER PgUp PgDn 0 1 2 4 5 7 8 DEL 3 6 9 Attn SysReq Del Clr NL Ins E Inp CAPS 2nd Rst PA1 PA2 PA3 Figure 2 24 QWERTY Keyboard with IBM 3270 Overlay IBM 5252 Overlay ESC SHIFT 2ND ALT SP F1 F2 F3 F4 F5 F6 F7 F8 F9 C...

Страница 71: ...epending on system software revision from the keymap popup and click OK Note VX6 and Custom Key Maps before connecting to a host using Remote Desktop Connection go to Start Settings Control Panel Keyboard and select Preload or 0409 depending on system software revision from the keymap popup Click OK NumLock and the VX6 The keyboard does not have a NumLock indicator or key By default NumLock is On ...

Страница 72: ...ard LEDs CAPS LED This LED indicates the state of the keyboard CapsLock mode If CapsLock is enabled this LED is illuminated green When CapsLock is off the LED is dark B D CAPS F1 Figure 2 27 The CapsLock Key Press 2nd then F1 to toggle CapsLock On and Off The default value of CapsLock is Off For information on preserving CapsLock configuration after a reboot please see Configuring CapsLock Behavio...

Страница 73: ...d by the superscripted key C C 2ND Figure 2 28 The Secondary Key Once the 2nd state is enabled by pressing the 2nd key the Secondary Mode LED is illuminated and the 2nd state is enabled until another key is pressed The 2nd key is toggled on with a 2nd keypress and then immediately off with another 2nd keypress For example Press 2nd and F1 to turn CapsLock on and off Press 2nd and to initiate the P...

Страница 74: ...n with no provision for contrast adjustments The 2nd functions of the F8 and F9 keys are not used as the sound volume on the VX6 is controlled with the Volume and Sounds icon in the Microsoft Windows CE Control Panel The 2nd function of the F10 key is not used as the display backlight timer also controls the keyboard backlight R S F3 F4 F5 F6 F7 F8 F9 BKLT F10 1 Display Brightness Control Keys Not...

Страница 75: ...lity to a mouse A touch on the touchscreen is equivalent to a left mouse click Many items can be moved by the drag and drop method touching the desired item moving the stylus across the screen and releasing the stylus in the desired location A double stylus tap is equivalent to a double click A touch and hold is equivalent to a right mouse click Note Some applications may not support this right cl...

Страница 76: ...s display the actual character a keypress results in For example pressing the Shift key on the virtual keyboard toggles the characters displayed on the keys between upper and lower case The áü key toggles the keys between standard and international symbols The Shift and áü keys can be used in combination for capitalized international characters Note When the virtual keyboard is displayed the physi...

Страница 77: ...Input Panel The Input Panel is disabled by default To enable the Input Panel select Start Settings Control Panel Input Panel icon Make sure the Allow applications to change the input panel state checkbox is checked and warmboot the VX6 Figure 2 31 Input Panel Properties ...

Страница 78: ...touchscreen is a Resistive Panel with a scratch resistant finish that can detect touches by a stylus and translate them into computer commands In effect it simulates a computer mouse Only Delrin or plastic styluses should be used A right mouse click is simulated by touching and holding the screen for the appropriate time interval Note Always use the point of the stylus for tapping or making stroke...

Страница 79: ...s The PCMCIA slots may be disabled by the user To enable or disable a PCMCIA slot select Start Settings Control Panel PCMCIA icon The center slot is a Compact Flash slot containing the CF ATA hard drive This drive contains the operating system and settings The left slot is used for Secure Digital SD memory cards SD CF ATA PCMCIA A PCMCIA B 2 1 3 4 1 SD Card Slot 2 Compact Flash Hard Drive 3 PCMCIA...

Страница 80: ...43 n c or VS1 10 A11 44 IORD 11 A9 45 IOWR 12 A8 46 A17 13 A13 47 A18 14 A14 48 A19 15 WE 49 A20 16 RDY IREQ 50 A21 17 SLOT_VCC 51 SLOT_VCC 18 SLOT VPP 52 SLOT_VPP 19 A16 53 A22 20 A15 54 A23 21 A12 55 A24 22 A7 56 A25 23 A6 57 n c or VS2 24 A5 58 RESET 25 A4 59 WAIT 26 A3 60 INPACK 27 A2 61 REG 28 A1 62 BVD2 SPKR 29 A0 63 BDV1 STSCHG 30 D0 64 D8 31 D1 65 D9 32 D2 66 D10 33 WP A_ IOIS16 67 CD2 34 ...

Страница 81: ...XE Model 6726 6816 and 6830 2 4GHz Type II PCMCIA radios Substitution of other PCMCIA radios will void the FCC Industry Canada and other international radio certifications for the Model VX6 Vehicle Mount Computer and is strictly prohibited 1 Turn the VX6 off and detach the power cable 2 Loosen the three 3 Phillips head screws securing the access panel cover so the cover can be removed The screws a...

Страница 82: ...tenna Connect antenna cable to right port as shown below Cisco radio with dual antennas Connect antenna cables to both ports C ISCO S YSTEMS CISCO AIRONET 350 WIRELESS LAN ADAPTER SERIES Right Port Left Port Figure 2 34 Cisco Antenna Cable Connections Symbol 11Mb Radio Card Hold the radio card with the Symbol logo label facing up Connect the antenna cable s as follows Symbol 11Mb radio with single...

Страница 83: ... Main Port Figure 2 36 Summit Antenna Cable Connections 4 Now complete the insertion of the 2 4GHz Type II PCMCIA Radio into the slot Note When this process is complete reattach the access cover screws using a torque wrench capable of measuring to 9 1 inch pounds 1 016 11 N m The screws must be fastened to 9 inch pounds each The screws require a Phillips size 1 driver head 5 Re connect the power c...

Страница 84: ... the cover and cannot be removed 3 Remove the card currently installed present in the CF slot and replace it with the new CF card The replacement CF card must contain the operating system in order for the VX6 to operate SD CF ATA PCMCIA A PCMCIA B CF Card Figure 2 37 Inserting the CF ATA Card Note The tethered access panel cover is not shown in the illustration above Note When this process is comp...

Страница 85: ... access panel cover so the cover can be removed The screws are a captive part of the cover and cannot be removed 3 Insert the card into the ATA SD This slot accepts an SD memory card only SD CF ATA PCMCIA A PCMCIA B SD Card Figure 2 38 Inserting the SD ATA Card Note The tethered access panel cover is not shown in the illustration above Note When this process is complete reattach the access cover s...

Страница 86: ... Input Cable US only 2 DC Output Cable Figure 2 39 Optional Power Supply Cable In North America this unit is intended for use with a UL Listed ITE power supply with output rated 12 80 VDC minimum 75 W Outside North America this unit is intended for use with an IEC certified ITE power supply with output rated 12 80 VDC minimum 75 W The external power supply may be connected to either a 120V 60Hz su...

Страница 87: ...3 pin female connector Output Voltage 24VDC Output Voltage Tolerance 8 measured at the end of the output power cable Output Current 0 Amps min 1 87 Amps max Safety and Emissions Compliance FCC Part 15 Radio Frequency Devices Class B EN 55022 UL1950 and IEC 950 Environmental Specifications The AC to DC adapter will withstand the following environmental characteristics Feature Specification Operatin...

Страница 88: ...ectrical System 2 5 Amp Slow Blow Fuse 3 DC 4 DC 5 Vehicle Chassis 6 Red White 7 Red Black 8 Green Figure 2 41 Connecting the Power Cable to the Vehicle Note Correct electrical polarity is required for safe and proper installation Connecting the cable to the VX6 with the polarity reversed will cause the VX6 s fuse to be blown See the following table for wire color coding specifics Wiring color cod...

Страница 89: ... 2 VX1 2 4 Power Supply Connector Figure 2 43 Power Adapter Cable VX1 2 4 to VX6 Caution For use only with VX1 2 4 DC power cables with yellow colored cable containing 18AWG wires Do not use this cable with VX1 2 4 DC power cables with gray colored cable containing 22AWG wires These power cables must be replaced with a VX5 6 7 power cable Caution When a DC power cable that is eight feet or longer ...

Страница 90: ...CC RULES OPERATION IS SUBJECT TO THE FOLLOWING TWO CONDITIONS 1 THIS DEVICE MAY NOT CAUSE HARMFUL INTERFERENCE AND 2 THIS DEVICE MUST ACCEPT ANY INTERFERENCE RECEIVED INCLUDING INTERFERENCE THAT MAY CAUSE UNDESIRED OPERATION This Class A digital apparatus complies with Canadian ICE 003 Cet appareil num de la Classe A est confirme l érique orme NMB 003 du Canada à n CAUTION For continues protection...

Страница 91: ...n most standard Windows computers Therefore the sections that follow describe only those Windows capabilities that are unique to the VX6 and its Windows CE environment 2 4 GHz Radio Configuration All 2 4GHz radio configuration is included in Chapter 5 Wireless Network Configuration Warmboot A warmboot reboots the computer without erasing any registry data However any applications installed to RAM ...

Страница 92: ...er device drivers Internet Explorer 6 0 for Windows CE browser and utilities The software supported is summarized below Operating System Full Operating System License Includes all operating system components including Windows CE 5 0 or CE NET 4 2 kernel file system communications connectivity for remote APIs device drivers events and messaging graphics keyboard and touchscreen input window managem...

Страница 93: ...e AppLock Administrator for the mobile device end user AppLock is password protected by the Administrator End user mode locks the end user into the configured application or applications The end user can still reboot the mobile device and respond to dialog boxes The administrator specified application is automatically launched and runs in full screen mode when the device boots up See Also Chapter ...

Страница 94: ...anche Update Settings panel through the Enabler Interface The designation of the mobile device to the Avalanche CE Manager is LXE_VXC LXE CE devices manufactured before October 2006 must have their drivers and system files upgraded before they can use the Avalanche Enabler functions Please contact an LXE representative for details on upgrading the mobile device baseline If the user is NOT using Wa...

Страница 95: ...ws menu options Programs Favorites Documents Settings Help and Run Desktop Icon Function My Computer Access files and programs Recycle Bin Storage for files that are to be deleted Internet Explorer Connect to the Internet intranet requires radio card and Internet Service Provider ISP enrollment is not available from LXE Wireless Configuration Icon Used for accessing the appropriate wireless config...

Страница 96: ...tion copies only the directory contents no sub folders The following folders are NOT copied on startup Windows AppMgr Windows Recent Windows Startup Because copying these has no effect on the system or an incorrect effect Files in the Startup folder are executed but only from System Startup Windows Startup is parsed too early in the boot process so it has no effect Executables in System Startup mu...

Страница 97: ...er View Excel 97 and newer documents Image Viewer View BMP JPEG and PNG images PDF Viewer View Adobe Acrobat documents Word Viewer View Word 97 and newer documents and RTF files Summit Set Summit radio network parameters Please see Chapter 5 Wireless Network Configuration for details Command Prompt The command line interface in a separate window Inbox Microsoft Outlook mail inbox Internet Explorer...

Страница 98: ...c on your desktop computer and completed the first synchronization process before you initiate synchronization from your device 1 To initiate synchronization from your device connect the USB cable to the PC and to the dongle cable on the VX6 The VX6 connects automatically 2 Click the Sync Now button to synchronize with the PC 3 Click the Disconnect button or remove the cable to disconnect 4 To mod...

Страница 99: ...fter a connect setup is selected Start Programs Communication Connect will start to connect to a host After this connection is made and an ActiveSync relationship established the ActiveSync menu item can be used to establish the connection over the radio link See Also Important Information Cold Boot and Loss of Host Re connection Start FTP Server Stop FTP Server These shortcuts call the Services M...

Страница 100: ...Outlook Inbox options Click the button to access Inbox Help ActiveSync can be used to transfer messages between the VX6 inbox and a desktop inbox Internet Explorer Access Start Programs Internet Explorer This option requires a radio card and an Internet Service Provider There are a few changes in the Windows CE version of Internet Explorer as it relates to the general desktop Windows PC Internet E...

Страница 101: ... and Custom Key Maps before connecting to a host using Remote Desktop Connection go to Start Settings Control Panel Keyboard and select Preload or 0409 depending on system software revision from the keymap popup Click OK Transcriber Access Start Programs Transcriber Select Transcriber on the Start Programs menu To make changes to the Transcriber application enable or disable the current Transcribe...

Страница 102: ...bar as it relates to the general desktop PC Windows Taskbar options When the taskbar is auto hidden press the Ctrl key then the Esc key to make the Start button appear Figure 3 2 Taskbar Properties Advanced Tab Expand Control Panel Tap the checkbox to have the Control Panel folders appear in drop down menu format from the Settings Control Panel menu option Clear Contents of Document Folder Tap the...

Страница 103: ...y Set background graphic color scheme appearance and power scheme properties Input Panel Select the current key data input method Internet Options CE NET Set General Connection Security and Advanced options for Internet connectivity CE 5 0 Set General Connection Security Privacy Advanced and Popups options for Internet connectivity Keyboard Set key repeat delay and key repeat rate Mixer Adjust the...

Страница 104: ...L Version Bootloader Version Compile Version FPGA Version and Language Hardware CPU Type Codec Type FPGA Version Scanner type Display Flash memory and DRAM memory Versions LXE Utilities LXE Drivers LXE Image LXE API and Internet Explorer Network IP Current network connection IP and MAC address User application version information can be shown in the Version window Version window information is tak...

Страница 105: ... and built in to the VX6 OS image Built in fonts are added to registry entries and are available immediately upon startup Thai Hebrew Arabic and Cyrillic Russian fonts are available in the English only default extended fonts When an Asian font is copied into the fonts folder on the System folder the font works for Asian web pages the font works with RFTerm the font does not work for Asian options ...

Страница 106: ...in this list and the list varies depending on the applications loaded on the VX6 The LXE Image line displays the revision of the system software installed Please refer to the last three digits to determine the revision level i e in the example below the revision level is 2BT Figure 3 4 About Properties Versions Radio MAC Address The Network IP tab displays the MAC address of the radio card Figure ...

Страница 107: ...ccessibility Properties Keyboard Note The StickyKeys option SHOULD NOT be used on the VX6 It does not work for the integrated VX6 keyboard If the ToggleKeys option is selected please note that Scroll Lock key does not produce a sound as the CapsLock and NumLock keys do This is due to a limitation in the Microsoft Windows CE operating system Figure 3 7 Accessibility Properties Sound If the SoundSen...

Страница 108: ... to the user LXE devices with the AppLock feature are shipped to boot in Administration mode with no default password thus when the device is first booted the user has full access to the device and no password prompt is displayed After the administrator specifies an application to lock a password is assigned and the device is rebooted or the hotkey is pressed the device switches to end user mode A...

Страница 109: ...e connect with the mobile device The default Bluetooth setting is On and all options on the Settings Panel are enabled The VX6 cannot be discovered by other Bluetooth devices when the Computer is discoverable option is disabled unchecked on the Settings panel Other Bluetooth devices cannot be discovered if they have been set up to be Non Discoverable or Invisible The mobile device can pair with on...

Страница 110: ...ooth Tap the Discover button to locate all discoverable Bluetooth devices in the vicinity The Discovery process also queries for the unique identifier for each device discovered Figure 3 9 Discover Bluetooth Devices Tap Stop at any time to end the Discover and Query for Unique Identifier functions ...

Страница 111: ...ay be audible or visual signals as paired devices disconnect from the VX6 The discovered paired devices may or may not be identified with an icon Discovered devices without an icon can be paired as printers or scanners the Bluetooth panel will assign an icon to the device name An icon with a red background indicates the device Bluetooth connection is inactive An icon with a white background indica...

Страница 112: ...aired Bluetooth device Tap Delete to remove an unpaired device from the Bluetooth device list The device name and identifier is removed from the VX6 Bluetooth Devices panel after the user taps OK Bluetooth Device Properties Figure 3 12 Bluetooth Device Properties Menu Data on the Bluetooth Properties panel cannot be changed by the user The data displayed is the result of the device Query performed...

Страница 113: ...ween a paired active device is re connected A visual signal may be a dialog box placed on the display Tap the X button or OK button to close the dialog box Report failure to reconnect Enabled The time delay is 30 minutes This value cannot be changed by the user There may be an audio or visual signal when a connection between a paired active device is re connected A visual signal may be a dialog bo...

Страница 114: ...t have lost connection When disabled the VX6 stops searching after hour Computer Friendly Name Empty The name or identifier entered in this space by the System Administrator is used exclusively by Bluetooth devices and during Bluetooth communication Note The Device Name listed in Start Settings Control Panel System Device Name is not used during Bluetooth operation Owner Identification name listed...

Страница 115: ...skbar Icon Legend Bluetooth is ready to connect or Bluetooth module is connected to one or more of the targeted Bluetooth device s VX6 is not connected to another Bluetooth device or VX6 is out of range of all targeted Bluetooth device s Connection is inactive Note Configuration elements are persistent and stored in the registry Setup the Bluetooth module to establish how the user is notified by e...

Страница 116: ...e Zone GMT 05 00 Daylight Savings Disabled Figure 3 15 Date Time Properties There is little change from general desktop PC Date Time Properties options Adjust the settings and click the OK box or the Apply button to save the changes The changes take effect immediately Double tapping the time displayed in the Taskbar causes this display to appear If an Internet connection is available click the Syn...

Страница 117: ...97 E EQ VX6RG F VX6 Reference Guide Dialing Access Start Settings Control Panel Dialing Figure 3 16 Dialing Set dialup properties for internal modems not supplied supported by LXE Tap the and follow the instructions in Help ...

Страница 118: ...es take effect immediately Appearance No change from general desktop PC Display Properties Appearance options Adjust the settings and click the OK box to save the changes The changes take effect immediately The default is Windows Standard Backlight Figure 3 17 Display Properties Backlight Tab Adjust the settings and click the OK box to save the changes The changes take effect immediately When the ...

Страница 119: ...lications to change input panel state Disabled Keys Small keys Use gestures Disabled Figure 3 18 Input Panel Properties Use this option to make the Soft Keyboard or the keypad primarily available when entering data Selecting Keyboard enables both The Input Panel is disabled by default To enable the input panel make sure the checkbox for Allow applications to change input panel state is checked and...

Страница 120: ...google com Cache Size 512 Kb Connection Use LAN Disabled Autodial Name Blank Proxy Server Disabled Security Allow cookies Enabled Allow TLS 1 0 security Disabled Allow SSL 2 0 security Enabled Allow SSL 3 0 security Enabled Warn when switching Enabled Advanced Display web images Enabled Play web sounds Enabled Enable web scripting Enabled Display script error note Disabled Underline links Never Se...

Страница 121: ...d Bypass Proxy Disabled Security Allow cookies Enabled Allow TLS 1 0 security Disabled Allow SSL 2 0 security Enabled Allow SSL 3 0 security Enabled Warn when switching Enabled Privacy First party cookies Accept Third party cookies Prompt Session cookies Always allow Advanced Stylesheets Enable Theming Support Enable Multimedia All options enabled Security All options enabled Popups Block popups D...

Страница 122: ...elay Short Rate Slow Key Map Default Windows CE 5 0 0409 Windows CE NET There is no change from general desktop PC Keyboard Properties options Adjust the settings and click the OK box to save the changes The changes take effect immediately When new key maps are added to the registry they will appear in the Key Map dropdown list on the Keyboard Panel These values do not affect virtual keyboard taps...

Страница 123: ...e Input for the mixer Move the sliders to adjust the decibel level Tap OK to save the settings The following options are available for Input None No microphone Use this setting when stereo headphones are attached to the device Mic1 Use this setting when a mono headset with microphone is attached to the device Bluetooth Reserved for future use When checked enabled Input Boost provides increased sen...

Страница 124: ...tings Control Panel Network and Dialup Connections Create a dialup direct or VPN connection on the VX6 To configure the VX6 to use DHCP or a fixed IP address select the desired connection The default is to obtain an IP address via DHCP A static IP address can be assigned by clicking the Specify an IP address radio button and entering the desired IP address subnet mask and gateway Figure 3 20 Netwo...

Страница 125: ...l Panel Owner Icon Set VX6 owner details Factory Default Settings Identification Blank Notes Blank There is no change from general desktop PC Owner Properties display Enter the information and click the OK box to save the changes The changes take effect immediately Figure 3 21 Owner Properties ...

Страница 126: ...ed If you forget the password it cannot be restored without performing a cold boot on the unit which erases all memory Enter the password then type it again to confirm it and click the OK box to save the changes The password is immediately in effect Tap the Power On checkbox to set whether the user types a password at Power On Tap the Screen Saver checkbox to set whether the user types a password ...

Страница 127: ... immediately Unchecking the Allow connection with disables ActiveSync Change Clicking Change lists configured ActiveSync connections In addition there is a checkbox for Automatic Connect This option applies to USB connection only If this checkbox is checked when the USB cable is connected the VX6 will automatically try to start ActiveSync over the USB port Note that this interferes with processes ...

Страница 128: ...ot 1 Tabs contain the same parameters If a card is present in the slot a description of the card is displayed To disable a slot check the Disable slot now checkbox and tap OK The change takes effect immediately Slot 0 is the lower slot labeled PCMCIA B Slot 1 is the upper slot labeled PCMCIA A Figure 3 24 PCMCIA Control Tab Slot 0 and Slot 1 The Slot 2 Tab provides information on the internal Comp...

Страница 129: ... if the User Idle timer is set to Never the power scheme timers never place the device in User Idle System Idle or Suspend modes For a VX6 the User Idle state turns off the display backlight There is no System Idle mode so the VX6 remains in User Idle mode until the Suspend timer expires or a primary even occurs Please see Power Modes in Chapter 2 Physical Description and Layout IMPORTANT There is...

Страница 130: ...an be selected After selecting a language to use and after all changes are made tap OK to save your changes then warmboot the device Factory Default Settings Regional Settings Your Locale English United States Number 123 456 789 00 123 456 789 00 neg Currency 123 456 789 00 pos 123 456 789 00 neg Time h mm ss tt tt AM or PM Date M d yy short dddd MMMM dd yyyy long User Interface Language User Inte...

Страница 131: ...ings Control Panel Storage Manager Installed storage devices are listed by device name in the dropdown box To view information about the disk or perform store operations select a device from the list On line help is available for this option Topics available are Manage storage devices Manage disk partitions Creating a new partition Advanced partition features LXE recommends caution when formatting...

Страница 132: ...lus Set double tap sensitivity properties and or calibrate the touch panel Double Tap Follow the instructions on the screen and click the OK box to save the changes The changes take effect immediately Calibration Figure 3 27 Stylus Properties Recalibration Start Figure 3 28 Stylus Properties Recalibration ...

Страница 133: ...or information only The System parameters cannot be changed by the user Computer The processor type is listed The type cannot be changed by the user The name of the installed radio card is listed in the dropdown list Total computer memory and the identification of the registered user is listed and cannot be changed by the user Memory sizes given do not include memory used up by the operating syste...

Страница 134: ...ing the amount of program memory Adjust the settings and click the OK box to save the changes The changes take effect immediately Device Name Figure 3 31 System Device Name The device name and description can be changed Enter the name and description using either the keypad or the Input Panel and tap OK to save the changes The changes take effect immediately Copyrights This screen is presented for...

Страница 135: ...tart Settings Control Panel Volume Sounds Icon Set volume parameters and assign sound wav files to Windows CE events Factory Default Settings Volume Events Enabled Application Enabled Notifications Enabled Volume Middle of Bar Key click Loud Screen tap Loud Sounds Scheme LOUD Follow the instructions on the screen and click the OK box to save the changes The changes take effect immediately Figure 3...

Страница 136: ... used for permanent storage of the LXE drivers and utilities It is also used for registry content back up The flash card is located in the socket under the main battery pack CAB files when executed are not deleted SUMMIT CAB Summit Client files needed for network card operation The following CAB files are optional and may or may not be present BLUETOOTH CAB Bluetooth Client files needed for LXEZ P...

Страница 137: ...ormation you want to synchronize The synchronization process makes the data in the information types you select identical on both your desktop computer and your device When installation of ActiveSync is complete on your desktop computer the ActiveSync Setup Wizard begins and starts the following processes connect your device to your desktop computer set up a partnership so you can synchronize info...

Страница 138: ... wizard on the host PC is checking COM ports to establish a connection for the first time Note USB will start automatically when the cable is connected not requiring you to select Connect from the Start menu Explore From the ActiveSync Dialog on the Desktop PC click on the Explore button which allows you to explore the VX6 from the PC side with some limitations You can copy files to or from the VX...

Страница 139: ...o objects a unique computer name and a random number generated when the partnership is first created An ActiveSync partnership between a unique client can be established to two hosts If the VX6 is cold booted the random number is deleted and the partnership with the last one of the two hosts is also deleted The host retains the random numbers and unique names of all devices having a partnership wi...

Страница 140: ...ction is not supported or detected by host Try forcing ActiveSync on the desktop PC to use a specific baud rate and set the VX6 to use the same baud rate or Incorrect or broken data lines in cable ActiveSync indicator on the host remains gray The host doesn t know you are trying to connect May mean a bad cable with no control lines connected or an incompatible baud rate Try the connection again wi...

Страница 141: ...spectively 7 Under the Call Options tab be sure to turn off Wait for dial tone since a direct connection will not have a dial tone Set the timeout parameter default is 90 seconds Click OK 8 TCP IP Settings should not need to change from defaults Click the Finish button to create the new connection 9 Close the Remote Networking window 10 To activate the new connection select Start Settings Control ...

Страница 142: ...rcial null modem cables will not work LXE recommends the following cable Serial cable 9000A054CBL6D9D9 6 1 5 9 Pinout DB9 female DB9 female 1 7 2 3 3 2 4 6 8 5 5 6 8 4 7 1 9 no connection Figure 3 33 Pinout Serial Cable for Synchronization Some laptop devices do not properly implement all control lines on the serial port the laptop connection will not work ...

Страница 143: ...launch installs the file FileCheck is the name of a file to look for to determine if the CAB file is installed This will be the name of one of the files with path installed by the CAB file Since the CAB file installs into DRAM when memory is lost this file is lost and the CAB file must be reinstalled There are three optional fields that may be added Order is used to force a sequence of events Orde...

Страница 144: ...files the executing process is started and then Launch will continue leaving the loading process to run independently For other persist keys including CAB files Launch will wait for the loading process to complete before continuing This is important for example to ensure that a CAB file is installed before the EXE files from the CAB file are run Note that the auto launch process can also launch ba...

Страница 145: ... 40 Delay dword 0 HKEY_LOCAL_MACHINE SOFTWARE LXE Persist Java FileName SYSTEM JEODE CAB Installed dword 0 FileCheck WINDOWS EVM EXE Order dword 30 Delay dword 0 this key installs APPLOCK from the CAB file HKEY_LOCAL_MACHINE SOFTWARE LXE Persist AppLockInstall FileName SYSTEM APPLOCK CAB FileCheck WINDOWS APPLOCK EXE Order dword 0 this key runs the APPLOCK prep app HKEY_LOCAL_MACHINE SOFTWARE LXE ...

Страница 146: ...eCheck SYSTEM AVALANCHE MODEL DAT Order dword 4 Installed dword 0 PCMCIA dword 0 Delay dword 0 HKEY_LOCAL_MACHINE SOFTWARE LXE Persist AvaLaunch FileName SYSTEM AVALANCHE AVAINIT EXE FileCheck dummy Order dword 5 Delay dword 0 PCMCIA dword 0 Installed dword 0 S Registry entries may vary depending on software revision level and options ordered with the VX6 LAUNCH EXE and Persistent Storage If any o...

Страница 147: ...le click this file to warm boot the computer i e all RAM is preserved It automatically saves the registry before rebooting which means configuration changes are not lost WAVPLAY EXE Double tapping a sound file e g WAV causes WavPlay to open the file and run it in the background VX6 Command line Utilites Command line utilities can be executed by Start Run program name COLDBOOT EXE Command line util...

Страница 148: ...of the calls in the LXE guide may be found in Microsoft s documentation The APIs documented in the programming guide are included in the file LXEAPI DLL which is in the standard Windows CE image on the VX6 For ease of software development the files LXEAPI H and LXEAPI LIB are available on the accessories CD which are the C C include files and the link library for the DLL respectively A full SDK is...

Страница 149: ... same operating system How To Reflash using Keypress Method 1 Place the PCMCIA adapter containing the CF card with new image files on it in the PCMCIA slot next to the radio 2 Double click My Computer then Storage Card folder 3 Select NK BIN EBOOT NB0 XSCALE BIT Select Edit Copy 4 Tap Back Arrow Doubleclick System folder 5 Select Edit Paste When asked Overwrite click Yes to All 6 When the copy pro...

Страница 150: ... the system files The contents of the file are unimportant but the file must be named REFLASH TAG and it must be in the System folder with the new system load 7 When the copy process finishes remove the he PCMCIA adapter containing the CF card 8 Select Start Run and type Coldboot Click OK 9 When booting the VX6 looks for a file named REFLASH TAG in the System folder When this file is encountered t...

Страница 151: ...g and perform a warm reboot Note The current status of NumLock can be changed with the 2nd SHIFT F10 keypress sequence however this method does not change NumLock behavior upon reboot Note These utilities affect the behavior of the NumLock on warmboot After a coldboot NumLock is enabled Disabling the Touchscreen Heater P The touchscreen heater can only be disabled on Platform 2 VX6 s For more info...

Страница 152: ...indows CE taskbar Note The current status of CapsLock can be changed with the CAPS key however this method does not change CapsLock behavior upon reboot Note These utilities affect the behavior of the CapsLock on warmboot After a coldboot CapsLock is disabled Configuring IPv6 S The ability to disable IPv6 is only present on VX6 s with software revision 1ED or greater For more information on identi...

Страница 153: ...tically at boot up run Windows tmsync reg and perform a warmboot For more detail see LAUNCH EXE earlier in this chapter Note This utility affects the behavior of GrabTime at warmboot After a coldboot GrabTime is disabled Synchronize with a Local Time Server By default GrabTime synchronizes via an Internet connection To synchronize with a local time server 1 Use ActiveSync to copy GrabTime ini from...

Страница 154: ... 5 Wireless Network Configuration for information on configuring the Summit Cisco or Symbol radio Ethernet Connector When the VX6 is networked using the Ethernet connector the VX6 s networking options are set via the Microsoft Windows CE Control Panel For more information on configuring the Microsoft Windows CE network settings please refer to the Windows CE Help feature or commercially available ...

Страница 155: ... possible network adapters the internal adapter for a cabled network connection and the wireless network card the Enabler uses the first network adapter it discovers In order to assure the Enabler uses the wireless connection perform one of the following actions Select the Adapters tab in the Enabler setup See Enabler Configuration later in this chapter and make sure the wireless adapter is select...

Страница 156: ... Server and the mobile device Wirelessly via the 2 4GHz radio and an access point After installing the Enabler on the mobile unit a reboot is required for the Enabler to begin normal functionality Following a mobile device reboot the Enabler searches for an Mobile Device Server first by polling all available serial ports and then over the wireless network The designation of the mobile device to th...

Страница 157: ...rol setting are Manage network settings enabled Use Avalanche network profile enabled Manage wireless settings disabled for Windows CE Units To configure the Avalanche Enabler management of the network and wireless settings 1 Open the Enabler Settings Panels by tapping the Avalanche icon on the desktop 2 Select File Settings Enter the password 3 Select the Adapters tab 4 Choose settings for the Us...

Страница 158: ...cons List Details Launchable All Packages Time on Taskbar Device Status Adapter Info About File Menu Options Connect The Connect option under the File menu allows the user to initiate a manual connection to the Mobile Device Server The connection methods by default are wireless and COM connections Any updates available will be applied to the mobile device immediately upon a successful connection A...

Страница 159: ...he applet Avalanche Update Settings Access Start Avalanche File Settings Use these menu options to setup the Avalanche Enabler on the mobile device LXE recommends changing and then saving the changes reboot before connecting to the network Alternatively the Mobile Device Server on the Wavelink Avalanche Management Console can be disabled until needed refer to the Wavelink Avalanche Mobility Center...

Страница 160: ...and wireless settings Select an adapter and switch between the Avalanche Network Profile and manual settings Status View the current adapter signal strength and quality IP address MAC address SSID BSSID and Link speed The user cannot edit this information Connection Figure 3 35 Connection Options Avalanche Server Address Enter the IP Address or host name of the Mobile Device Server assigned to the...

Страница 161: ...upon startup Figure 3 36 Execution Options Dimmed Auto Execute Selection An application that has been installed with the Avalanche Mobility Center Console can be run automatically following each boot Select Auto Execute App The drop down box provides a list of applications that have been installed by the Avalanche Mobility Center Console Delay before execution Time delay before launching Auto Exec...

Страница 162: ...led Initiate connection to the Mobile Device Server based on a docking event Contact Periodically Allows the administrator to configure the Enabler to contact the Mobile Device Server and query for updates at a regular interval beginning at a specific time Wakeup device if suspended If the time interval for periodic contact with the Mobile Device Server occurs a mobile device that is in Suspend Mo...

Страница 163: ... updates Attempt to connect to the Mobile Device Server and process any updates that are available Do not launch the Enabler application Monitor and launch Enabler Attempt to connect to the Mobile Device Server and process any updates that are available Launch the Enabler application Manage Taskbar Lock or Hide Note the dimmed options The Enabler can restrict user access to other applications when...

Страница 164: ...ure 3 39 Scan Config Option Display Figure 3 40 Window Display Options Update Window Display The user interface for the Enabler can be configured to dynamically change based on the status of the connection with the Mobile Device Server At startup Half screen Hidden or Full screen Default is Half screen On connect As is Half screen full screen Locked full screen Default is As is Normal Half screen ...

Страница 165: ... configuration instructions are located in Chapter 6 Figure 3 41 Application Shortcuts Configure shortcuts to other applications on the mobile device Shortcuts are viewed and activated in the Programs panel This limits the user s access to certain applications when the Enabler is controlling the mobile device display LXE recommends using LXE AppLock for this function See Chapter 6 AppLock for inst...

Страница 166: ...ttings When enabled the Enabler will control the wireless settings This parameter cannot be configured from the Avalanche Mobility Center Console and is disabled by default This parameter setting does not apply to Summit Clients only Current Adapter Lists all network adapters currently installed on the mobile device Primary Adapter Indicates if the Enabler is to attempt to configure the primary ad...

Страница 167: ...e Manual Settings When enabled the Enabler will ignore any network or wireless settings coming from the Avalanche Mobility Center Console and use only the network settings on the mobile device Properties Icon Selecting the Properties icon displays the Manual Settings Properties dialog applet From here the user can configure Network DNS and Wireless parameters using the displays shown below Note A ...

Страница 168: ...148 Wavelink Avalanche Enabler Configuration VX6 Reference Guide E EQ VX6RG F Network DNS Wireless Figure 3 44 Manual Settings Properties Panels ...

Страница 169: ...igure titled Adapters Options Network Until these options are enabled the network and wireless settings are controlled by the third party software associated with these settings Status The Status panel displays the current status of the mobile device network adapter selected in the drop down box Note the availability of the Windows standard Refresh button When tapped the signal strength signal qua...

Страница 170: ...150 Wavelink Avalanche Enabler Configuration VX6 Reference Guide E EQ VX6RG F ...

Страница 171: ...Ports COM1 COM3 3 Baud Rate 9600 9600 Parity None None Stop Bits 1 1 Data Bits 8 8 Power on Pin 9 On Off Barcode Enable Code ID None Symbology Symbology All Enable Checked Min 1 Max all Add Prefix Disabled Add Suffix Disabled Strip Leading Disabled 0 Characters Strip Trailing Disabled 0 Characters Strip CodeID Disabled Strip Barcode Data Disabled Control Character Translate All Disabled Control Ch...

Страница 172: ...is action synchronizes all scanner formats The scanner wedge does not configure an external scanner Supported symbologies must be enabled for external scanner see the documentation provided with the external scanner Enabling or disabling a symbology in the scanner wedge only affects processing of the barcode data It does not enable or disable the external scanner s ability to scan the symbology LX...

Страница 173: ...rokes All data scanned is converted to keystrokes and sent to the active window If Send Key Messages WEDGE is not checked the Scanner Driver is in Block mode which buffers the data that can be read by an application from the WDG device through the OS or LXE APIs Note that this latter method is significantly faster than using Wedge Even if Send Key Messages is enabled key mode the data is still ava...

Страница 174: ... take effect immediately Note This panel configures the VX6 for an external scanner It DOES NOT configure the tethered scanner Please refer to the documentation for the tethered scanner for information on configuring the tethered scanner Serial Port Pin 9 To configure either COM port to have power 5V on Pin 9 check the Power on pin 9 5V checkbox on the appropriate tab This is required to supply po...

Страница 175: ...l options to control barcode processing Options include Defining custom Code IDs Disable processing of specified barcode symbologies Rejecting barcode data that is too sort or too long Stripping characters including Code ID leading or trailing characters and specified barcode data strings Replacing control characters Adding a prefix and a suffix For examples of the barcode processing options in us...

Страница 176: ...y customized If any settings have been customized for an individual symbology that symbology has an asterisk beside its name in the list Once configured the specified symbology uses the entries on its individual screen The default All settings have no effect on a previously customized symbology Symbology settings are saved when the OK button is clicked Settings are also saved when a new Symbology ...

Страница 177: ...must be in able to be processed Please see Step 3 Check Barcode Length Max Specifies the maximum length the barcode data can be in able to be processed Please see Step 3 Check Barcode Length Prefix Specifies the string to be added to the beginning of barcode data Please see Step 8 Add Prefix String Suffix Specifies the string to be added to the end of barcode data Please see Step 11 Add Prefix Str...

Страница 178: ...late All is not checked and Send Key Messages is checked any CTRL code which has a keyboard equivalent is passed as a keystroke enter tab escape backspace etc any CTRL code which does not have a keyboard equivalent is dropped Please see Step 13 Start Key Output Thread In Block mode Send Key Messages is not checked CTRL codes are always passed through as a single CTRL code value Character translati...

Страница 179: ... the Name and ID Code textboxes The leftmost button is enabled and labeled Add Click the Add button to add this data to the next available location in the list To insert data into a blank entry Click on the desired entry The leftmost button is enabled and labeled Insert Type the data into the Name and Code ID textboxes When the Insert button is clicked the data is added into the selected list entr...

Страница 180: ... appear in the symbology list If None is selected from the Enable Code ID pulldown list custom IDs are ignored Note Custom symbologies appear at the end of the Symbology pulldown list but are processed at the beginning of the list This allows a custom ID based on a predefined Code ID to be processed before the predefined Code ID When the Code ID strip feature is enabled please see Step 1 Check Cod...

Страница 181: ... internal scanner to disable transmission of a code ID N A on the VX6 see note above After clicking the Symbology Settings button the only entry on the Symbology listing is All plus any configured custom IDs Select this option to disable Code ID processing The barcode data is received but is not checked for a Code ID AIM Programs an internal scanner to transmit the AIM ID with each barcode N A on ...

Страница 182: ...behavior of the external scanner Please refer to the scanner documentation to enable the Code ID By default all symbologies are enabled To disable a particular symbology select the symbology from the pulldown listing and uncheck the Enable box Note The symbology is now shown with an asterisk to indicate the default settings have been modified for this symbology When a symbology is disabled any inc...

Страница 183: ...nned that is less than the number of characters specified is rejected The default value for this parameter is 1 The Max textbox specifies the maximum length the barcode data can be in order to be processed The Code ID does not count when determining maximum length Any barcode scanned that is more than the number of characters specified is rejected The default value for this parameter is All equiva...

Страница 184: ...data unconditionally for the Symbology selected from the pulldown list If All is selected the character stripping is applied to all symbologies that have not been previously customized Code ID stripping discussed earlier is performed first Next Leading and Trailing characters are stripped Barcode data stripping discussed later is performed last Note If the total number of characters being stripped...

Страница 185: ...ta unconditionally for the Symbology selected from the pulldown list If All is selected the character stripping is applied to all symbologies that have not been previously customized Code ID stripping discussed earlier is performed first Next Leading and Trailing characters are stripped Barcode data stripping discussed later is performed last Note If the total number of characters being stripped i...

Страница 186: ...the desired search string The rules are listed below Strings are searched in the order they are listed If the list contains ABC and AB in that order incoming data is searched for ABC first and then searched for AB When a match between the first characters of the barcode and a string from the list is found that string is stripped from the barcode data Processing terminates when a match from the lis...

Страница 187: ...o the next available entry To insert data into a blank entry Click on the desired entry The leftmost button is enabled and labeled Insert Type the data into the textbox When the Insert button is clicked the data is added into the selected list entry To edit data in the list Double click on the item to edit The current value of that item is copied into the textbox for editing The leftmost button is...

Страница 188: ...re the user types the characters to be assigned as the replacement of the control character Replacements for a control character are assigned by selecting the appropriate character from the Character combo box typing the replacement in the Replacement text box and then selecting Assign The assigned replacement is then added to the list box above the Assign button Replacement characters may be spec...

Страница 189: ...n the Replacement textbox Clicking the Assign button adds the entry to the list To delete an item from the list Click on the item to be deleted The rightmost button is enabled and labeled Remove Click the Remove button to remove the entry from the list For examples please see Control Code Replacement Examples later in this chapter ...

Страница 190: ...their hex and hat encoded values Using the Escape function allows entering of literal hex and hat values Figure 4 17 Specify Prefix To enable a prefix check the Prefix checkbox and enter the desired string in the textbox The default is disabled unchecked and a blank text string When barcode data is processed the Prefix string is sent to the output buffer before any other data Because all stripping...

Страница 191: ...tput buffer after the Prefix string if any Figure 4 18 Code ID Strip The default is to enable Code ID stripping the checkbox is enabled and the Code ID is not added to the output buffer The Code ID is stripped from the barcode data for the Symbology selected from the pulldown list If All is selected the Code ID stripping is applied to all symbologies that have not been previously customized ...

Страница 192: ...luded in the string The string can include any character from the keyboard plus characters specified by hex equivalent or entering in hat encoding Please see the Hat Encoding section later in this chapter for a list of characters with their hex and hat encoded values Using the Escape function allows entering of literal hex and hat values Figure 4 19 Specify Suffix To enable a suffix check the Suff...

Страница 193: ...Translate All is checked and Send Key Messages is checked unprintable ASCII characters are assigned to their appropriate 2 keystroke CTRL code sequence CTRL letter when the barcodes are sent in Key Message mode When Translate All is not checked and Send Key Messages is checked any CTRL code which has a keyboard equivalent is passed as a keystroke enter tab escape backspace etc any CTRL code which ...

Страница 194: ...nverted to the text STX Hat encoded text The hat encoded text is translated to the equivalent hex value Carriage Return M Value 0x0d in a barcode is converted to the value 0x0d Escaped hat encoded text The hat encoding to pass thru to the application Horizontal Tab I Value 0x09 in a barcode is converted to the text I Hex encoded text The hex encoded text is translated to the equivalent hex value C...

Страница 195: ...esults of these manipulations Barcode Symbology Raw Scanner Data Resulting Data EAN 128 C11234567890123 bbb1234567890xxx EAN 128 C111234567890123 bbb11234567890xxx EAN 128 C1123 rejected too short EAN 13 E01234567890987 ccc E04567890yyy EAN 13 E01231234567890987 ccc E0234567890yyy EAN 13 E01234 ccc E0yyy I2 5 I04444567890987654321 rejected too long I2 5 I04444567890123 ddd7890zzz I2 5 I0444 dddzzz...

Страница 196: ... example the following sample barcode parameters will be used EAN128 and Code128 barcodes Some of the barcodes start with 00 and some start with 01 The barcodes are different lengths 34 character length with first two characters 01 strip first 2 and last 18 26 character length with first two characters 01 strip first 2 and last 10 24 character length with first two characters 01 strip first 2 and ...

Страница 197: ...24 strip leading 2 strip trailing 8 Code ID enabled Barcode Data 01 c4 min length 20 max length 20 strip leading 0 strip trailing 4 Code ID enabled Barcode Data 00 Add the AIM custom symbologies Refer to the previous section Barcode Symbology Settings for instruction Figure 4 23 AIM Custom Setup for C1 Click the Barcode Data button Click the Add button Add the data for the match codes Figure 4 24 ...

Страница 198: ...nfigured on the Main tab of the Scanner control panel Figure 4 25 Enable Screen Blanking S If the COM1 COM3 screen blanking and On Delay choices are not shown the system load must be updated Warning Do not select COM1 ScrCtl or COM3 ScrCtl unless you have already attached the cable described in Technical Specifications Screen Blanking Cable in Chapter 2 Physical Description and Layout Failure to a...

Страница 199: ...lanking feature For more information on the Password feature please refer Password earlier in this chapter AppLock can be used to restrict the general user s access to only a certain program Since the user under AppLock cannot access the Control Panel the user cannot disable the screen blanking feature For more information on AppLock please refer to Chapter 6 AppLock Operation of the VX6 is unchan...

Страница 200: ...180 Screen Blanking VX6 Reference Guide E EQ VX6RG F ...

Страница 201: ... NET operating system Summit is supported for Windows CE NET and CE 5 0 operating systems Certificates are necessary for many of the WPA authentications Please refer to the Certificates section at the end of this chapter for more information on generating and installing certificates Please refer to the table below for the security options supported for each radio type Radio Type Security Options S...

Страница 202: ...oint for VX6 communication It is important that all dates are correct on CE computers when using any type of certificate Certificates are date sensitive and if the date is not correct authentication will fail It may be necessary to upgrade radio drivers to in order to use certain Summit Client Utility SCU features described in this chapter Please contact your LXE representative for details The Sum...

Страница 203: ...ue values for each profile This tab was labeled Config in early versions of the SCU The Status tab contains information on the current connection The Diags tab provides utilities to troubleshoot the radio Global parameters are found on the Global tab The values for these parameters apply to all profiles This tab was labeled Global Settings in early versions of the SCU Help Help is available by cli...

Страница 204: ...onger than 40 dBm Wireless Zero Config Utility and the Summit Radio The WZC utility has an icon in the toolbar that looks like networked computers with a red X through them indicating that Wireless Zero Config application is enabled but the connection is inactive at this time the VX6 is not connected to a network You can use either the Wireless Zero Configuration Utility or the Summit Client Utili...

Страница 205: ...ab Status of the radio Down Associated Authenticated etc The Disable Radio button can be used to disable the radio card Once disabled the button label changes to Enable Radio By default the radio is enabled The Admin Login button provides access to editing radio parameters as well as adding renaming and deleting profiles Profile and Global parameters may only be edited after entering the Admin Log...

Страница 206: ... Global tab The end user can Turn radio On Off on the Main tab Select active Profile on the Main tab View the current parameter settings for the profiles on the Profile tab View the global parameter settings on the Global tab View the current connection details on the Status tab View the radio status software versions and regulatory domain on the Main tab Access additional troubleshooting features...

Страница 207: ...is not unique an error message is displayed and the profile is not renamed Delete Deletes the profile The current active profile cannot be deleted In that case an error message is displayed and the profile is not deleted New Creates a new profile with the default settings see the list below and prompts for a name The name must be unique If not an error message is displayed and the profile is not c...

Страница 208: ...ings If there is more than one AP with the same SSID the listing displays the AP with the strongest signal and least security If you are logged in as an administrator you can use the Connect button to create a new profile The button is grayed out is an administrator is not logged in Highlight the desired network in the listing and click the Connect button The new profile is named based on the SSID...

Страница 209: ...cters the Service Set Identifier SSID of the WLAN to which the radio connects Default Blank Client Name A string of up to 16 characters Name assigned to the radio and the device using the radio The client name may be passed to networking radio devices e g Access Points Default Blank Power Save Power save mode Options CAM Constantly Awake Mode power save off Maximum Maximum power saving mode Fast F...

Страница 210: ...en Shared key LEAP Default Open Note Set the Auth Type radio parameter is set to Open for all configurations unless using LEAP not WPA and the AP is configured for network EAP only In this case set the Auth Type radio parameter to LEAP EAP Type Extensible Authentication Protocol EAP type used for 802 1x authentication to AP Options None LEAP EAP FAST PEAP MSCHAP PEAP GTC EAP TLS Default None Note ...

Страница 211: ... AES CCKM TKIP CKIP Manual CKIP Auto Default None Note The Encryption type chosen determines if the WEP PSK Keys button is active Available entries on the pop up window vary by encryption type chosen IMPORTANT The settings for Auth Type EAP Type and Encryption depend on the security type chosen Please refer to Summit Wireless Security later in this chapter to determine the proper settings for the ...

Страница 212: ...d the time between AP beacons in kilomircoseconds one kilomicrosecond 1 024 microseconds DTIM interval A multiple of the beacon period that specifies how often the beacon contains a delivery traffic indication message DTIM The DTIM tells power saving devices a packet is waiting for them For example if DTIM 3 then every third beacon contains a DTIM Signal strength RSSI displayed in dBm and graphica...

Страница 213: ...n Start Ping Start a continuous ping to the IP address specified in the text box to the right of this button Once the button is clicked the ping begins and the button label changes to Stop Ping Clicking the button ends the ping The ping also ends when any other button on this screen is clicked or the user browses away from the Diags tab The results of the ping are displayed in the Diagnostic Outpu...

Страница 214: ... button is not clicked before an attempt it made to close or browse away from the Global tab if there are unsaved changes Note Custom parameter options Some parameters contain an option for custom The parameter s value is displayed as Custom when the operating system registry has been used to set the parameter to a value not available from the Global settings parameter options Selecting Custom for...

Страница 215: ...specifying the channels to search roaming time may be reduced over scanning all channels Options Full all channels 1 6 11 the most commonly used channels 1 7 13 For ETSI and TELEC radios only Custom see Note above Default Full Aggressive Scan When set to On and the current connection to an AP becomes weak the radio scans for available APs more aggressively Aggressive scanning work with standard sc...

Страница 216: ...in Only For a VX6 with dual external antennas or an internal antenna use On start on main Frag Thresh If the packet size in bytes exceeds the specified number of bytes set in the fragment threshold the packet is fragmented sent as several pieces instead of as one block Use a low setting in areas where communication is poor or where there is a great deal of radio interference Options 256 to 2346 De...

Страница 217: ... out the association fails No error message or prompting for corrected credentials is displayed If the authentication credentials are not stored in the active profile and the authentication times out the user is again prompted to enter the credentials Options An integer from 3 to 60 Default 8 Certs Path A valid directory path of up to 64 characters where Root CA certificates for EAP authentication...

Страница 218: ... milliseconds that a device will be continuously pinged The Stop Ping button can be tapped to end the ping process ahead of the ping timeout Options 0 to 30 000 ms Default 5000 Ping Delay ms The amount of time specified in milliseconds between each ping Options 0 to 30 000 ms Default 1000 ...

Страница 219: ... the CA certificate into the Windows certificate store 6 For EAP TLS also import the User Certificate into the Windows certificate store 7 Access the Credentials screen again Make sure the Validate server and Use MS store checkboxes are checked 8 The default is to use the entire certificate store for the CA certificate Alternatively use the Browse button next to the CA Cert CA Certificate Filename...

Страница 220: ...ntials screen by using the Browse button 7 Click the OK button then the Commit button 8 When the device attempts to connect to the network a sign on screen is displayed 9 Enter the Username and Password Click the OK button Figure 5 9 Sign On Screen 10 Verify the device is authenticated by reviewing the Status tab When the device is property configured the Status tab indicates the device is Authent...

Страница 221: ...P MSCHAP PEAP GTC and EAP TLS Two options are offered for storing these certificates They may be imported into the Windows certificate store or copied into the Certs Path directory How To Use the Certs Path 1 Follow the instructions later in this chapter for Downloading a Root CA Certificate to a PC 2 Copy the certificate to specified directory on the mobile device The default location for Certs P...

Страница 222: ...ials screen for the desired authentication be sure to check the Use MS store checkbox after checking the Validate server checkbox 4 The default is to use all certificates in the store If this is OK skip to Step 8 5 Otherwise to select a specific certificate click on the Browse button Figure 5 10 Choose Certificate 6 Uncheck the Use full trusted store checkbox 7 Select the desired certificate and c...

Страница 223: ...r system administrator for complete information about your network and its wireless security requirements To begin the configuration process On the Main tab click the Admin Login button and enter the password LXE recommends editing the default profile with the parameters for your network Select the Default profile from the pull down menu Figure 5 11 Default Profile Make any desired parameter chang...

Страница 224: ...used Enter the SSID of the Access Point assigned to this profile Set EAP Type to None Set Encryption to None Set Auth Type to Open Figure 5 12 No Security Once configured click the Commit button Ensure the correct Active Profile is selected on the Main tab and warmboot The SCU Main tab shows the device is associated after the radio connects to the network ...

Страница 225: ...l WEP Set Auth Type to Open Figure 5 13 WEP Encryption Click the WEP keys PSKs button Figure 5 14 WEP Keys Valid keys are 10 for 40 bit encryption or 26 for 128 bit encryption hexadecimal characters Enter the key s and click OK Once configured click the Commit button Ensure the correct Active Profile is selected on the Main tab and warmboot The SCU Main tab shows the device is associated after the...

Страница 226: ...EAP Set Encryption to Auto WEP Set Auth Type as follows o If the Cisco CCX certified AP is configured for open authentication set the Auth Type radio parameter to Open o If the AP is configured for network EAP only set the Auth Type radio parameter to LEAP Please see WPA LEAP later in this section to configure the radio for WPA LEAP Figure 5 15 LEAP Configuration Please review Sign On vs Stored Cr...

Страница 227: ...Username and Password when connecting to the network Figure 5 16 LEAP Credentials Enter the Domain Username if the Doman is required otherwise enter the Username Enter the password and click OK Once configured click the Commit button Ensure the correct Active Profile is selected on the Main tab and warmboot The SCU Main tab shows the device is associated after the radio connects to the network ...

Страница 228: ...to Open Figure 5 17 PEAP MSCHAP Please review Sign On vs Stored Credentials earlier in this chapter Click the Credentials button No entries except the CA Certificate Filename are necessary for Sign On Credentials as the user will be prompted for the User Name and Password when connecting to the network For Stored Credentials User Password and the CA Certificate Filename must be entered Enter these...

Страница 229: ...e Filename If using the Windows certificate store Check the Use MS store checkbox The default is to use the Full Trusted Store To select an individual certificate click on the Browse button Uncheck the Use full trusted store checkbox Select the desired certificate and click Select You are returned to the Credentials screen If using the Certs Path option Leave the Use MS store box unchecked Enter t...

Страница 230: ...o Open Figure 5 20 PEAP GTC Please review Sign On vs Stored Credentials earlier in this chapter Click the Credentials button No entries except the CA Certificate Filename are necessary for Sign On Credentials as the user will be prompted for the User Name and Password when connecting to the network For Stored Credentials User Password and the CA Certificate Filename must be entered Enter these ite...

Страница 231: ... Filename If using the Windows certificate store Check the Use MS store checkbox The default is to use the Full Trusted Store To select an individual certificate click on the Browse button Uncheck the Use full trusted store checkbox Select the desired certificate and click Select You are returned to the Credentials screen If using the Certs Path option Leave the Use MS store box unchecked Enter th...

Страница 232: ...ns are used Enter the SSID of the Access Point assigned to this profile Set EAP Type to LEAP Set Encryption to WPA TKIP Set Auth Type to Open Please see LEAP earlier in this section to configure the radio for LEAP without WPA Figure 5 23 WPA LEAP Please review Sign On vs Stored Credentials earlier in this chapter ...

Страница 233: ...ed for the Username and Password when connecting to the network Figure 5 24 WPA LEAP Credentials Enter the Domain Username if the Doman is required otherwise enter the Username Enter the password Click OK then click Commit Ensure the correct Active Profile is selected on the Main tab and warmboot The SCU Main tab shows the device is associated after the radio connects to the network ...

Страница 234: ...are sent to the RADIUS server The RADIUS server must have auto provisioning enabled to send the PAC provisioning credentials to the client device Please refer to the LXE Security Primer for more information on the RADIUS server configuration Figure 5 25 EAP FAST Configuration For automatic PAC provisioning once a username password is authenticated the PAC information is stored on the computer The ...

Страница 235: ...n connecting to the network To use Stored Credentials Enter the Domain Username if the Doman is required otherwise enter the Username Enter the password To use Automatic PAC Provisioning No additional entries are required To use manual PAC Provisioning Enter the PAC Filename and PAC Password The PAC file must be copied to the directory specified in the Certs Path global variable The PAC file must ...

Страница 236: ... EAP TLS Please review Sign On vs Stored Credentials earlier in this chapter Click the Credentials button No entries except the User Certificate Filename and the CA Certificate Filename are necessary for Sign On Credentials as the user will be prompted for the User Name and Password when connecting to the network For Stored Credentials User Password and the CA Certificate Filename must be entered ...

Страница 237: ...n this chapter Check the Validate server a checkbox Figure 5 29 EAP TLS Credentials If using the Windows certificate store Check the Use MS store checkbox The default is to use the Full Trusted Store To select an individual certificate click on the Browse button Uncheck the Use full trusted store checkbox Select the desired certificate and click Select You are returned to the Credentials screen If...

Страница 238: ...ncryption to WPA PSK Set Auth Type to Open Figure 5 30 WPA PSK Encryption Click WEP keys PSKs button Figure 5 31 PSK Entry This value can be 64 hex characters or an 8 to 63 byte ASCII value Enter the key and click OK Once configured click the Commit button Ensure the correct Active Profile is selected on the Main tab and warmboot The SCU Main tab shows the device is associated after the radio conn...

Страница 239: ...MSCHAP PEAP GTC EAP TLS WPA LEAP and WPA PSK Configuring without WPA Cisco Aironet Client Utility ACU Note When making changes to profile parameters the VX6 should be warmbooted afterwards Access Start Programs Cisco ACU or ACU Icon on Desktop Figure 5 32 Cisco Aironet Client Utility Note To configure WPA please see Configuring for WPA later in this section ...

Страница 240: ...P Authentication Types Open LEAP Disabled Mixed Mode Disabled World Mode Disabled Data Rates Auto Transmit Power MAX Offline Channel Scan Enabled Select an active profile to manage Figure 5 33 Cisco Profile Properties Screen No Security Create a new profile or edit an exiting profile If no security is used the only entry necessary on the Profile Properties screen may be the SSID If the SSID is lef...

Страница 241: ...den from view if you return to the screen However the Already Set indicates if a key has previously been entered Tap the WEP Keys button to enter WEP information If a key is already entered the Already set Checkbox is checked The previously entered key value is not displayed for security Figure 5 34 Cisco Profile WEP Keys LEAP Note The instructions in this section are for LEAP without WPA Please s...

Страница 242: ...wse button to locate the new firmware file Status Tab Immediately runs status on signal strength and signal quality Statistics Tab Select the Receive Stats or Transmit Stats The data is displayed on the screen Survey Tab Immediately runs signal strength and quality and link speed An option is available to Setup parameters for Active Mode reporting ...

Страница 243: ...cted Access WPA the VX6 must be equipped as follows Cisco 350 radio card with driver release 2 60 or later The LXE VX6 supports WPA and all authentications The Microsoft supplicant and Cisco supplicants are used separately or together to provide support for the different authentications Most of the configuration is done with the Microsoft Wireless Configuration tool WPA LEAP requires the Cisco sup...

Страница 244: ...Figure 5 35 No Cisco PEAP Figure 5 36 Cisco PEAP installed If the Cisco installation is correct continue with the configuration If it is not correct follow the procedures below Note Instructions are also included in the README file located in the SYSTEM folder There are two Cisco CAB files in the SYSTEM folder of the VX6 The default files are CISCO CAB CISCOPEAP CAB The default CISCO CAB file prov...

Страница 245: ... CAB file provides for Cisco PEAP and PEAP GTC authentications When the renamed CISCO CAB file is loaded the Wireless Network Properties screen looks like the figure labeled Cisco PEAP Installed above If it becomes necessary to switch to a different authentication than Cisco PEAP or PEAP GTC 1 Rename the CISCO CAB file to CISCOPEAP CAB 2 Rename the CISCOMSCHAP CAB file to CISCO CAB 3 Coldboot the ...

Страница 246: ...U see Section WPA LEAP Authentication Configuration Click the ACU icon on the desktop Figure 5 37 Cisco ACU Profile Selection From the Select Active Profile pull down list select External Settings Click OK and warmboot Figure 5 38 Cisco ACU Reboot Message After booting up the Microsoft Zero Config tool should start If it does not start configuring the wireless connection by clicking on the icon on...

Страница 247: ...fy me when new wireless networks are available box is not checked Click the Advanced button Figure 5 41 Advanced Wireless Settings Make sure the Use Windows to configure my wireless settings box is checked Set the Networks to access drop down box to Only access points Click the OK button to return to the Wireless Information Screen Click the Add New line ...

Страница 248: ...the Network name SSID into the text field For PEAP MSCHAP and EAP TLS set Encryption to TKIP and Authentication to WPA For WPA PSK see WPA PSK Authentication Configuration To configure the IEEE 802 1X Authentication box see the following sections for configuration of each authentication protocol ...

Страница 249: ...SCHAP Wireless Network Properties With the radio parameters configured see Wireless Network Configuration earlier in this chapter set the EAP type to PEAP as shown above If the EAP type box text is not exactly as shown see Installing Radio Drivers earlier in this chapter to change the radio cab file Click the Properties button Figure 5 44 Authentication Settings When first configuring and authenti...

Страница 250: ... logging into the wireless network Figure 5 45 Wireless Network Login Once authenticated click the IP Information tab Figure 5 46 IP Information Tab If the network is set to use DHCP the VX6 displays the IP address given by the DHCP server Now go back and authenticate the server ...

Страница 251: ...e Wireless Network Properties configuration screen Click the Properties button Check the Validate server Click OK to dismiss the configuration boxes Figure 5 48 Advanced Wireless Settings Authenticated SSID Once the authentication completes the status changes to show the VX6 has authenticated to the SSID as shown in the figure above Click on the IP Information tab and make sure there is a valid IP...

Страница 252: ...etwork Properties If the EAP type box text is not exactly as shown see Installing Radio Drivers earlier in this chapter to change the radio cab file Click the Properties button Figure 5 50 PEAP Properties When first configuring and authenticating do not validate the server certificate This allows the user authentication to be tested When user authentication is successful return to this screen and ...

Страница 253: ...other AP Click the OK button The login screen appears for logging into the wireless network Figure 5 51 Login Screen Enter valid user credentials Once authenticated click the IP Information tab Figure 5 52 IP Information Tab The device displays the IP address given by the DHCP server Now go back and authenticate the server ...

Страница 254: ...5 53 PEAP Properties Validate Server Certificate Check the Validate server certificate box Click OK to dismiss the configuration boxes When the login box appears enter valid user credentials It is possible for to be prompted to accept a Root CA certificate when using PEAP GTC If the trusted root certificate box as shown in the previous figure is blank the user will be prompted to accept the Root C...

Страница 255: ...the properties window Figure 5 55 PEAP Properties Trusted Root Certificate The same thing can be done for the Connect only if server name ends in field Check the box and leave the field blank A prompt window will appear asking for confirmation of the correct server name Figure 5 56 Accept Server Connection Warning ...

Страница 256: ...and the server name field will be filled in with the correct server name The other option is to fill in the correct name Figure 5 58 Wireless Information Authenticated Once the authentication completes the status will change to Authenticated to SSID as shown Click on the IP Information tab and make sure there is a valid IP address as shown previously in this section ...

Страница 257: ... configure the VX6 for WPA LEAP use the Cisco ACU installed during normal installation of the Cisco radio driver Cisco ACU Start the Cisco ACU by clicking the icon on the desktop or navigate to Start Programs Cisco ACU Click on the Profile tab Figure 5 59 ACU Profile Tab Click the Rename button Name the profile Figure 5 60 Renaming Profile Click the Edit button ...

Страница 258: ...es screen is displayed Figure 5 61 Profile Properties Screen Enter the SSID and Client Name in the correct fields Set the Network Security Type to LEAP WPA Click the OK button Figure 5 62 Select Profile Use the drop down box to choose the profile just configured Click OK ...

Страница 259: ...Cisco Radio 239 E EQ VX6RG F VX6 Reference Guide The VX6 associates and displays the sign on screen Figure 5 63 Login Screen Click the Status tab to display status Figure 5 64 ACU Status Tab ...

Страница 260: ... is installed Note It is important that all dates are correct on the device when using any type of certificate Certificates are date sensitive and if the date is not correct authentication will fail User Certificate To check if a user certificate is installed navigate to Start Control Panel Certificates Set the drop down box to My Certificates as shown below The correct user certificate should be ...

Страница 261: ...o user certificate refer to User Certificates earlier in this chapter to acquire a user certificate and private key file Setting EAP TLS Parameters With the radio parameters configured see Wireless Network Configuration set the EAP type to TLS as shown Figure 5 67 EAP TLS Configuration Click the Properties button Figure 5 68 Authentication Settings ...

Страница 262: ...box This allows the user to be authenticated as the first step When the user certificate successfully authenticates come back to this screen and validate the server certificate as described in the next section Click the OK button to dismiss the configuration screens When the radio re connects the user is authenticated with the user certificate If the user does not authenticate recheck the user cer...

Страница 263: ...alled on the VX6 Navigate to the Wireless Network Properties configuration screen Click the Properties button Check the Validate server box as shown below Figure 5 71 Validate Server Click OK to dismiss the configuration boxes Figure 5 72 SSID Authenticated Once the authentication completes the status changes to show the VX6 has authenticated to SSID as shown above ...

Страница 264: ...k Settings as described in Wireless Network Settings earlier in this chapter Change the Network Authentication to WPA PSK Enter an ASCII network key in the text field Hex keys do not work in the Microsoft Zero Config utility at this time There is no server authentication when using WPA PSK Click the OK button to complete configuration ...

Страница 265: ...twork Connected Icon in the Status Bar Figure 5 74 Symbol NETWLAN Screen IP Information Tab After the IP Address has been assigned to the VX6 tap the Renew button to renew the IP address if necessary Tap the Details button to view the Network Connection details IPv6 Information Tab This is the TCP IPv6 information screen The contents cannot be edited by the user Note IPv6 can be disabled Please se...

Страница 266: ...utomatically connect to non preferred networks Disabled Networks to access Only APs Only comp to comp All available Encryption WEP TKIP WEP Authentication WPA Open Shared WPA PSK WPA Ad hoc network Disabled Key provided automatically Enabled Enable 802 1X authentication Enabled EAP Type MDF Challenge PEAP TLS TLS Figure 5 75 Symbol Wireless Information Tab View Log Displays the logon connection da...

Страница 267: ...on drop down box Tap Disabled and WEP is disabled Tap the OK button to return to the Wireless Information tab Enable WEP Tap the down arrow in the Authentication drop down box Tap the WEP Authentication protocol If the key is provided automatically by your network check the Key provided automatically checkbox If you wish to enter your Authentication key uncheck the Key provided automatically check...

Страница 268: ...s Information tab Tap the Connect button Figure 5 77 Symbol Advanced Wireless Settings To access NETWLAN1 Properties again double tap the Network Connected icon in the Toolbar Select a User Certificate 1 Select Wireless Information Tab 2 Select a network by double tapping the network name 3 In the IEEE 802 1X Authentication box enable 802 1X authentication 4 Select an EAP type 5 Tap the Properties...

Страница 269: ...root certificates The easiest way to get the root CA certificate is to use a browser on a PC to navigate to the CA To request the root CA certificate open a browser to http CA IP address certsrv Sign into the CA with any valid username and password Figure 5 78 Logon to Certificate Authority Figure 5 79 Certificate Services Welcome Screen Click the Download a CA certificate certificate chain or CRL...

Страница 270: ... the list box Figure 5 80 Download CA Certificate Screen Click the DER button To download the CA certificate click on the Download CA certificate link Figure 5 81 Download CA Certificate Screen Click the Save button and save the certificate Make sure to keep track of the name and location of the certificate ...

Страница 271: ...ot use the Windows certificate store Instead copy the certificate to the System folder for use with a Summit radio Copy the certificate file to the VX6 Import the certificate by navigating to Start Control Panel Certificates Figure 5 82 Certificates Click the Import button Figure 5 83 Import Certificate Make sure From a File is selected and click OK ...

Страница 272: ... the explorer buttons browse to the location where you copied the certificate select the certificate desired and click OK Figure 5 85 Certificate Import Confirmation Click Yes to import the certificate Once the certificate is installed return to the proper authentication section earlier in this manual ...

Страница 273: ...to navigate to the CA To request the user certificate open a browser to http CA IP address certsrv Sign into the CA with the username and password of the person who will be logging into the mobile device Figure 5 86 Logon to Certificate Authority This process saves a user certificate and a separate private key file Windows CE equipped devices such as the VX6 require the private key to be saved as ...

Страница 274: ...EQ VX6RG F Click the Request a certificate link Figure 5 88 Request a Certificate Screen Click on the advanced certificate request link Figure 5 89 Advanced Certificate Request Screen Click on the Create and submit a request to this CA link ...

Страница 275: ...es Type the full path on the local PC where the private key is to be copied Also specify the private key filename Be sure to note the name used for the private key file for example VX6USER PVK The certificate file created later in this process must be given the same name for example VX6USER CER DO NOT check to use strong private key protection Make any other desired changes and click the Submit bu...

Страница 276: ...rnings If any script notifications occur click the Yes button to continue the certificate request Figure 5 92 Script Warnings When prompted for the private key password Click None if you do not wish to use a password or Enter and confirm your desired password then click OK ...

Страница 277: ...user certificate to the PC Make sure to keep track of the name and location of the certificate The private key file is also downloaded and saved during this process Be sure use the same name for the certificate file as was used for the private key file For example it the private key was saved as VX6USER PVK then the certificate file created must be given the same name for example VX6USER CER ...

Страница 278: ...certificate and private key files to the VX6 Import the certificate by navigating to Start Control Panel Certificates Select My Certificates from the pull down list Figure 5 95 Certificates Click the Import button Figure 5 96 Import Certificate Make sure From a File is selected and click OK ...

Страница 279: ...he explorer buttons browse to the location where you copied the certificate select the certificate desired and click OK The certificate is now shown in the list Figure 5 98 Certificate Listing With the certificate you just imported highlighted click View From the Field pull down menu select Private Key ...

Страница 280: ...t the private key click OK to return to the Certificates screen Click import Figure 5 100 Browsing to Private Key Location Using the explorer buttons browse to the location where you copied the private key file change the Type pull down list to Private Keys select the certificate desired and click OK Enter the password for the certificate if appropriate Click on View to see the certificate details...

Страница 281: ...a separate private key file as shown earlier in this section If the certificate was not generated with a separate private key file generate a new certificate and follow the import process again Make sure the certificate and private key file have the same name for example vx6user cer for the certificate and vx6user pvk for the private key file If the file names are not the same rename the private k...

Страница 282: ...262 Certificates VX6 Reference Guide E EQ VX6RG F ...

Страница 283: ...set the Administrator may need to reconfigure the AppLock parameters LXE has made the assumption in this chapter that the first user to power up a new mobile device is the system administrator Note AppLock Administrator Control panel file Launch option does not inter relate with similarly named options contained in other LXE Control Panels Note A few applications do not follow normal procedures wh...

Страница 284: ...e available to the end user This version offers a user mode taskbar icon allowing the end user to switch between user applications If your Administrator Control Panel has Application Security and Status tabs then the device has LXE Multi Application AppLock installed The Administrator can configure multiple applications to lock and the end user can swap between the applications Figure 6 1 Multi Ap...

Страница 285: ... can configure a single application to lock and the end user is limited to that application Figure 6 2 Single Application AppLock Though this chapter is designed for users of the newer Multi Application AppLock the instructions may also be used to configure Single Application AppLock with the following differences The Control tab is used to specify the application to lock instead of the Applicatio...

Страница 286: ...switches to end user mode Briefly the process to configure a new device is as follows 1 Connect an external power source to the device and press the Power button 2 Adjust screen display audio volume and other parameters if desired Install accessories 3 Tap Start Settings Control Panel Administration icon 4 Assign applications on the Control single application or Application dual application tab sc...

Страница 287: ...is automatically launched and runs in full screen mode when the device boots up The user cannot unintentionally or intentionally exit the application nor can the end user execute any other applications Normal application exit or switching methods and all Microsoft defined Windows CE key combinations such as close X icon File Exit File Close Alt F4 Alt Tab etc are disabled The Windows CE desktop ic...

Страница 288: ... dismissed and the device returns to end user mode All other situations that present the password prompt do not dismiss the prompt this is because the other situations result in invalid end user operation These conditions include If inaccurate configuration information is entered by the administrator i e an application is specified that does not exist If the application name which is mandatory for...

Страница 289: ...nd Stylus taps affect the application in focus only When the user needs to use the Input Panel they tap the Keyboard option Input Panel taps affect the application in focus only The figure shown above is an example and is shown only to aid in describing how the user can switch between applications using a stylus The switchpad lists user applications as well as the Keyboard option See Also Applicat...

Страница 290: ...played When a valid password is not entered within 30 seconds the user is returned to the System Control Panel If a password has not been configured the Administrator Control panel is displayed Important Before setting up multiple instances of the same application make sure the targeted software application will allow two instances to run at the same time Application Panel Note Users of Single App...

Страница 291: ... Menu and Internet Status are available See the section titled End user Internet Explorer EUIE for more details Launch Button See following section titled Launch Button Note AppLock Administrator Control panel file Launch option does not inter relate with similarly named options contained in other LXE Control Panels Global Key Default is Ctrl Spc Select the Global Key key sequence the end user is ...

Страница 292: ... Option Explanation Scroll Buttons Use the left and right scroll buttons to move from application setup screen to application setup screen The left and right buttons update the information on the screen with the previous or next configured application respectively ...

Страница 293: ...launched at bootup Valid values are between 0 no tries and 99 tries or 1 for infinite Infinite tries ends when the application successfully launches The default is 0 retries Auto At Boot Delay timer is the time that AppLock waits prior to the initial launch of the selected application when it is automatically launched at bootup Delay default is 10 seconds Valid values are between 0 seconds no dela...

Страница 294: ...nds Valid values are between 0 no delay and 99 seconds AppLock must also be configured to automatically re launch an application To AppLock application termination by the end user is indistinguishable from application termination for any other reason Manual Launch Default is Disabled Enabling this option allows the end user to launch the specified application s Upon bootup completion an applicatio...

Страница 295: ... mode End user Internet Explorer EUIE EXE The EUIE executes the Internet Explorer application in full screen mode which removes the address bar and status bar The Options Dialog is also removed so the end user cannot re enable the address bar The administrator specifies the EUIE by checking the Internet checkbox in the Application tab of the Administrator applet The internet application should the...

Страница 296: ... the normal key must be pressed from the keyboard when switching modes The hotkey sequence is displayed in the Hot key text box with Shift Alt and Ctrl text strings representing the shift state keys The normal keyboard key completes the hotkey sequence The hotkey must be entered via the keypad Some hotkeys cannot be entered via the Input Panel Also hotkeys entered via the SIP are not guaranteed to...

Страница 297: ...age device and in a specific logfile specified by the Administrator For this reason the administrator can configure the type of status information that is logged as well as clear the status information Figure 6 7 Status Panel Move the cursor to the Filename text box and either type the logfile path or tap the Browse button the button The standard Windows CE Browse dialog is displayed After selecti...

Страница 298: ...tus information be logged or turn off all status information logging completely The system default is None however to reduce registry use the administrator may want to select None after verifying the configuration Tap the Clear button to clear the status information from the registry None Error Processing Extended All Save As When the Save As button is selected a standard Save As dialog screen is ...

Страница 299: ...umLock can be configured Please refer to Chapter 3 System Configuration When NumLock is off only the numeric 0 through 9 and DOT keys are affected All other keymaps are unchanged When the VX6 boots the default condition of Caps or CapsLock is Off The Caps or CapsLock condition can be set toggled with a 2nd F1 key sequence The CAPS LED on the keyboard is illuminated when CapsLock is On Press These ...

Страница 300: ...F2 Pause x F2 Up Arrow Up Arrow Down Arrow Down Arrow Right Arrow Right Arrow Left Arrow Left Arrow Insert x Ins BkSp Delete numeric x DOT Home x Left Arrow End x Right Arrow Page Up x Up Arrow Page Down x Down Arrow Right Shift x x F7 Right Alt x x F8 Right Ctrl x x F9 ScrollLock x x F4 NumLock x x F10 F1 F1 F2 F2 6 The Volume Control keys have no function as the volume control is adjusted via th...

Страница 301: ...ese Keys and Then To get this key 2 nd Shift Ctrl Alt CapsLock Press this key F3 F3 F4 F4 F5 F5 F6 F6 F7 F7 F8 F8 F9 F9 F10 F10 F11 x x F1 F12 x x F2 a A b B c C d D e E F F g G h H I I j J k K l L m M n N o O p P q Q r R s S t T u U v V w W x X y Y z Z A x A B x B C x C D x D ...

Страница 302: ...Keys and Then To get this key 2 nd Shift Ctrl Alt CapsLock Press this key E x E F x F G x G H x H I x I J x J K x K L x L M x M N x N O x O P x P Q x Q R x R S x S T x T U x U V x V W x W X x X Y x Y Z x Z 1 1 2 2 3 3 4 4 5 5 6 6 7 7 8 8 9 9 0 0 DOT DOT x 0 x 1 x 2 x 3 x 4 x 5 x 6 ...

Страница 303: ...hen To get this key 2 nd Shift Ctrl Alt CapsLock Press this key numeric x x 7 alpha x 7 numeric x x 8 alpha x 8 numeric x x 9 alpha x 9 numeric x I alpha x x I colon x D semicolon x F x L x N _ underscore x M comma x J apostrophe x H tilde x B x S x A x G x Q x W x E x R x T x Y x U x O x P ...

Страница 304: ...s RFTermTM program When running this program please refer to the RFTermTM Reference Guide for equivalent keys and keypress sequences IBM 5250 Terminal Emulator Keypad ESC SHIFT 2ND ALT SP F1 F2 F3 F4 F5 F6 F7 F8 F9 CAPS BREAK R S B C M N A D F G H J K L S V X Z F10 BKLT INS BKSP E I O P R T U W Y CTRL _ Home END ENTER PgUp PgDn 0 1 2 4 5 7 8 DEL 3 6 9 Attn SysReq Del Clr Dup NL Ins Fld Fld E Inp F...

Страница 305: ...quires decimal but the desktop one used over ActiveSync that a developer may use requires hex Example KEYCOMP DEFAULT KEY writes KEYCOMP REG to local directory Input File Compiler Text File DEFAULT KEY Æ KEYCOMP EXE Æ KEYCOMP REG This output file should be renamed to xxx REG the suffix must remain REG then copied to the VX6 over ActiveSync Once the file is loaded on the VX6 double click the file f...

Страница 306: ...cting the keymap in the control panel The default value for MAPDESC is reload The format of this file is familiar to anyone who has used INI files under Windows There is a section header in square brackets followed by various values in the form value data Lines beginning with a semicolon or empty lines are ignored as comments Spaces or tabs before or after the information are stripped off and igno...

Страница 307: ... keymap tables in this source file MAPCOLS Number of columns in each keymap table This is defined by the hardware keyboard MAPROWS Number of rows in each keymap table This is defined by the hardware keyboard ALGOR Defines the algorithm for converting row column to internal scan code Current values are MX3X scancode column 3 row SPECIAL Section Special KEYSHIFT COL8ROW0 KEYALT COL9ROW0 The second s...

Страница 308: ... names are MAP and COLxROWx defining a key code The only valid values for MAP are MAP_NORMAL no modifier keys MAP_2ND 2nd modifier only MAP_SHIFT shift modifier only MAP_2NDSHF or MAP_2NDSHIFT 2nd and shift modifiers together In addition certain keymaps are used for special adjustment functions within the keyboard driver via the CHANGE mapname specification MAP_VOLUM or MAP_VOLUME special keymap f...

Страница 309: ... codes listed below CHANGE mapname for modifier keys change keymaps to mapname as specified above OPEN an unused key position does nothing when pressed Valid ACTION codes are as follows SCAN1 Scan key 1 N A on VX6 SCAN2 Scan key 2 N A on VX6 SCAN3 Handle trigger button unused on VX6 but specified POWER power button BACKLIGHT backlight on off function Note that specifying the power button in a diff...

Страница 310: ... but the ACTION code parsed is not recognized The following values are valid SCAN1 SCAN2 SCAN3 POWER or BACKLIGHT Invalid keycode s The keycode parsed is not recognized The following values are valid VK code from the VK code table below x where x is an ASCII code e g A or OPEN for unused entries will not do anything when pressed Invalid MAP value s The MAP value parsed is not one the following lis...

Страница 311: ...ction The value name parsed is invalid for the GENERAL section The recognized names are MAPNAME MAPCNT MAPCOLS MAPROWS or ALGOR Invalid value s in MAP section The value name parsed is not expected in the SPECIAL section The only recognized names are MAP and COLxxx Invalid value s in SPECIAL section The value name parsed is not expected in the SPECIAL section The only recognized names are KEYSHIFT ...

Страница 312: ...essage comes from the post parse validation so no line is specified No definition for MapHead keyalt No ALT modifier key definition was found The keyboard driver requires this key to be defined somewhere in one of the keymaps This message comes from the post parse validation so no line is specified No definition for MapHead keycontrol No CTRL modifier key definition was found The keyboard driver r...

Страница 313: ...ere in one of the keymaps This message comes from the post parse validation so no line is specified No equal in value line A value line must be of the form value data A value line was expected but there was no equal in it or A comment line did not begin with a semicolon No MAPNAME defined There is no map name defined The keyboard driver requires this name to be able to load the keymap tables This ...

Страница 314: ...4 MAPCOLS 8 MAPROWS 8 ALGOR MX3X special keys are accessed outside the map this specifies the row and column these should not need to change but Special KEYSHIFT COL8ROW0 KEYALT COL9ROW0 KEY2ND COL10ROW0 KEYCONTROL COL11ROW0 the name of this key doesn t matter the important part is the MAP value codes are defined in docs this is the map for keys with no modifier Map MAP MAP_NORMAL COL0ROW0 VK_ESCA...

Страница 315: ...OW5 0 COL3ROW6 VK_LEFT COL3ROW7 VK_TAB COL4ROW0 VK_F9 COL4ROW1 S COL4ROW2 VK_RIGHT COL4ROW3 F COL4ROW4 H COL4ROW5 K COL4ROW6 2 COL4ROW7 VK_UP COL5ROW0 6 COL5ROW1 Z COL5ROW2 VK_BACK COL5ROW3 C COL5ROW4 B COL5ROW5 M COL5ROW6 VK_PERIOD COL5ROW7 VK_DOWN COL6ROW0 VK_F10 COL6ROW1 W COL6ROW2 VK_RETURN COL6ROW3 R COL6ROW4 Y COL6ROW5 I COL6ROW6 5 COL6ROW7 P COL7ROW0 E COL7ROW1 open COL7ROW2 VK_F3 COL7ROW3 ...

Страница 316: ...COL1ROW4 SHIFT 7 COL1ROW5 VK_EQUAL COL1ROW6 SHIFT 9 COL1ROW7 ACTION SCAN2 COL2ROW0 SHIFT VK_BACKSLASH COL2ROW1 open COL2ROW2 SHIFT VK_SEMICOLON COL2ROW3 SHIFT VK_APOSTROPHE COL2ROW4 VK_COMMA COL2ROW5 VK_LBRACKET COL2ROW6 SHIFT VK_SLASH COL2ROW7 SHIFT VK_PERIOD COL3ROW0 open COL3ROW1 open COL3ROW2 open COL3ROW3 open COL3ROW4 VK_BACKQUOTE COL3ROW5 SHIFT VK_COMMA COL3ROW6 VK_HOME COL3ROW7 SHIFT VK_TA...

Страница 317: ...SH COL7ROW6 CHANGE MAP_VOLUME COL7ROW7 open the name of this key doesn t matter the important part is the MAP value codes are defined in docs this is the map for keys with 2ND and SHIFT Map MAP MAP_2NDSHIFT COL0ROW0 open COL0ROW1 VK_F11 COL0ROW2 ACTION POWER COL0ROW3 VK_F12 COL0ROW4 open COL0ROW5 open COL0ROW6 8 COL0ROW7 ACTION SCAN1 COL1ROW0 open COL1ROW1 9 COL1ROW2 ACTION SCAN3 COL1ROW3 open COL...

Страница 318: ...OW3 open COL4ROW4 open COL4ROW5 open COL4ROW6 2 COL4ROW7 open COL5ROW0 6 COL5ROW1 open COL5ROW2 open COL5ROW3 open COL5ROW4 open COL5ROW5 open COL5ROW6 open COL5ROW7 open COL6ROW0 open COL6ROW1 open COL6ROW2 open COL6ROW3 open COL6ROW4 open COL6ROW5 open COL6ROW6 5 COL6ROW7 open COL7ROW0 open COL7ROW1 open COL7ROW2 VK_PAUSE COL7ROW3 VK_SCROLL COL7ROW4 VK_SNAPSHOT COL7ROW5 7 COL7ROW6 open COL7ROW7 ...

Страница 319: ...T 9 COL1ROW2 ACTION SCAN3 COL1ROW3 SHIFT T COL1ROW4 SHIFT U COL1ROW5 SHIFT 4 COL1ROW6 SHIFT O COL1ROW7 ACTION SCAN2 COL2ROW0 SHIFT A COL2ROW1 open COL2ROW2 SHIFT D COL2ROW3 SHIFT G COL2ROW4 SHIFT J COL2ROW5 SHIFT 1 COL2ROW6 SHIFT L COL2ROW7 SHIFT 3 COL3ROW0 SHIFT COL3ROW1 open COL3ROW2 SHIFT X COL3ROW3 SHIFT V COL3ROW4 SHIFT N COL3ROW5 SHIFT 0 COL3ROW6 SHIFT VK_LEFT COL3ROW7 SHIFT VK_TAB COL4ROW0 ...

Страница 320: ...COL5ROW7 SHIFT VK_DOWN COL6ROW0 SHIFT VK_F10 COL6ROW1 SHIFT W COL6ROW2 SHIFT VK_RETURN COL6ROW3 SHIFT R COL6ROW4 SHIFT Y COL6ROW5 SHIFT I COL6ROW6 SHIFT 5 COL6ROW7 SHIFT P COL7ROW0 SHIFT E COL7ROW1 open COL7ROW2 SHIFT VK_F3 COL7ROW3 SHIFT VK_F4 COL7ROW4 SHIFT VK_F6 COL7ROW5 SHIFT 7 COL7ROW6 SHIFT VK_F8 COL7ROW7 open ...

Страница 321: ...7 00 Flag0 is the shift codes for the NORMAL key map Flag0 hex 00 00 A0 00 00 00 00 A0 00 00 A0 00 00 00 00 A0 00 00 00 00 00 00 00 00 00 00 00 00 00 00 00 00 00 00 00 00 00 00 00 00 00 00 00 00 00 00 00 00 00 00 00 00 00 00 00 00 00 00 00 00 00 00 00 00 Map1 is the scancode values for the 2ND key map Map1 hex 00 14 DF 13 00 00 BD 87 31 BB 89 35 37 BB 39 88 DC 00 BA DE BC DB BF BE 00 00 00 00 C0 B...

Страница 322: ...00 00 00 00 00 Map3 is the scancode values for the SHIFT key map Map3 hex 1B 70 DF 71 74 76 38 87 51 39 89 54 55 34 4F 88 41 00 44 47 4A 31 4C 33 20 00 58 56 4E 30 25 09 78 53 27 46 48 4B 32 26 36 5A 08 43 42 4D BE 28 79 57 0D 52 59 49 35 50 45 00 72 73 75 37 77 00 Flag3 is the shift codes for the SHIFT key map Flag3 hex 10 10 A0 10 10 10 10 A0 10 10 A0 10 10 10 10 A0 10 00 10 10 10 10 10 10 10 00...

Страница 323: ...epts Type I and II PCMCIA cards Two 2 external RS 232C serial ports COM1 and COM3 10 9 pin D male connectors External Connectors Interfaces One USB Host and one USB Client Port One 1 Ethernet Port Via Adapter Cable Power Connector 12 80V DC input power 5 pin connector Power Switch Sealed power switch Beeper Minimum loudness greater than 95dBm at 10 cm in front of unit Dimensions Length 12 2 in 30 ...

Страница 324: ...sion 4 F to 122 F 20 C to 50 C non condensing Extended temperature version 22º to 122º F 30ºC to 50ºC condensing Storage Temperature Standard version 22 F to 140 F 30 C to 60 C non condensing Extended temperature version 22 F to 140 F 30 C to 60 C condensing Water Sand and Dust IP66 per IEC60529 Humidity Standard version Up to 90 Non condensing at 40 C 104 F Extended temperature version 100 Vibrat...

Страница 325: ...m x 218mm x 11mm 11 0 x 8 6 x 0 4 Viewing Area 249mm x 187 5mm 9 8 x 7 38 Active Display Area 246mm x 98 3mm 9 7 x 3 87 UPS Battery Pack Specifications Feature Specification Altitude Operational to 10 000 ft 3048 meters Operating Temperature 30 C to 50 C 22 F to 122 F Storage Temperature 40 C to 70 C 40 F to 158 F Water Sand and Dust IP66 per IEC60529 Humidity 10 90 Non condensing at 40 C 104 F Vi...

Страница 326: ...II Bus Interface PCMCIA 2 0 Type II slot Radio Frequencies 2 4 2 4835 GHz IEEE 802 11b DS SS RF Data Rates 11 Mbps RF Power Level 100 mW Channels 11 US 13 Europe 4 France 1 Japan Operating Temperature see VX6 Environmental Specifications Storage Temperature see VX6 Environmental Specifications Connectivity Novell TCP IP Ethernet ODI PCMCIA Symbol 11Mb 2 4GHz Type II Bus Interface PCMCIA 2 0 Type I...

Страница 327: ...PCMCIA adapter Enhanced Data Rate Up to 3 0 Mbit s over the air Connection No less than 32 80 ft 10 meters line of sight Bluetooth Version 2 0 EDR Operating Frequency 2 402 2 480 GHz Operating Temperature see VX7 Environmental Specifications Storage Temperature see VX7 Environmental Specifications ...

Страница 328: ...308 Radio Specifications VX6 Reference Guide E EQ VX6RG F ...

Страница 329: ...dix C Reference Material Introduction Contents of this Appendix include AppLock Error Messages and Registry Settings Revision History and the following charts Valid VK Codes for CE ASCII Control Codes Hat Encoding Decimal Hexadecimal Chart ...

Страница 330: ...e reading the hotkey the internal factory default is used LOG_ERROR App Command Line Command line Command line of the application being locked LOG_PROCESSING App Application name Name of the application being locked LOG_PROCESSING dwProcessID Device ID of the application being locked LOG_EX Encrypt exported key len Size of encrypt export key LOG_EX Encrypt password length The length of the encrypt...

Страница 331: ...k dll If it exists delete it Also delete AppLock exe from the Windows directory and reboot the unit Deleting AppLock exe triggers the AppLock system to reload LOG_ERROR Converted Pwd Converted password from wide to mbs LOG_EX Could not create event EVT_HOTKEYCHG The keyboard filter uses this event at the Administrator Control panel The event could not be created LOG_ERROR Could not hook keyboard I...

Страница 332: ...ncrypt failure The password encryption failed LOG_ERROR Encrypt gen key failure Unable to encrypt password LOG_ERROR Encrypt generate key failure Unable to encrypt password LOG_ERROR Encrypt get user key failure Unable to encrypt password LOG_ERROR Encrypt get user key ok Encrypt password process successful LOG_EX Encrypt hash data failure Unable to encrypt password LOG_ERROR Encrypt hash data fro...

Страница 333: ...n mode and enable the taskbar LOG_PROCESSING Enter ToAdmin Entering the function that handles a mode switch into admin mode LOG_PROCESSING Enter ToUser Entering the function that handles the mode switch to user mode LOG_PROCESSING Enter verify password Entering the password verification processing LOG_PROCESSING Exit AppLockEnumWindows Found There are two exit paths from the enumeration function T...

Страница 334: ...address of the keyboard hook LOG_PROCESSING Getting configuration from registry The AppLock configuration is being read from the registry This occurs at initialization and also at entry into user mode The registry must be re read at entry into user mode in case the administration changed the settings of the application being controlled LOG_PROCESSING Getting encrypt pwd length The length of the en...

Страница 335: ...ard hook processing This message is logged prior to the load attempt LOG_PROCESSING Open failure The status information is being saved to a file and the file open has failed This could occur if the file is write protected If the file does not exist it is created LOG_ERROR Open registry failure If the Administration registry key does not exist the switch to user mode fails because the AppName value...

Страница 336: ...command line LOG_ERROR Registry read failure at reenter user mode The registry has to be read when switching into user mode This is because the administrator can change the settings during administration mode The read of the registry failed which means the Administration key was not found or the AppName value was missing or empty LOG_ERROR Registry read failure The registry read failed The registr...

Страница 337: ... read and AppLock is starting the process to switch to user mode LOG_PROCESSING Switching to user hotkey press The system is currently in admin mode and is now switching to user mode The switch occurred because of a hotkey press by the administrator LOG_PROCESSING Taskbar hook failure AppLock is unable to control the taskbar to prevent the locked application from re enabling it LOG_ERROR Taskbar h...

Страница 338: ...oc failure AppLock could not remove the hook that allows monitoring of the application LOG_ERROR Unhooking taskbar In administration mode the taskbar should return to normal operation so AppLock s control of the taskbar should be removed LOG_EX Unhooking wndproc When the administrator leaves user mode the device is fully operational therefore AppLock must stop monitoring the locked application LOG...

Страница 339: ...LOCAL_MACHINE Software LXE Persist FileCheck AppLock registry settings identify the application that is going to be locked and any parameters that are needed by the application These registry settings are as follows HKEY_LOCAL_MACHINE Software LXE Administration AppName HKEY_LOCAL_MACHINE Software LXE AppCommandLine In addition to the registry settings needed to specify the application additional ...

Страница 340: ...SER_STOP VK_INSERT VK_RIGHT VK_CANCEL VK_JUNJA VK_RMENU VK_CAPITAL VK_KANA VK_RSHIFT VK_CLEAR VK_KANJI VK_RWIN VK_COMMA VK_LAUNCH_APP1 VK_SCROLL VK_CONTROL VK_LAUNCH_APP2 VK_SELECT VK_CONVERT VK_LAUNCH_MAIL VK_SEMICOLON VK_CRSEL VK_LAUNCH_MEDIA_SELECT VK_SEPARATOR VK_DECIMAL VK_LBRACKET VK_SHIFT VK_DELETE VK_LBUTTON VK_SLASH VK_DIVIDE VK_LCONTROL VK_SLEEP VK_DOWN VK_LEFT VK_SNAPSHOT VK_END VK_LMEN...

Страница 341: ... Ctrl d ENQ 5 E ENQuiry Ctrl e ACK 6 F ACKnowledge Ctrl f BEL 7 G BELl rings terminal bell Ctrl g BS 8 H BackSpace non destructive Ctrl h HT 9 I Horizontal Tab move to next tab position Ctrl i LF a J Line Feed Ctrl j VT b K Vertical Tab Ctrl k FF c L Form Feed Ctrl l CR d M Carriage Return Ctrl m SO e N Shift Out Ctrl n SI f O Shift In Ctrl o DLE 10 P Data Link Escape Ctrl p DC1 11 Q Device Contro...

Страница 342: ...eparator VK_CONTROL 0x11 down VK_PACKET 0xe7 down WM_CHAR 0x1c VK_PACKET up VK_CONTROL up GS 1d Group Separator VK_CONTROL 0x11 down VK_PACKET 0xe7 down WM_CHAR 0x1d down WM_CHAR 0x1d up VK_PACKET up VK_CONTROL up RS 1e Record Separator VK_CONTROL 0x11 down VK_SHIFT 0x10 down WM_CHAR 0x36 down WM_CHAR 0x36 up VK_SHIFT up VK_CONTROL up US 1f _ Unit Separator VK_CONTROL 0x11 down VK_SHIFT 0x10 down ...

Страница 343: ...8 H SS3 8F O HT 0X09 I DCS 90 P LF 0X0A J PU1 91 Q VT 0X0B K PU2 92 R FF 0X0C L STS 93 S CR 0X0D M CCH 94 T SO 0X0E N MW 95 U SI 0X0F O SPA 96 V DLE 0X10 P EPA 97 W DC1 XON 0X11 Q 98 X DC2 0X12 R 99 Y DC3 XOFF 0X13 S 9A Z DC4 0X14 T CSI 9B NAK 0X15 U ST 9C SYN 0X16 V OSC 9D ETB 0X17 W PM 9E CAN 0X18 X APC 9F _ Underscore EM 0X19 Y no break space A0 Tilde and Space SUB 0X1A Z A1 ESC 0X1B A2 FS 0X1C...

Страница 344: ...E0 B8 8 á E1 a B9 9 â E2 b º BA ã E3 c BB ä E4 d BC å E5 e BD æ E6 f BE ç E7 g BF è E8 h À C0 é E9 i Á C1 A ê EA j  C2 B ë EB k à C3 C ì EC l Ä C4 D í ED m Å C5 E î EE n Æ C6 F ï EF o Ç C7 G ð F0 p È C8 H ñ F1 q É C9 I ò F2 r Ê CA J ó F3 s Ë CB K ô F4 t Ì CC L õ F5 u Í CD M ö F6 v Î CE N F7 w Ï CF O ø F8 x Ð D0 P ù F9 y Ñ D1 Q ú FA z Ò D2 R û FB Ó D3 S ü FC Ô D4 T ý FD Õ D5 U þ FE Ö D6 V ÿ FF ...

Страница 345: ...0x88 17 0x11 57 0x39 97 0x61 137 0x89 18 0x12 58 0x3A 98 0x62 138 0x8A 19 0x13 59 0x3B 99 0x63 139 0x8B 20 0x14 60 0x3C 100 0x64 140 0x8C 21 0x15 61 0x3D 101 0x65 141 0x8D 22 0x16 62 0x3E 102 0x66 142 0x8E 23 0x17 63 0x3F 103 0x67 143 0x8F 24 0x18 64 0x40 104 0x68 144 0x90 25 0x19 65 0x41 105 0x69 145 0x91 26 0x1A 66 0x42 106 0x6A 146 0x92 27 0x1B 67 0x43 107 0x6B 147 0x93 28 0x1C 68 0x44 108 0x6C...

Страница 346: ... 0xAC 212 0xD4 252 0xFC 173 0xAD 213 0xD5 253 0xFD 174 0xAE 214 0xD6 254 0xFE 175 0xAF 215 0xD7 255 0xFF 176 0xB0 216 0xD8 177 0xB1 217 0xD9 178 0xB2 218 0xDA 179 0xB3 219 0xDB 180 0xB4 220 0xDC 181 0xB5 221 0xDD 182 0xB6 222 0xDE 183 0xB7 223 0xDF 184 0xB8 224 0xE0 185 0xB9 225 0xE1 186 0xBA 226 0xE2 187 0xBB 227 0xE3 188 0xBC 228 0xE4 189 0xBD 229 0xE5 190 0xBE 230 0xE6 191 0xBF 231 0xE7 192 0xC...

Страница 347: ...inistrator Control LAUNCH EXE Reflash the VX6 Cisco Aironet Configuration Utility ACU Symbol Accessibility and Date Time sections Added 2 4GHz Radio Configuration Disabling the Touchscreen Heater Configuring CapsLock Behavior and Configuring IPv6 Broadcast Messages sections Removed Cisco Aironet Configuration Utility ACU and Symbol sections This information is now included in Chapter 5 Chapter 5 W...

Страница 348: ...anner Storage Manager LAUNCH EXE and Reflash the VX6 sections Added new sections Folders Copies at Startup and Enabling GrabTime Removed section Bluetooth Manager Renamed VX6 Command Line Utility to VX6 Command Line Utilities and updated section Chapter 5 Wireless Network Configuration Revised Profiles Tab section Split radio configuration section into two sections Cisco Radio and Symbol radio Add...

Страница 349: ...on removed from Chapter 4 System Configuration and updated as necessary Chapter 5 Wireless Network Configuration Revised Summit Radio section to include new Sign On screen and support for PEAP GTC Chapter 6 AppLock Revised Setup A New Device Revision E November 2007 Section Explanation Entire Manual Added CE 5 0 information and instruction where applicable Chapter 1 Introduction Added Bluetooth in...

Страница 350: ...330 Revision History VX6 Reference Guide E EQ VX6RG F ...

Страница 351: ...End user mode 265 EUIE 273 Hotkey for Administrator 265 Passwords 266 Setup 261 AppLock Registry settings 317 ASCII Control Codes in hex 319 At Power On 104 Audio Connector 42 Auto hide 80 Auto reconnect Bluetooth 93 B Background and Window colors 96 Backlight timers 96 Barcode Data Entry 9 Barcode scanner data entry 9 Battery CMOS Specifications 301 Battery Auto Turn Off 96 Baud Rate 109 149 Beep...

Страница 352: ...or VPN connection 102 Current Time 94 Custom Key Mapping 283 D Data Bits 109 149 Data entry 9 Daylight Savings 94 DB9 DB9 Serial Cable Tech Specifications 35 120 Decimal Hexadecimal Equivalent 0 159 323 160 255 324 DEFAULT KEY 284 Defaults Caps Lock 50 Delay 100 Desktop 73 Device Name and description 112 DHCP 102 Dialup properties for dial up access 95 Dimensions Specifications 301 Discover and Qu...

Страница 353: ...tall Radio Card 59 Keyboard data entry 9 Toggle 2nd key on and off 51 Toggle Caps Lock on and off 51 Type 51 HyperTerminal 118 I Icons Explorer Internet 73 My Computer 73 My Documents 73 Recycle Bin 73 Idle Time 96 Inbox Outlook 78 Input Panel 97 Install Equipment Needed 59 Fuse 68 Type II 2 4GHz Radio Card 59 62 63 Internet Explorer AppLock 273 Radio card and ISP required 78 Internet Options 98 9...

Страница 354: ...ty 109 149 Password 104 AppLock 266 AppLock Save As 276 lost at cold boot 125 PC Card Slots Location 6 8 PC Cards Plug and Play 28 PCMCIA Cards Plug and Play 28 Types Specifications 301 PCMCIA Slots 57 Disable Enable 106 PEAP GTC Cisco Radio 230 Summit Radio 208 214 PEAP MSCHAP Cisco Radio 227 Summit Radio 206 Pen Stylus 10 56 Permanent storage of drivers and utilities 114 Phillips No 1 Screwdrive...

Страница 355: ...or stylus taps 102 Setup AppLock 261 Show Clock 80 Single Application AppLock 263 Slot 0 Left 57 Slot 1 Right 57 Soft Keyboard 97 Software and Files 70 121 Software Load 70 Software Revision 25 Speaker Jack Location 6 8 Speaker Volume Control Keys 52 Speaker Beeper Location 6 8 Specifications Audio Connector 42 Display 303 Environmental 302 Input Power 67 Physical 301 Power Connector 43 USB Connec...

Страница 356: ...r Supply 67 Video Subsystem 27 View Display 56 Viewing Area Specifications 303 Virtual Keyboard 97 VK_Code List 318 W Warmboot 21 WARMBOOT EXE 125 WAVPLAY EXE 125 WEP Cisco Radio 219 Summit Radio 203 Symbol Radio 245 When to use this guide 2 Windows Network Configuration 132 Windows CE on line Help 73 Windows Explorer 79 Windows version 111 Wire Color Cable Wiring 66 WPA Radio Driver Cisco 221 Sup...

Отзывы: