background image


VAM (VISTA Automation Module) - Installation & Setup Guide 

Introduction 

VISTA Automation Module (herein referred to as “VAM”) combines home automation and home security and is intended 

for use with compatible VISTA

®

 series control panels. VAM includes a built-in web server, Wi-Fi

®

 capability, and Z-Wave

®


technology allowing VISTA installations to support Z-Wave devices.  
The VISTA Automation Module also supports Remote Services for controlling Z-Wave devices and Scenes remotely from 

an associated Total Connect™ account. 
VAM is controlled using a web browser on a Wi-Fi enabled smart device such as a Tablet PC, laptop, Smartphone, etc.  

DISPLAY NOTE:

 For optimum viewing of the screens and menus, the tablet’s font size setting may need to be adjusted. 


Make Wiring Connections 

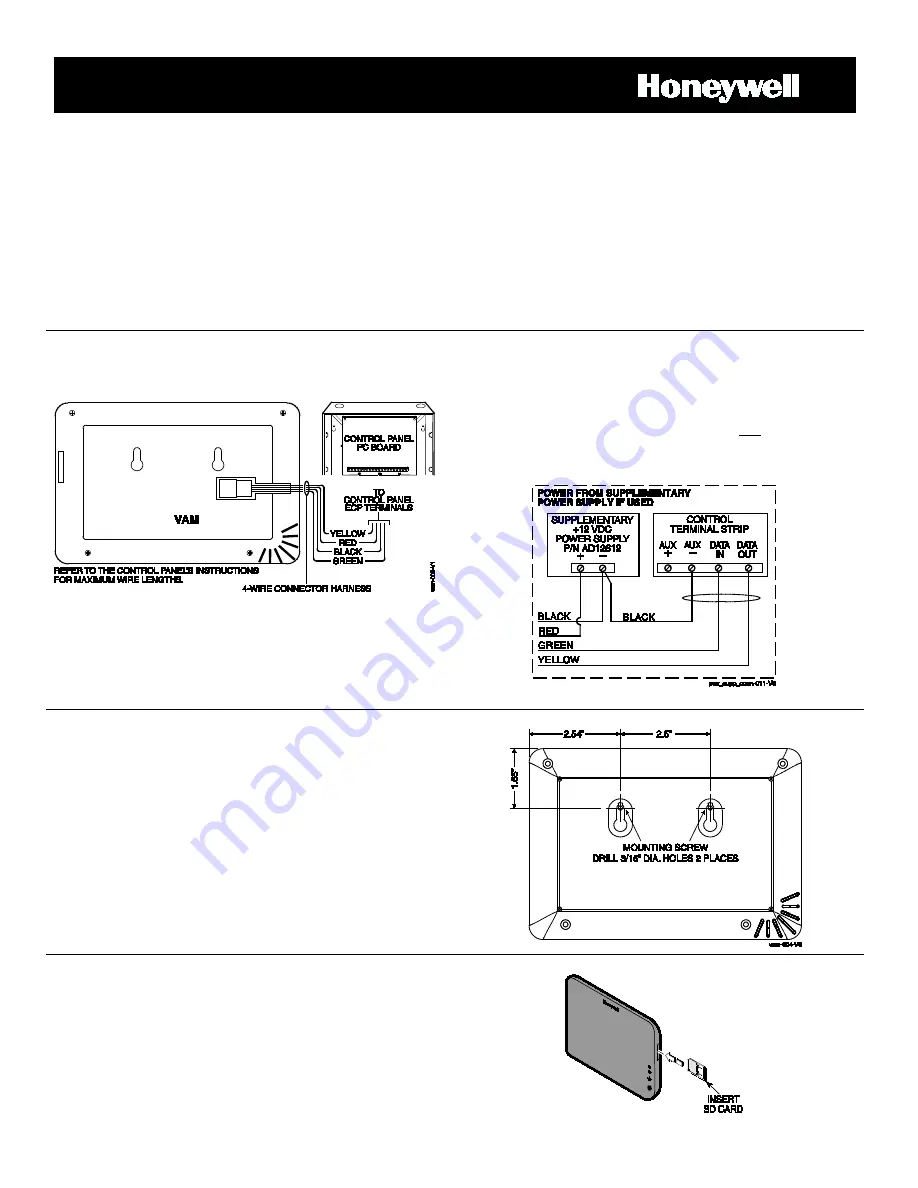
Connect VAM to the control panel’s keypad data (ECP) 

terminals using a standard 4-wire keypad connector harness.  


Wire Connections to the Control Panel 


Verify that VAM and other connected devices do not exceed the 

control’s Aux Power output capability. If it does, use a 

supplementary power supply as shown. 

IMPORTANT:

 When VAM is powered from an auxiliary power 

supply, always apply power to the control panel first and then VAM. 

Failure to observe this sequence results in improper operation of 

VAM and may result in an ECP Error indication. 


Supplementary Power Connections 


Mount the VAM 

VAM is for indoor use only and should be mounted near the 

control panel or a keypad connected to the control panel for 

ease of wiring.  


VAM mounts to a wall surface by hanging on two screws. See 

the diagram below. 


  Leave the screw heads 1/8” above the wall surface. 

  If necessary, drill a hole in the wall for the wire harness to 

pass through. 

  Connect the wire harness to the VAM before mounting. 

  Refer to control panel’s installation instructions for ECP wire 

limitations. 


Insert an SD/SDHC Memory Card 

An SD card must be installed to receive automatic software 

upgrades. The SD card can be left in the VAM. See Software 

Upgrades section. 

  Avoid touching the contacts on the card 

  4GB SD card supplied 

  Supports up to 16GB SD Card 


Insert the memory card (SD/SDHC Card) as shown.


Содержание VAM

Страница 1: ...s do not exceed the control s Aux Power output capability If it does use a supplementary power supply as shown IMPORTANT When VAM is powered from an auxiliary power supply always apply power to the control panel first and then VAM Failure to observe this sequence results in improper operation of VAM and may result in an ECP Error indication Supplementary Power Connections Mount the VAM VAM is for ...

Страница 2: ...d located on the VAM s label VAM default IP address 192 168 2 1 Home router SSID and WPA2 password typically located on the home router s label home router must use WPA2 encryption and have a password key assigned NOTES 1 Before setting up the network set your smart device for Wi Fi operation only turn off 3G 4G option 2 If the wireless router is later replaced these steps must be repeated to conn...

Страница 3: ...n menu If the main menu is not displayed check that the smart device is connected to the correct router b Bookmark the URL displayed in the browser s address bar for easy access to VAM later c To access VAM s main menu at a later session simply go to the bookmarked address or go to http vam mylanconnect com Program the Control Panel for use with VAM At the control assign an appropriate touchscreen...

Страница 4: ...is required to enable Total Connect and a communication device must be connected to the VISTA control panel 1 Verify that the VAM is connected to the Internet via the network router 2 Using AlarmNet Direct enroll the communication device and VAM and enable Total Connect usage Select Yes at the using VISTA Automation Module Yes No prompt You will need the VAM MAC ID and CRC number which can be foun...

Страница 5: ...on on the VAM click Back wait 30 seconds Click Refresh the new device is displayed Adding Cameras VAM supports up to 32 cameras IMPORTANT Connect cameras only when accessing VAM via the home router network Follow the camera s instructions for mounting To add a camera to VAM it must be connected via an Ethernet cable even if the camera is wireless After a wireless camera is added the Ethernet cable...

Страница 6: ... this room from the drop down list 4 Click Save Using VAM as a Secondary Controller VAM can be used as a secondary controller when connected to another Z Wave network NOTE If VAM is configured as secondary controller it cannot be used with Total Connect Remote Services 1 Remove any Z Wave devices previously included in VAM Click Automation Z Wave Setup to display the Z Wave Management screen then ...

Страница 7: ...cters and must include at least one uppercase one lowercase and one number 3 Click Save The new user is displayed To clear a user s login click the CLEAR button To access VAM remotely use a web browser and VAM s network IP address to go to the login screen Enter the assigned user name and password to open the main menu NOTE Remote login is blocked after 3 failed attempts To reset remote access you...

Страница 8: ...desired operation Cet appareil est conforme à la partie 15 des règles de la FCC de RSS 210 des Industries Canada Son fonctionnement est soumis aux conditions suivantes 1 Cet appareil ne doit pas causer d interférences nuisibles 2 Cet appareil doit accepter toute interférence reçue y compris les interférences causant une réception indésirable RF EXPOSURE WARNING The VISTA Automation Module VAM must...

Отзывы: