background image

24

Using the UltraKey Touch Controller

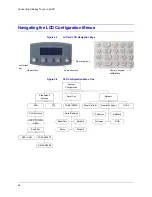
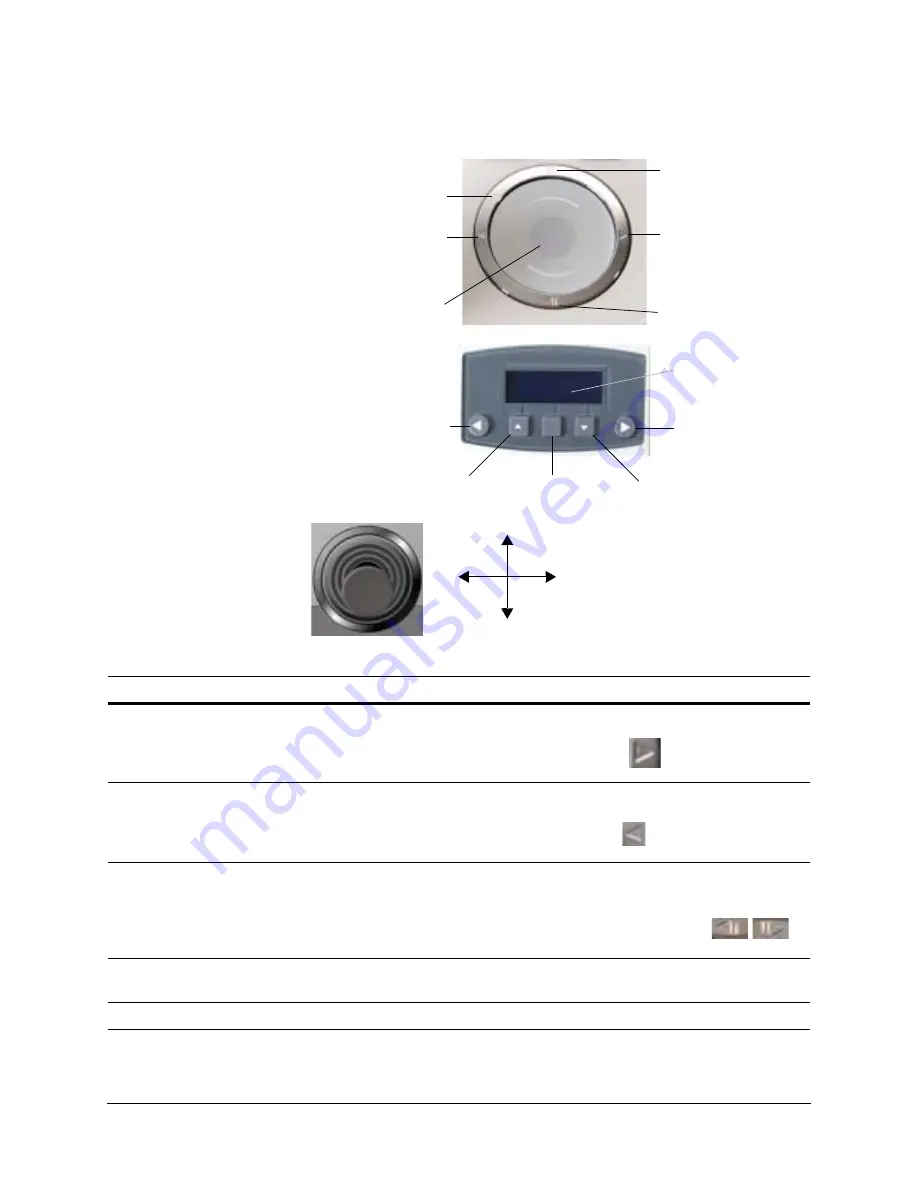
Figure 2-2

UltraKey Touch Navigation Controls 

Touch pad slider (used 
like a laptop mouse pad)

Right arrow key 

Left arrow key

Backward or reverse key 
(or down)

Forward key (or up)

Center key is not used 
for controlling

Right arrow key

Left arrow key

Up arrow key

Down arrow key

Touch Pad and Ring

LCD Keys

Joystick

Move the joystick left and right or 
up and down to navigate the menus

Touch pad ring

LCD screen

Table 2-2

LCD Menu Navigation During Setup

Task

Options

To confirm a change or enter the 
current menu 

You can use any of these methods to change or enter the current menu:
• KEYS:  Press 

Ent

• TOUCH  PAD  RING:  Press  the 

right

 arrow key 

• JOYSTICK:  Move  right

To cancel an operation or return to 
the previous level of the menu

You can use any of these methods to cancel or return to the previous menu:
• KEYS:  Press 

Alt > Clr


• TOUCH  PAD  RING:  Press  the 

left

 arrow key 

• JOYSTICK:  Move  left

To view or switch between the 
menu items of the same level

You can use any of these methods to switch between menu items:
• LCD KEYS: Press up / down arrow keys
• TOUCH PAD SLIDER: Rotate your finger clockwise or counterclockwise
• TOUCH  PAD  RING:  Press  the 

forward

 / 

backward

 arrows 

• JOYSTICK:  Move  up  /  down

To move back through the menus 
one level at a time

• KEYS:  Press 

Alt > Clr


To correct errors

• KEYS: Press 

Clr


Содержание UltraKey Touch HJC4000

Страница 1: ...Document 800 06554 Rev C 02 11 Installation and User Guide UltraKey Touch DVR and PTZ Keyboard Controller HJC4000 ...

Страница 2: ......

Страница 3: ...Installation and User Guide ...

Страница 4: ...10 Document revised for preproduction release C 02 11 Document updated for latest software changes Changes include additions to the PTZ keyboard operations section for Diamond and Intellibus protocols This is the production release version of this document 4 ...

Страница 5: ...to a DVR 25 Navigating the LCD Configuration Menus 26 Connect to the UltraKey Touch Using the Serial Port RS232 27 Step 1 Connect to the UltraKey Touch Using the Serial Port 27 Step 2 Configure the UltraKey Touch for DVR Use 28 Step 3 Configure the UltraKey Touch Serial Port Settings 29 Connect to the UltraKey Touch Using the Serial Port RS485 30 Step 1 Connect to the UltraKey Touch Using the Seri...

Страница 6: ...ntroller 54 Configuring UltraKey Touch Using the Web Browser Optional 56 Logging into the Web Browser 56 Step 1 Configure UltraKey Touch to System Configurations 56 Step 2 Standalone Configuration for PTZ Settings 57 Step 3 Configure the Controller for a Serial Port Connection 58 Controlling PTZs 59 Step 1 Keyboard Setup 59 Step 2 Camera Selection 60 Operating a PTZ Camera 60 5 System Administrati...

Страница 7: ...S485 32 Figure 3 5 Ethernet Port Connections to DVR 36 Figure 3 6 UltraKey Touch Login Page 39 Figure 3 7 System Configuration Tab 40 Figure 3 8 Standalone Configuration for DVR Tab 41 Figure 3 9 Serial Port Configuration Tab 42 Figure 3 10 IP Configuration Tab 43 Figure 4 1 PTZ Configuration Menu Tree 52 Figure 4 2 RS485 Serial Port Connection PTZ by RJ45 Box 53 Figure 4 3 UltraKey Touch Login pa...

Страница 8: ...8 Figures ...

Страница 9: ...e 3 3 Serial Port Com1 RS485 Pin Assignments 30 Table 3 4 RJ45 Box Pin Assignments 31 Table 3 5 Serial Port Com1 RS485 Configurations 34 Table 3 6 RJ45 Ethernet Pin Assignments 35 Table 3 7 DVR Control CAM 44 Table 3 8 Operating a Fusion DVR 44 Table 3 9 Operating an HRXD DVR 46 Table 3 10 Operating an HRDP DVR 48 Table 3 11 Joystick Controls 50 Table 4 1 Serial Port COM1 Pin Assignments 52 Table ...

Страница 10: ...10 Tables ...

Страница 11: ...er and using it to navigate the LCD menus Chapter 3 Connecting UltraKey Touch to a DVR explains connecting the controller to a DVR and using the controller to perform basic DVR configuration Chapter 4 Installing UltraKey Touch with PTZ describes connecting the controller to a PTZ camera and using the controller to perform basic PTZ camera configuration Chapter 5 System Administration and Troublesh...

Страница 12: ...nt operating and maintenance servicing information Cautions and Warnings Installation and servicing should be performed only by qualified and experienced technicians to conform to all local codes and to maintain your warranty WARNING 12 VDC 24 VAC models require the use of CSA Certified UL Listed Class 2 power adapters to ensure compliance with electrical safety standards WEEE Waste Electrical and...

Страница 13: ...t the interference by one of the following measures Reorient or relocate the receiving antenna Increase the separation between the equipment and receiver Connect the equipment to an outlet on a circuit different from that to which the receiver is connected Consult the dealer or a radio TV technician for help Caution Changes or modifications not expressly approved by the party responsible for compl...

Страница 14: ...oduct should be operated only from the type of power source indicated on the marking label If you are not sure of the type of power supplied to your facility consult your product dealer or local power company 4 HEAT Situate the unit away from items that produce heat or are heat sources such as radiators heat registers stoves or other products including amplifiers 5 WATER AND MOISTURE Do not use th...

Страница 15: ...ing More Information Refer to the online literature library to access other electronic documents in PDF format including data sheets quick references installation and user guides specifications software and product notices http www honeywellvideo com Also see the back cover for international web sites and contact details Typographical Conventions This document uses the following typographical conv...

Страница 16: ...ct Double click Open from the File menu Buttons you click to perform actions Pressing a key on the keyboard Click Exit to close the program Press and hold Login Italic Placeholders words that vary depending on the situation user name Cross reference to external source Refer to the System Administrator Guide Cross reference within document See Chapter 2 Installation Font What it represents Example ...

Страница 17: ...s of installations Use a serial port or an Ethernet RJ45 connection to connect UltraKey Touch to a DVR and PTZ Table 1 1 Shipping Checklist Quantity Part Use for 1 UltraKey Touch keyboard controller All installations 1 UltraKey Touch installation and user guide All installations 1 box Power adapter with plugs for 100 240 VAC 12 VDC 50 60 HZ 1 A 12 W Meeting the requirements for the local electrica...

Страница 18: ...insert one of the four adapters based on your local power requirements Ethernet Port Ethernet is used to connect to the controller or DVR for controlling and web browser configuration 1 RJ45 network cable 2 meters All installations 1 RJ45 box RS485 connection requirements Table 1 1 Shipping Checklist cont d Quantity Part Use for Power RJ45 Ethernet RS232 and RS485 Serial Port 8 1 Pins are numbered...

Страница 19: ...TZ RS485 ports An isolated surge protector is suggested when using RS485 and when cabling between buildings RJ45 Box Use the terminal box RJ45 port and 8 pin terminal plug as required for compatibility and connectivity options It can be used to break out the RJ45 cable when wiring to existing infrastructure is required Figure 1 2 RJ45 Box Front and Back Ports ...

Страница 20: ...RS232 485 RJ45 with LED LCD Type STN Positive Image Backlight Blue White Characters 122 32 dots Compliance EN 55022 for radiated and conducted emissions Mechanical Dimensions 16 1 L 8 5 W 4 1 H 408 mm L 215 mm W 105 mm H Gross Weight 7 05 lb 3 2 kg Cover material ABS PC cool gray Environment Operating Temperature 14 F to 131 F 10 C to 55 C Storage Temperature 40 F to 167 F 40 C to 75 C Humidity 0 ...

Страница 21: ...er 12V 10 DC 1 A included 2 Press Login on the keyboard 3 Enter the password 1234 4 Press Alt Clr to configure the main menu settings Note If an invalid password is entered a message displays and the controller buzzes Repeat the steps to log in Using the UltraKey Touch to Navigate the LCD Menus There are a variety of ways to navigate the LCD menus during configuration as well as normal operation S...

Страница 22: ...ontroller Keys and Controls No Icon Description No Icon Description 1 LCD screen 2 Alarm key 3 Sequence key 4 Iris open close key 5 Set key 6 Recycle key 7 Backwards key 8 Review key 9 Stop key 10 Search key 11 Forwards key 12 Tour key 13 View key 14 DVR key 15 Split screen key 16 Number keys 17 Enter key 18 Clear key ...

Страница 23: ...perations with the touch pad are described in these instructions as Slider_Direction 24 Focus near far key 25 Joystick 26 Focus near far key 27 Monitor B key 28 Monitor A key 29 Login key 30 F1 F10 keys 31 Left key Up key Select key Down key and Right key Table 2 1 UltraKey Touch Controller Keys and Controls cont d No Icon Description No Icon Description ...

Страница 24: ...n use any of these methods to change or enter the current menu KEYS Press Ent TOUCH PAD RING Press the right arrow key JOYSTICK Move right To cancel an operation or return to the previous level of the menu You can use any of these methods to cancel or return to the previous menu KEYS Press Alt Clr TOUCH PAD RING Press the left arrow key JOYSTICK Move left To view or switch between the menu items o...

Страница 25: ...able DVR user guides for more information This section explains how to connect the UltraKey Touch controller to a DVR and how to enter the basic configuration settings specific to that DVR UltraKey Touch can control the remote DVR through either of the serial port or Ethernet connections Then you can start configuring the system Familiarize yourself with these basic operations To confirm a modific...

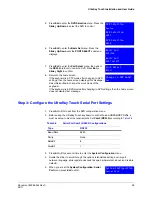
Страница 26: ...Right arrow key Left arrow key Up arrow key Down arrow key Numeric keypad and Ent key System Configuration Data Bit Network Serial Port Standalone Settings DVR CAM PORT SELECT HRDP FUSION HRXD DVR PTZ Baud Rate Parity Stop Bit IP Address COM2 RS232 Show Net Infor Manual Settings DHCP Serial Settings DVR Selection RS232 RS485 Gateway NetMask DNS Basic Set ...

Страница 27: ...he controller power port and the adapter into a power source 3 Connect the RJ45 network cable to the controller serial port and the connector adapter 4 Connect the serial port of the connector adapter to the serial port of the DVR For backwards compatibility with DVRs a DB9 male adapter is required and included with your shipment see Figure 3 3 For other DVRs the installation is a direct connectio...

Страница 28: ...nnected 2 Press Login and then enter the password 1234 3 From the home screen press Alt Clr to enter the System Configuration menu Scroll the slider or rotate the joystick until System Configuration Standalone Settings displays 4 Press Ent and rotate the slider to select DVR Serial Port RS232 Network cable RJ45 to DB9F for RS232 UltraKey Touch Network Port Network Port NETWORK Network cable Networ...

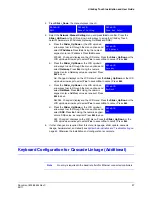
Страница 29: ...t display that message Step 3 Configure the UltraKey Touch Serial Port Settings 1 Press Alt Clr to exit from the DVR configuration menu 2 Before using the UltraKey Touch keyboard to control Fusion HRXD HRDP DVRs it must be setup to meet the requirements Set Com2 RS232 according to Table 3 2 3 Press Alt Clr a second time to enter the System Configuration menu 4 Rotate the slider to scroll through t...

Страница 30: ...Data Bit Press Ent and use the Slider_Up Down to select 7 bit or 8 bit Press Ent to save d Press the down arrow key to select Stop Bit Press Ent and use the Slider_Up Down or the LCD up down arrow keys to select 1 bit or 2 bit Press Ent to save 8 Press Slider_Left to return to the main menu Connect to the UltraKey Touch Using the Serial Port RS485 Step 1 Connect to the UltraKey Touch Using the Ser...

Страница 31: ...232 RS485 converter using appropriate wire See Table 3 4 for the RJ45 box pin assignments 5 Connect the RS232 RS485 converter s serial port to the DVR s serial port For backwards compatibility with DVRs an RS232 RS485 converter is required see Figure 3 4 To use the controller s RS485 serial port an RJ45 box is required Note To setup cascade linkage for UltraKey Touch see Keyboard Configuration for...

Страница 32: ...ame as the connected DVR type If any other type has been selected then use the following procedure to select a different DVR type 1 Install and connect the controller to a power source if it is not already connected Serial Port RS232 Serial Port RS485 Network Cable Serial Port RS485 UltraKey Touch RS232 RS485 Converter RJ45 Box Master Slave1 Network Cable Network Cable Network Port Network Port NE...

Страница 33: ...f the keyboard is in PTZ mode after changing to DVR settings then the home screen displays this message Select Yes or No to change the work mode of the keyboard If the keyboard is in DVR mode after changing to DVR settings then the home screen does not display that message Step 3 Configure the UltraKey Touch for Serial Port Settings 1 Press Alt Clr to exit from the DVR configuration menu 2 Before ...

Страница 34: ...e LCD up down arrow keys to select none Press Ent to save b Press the Slider_Down or the LCD up down arrow keys to select Baud Rate Press Ent and use the up down arrow keys to select 1200 1800 2400 4800 9600 19200 38400 or 57600 Press Ent to save c Press the Slider_Up Down or the LCD up down arrow keys to select Data Bit Press Ent and use the Slider_Up Down or the LCD up down arrow keys to select ...

Страница 35: ...otocol Step 1 Connect to the UltraKey Touch Using the Ethernet Port 1 Select the applicable adapter plug and insert it into the AC adapter Push to click it into place 2 Plug the AC adapter into the controller power port and the adapter into a power source 3 Plug an RJ45 network cable from the network to the controller Ethernet port see Figure 3 5 4 Connect a DVR to the network Refer to the applica...

Страница 36: ...y Touch Ethernet Connection Settings 1 Press Alt Clr to enter the System Configuration menu 2 Rotate the slider or press the LCD up down arrow keys to scroll through the options standalone settings serial port network language slider update cascade linkage hardware test about and restore default 3 Press Ent when you are at the System Configuration Network menu Network Port Network Port Network Por...

Страница 37: ...to cancel Press Ent c Press the Slider_Up Down or the LCD up down arrow keys to scroll through the menu options and select NetMask Press Ent Using the numeric keypad enter a NetMask value as required Press Ent to save NetMsk Changed displays on the LCD menu Press the Slider_Up Down or the LCD up down arrow keys to select Yes to save or No to cancel Press Ent d Press the Slider_Up Down or the LCD u...

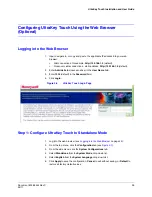
Страница 38: ... scroll to KBD Mode and press Ent Set the keyboard as master or slave and press Slider_Right or Ent to confirm 5 For a slave keyboard press the Slider_Left to return to the Cascade Linkage menu Press the Slider_Up Down until the IP Address menu displays then set this cascade IP address to match the master s IP address 6 For a master keyboard this cascade IP address is invalid Set the master s IP a...

Страница 39: ...sensitive in the User Name field 3 Enter 1234 default in the Password field 4 Click Login Figure 3 6 UltraKey Touch Login Page Step 1 Configure UltraKey Touch to Standalone Mode 1 Log into the web browser see Logging into the Web Browser on page 39 2 From the top menu click the Configuration tab see Figure 3 7 3 From the side menu click the System Configurations tab 4 Select Standalone from the Sy...

Страница 40: ... DVR type as Fusion HRXD HRSD or HRDP 3 Cascade Mode settings are used for the Cascade Linkage of keyboards a Set the Ultrakey Touch as Master or Slave in the Mode drop down list b Set the IP of the Master UltraKey Touch in the Master IP Address drop down list 4 Set the Address Name and Protocol Type for the controlled PTZ in the PTZ window area 5 Click Apply to save the configuration Cancel to ex...

Страница 41: ...e Serial Port1 Settings window area select the appropriate value in the drop down lists from each of the following fields Baud Rate 1200 1800 2400 4800 9600 19200 38400 or 57600 bps Parity none even or odd Stop Bits 1 or 2 bits Data Bits 7 or 8 bits Serial Mode RS232 or RS485 3 If required repeat step 2 for serial Com1 Com2 settings 4 Click Apply to save the configuration Cancel to exit without sa...

Страница 42: ...ontroller IP for an Ethernet Connection 1 From the side menu click IP Configuration see Figure 3 10 2 Enter IP Address Subnet Mask Gateway and DNS values in each of the fields 3 Click Apply to save the configuration Cancel to exit without saving or Default to restore all factory default values Side menu ...

Страница 43: ...page 28 and Figure 3 4 on page 32 Step 2 Select DVR Type 1 Press Alt Clr to enter the Standalone Settings menu See the menu tree see Figure 3 2 on page 26 to select the DVR 2 Press the Slider_Right and rotate the slider in the DVR TYPE menu The following LCD screens are displayed 3 Press the Slider_Right to select FUSION Side menu Standalone Set DVR DVR Selection FUSION ...

Страница 44: ... Control CAM CAM 1 4 DVR 1 4 channel DVR DVR 1 CAM 5 8 DVR 2 4 channel DVR DVR 2 CAM 9 24 DVR 3 16 channel DVR DVR 3 CAM 25 33 DVR 4 9 channel DVR DVR 4 Table 3 8 Operating a Fusion DVR You want to Do this Select a DVR Press a number DVR or DVR a number Ent Use the Display function to program DVRs to rotate different Live or Search display grids For example 4 camera A 4 camera B 4 camera C 4 camer...

Страница 45: ... Stop to halt video playing on a DVR Play Press Review to make a DVR play forwards while searching Adjust the forward or backward playback speed Rotate your finger on the touch pad slider Zoom if only one camera is selected in Search Press Set to adjust the zoom level from level 1 to level 5 Search Date Press Search to display the Search menu for configuring the date month and time for playback Wh...

Страница 46: ...d Press and hold the Alt key and then press the number keys Access the DVR menus Press F1 to open the password screen Press and hold the Alt key and enter the password Then press Ent to access the DVR setup menu Navigate the DVR menus Use the following keys Cycle through the display settings Press Split to select the next display setting in the cycle of 4x4 3x3 2x2 and PIP Press To Slider_Up or F2...

Страница 47: ...event log Once the event log is open navigate through it in the same way as described in Navigate the DVR menus on page 46 Note If user password is enabled on the DVR then pressing Alarm will cause a user password screen to display If a user password is required then enter the password as described on page 46 Display a camera on the spot monitor Press Monitor number Ent to choose a Spot Monitor th...

Страница 48: ...FUSION DVR on page 43 Operating an HRDP DVR Zoom in on an image on the screen Press Set To control PTZ domes Press Alt Set to enable HJC4000 to control PTZ domes Table 3 9 Operating an HRXD DVR You want to Do this DVR Selection HRDP Table 3 10 Operating an HRDP DVR You want to Do this Select a DVR Press a number key DVR or DVR number Ent Note Common operations of the HRDP and Fusion DVRs are not l...

Страница 49: ...inuously press Reverse to change the playback speed Stop playback Not supported Play recorded videos Press F8 or Forward You can continuously press Forward to change the playback speed Zoom in on video Image Zoom function is not supported in Live or Search mode But when an HRDP is in PTZ mode press the Set key to enter ZOOM mode Enter Backup mode while in Live or Search mode Press Set Enter the ex...

Страница 50: ...avigation mode move the cursor up down Playback mode start a Panorama Smart search PTZ mode same functions as for a Fusion DVR Joystick left right Navigation mode move the cursor left right Playback mode play recorded videos forwards or reversed PTZ mode same functions as for a Fusion DVR Joystick zoom in Live mode starts playback of the latest recording PTZ mode adjust zoom and focus on a PTZ cha...

Страница 51: ... the applicable PTZ installation or user guides for more information This section explains how to connect the UltraKey Touch controller to a PTZ camera and how to enter the basic configuration settings specific to PTZs For other user configurations see the table of contents Navigating LCD Configuration Menus Note See Using the UltraKey Touch to Navigate the LCD Menus on page 21 for detailed instru...

Страница 52: ...nfigured using the System Configuration menu See Table 4 1 below For connection between Ultrakey Touch and PTZ refer to Figure 4 2 Certain settings should be done before using the direct control of a PTZ with Ultrakey Touch Table 4 1 Serial Port COM1 Pin Assignments Serial Port Type Pin Signal COM1 RS485 1 T R 2 T R System Configuration Data Bit Network Serial Port Standalone Settings Protocol Add...

Страница 53: ...ller serial port 3 Connect the pin RS485 RS485 of the RJ45 Box to a PTZ using an appropriate wire Note To setup Cascade Linkage for UltraKey Touch see Keyboard Configuration for Cascade Linkage Additional on page 37 Figure 4 2 RS485 Serial Port Connection PTZ by RJ45 Box Serial Port RS485 4 3 2 1 5 6 7 8 RJ45 box Network cable RS485 UltraKey Touch Network Port Network Port NETWORK Master Slave 1 N...

Страница 54: ... Slider_Up Down keys to scroll to different controller protocols Press Ent to save b Use the Slider_Up Down keys to scroll to change the name of the controller Press Ent to save c Use the Slider_Up Down keys to scroll to an address between 1 and 128 to assign to the controller Press Ent to save Return to the home screen If the keyboard is in DVR mode after changing to PTZ settings then the home sc...

Страница 55: ...ect BaudRate Press Ent and use Slider_Up Down keys to select 1200 1800 2400 4800 9600 19200 38400 or 57600 Press Ent to save c Press LCD up down arrow key to select DataBit Press Ent and use Slider_Up Down to select 7 bit or 8 bit Press Ent to save d Press LCD up down arrow key to select StopBit Press Ent and use Slider_Up Down to select 1 bit or 2 bit Press Ent to save 6 If other changes are requ...

Страница 56: ...sensitive in the User Name field see Figure 4 3 3 Enter 1234 default in the Password field 4 Click Login Figure 4 3 UltraKey Touch Login page Step 1 Configure UltraKey Touch to System Configurations 1 Log into the web browser 2 From the top menu click the Configuration tab 3 From the side menu click the System Configurations tab 4 From the System Mode drop down list select Standalone see Figure 4 ...

Страница 57: ...he settings are used for cascading linkage of keyboards a Under Mode drop down list select Master or Slave for Ultrakey Touch b Under Master IP Address drop down list set the IP of the Master UltraKey Touch 4 Under PTZ set the address name and protocol for the controlled PTZ 5 Under Protocol Type drop down list select Diamond PelcoD PelcoP VCL IntelliBUS protocol consistant with the controlled Ult...

Страница 58: ...ort Configuration see Figure 4 6 2 Under Serial Com1 Settings select the following from each drop down list as required Baud Rate 1200 1800 2400 4800 9600 19200 38400 or 57600 bps Parity none even or odd Stop Bits 1 or 2 bits Data Bits 7 or 8 bits Serial Mode RS485 3 Click Apply to save the configuration Cancel to exit without saving or Default to restore all factory default values ...

Страница 59: ...ration Tab Controlling PTZs Step 1 Keyboard Setup For a connection between Ultrakey Touch and a PTZ see Figure 4 2 Certain settings should be done before using the direct control of PTZ with Ultrakey Touch 1 Set COM1 RS485 according to the table below Type RS485 BaudRate 9600 Parity None DataBit 8 StopBit 1 ...

Страница 60: ...a PTZ call for Diamond Protocol The PTZ call is used in Diamond protocol and Intellibus protocol to control certain features of the PTZ camera For Diamond protocol press PTZ call and the following figures are displayed in sequence by rotating the slider Press Ent to select Press Clr to exit from the Dome OSD display 1 PTZ Auto Iris Press Ent to send auto iris command Standalone Set PTZ Table 4 3 O...

Страница 61: ...r menu operation is just the same as Preshot Menu Press a number on the keyboard to select a submenu then press another number on the keyboard to enter the lower submenu 6 PTZ List Preshot Press the Slider_up down to scan to different pages 7 PTZ List Vector Press the Slider_up down to scan to different pages 8 PTZ List Sector Press the Slider_up down to scan to different pages 9 PTZ Vector This r...

Страница 62: ...ct an option 1 PTZ Setup Press Ent The Sel Character menu displays on the keyboard LCD Press a number on the keyboard to select a submenu on the LCD screen then press Ent to confirm the selection 2 PTZ Sector List Press PTZ call and Sector List is displayed on the LCD screen Press the Slider_Up Down to scan to different pages 3 PTZ Sector Prog Press PTZ call select Sector Prog and press Ent You ca...

Страница 63: ... pages 9 PTZ Preset Prog Program Preset Press View number Set Run Preset Press View number Ent or number View You can also edit or delete presets in the Setup menu Press PTZ call on the keyboard to select the Setup menu Press Ent to confirm Press the number of the preset you want to select Press Ent to confirm Note For ACUIX PTZs Intellibus protocol only supports three Baud Rates 9600 19200 and 38...

Страница 64: ...64 Installing UltraKey Touch with PTZ ...

Страница 65: ...ration Menu 1 If not already done install and connect the controller to a power source The UltraKey Touch LCD displays 2 Enter the PIN password 1234 3 From the home screen press Alt Clr to enter the System Configuration Setting the Screen Language 1 Log into the controller 2 From the System Configuration menu press Slider_Up Down continuously to enter the language setup menu or rotate the slider u...

Страница 66: ...e firmware Select No and press Ent to cancel If you select Yes the message Slider Firmware Download displays followed by Download OK 4 Press Ent to exit the menu Viewing the Firmware Version 1 Log into the controller 2 From the System Configuration menu press Slider_Up Down to scroll to About Press Ent The LCD scrolls to display the firmware version 3 Press any key to return to the previous menu T...

Страница 67: ...pplicable IP address into your web browser LAN connections for example http 192 168 1 9 Crossover cable connections static address http 192 168 1 9 and it must be consistent with the UltraKey Touch IP address refer to network configuration In the User Name field enter Administrator case sensitive 2 In the Password field enter 1234 default 3 Click Login Upgrading the UltraKey Touch Firmware 1 Log i...

Страница 68: ...eb browser 2 From the top menu click the System Reboot tab The Reboot System window opens 3 Click Reboot to continue click another tab or click Logout to exit without rebooting Changing the UltraKey Touch Password 1 Log into the web browser 2 In the upper right corner click Change Password see Figure 5 2 3 In the Old Password field enter the current password 4 In the New Password field enter a new...

Страница 69: ...UltraKey Touch Installation and User Guide Document 800 06554 Rev C 69 02 11 Figure 5 2 Change Password Page ...

Страница 70: ...70 System Administration and Troubleshooting ...

Страница 71: ...oggle Auto Sequence on Fusion DVR Alarm Press the number key less than 5 followed by Alarm to toggle Relay Alarm output on specified channel Recycle Press the number key which presents for the specified channel then Recycle to toggle Instant Record on specified channel Camera Press the number key Camera or Camera number Ent to show the specified camera Live Search Toggles Fusion Live Search Displa...

Страница 72: ... hold while in the DVR menu then enter the password And then press Ent to access the DVR set up menu Slider_Up F2 Press while in the DVR menu to move up Slider_Down F7 Press while in the DVR menu to move down Slider_Left F6 Press while in the DVR menu to move left Slider_Right F8 Press while in the DVR menu to move right Ent Press while in the DVR menu to select an option F1 Press while in the DVR...

Страница 73: ...se to show the previous frame when the DVR is in pause state Forward Press to make DVR playback quickly Backward Press to make DVR rewind quickly Set Press to zoom the image on the screen PTZ Control Press Alt Set to enable HJC4000 to control PTZ of HRXD HRSD Table A 3 HRDP Operations Keys Function Number keys Press a number key DVR or DVR number Ent to select a DVR to control Display Cannot take ...

Страница 74: ... Note You can also use the joystick to control a PTZ camera Iris Iris key Not supported Focus Focus key Not supported Preset call View key Supported Preset store View key Not supported Joystick_Up Down Navigation mode move the cursor up down Playback mode start a Panorama Smart search PTZ mode same controls as a Fusion DVR Joystick_Left Right Navigation mode move the cursor left right Playback mod...

Страница 75: ... Update Standalone Settings KBD Mode DVR PTZ Baud Rate Parity Stop Bit IP Address Show Net Infor Manual Settings DHCP Serial Settings Slider Gateway NetMask DNS Hardware Test Cascade Linkage Serial Port About Language Restore Default IP Address Com1 RS485 Com2 RS232 Standalone Set English Protocol Address Name HRDP FUSION HRXD PORT SELECT DVR CAM DVR Selection Serial Port Key Joystick Basic Set RS...

Страница 76: ...76 DVR Operation Commands ...

Страница 77: ......

Страница 78: ...00 Honeywell Systems Deutschland Johannes Mauthe Straße 14 D 72458 Albstadt Germany www honeywell com security de 49 74 31 8 01 0 Honeywell Systems France Immeuble Lavoisier Parc de Haute Technologie 3 7 rue Georges Besse 92160 Antony France www honeywell com security fr 33 0 1 40 96 20 50 Honeywell Systems Italia SpA Via della Resistenza 53 59 20090 Buccinasco Milan Italy www honeywell com securi...

Отзывы: