background image

HE360 HUMIDIFIER AND INSTALLATION KIT

69-2629EF—01

WELCOME

To the comfortable world of humidified air. When you use your Honeywell humidifier, 

notice that your skin is not as dry, and that your scratchy throat and irritated nasal 

passages that aggravate allergies and asthma are steadily improving.

You have also taken the first step in reducing the 

zapping

 you create when you walk on 

your carpet and then touch your TV, computer, metal door knob or your pet. Your 

furniture and woodwork are also benefitting from the difference that humidified air 

makes.

Congratulations! You have just made a great investment in improving the comfort of 

your home.

APPLICATION

This kit contains your new Honeywell HE360 Humidifier, H8908 Humidistat and all the 

accessories required for installation. 

INSTALLATION

Preparing for the Installation

Be sure to identify all the required (Table 1) accessories (included) and make sure the 

appropriate tools are available before beginning the installation.

Included Accessories

Table 1. Included Accessories.

Quantity

Accessory

20 ft (6.2m)

18 gauge, two-strand thermostat wire

20 ft (6.2m)

1/4 in. (6.35 mm) OD feed water tubing

10 ft (3.1m)

1/2 in (12.7 mm) ID drain tubing

1 bag

Connecting and mounting hardware:

Wire nuts (4)

No. 8 sheet metal screws (18)

Drain tube clamp

Feed tube mounting clamps (6)

Brass inserts (2)

Plastic compression rings (2)

1

Pressure switch

Содержание TRADELINE HE360

Страница 1: ...69 2629EF 01 HE360 Humidifier and Installation Kit INSTALLATION GUIDE OWNER S MANUAL ...

Страница 2: ...t made a great investment in improving the comfort of your home APPLICATION This kit contains your new Honeywell HE360 Humidifier H8908 Humidistat and all the accessories required for installation INSTALLATION Preparing for the Installation Be sure to identify all the required Table 1 accessories included and make sure the appropriate tools are available before beginning the installation Included ...

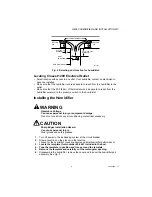
Страница 3: ...eater than 124 psi Select a location for the humidifier on the supply warm air stream plenum See Fig 1 Select a location that cannot damage the air conditioner A coil during installation Do not locate the humidifier on the furnace body Allow adequate clearance in front of and above the humidifier so you can easily remove the cover to perform routine maintenance Mount the humidifier at least 3 in 7...

Страница 4: ... humidifier drainage If you do not have a drain available we recommend that you install the Honeywell Whole House Drum or Disk Humidifier Make sure that the 10 ft 3 1m of drain tubing is adequate to reach from the humidifier drain connection to the floor drain Selecting Location for Humidistat Select a location for the humidistat on the return plenum or on the wall in the living space Mounting on ...

Страница 5: ...mage Do not cut or drill into any air conditioning or electrical accessory CAUTION Sharp Edges Installation Hazard Can cause personal injury Wear gloves and safety glasses 1 Turn off power to the air handing system at the circuit breaker 2 Draw a level line on the plenum in the location chosen for the humidifier Leveling assures optimal humidifier performance 3 Locate the template form number 69 2...

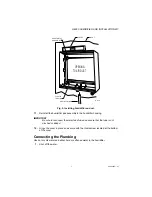
Страница 6: ...tic tabs are in place on the lower sheet metal edge of the opening Use pli ers as necessary to flatten cut edges See Fig 5 9 Push in securing clips until completely seated 10 Drill holes and install the three sheet metal screws on the top of the humidifier housing Secure the housing with the three remaining screws M12809 COVER ASSEMBLY HUMIDIFIER PAD ASSEMBLY FEED TUBE NOZZLE WATER DISTRIBUTION TR...

Страница 7: ...reconnect the water feed tube and ensure that the tube is not pinched or kinked 12 Hinge the cover in place and secure with the thumbscrew located at the bottom of the cover Connecting the Plumbing Use hot or cold water and either hard or softened water in the humidifier 1 Shut off the water DUCT LEVEL SHEET METAL SCREWS 4 PLASTIC TABS 2 DRAIN TUBING M20204 OPENING TOAIR DUCT ...

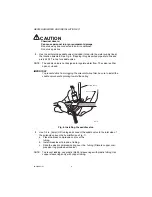
Страница 8: ...ither open or closed IMPORTANT To prevent debris from clogging the solenoid in line filter be sure to install the saddle valve handle pointing toward the ceiling Fig 6 Installing the saddle valve 3 Use 1 4 in 6 mm OD tubing and connect the saddle valve to the inlet side of the solenoid valveon the humidifier see Fig 7 a Place the brass compression nut over the tubing b Install brass insert into en...

Страница 9: ... a 1 2 in 13 mm drain tube to the humidifier drain fitting and run to the floor drain see Fig 8 a Slide the drain clamp over the tub ing b Push the tubing over the drain nip ple on the humidifier c Hand tighten the clamp around the tubing to secure the humidifier drain d Fasten the drain tubing can use duct tape along the route to prevent movement and ensure downward slope for correct drainage NOT...

Страница 10: ...tch in an area where temperature exceeds rating of 40 F to 190 F 40 C to 88 C 1 Disconnect power from the humidifier before installing 2 Mount the switch vertically with pressure connectors facing down using pro vided self tapping screws to secure the switch to the duct Fig 9 Pressure switch oriented vertically M27300 ...

Страница 11: ...y and black if installed on both IMPORTANT With low speed airflow or vari able speed systems it is recom mended to run tubing to both the supply and return ducts Fig 10 Mounting the pressure switch Fig 11 Install tubing 8 You may cut the tubing to fit the connection length between the elbow fitting and switch It is also recommended to secure the hose to existing structures to avoid accidental disc...

Страница 12: ... from the base 4 Position the foam gasket on the H8908 base 5 Position the base on the duct with the arrow up 6 Secure the base to the duct using the four 1 in 25 mm mounting screws provided with humidistat 7 Connect the low voltage wires to the leads and replace the H8908 case See Fig 12 NOTE For wall mounting instructions see the H8908 Installation Instructions Fig 12 Humidistat base and rear vi...

Страница 13: ...distat and pressure switch can be wired in any order 3 At the humidifier connect the black and white conductors to the two yellow humidifier wires The red wires from the humidifier are not used 4 At the humidistat connect both black conductors to the two humidistat terminals Use a wire nut to connect together the two white conductors 5 At the pressure switch connect the black and white conductors ...

Страница 14: ... Troubleshooting Your Humidifier section 4 Check for leaks 5 Reset the thermostat and H8908 Humidistat to a comfortable setting for auto matic operation OPERATION How Your Humidifier Works Your Honeywell humidifier uses the principle that vapor evaporated water is created when warm air blows over a water soaked area As the vapor circulates the relative humidity rises Your humidity control monitors...

Страница 15: ...y setting is recommended to accommodate dewpoint effects These settings should reduce the accumu lation of moisture and ice on windows and other areas of the home Adjust the humidity control setting to adjust for indoor activities such as cooking showering and clothes drying which can cause excessive levels of humidity that can accumulate moisture on your windows NOTE If these activities persist f...

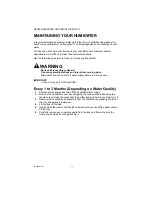
Страница 16: ...oving parts Disconnect power and shut off water supply before removing cover IMPORTANT Never oil any part of the humidifier Every 1 to 3 Months Depending on Water Quality 1 Disconnect the power and turn off the humidifier water supply 2 Remove the humidifier cover by unplugging the connector and loosening the thumb screw Grasp the cover near the bottom and pull toward you See Fig 14 3 Remove the h...

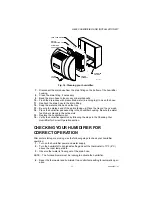
Страница 17: ...ube is placed in the guide slots 15 Replace the humidifier cover 16 Verify the humidifier operation by following the steps in the Checking Your Humidifier for Correct Operation section CHECKING YOUR HUMIDIFIER FOR CORRECT OPERATION After winter startup or servicing use the following steps to check your humidifier operation 1 Turn on the humidifier power and water supply 2 Turn the humidistat to it...

Страница 18: ...fy that needle pierces water line and then backs out needle to open valve Humidifier Remove cover and verify that water flows into distribution tray Drain tubing Verify no obstructions Low humidity Furnace blower not operating Reset circuit breaker or check for blown fuse Check that the furnace power is on Check all external wiring connections Check the humidity control setting Call a professional...

Страница 19: ...the terms stated above HONEYWELL SHALL NOT BE LIABLE FOR ANY LOSS OR DAMAGE OF ANY KIND INCLUDING ANY INCIDENTAL OR CONSEQUENTIAL DAMAGES RESULTING DIRECTLY OR INDIRECTLY FROM ANY BREACH OF ANY WARRANTY EXPRESS OR IMPLIED OR ANY OTHER FAILURE OF THIS PRODUCT Some states do not allow the exclusion or limitation of incidental or consequential damages so this limitation may not apply to you THIS WARR...

Страница 20: ...Honeywell International Inc 1985 Douglas Drive North Golden Valley MN 55422 Honeywell Limited Honeywell Limitée 35 Dynamic Drive Toronto Ontario M1V 4Z9 yourhome honeywell com U S Registered Trademark 2011 Honeywell International Inc 69 2629EF 01 M S 04 11 Printed in U S A ...

Страница 21: ...69 2629EF 01 Humidificateurs HE360 et trousse d installation INSTRUCTIONS D INSTALLATION MANUEL DU PROPRIÉTAIRE ...

Страница 22: ... Enfin l air humidifié fait toute la différence car il préserve également les meubles et les boiseries Félicitations En rendant votre maison plus confortable vous venez de réaliser un investissement important APPLICATION Cette trousse comprend un humidificateur HE360 et un humidistat H8908 de Honeywell ainsi que tous les accessoires nécessaires à l installation INSTALLATION Avant d installer ce pr...

Страница 23: ...l endroit où installer l humidificateur sur le plenum flux d air chaud Voir la Fig 1 S assurer qu à l endroit choisi le serpentin en A de l appareil de climatisation ne risque pas d être endommagé au cours de l installation Ne pas installer l humidificateur sur le boîtier de l appareil de chauffage S assurer qu il y a suffisamment d espace devant l humidificateur et au dessus pour enlever le couve...

Страница 24: ...0 pi fourni permet de raccorder l alimentation d eau robinet vanne à étrier à l électrovanne de l humidificateur Repérage du siphon de sol le plus près Choisir un endroit avec accès au siphon de sol pour l évacuation de la condensation du climatiseur et la vidange de l humidificateur S il n y a pas de siphon à proximité il est préférable d installer l humidificateur central à tambour ou à disque d...

Страница 25: ...uffisamment long pour être branché de l électrovanne de l humidificateur à Pressostat et à l humidistat Installation de l humidificateur AVERTISSEMENT Risque de choc électrique Peut causer des blessures ou des dommages matériels Ne pas couper ou percer un appareil électrique ou de conditionnement d air MISE EN GARDE Arêtes vives présentant un danger au moment de l installation Peut causer des bles...

Страница 26: ...niveau puis le placer de manière que les attaches de plastique soient sur l arête de la tôle inférieure de l ouverture S il y a lieu aplatir les bords à l aide de pinces Voir la Fig 5 9 Enfoncer les pinces jusqu à ce qu elles soient bien fixées 10 Percer les trous et insérer trois vis à tôle dans la partie supérieure du boîtier de l humidificateur Puis fixer le boîtier de l humidificateur à l aide...

Страница 27: ...aporateur dans le boîtier de l humidificateur IMPORTANT S assurer que le tube d arrivée d eau est raccordé et qu il n est pas coincé ou pincé 12 Remettre le couvercle dans les fentes et le fixer au moyen de la vis à oreilles au bas du couvercle GAINE NIVEAU VIS À TÔLE 4 ATTACHES EN PLASTIQUE 2 TUYAU DE VIDANGE MF20204 OUVERTURE VERS LA GAINE D AIR ...

Страница 28: ...et vanne à étrier autoperceur fourni pour percer le tuyau d arrivée d eau à l endroit choisi Voir la Fig 8 Si le tuyau est en acier galva nisé vider la canalisation et percer un trou de 3 17 po pour le robinet vanne à étrier REMARQUE Le robinet vanne à étrier ne doit pas servir de régulateur de débit d eau Le robinet vanne doit être soit ouvert soit fermé IMPORTANT Pour éviter que des débris ne bl...

Страница 29: ... de com pression tout en prenant soin de soutenir la vanne REMARQUE Ne pas trop serrer l écrou à compression Un serrage moyen empêche les fuites e Répéter les étapes a à d pour le raccord de l électrovanne f Fixer le tuyau à l aide des brides fournies 4 Relier un tuyau de vidange de 13 mm 1 2 po au raccord de vidange de l humidificateur et le diriger vers le siphon de sol voir la Fig 8 a Glisser l...

Страница 30: ... pressostat dans un endroit où la tem pérature est inféri eure à 40 C 40 F ou supérieure à 88 C 190 F 1 Coupez l alimentation électrique du TrueSTEAM avant l installation 2 Installez le pressostat à la verticale de façon à ce que les connecteurs à pression pointent vers le bas et fixez le au conduit à l aide des vis autotaraudeuses incluses Fig 9 Pressostat installé à la verticale M27300 ...

Страница 31: ...é à la fois sur le conduit d alimentation et sur le conduit de retour Fig 10 Installation du pressostat IMPORTANT Si la vitesse de circulation de l air est basse ou variable il est recommandé de raccorder un tuyau au conduit d alimentation et au conduit de retour 8 Vous pouvez couper le tuyau afin de l ajuster à la distance comprise entre le coude et le pressostat Il est également recommandé de fi...

Страница 32: ... sur le socle du H8908 5 Placer le socle sur la gaine la flèche vers le haut 6 Fixer le socle sur la gaine à l aide des quatre vis de montage de 25 mm 1 po fournies avec l humi distat 7 Connecter les fils basse tension aux conducteurs et remettre le boîtier du H8908 Voir la Fig 12 REMARQUE Pour une installation au mur consulter les instructions d installation du H8908 Fig 12 Socle et vue arrière d...

Страница 33: ...rvent pas 4 À l humidistat raccorder les deux conducteurs noirs aux deux bornes de l humid istat Connecter ensemble les deux conducteurs blancs à l aide d un serre fils 5 À le pressostat raccorder les conducteurs noir et blanc aux bornes C et NO de le pressostat La borne NC ne sert pas VÉRIFICATION DU FONCTIONNE MENT DE L HUMIDIFICATEUR LISTE DE VÉRIFICATION L humidificateur est de niveau Le câbla...

Страница 34: ... humidité relative et s il y a lieu fait fonctionner l humidificateur Le système d arrivée d eau répartit uniformément l eau sur l écran évaporateur de l humidificateur L air sec et chaud qui sort de l appareil de chauffage passe sur l écran évaporateur de l humidificateur et capte l air humide pour le faire circuler dans la maison L air humidifié est plus chaud et il assure un meilleur confort Le...

Страница 35: ...cateur peut fonctionner avec de l eau dure ou de l eau douce Toutefois les dépôts de sédiments d eau dure sont plus difficiles à enlever que ceux d eau douce Pour nettoyer l humidificateur suivre les étapes suivantes AVERTISSEMENT Risque de blessures graves Les pièces mobiles peuvent causer des chocs électriques ou des blessures Couper l alimentation électrique et fermer l arrivée d eau avant d en...

Страница 36: ...lier le tuyau de vidange pour décoller les dépôts de sédiments 10 Rincer le tuyau de vidange avec de l eau sous pression eau du robinet pour le nettoyer 11 Replacer le tuyau de vidange sur le raccord de vidange 12 Replacer le gicleur sur le plateau 13 S assurer que la partie marquée de l écran évaporateur est orientée vers le haut Remettre le plateau sur le cadre 14 Mettre l ensemble écran évapora...

Страница 37: ...he l humidificateur et ouvrir l arrivée d eau 2 Régler l humidistat à la valeur la plus élevée et régler le thermostat pour qu il indique 6 C 10 F de plus que la température de la pièce 3 Vérifier si l eau circule dans le tuyau de vidange REMARQUE Le ventilateur de l appareil de chauffage doit être en marche pour que l humidificateur fonctionne 4 Régler le thermostat et l humidistat pour qu ils fo...

Страница 38: ...mande Vérifier toutes les connexions Humidistat Abaisser et augmenter le réglage de l humidistat et vérifier s il se produit un bruit de contact Alimentation de l humidistat Vérifier si la prise est sous tension Électrovanne Vérifier les autres éléments de câblage puis mettre en marche le ventilateur de l appareil de chauffage abaisser et augmenter le réglage de l humidistat et vérifier s il y a d...

Страница 39: ...portes et les fenêtres fermées Fermer le registre de la cheminée foyer lorsque celle ci n est pas utilisée Faire fonctionner le ventilateur d extraction pendant une période minimum Rendre les portes et les ouvertures étanches Humidité élevée Condensation sur les murs Arrêter l humidistat et fermer l arrivée d eau jusqu à ce que la condensation disparaisse complètement Forte condensation dans les f...

Страница 40: ...té ou le mauvais fonctionnement du produit est attribuable à un endommagement du produit alors que le consommateur l avait en sa possession La responsabilité de Honeywell se limite à réparer ou à remplacer le produit conformément aux modalités susmentionnées HONEYWELL N ASSUME AUCUNE RESPONSABILITÉ POUR QUELQUE DOMMAGE INDIRECT QUE CE SOIT RÉSULTANT D UNE VIOLATION QUELCONQUE D UNE GARANTIE EXPRES...

Отзывы: