


1126800
SmartPAC 2 with WPC Integration
Page 338
Chapter 6
SmartPAC 2 Run Mode
For HELP press the HELP key located at the center of the cursor (arrow) keys.
NOTICE
To e-mail a copy of this screen, see “Screen Capture,” page 199.
Show Sensor Status
(RUN – DIE PROTECTION– Select Sensor –
F7
-SHOW SENSOR STATUS)
To access "Sensor Status,” first select "Die Protection" from the Main Run menu and you
will see a list of sensors. Press the
F7
function key for "Show sensor status" which allows
you to see the status of all your sensors at once while the press is running or stopped.
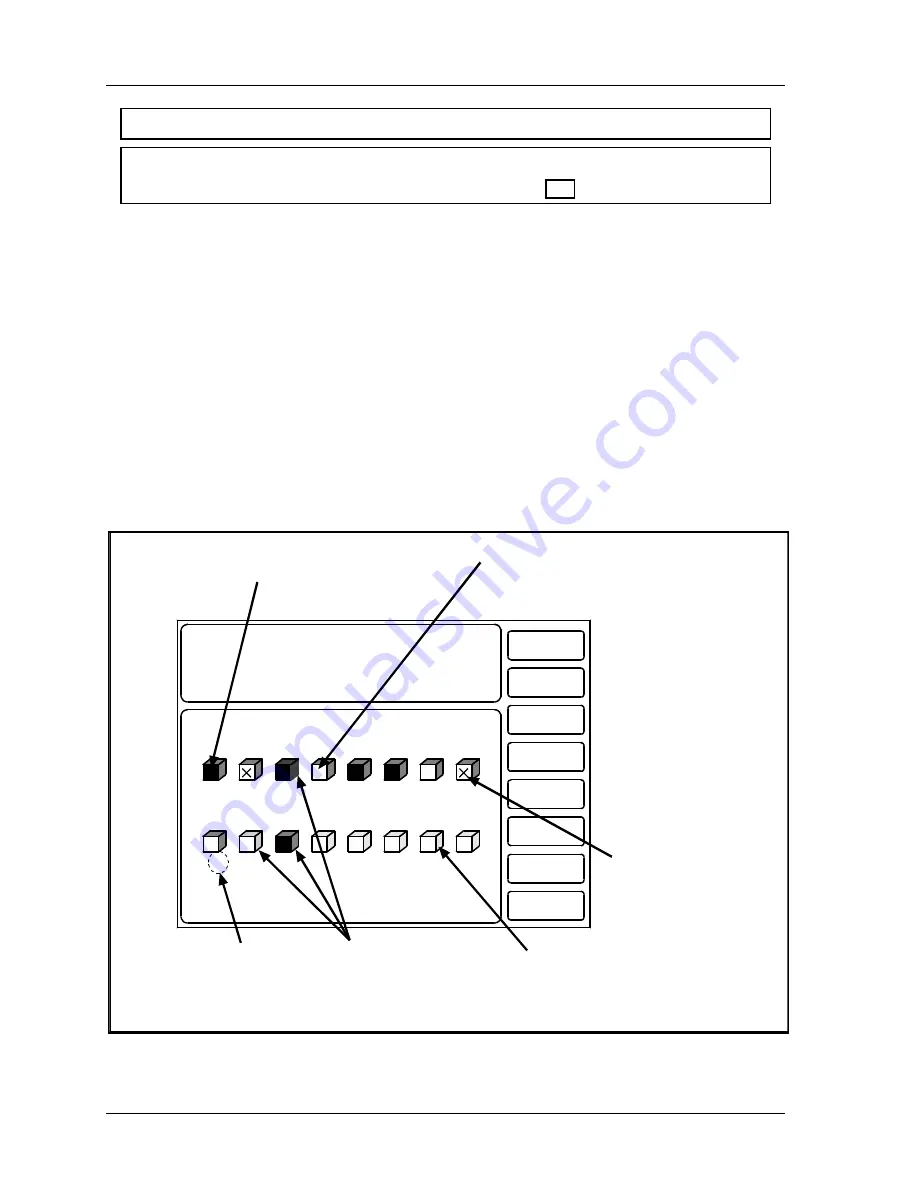
The following display shows the status of every sensor for a loaded tool number. The sixteen
sensor inputs are indicated by the numbers 1 through 8, and 9 through 16 (if installed). The
type of sensor connected to each input is indicated by the letters (and/or numbers) under the
numbered inputs. G = green; GCON = green constant; RED is a red sensor; GQC = green
quick check; YEL = yellow; GS = green special (11 represents maximum number of strokes
allowed); N/U = not used. If the square actuation block representing the sensor is dark, this
indicates that the sensor is actuated.
SENSOR STATUS
PRESS THE RESET KEY WHEN DONE.
CAMBIE
AL ESPANOL
PRESS #14
TOOL NUMBER 6160
PART CNTR 51635
FLANGE
TWO HAND CONT
PRESS SPEED 67
RETURN TO
MAIN MENU
3
RED
7
GQC
4
G
8
G
1
G
6
G
2
G
5
GCONS
10
YEL
9
GS 5
11
12
N/U
13
N/U
14
N/U
15
N/U
16
N/U
X indicates
sensor is
turned off
White actuation block
indicates sensor is
ungrounded
Black actuation block
indicates sensor is
grounded
Color indicates
type of sensor
(green, red, yellow)
Gray indicates not-used
(unprogrammed) sensors
Number indicates
maximum number
of strokes allowed
for Green Special
GCONS
Figure 6 - 13. Show Sensor Status
Содержание SmartPAC 2
Страница 192: ...1126800 SmartPAC 2 with WPC Integration Page 170 Chapter 2 Installing SmartPAC 2 and WPC ...
Страница 222: ...1126800 SmartPAC 2 with WPC Integration Page 200 Chapter 3 SmartPAC 2 Keyboard Displays and Operating Modes ...
Страница 294: ...1126800 SmartPAC 2 with WPC Integration Page 272 Chapter 4 SmartPAC 2 Initialization Mode ...
Страница 342: ...1126800 SmartPAC 2 with WPC Integration page 320 Chapter 5 SmartPAC 2 Program Mode ...
Страница 404: ...1126800 SmartPAC 2 with WPC Integration Page 382 Chapter 6 SmartPAC 2 Run Mode ...
Страница 448: ...1126800 SmartPAC 2 with WPC Integration Page 426 Chapter 7 SmartPAC 2 Fault Messages ...
Страница 476: ...1126800 SmartPAC 2 with WPC Integration page 454 Appendix C Updating SmartPAC 2 Firmware ...
Страница 478: ...1126800 SmartPAC 2 with WPC Integration page 456 Appendix D SmartView Remote Viewing and E mail Setup ...
Страница 480: ...1126800 SmartPAC 2 with WPC Integration page 458 Appendix E Upgrade from Original SmartPAC to SmartPAC 2 ...
Страница 482: ...1126800 SmartPAC 2 with WPC Integration page 460 Appendix F Replacing SmartPAC 2 PC Board ...
Страница 492: ...1126800 SmartPAC 2 with WPC Integration page 470 Glossary ...