Log on to the MAXPRO NVR Viewer
1.
As soon as you click
in the Setup
Wizard, the Log On dialog displays. Please wait
while the system logs you on automatically as a
Windows Logged-In User.
2.
MAXPRO NVR launches and the Viewer tab
displays (see below). The Devices area on the
left hand pane lists all the discovered network
cameras.
View Live Video
To view video from cameras, double-click
MAXPRO NVR
in the Devices list to display video
from all discovered cameras in the Viewer. You can also highlight and drag each camera into a
panel.
Live Viewer Player Controls
List of Honeywell IP
cameras connected to
and discovered by
MAXPRO NVR.
Devices tab: currently active.
Alarms tab: acknowledge and
clear alarms.
Images/Clips: select images and
clips to view.
Double-click or drag the clip to a
Viewer panel to view.
To export a clip for forensics,
click
Clip Export
.
Live viewer player controls
Play forward
Pause
Play backward
Change
playing speed
Time jump control to
quickly locate video
Timeline
Select date and time
to start recording
Number of alarms
detected
User currently
logged on
Honeywell IP Camera Configuration
2
Using the MAXPRO NVR Wizard (3 Clicks to Live Video)
Power up the MAXPRO NVR XE unit. When the
Log On dialog box displays, log on as Windows
Administrator (Username:
Administrator
,
Password:
Password1
). The setup wizard starts
automatically but may take two minutes.
1.
The
CONFIGURATION
page displays.
When the network is ready (network icon in
Windows tray), click
to accept
the default settings and proceed to
CAMERA DISCOVERY.
To modify the settings for your unique
system requirements, follow the table
below. After initial setup, you can do this in
the MAXPRO NVR client.
Click
to reset the values without
saving any changes.
2.
The
CAMERA DISCOVERY
page displays.
Each newly connected camera is identified
and an IP address is assigned to the
camera by the Wizard, after which the
camera reboots.
I
t may take a few minutes before cameras are
discovered and added. You will see a Discovery
in progress… indicator as well as a pop-up
message on the lower right of your monitor. The
list disappears as the cameras are added to the
MAXPRO NVR.
Click
only after all connected
cameras are discovered and added.
Click
to return to the
CONFIGURATION page.
3.
The
INSTALLATION
page displays. Click
to start the MAXPRO NVR
application (see
3
).
Note
To add non-Honeywell devices, see
Third Party Device Configuration
.
Field
Description
Video Format
NTSC, PAL
Start Recording
Start recording as soon as the
camera is added in MAXPRO NVR.
Auto IP
Assignment
Software assigns IP address
automatically.
Dynamic IP
Synchronization
Software synchronizes any change
in a device’s IP address.
Auto Add
Discovered
Camera
Any newly connected device is
automatically added to the devices
list.
Custom Camera
Credentials
Not configurable in the Wizard.
Camera Type
Not configurable in the Wizard.
Username,
Password
Not configurable in the Wizard.
Camera IP
Range
The system automatically detects
all cameras in this range on the
network.
STEP 1 CONFIGURATION
STEP 2 CAMERA DISCOVERY
STEP 3 INSTALLATION
Pop-up
message
Hardware Installation
1
Connect Peripherals — Dedicated Network Scenario
The installation below demonstrates a static IP network configuration. For DHCP based
configurations (such as a corporate WAN network), please refer to the
Commissioning and
Installation
guide on your software/documentation DVD.
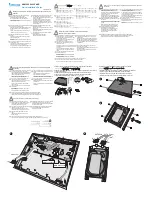
1.
Install the MAXPRO NVR XE unit on a flat surface.
2.
Connect the keyboard, mouse and power cable (supplied), and then connect a
monitor and Honeywell IP camera(s). You will also require a network PoE switch to
connect the IP camera(s). Your system may include some or all of these typical system
components.
Rear Panel Connections — Dedicated Network Scenario
M
A
XPR
O
®
NV
R
X
E
Network
MAXPRO
®
NVR XE
VGA
CAT5e
CAT5e
to Network Port 1
CAT5e
CAT5e
CAT5e
CAT5e
Network PoE Switch (not supplied)
HD55IP
Outdoor, 720p
HD45IP
Indoor, 720p
HD54DIP
Outdoor, VGA
HD44IP
Indoor, VGA
USB
USB
Monitor
(not supplied)
Honeywell IP cameras. Contact your dealer to purchase.
Serial
connector
Network port 2
(not used)
Serial
connector
PS/2
connector
Audio In/OUT
(not used)
Display port
DB15 connector.
Connect to VGA
monitor
(not supplied).
PS/2
connector
24V USB
USB 2.0 (x4)
Connect to USB keyboard,
mouse
(supplied).
Network port 1
Connect to PoE switch
(not supplied)
Live View
3