background image

IMPORTANT SAFETY 

INSTRUCTIONS

READ AND SAVE THESE SAFETY 

INSTRUCTIONS BEFORE USING 

THIS FAN

When using electrical appliances, basic 

precautions should always be followed to 

reduce the risk of fire, electric shock, and 

injury to persons, including the following:
FOR US MODELS ONLY - This product 

employs overload protection (fuse). A 

blown fuse indicates an overload or short-

circuit situation. If the fuse blows, unplug 

the product from the outlet. Replace the 

fuse as per the user servicing instructions 

(follow product marking for proper fuse 

rating) and check the product. If the 

replacement fuse blows, a short-circuit 

may be present and the product should 

be discarded or returned to an authorized 

service facility for examination and/or 

repair. 
1.

  Use this fan only as described in this 

manual. Other use not recommended as it 

may cause fire, electric shock or injury to 

persons.

2.

  This product is intended for household 

use 

ONLY

 and not for commercial, 

industrial or outdoor use. 

3.

  To protect against electric shock, do not 

place fan in window, immerse unit, plug 

or cord in water or spray with liquids.

4.

  This appliance has a polarized plug 

(one blade is wider than the other). To 

reduce the risk of shock, this plug is 

intended to fit only one way in a polarized 

outlet. If the plug does not fit fully in the 

outlet, reverse the plug. If it still does 

not fit, contact a qualified electrician. 

DO NOT

 attempt to defeat this safety 

feature.

5.

  Close supervision is necessary when any 

appliance is used by or near children.

6.

  Turn the fan 

OFF

 and unplug the fan from 

the outlet when not in use, when moving 

the fan from one location to another and 

before cleaning.

7.

  To disconnect the fan, first turn the unit 

OFF

, grip the plug and pull it from the 

wall outlet. Never pull the plug by the 

cord.

8.

  Do not operate the fan in the presence of 

explosive and/or flammable fumes.

9.

  Do not place the fan or any parts near 

an open flame, cooking or other heating 

appliance.

10.

  Do not operate the fan with a 

damaged cord or plug or if the product 

malfunctions, is dropped  

or damaged in any manner  

(see warranty).

11.

  Avoid contact with moving fan parts.

12.

  The use of attachments not recommended 

by the manufacturer may be hazardous.

13.

  Place the fan on a dry level surface.

14.

  Do not hang or mount fan on a wall 

or ceiling.

15.

  Do not operate if the fan housing is 

damaged.

16.

  A loose fit between the AC outlet 

(receptacle) and plug may cause 

overheating and a distortion of the plug. 

Contact a qualified electrician to replace 

loose or worn outlet.

QUIETSET


WHOLE ROOM STAND FAN

HS-1650 Series

HS-1660 Series

Owner’s Manual

The Honeywell trademark is used by Kaz USA, Inc. under license from Honeywell International Inc. 

Honeywell International Inc. makes no representation or warranties with respect to this product.

Содержание HS-1650 Series

Страница 1: ...ully in the outlet reverse the plug If it still does not fit contact a qualified electrician DO NOT attempt to defeat this safety feature 5 Close supervision is necessary when any appliance is used by or near children 6 Turn the fan OFF and unplug the fan from the outlet when not in use when moving the fan from one location to another and before cleaning 7 To disconnect the fan first turn the unit...

Страница 2: ...plug Contains a safety device fuse that should not be removed Discard product if the attachement plug is damaged 6 If you need further information on how or when to replace the fuse in the safety plug please contact Kaz Consumer Relations Department by visiting our website at www kaz com or calling 1 800 477 0457 This fan features a fused safety plug which is designed to cut off electric current t...

Страница 3: ...ghtening the 3 screws in the 3 holes on the bottom of the base Fig 2 Slide the Pole Base Cover into place in the base and turn COUNTER CLOCKWISE until it snaps securely into place C Determining the Height of the Fan Turn the Height Adjustment Knob B in a COUNTER CLOCKWISE direction so that the Knob loosens around the Metal Pole Extension Pull the Metal Pole Extension out of the Metal Fan Pole to t...

Страница 4: ...es in the center of the Rear Grille fit over the 2 raised knobs on the Motor Housing Now place the Rear Grille Mounting Nut E onto the center of the fan and tighten by turning it CLOCKWISE Fig 5 Align hole in center of Fan Blade with the screw extending from the Motor Assembly Make sure that the 2 slots on the back of the Fan Blade align with the bars extending from the shaft surrounding the screw...

Страница 5: ...e control panel Fig 10 SPEED CONTROL To adjust the speed up or down press the Fan Speed button repeatedly to increase level Fig 10 TIMER Choose from 1 2 4 or 8 hour settings by performing the following function Fig 10 1 hour Press the Timer button once 2 hours Press the Timer button twice 4 hours Press the Timer button a third time 8 hours Press the Timer button a fourth time Press the Timer butto...

Страница 6: ...evel Fig 12 13 TIMER Choose from 1 2 4 or 8 hour settings by performing the following function Fig 12 13 1 hour Press the Timer button once 2 hours Press the Timer button twice 4 hours Press the Timer button a third time 8 hours Press the Timer button a fourth time Press the Timer button a fifth time to turn the Timer feature off Fig 12 13 HS 1655 HS 1665 SERIES REMOTE CONTROL OPERATION Speed Time...

Страница 7: ...merse the fan in water and never allow water to enter the Motor Housing DO NOT use gasoline paint thinner or other chemicals to clean the fan REMOVAL OF THE FRONT GRILLE FOR CLEANING Remove the Front Grille by releasing the Grille clips Unscrew the Blade Knob by turning it CLOCKWISE REVERSE THREAD Pull the Fan Blade away from the Motor Housing Gently wipe the Fan Blade and Grilles with a soft damp...

Страница 8: ...ginal purchaser of this product from the original date of purchase B At its option Kaz USA Inc will repair or replace this product if it is found to be defective in material or workmanship Defective product should be returned to the place of purchase in accordance with store policy Thereafter while within the warranty period defective product may be returned to Kaz USA Inc C This warranty does not...

Страница 9: ...rend une fiche polarisée une branche est plus large que l autre Pour réduire les risques de choc électrique la fiche n enfonce que dans un sens dans les prises polarisées Si elle ne pénètre pas totalement dans la prise inversez la Si elle ne rentre toujours pas faites appel à un électricien NE neutralisez PAS ce dispositif de sécurité 5 Surveillez assidûment l appareil s il est utilisé par des enf...

Страница 10: ...e grillé La fiche devrait alors pouvoir être utilisée normalement 5 Risque d incendie Ne remplacez pas la fiche Elle contient un dispositif de sécurité fusible qui ne doit pas être enlevé Jetez l appareil si sa fiche est abîmée 6 S il vous faut de plus amples renseignements en ce qui concerne le remplacement du fusible de la fiche de sécurité veuillez communiquer avec le Service à la clientèle de ...

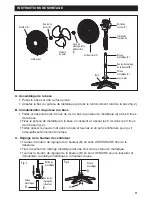
Страница 11: ...pour qu il s assujettisse fermement en place C Réglage de la hauteur du ventilateur Tournez le bouton de réglage de la hauteur B en sens ANTIHORAIRE afin de le desserrer Tirez la section de rallonge métallique désirée hors de la poteau de métallique Tournez le bouton de réglage de la hauteur B en sens HORAIRE pour le resserrer et immobiliser la rallonge métallique à la hauteur voulue Attaches G Bo...

Страница 12: ...ière doivent se caler sur les 2 saillies du boîtier du moteur Placez alors l écrou de montage de la grille arrière E au centre et tournez le en sens HORAIRE fig 5 pour le serrer Faites correspondre le trou central du module des pales et la vis en saillie par rapport à l ensemble du moteur Veillez à ce que les 2 rainures se trouvant à l arrière de l hélice coïncident bien avec les barres en saillie...

Страница 13: ... le bouton d oscillation Pour DÉSACTIVER l oscillation LEVEZ simplement le bouton fig 11 MISE EN PLACE DES PILES DE LA TÉLÉCOMMANDE INSTRUCTIONS DE REMPLACEMENT A Faites glisser le volet du compartiment des piles dans le sens de la flèche B Placez 2 piles AAA tel que l indiquent les guides directionnels des rainures fig 9 Les piles sont fournies C Faites coulisser le volet du compartiment dans le ...

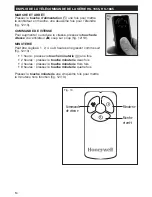
Страница 14: ...e vitesse du ventilateur coup sur coup fig 12 13 MINUTERIE Peut être réglée à 1 2 4 ou 8 heures en agissant comme suit fig 12 13 1 heure pressez la touche minuterie une fois 2 heures pressez la touche minuterie deux fois 4 heures pressez la touche minuterie trois fois 8 heures pressez la touche minuterie quatre fois Pressez la touche minuterie une cinquième fois pour mettre la minuterie hors fonct...

Страница 15: ...humide Assembler le ventilateur en suivant les trois dernières étapes des INSTRUCTIONS D ASSEMBLAGE ENTREPOSAGE Au moment de ranger l appareil le démonter et le nettoyer soigneusement conformément aux instructions avant de le placer dans sa boîte d origine Si on préfère ne pas démonter le ventilateur il est recommandé de le couvrir d une enveloppe de plastique pour le protéger de la poussière Rang...

Страница 16: ...ts diffèrent d une région à l autre et il est possible que vous en ayez d autres Cette garantie s applique uniquement à l acheteur initial de ce produit à compter de la date de l achat initial B À sa discrétion Kaz USA Inc réparera ou remplacera ce produit si l on constate qu il comporte un vice de matière ou de main d œuvre C Cette garantie ne couvre pas les dommages découlant des tentatives de r...

Страница 17: ...nchufe polarizado una pata de la clavija es más ancha que la otra Para reducir el riesgo de descarga este enchufe fue pensado para entrar sólo en una dirección en un tomacorriente polarizado Si la clavija no entra completa en el tomacorriente voltéelo si aun así no entra contacte a un electricista calificado NO intente vencer esta característica de seguridad 5 Es necesaria supervisión directa cuan...

Страница 18: ...o Ahora el enchufe debe estar listo para uso normal 5 Riesgo de incendio No reemplace el accesorio del enchufe Contiene un dispositivo de seguridad fusible que no se debe quitar Deseche el producto si el accesorio del enchufe está dañado 6 Si necesita mayores informes de cómo o cuándo debe cambiar el fusible de seguridad de su enchufe por favor contacte al Departamento de Servicio al Consumidor de...

Страница 19: ... lugar en la base y gire hacia la izquierda hasta que encaje a presión en su lugar C Determinar la Altura del Ventilador Gire hacia la IZQUIERDA la Perilla de Ajuste de Altura B para que la Perilla se afloje alrededor de la Extensión Metálica del Poste Jale la Extensión Metálica del Poste hacia afuera de la Poste De Metálica a la altura deseada Gire hacia la DERECHA la Perilla de Ajuste de Altura ...

Страница 20: ...o de la Rejilla Posterior se acomoden sobre las dos perillas elevadas en la Cubierta del Motor Ahora coloque la Tuerca de Montaje de la Rejilla Posterior E en el centro del ventilador y apriete girándola hacia la DERECHA Fig 5 Alinee el agujero en el centro del Aspa del Ventilador con el tornillo extendido del Montaje del Motor Asegúrese que las 2 ranuras en la parte posterior del Aspa del Ventila...

Страница 21: ...f the control panel Fig 10 CONTROL DE VELOCIDAD Para ajustar la velocidad hacia arriba o hacia abajo presione el botón de Velocidad del Ventilador repetitivamente para aumentar el nivel Fig 10 TEMPORIZADOR Escoja entre los ajustes de 1 2 4 u 8 horas realizando la siguiente función Fig 10 1 hora Presione una vez el botón del Temporizador 2 horas Presione dos veces el botón del Temporizador 4 horas ...

Страница 22: ...ntilador repetitivamente para aumentar el nivel Fig 12 13 TEMPORIZADOR Escoja entre los ajustes de 1 2 4 u 8 horas realizando la siguiente función Fig 12 13 1 hora Presione una vez el botón del Temporizador 2 horas Presione dos veces el botón del Temporizador 4 horas Presione tres veces el botón del Temporizador 8 horas Presione cuatro veces el botón del Temporizador Presione el botón del Temporiz...

Страница 23: ...rejilla separándola de la rejilla trasera Desatornille el botón de las hojas girándolo EN EL SENTIDO DE LAS AGUJAS DE UN RELOJ AL CONTRARIO DE LAS ROSCAS Separe el módulo de las hojas del cajetín del motor Limpie con cuidado las hojas y las rejillas con un paño suve humedecido Vuelva a montar el ventilador siguiendo las 3 últimas etapas de las INSTRUCCIONES DE ENSAMBLAJE ALMACENAMIENTO Cuando vaya...

Страница 24: ...an de jurisdicción en jurisdicción Esta garantía aplica solo para el comprador original de este producto desde la fecha original de la compra B A su consideración Kaz USA Inc reparará o cambiará este producto si encuentra defecto en materiales o de fabricación Los productos defectuosos deben de regresarse al lugar de compra de acuerdo con las políticas de la tienda A partir de ese momento mientras...

Отзывы: