Configuration
Document 800-03650
Rev D
75
02/09
Save your Record settings by highlighting Save and pressing the
button. Select
Cancel to exit the screen without saving the changes.
Schedule Screen
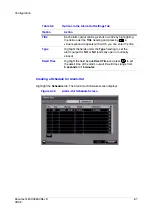
Using the Schedule screen, you can program the DVR to record only during certain
times based on time, day of the week, and holidays. The smallest time segment you can
use is 15 minutes.
Scheduling Recording Times
Highlight Schedule in the Record menu and press
. The Schedule setup screen
appears.
Panic Recording - Duration
Highlight the Panic Recording - Duration field and set the duration
of panic recording. You can set the dwell from No Limit to 5 minutes
to 1 hour.
Panic recording stops automatically after the preset duration as long
as the PANIC button is not pressed to stop the panic recording.
Select No Limit if you want to stop panic recording manually.
Panic Recording - ips
Highlight the Panic Recording - ips field and press
to set the
images per second for Panic recording. You can select from 0.10 to
30.0 images per second (ips).
Panic Recording - Quality
Highlight the Panic Recording - Quality field and press
to set
the recorded image quality for Panic recording. You can select from:
Very High, High, Standard, and Basic.
Table 3-11
Record Setup Screen Options
Option
Action
Содержание HRSD16
Страница 12: ...Tables 12 ...
Страница 18: ...18 ...
Страница 22: ...Introduction 22 ...
Страница 138: ...Operation 138 ...
Страница 140: ...USB Hard Disk Drive Preparation 140 ...
Страница 158: ...Time Overlap 158 ...
Страница 160: ...Troubleshooting 160 ...
Страница 162: ...Connector Pinouts 162 ...
Страница 163: ...Map of Screens Document 800 03650 Rev D 163 02 09 H Map of Screens ...
Страница 164: ...Map of Screens 164 ...
Страница 166: ...System Log Notices 166 ...
Страница 175: ......

