background image

Controlling a PTZ Device  |  47

800-16694 - A - 04/2014

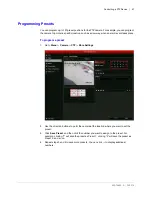
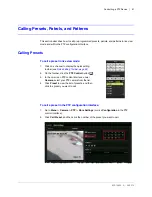
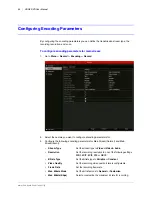
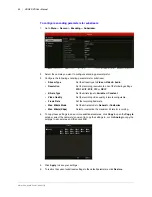
Programming Presets

You can program up to 127 preset positions for the PTZ camera. For example, you can program 
the camera to point at a specific location, such as a doorway, when an alarm event takes place.

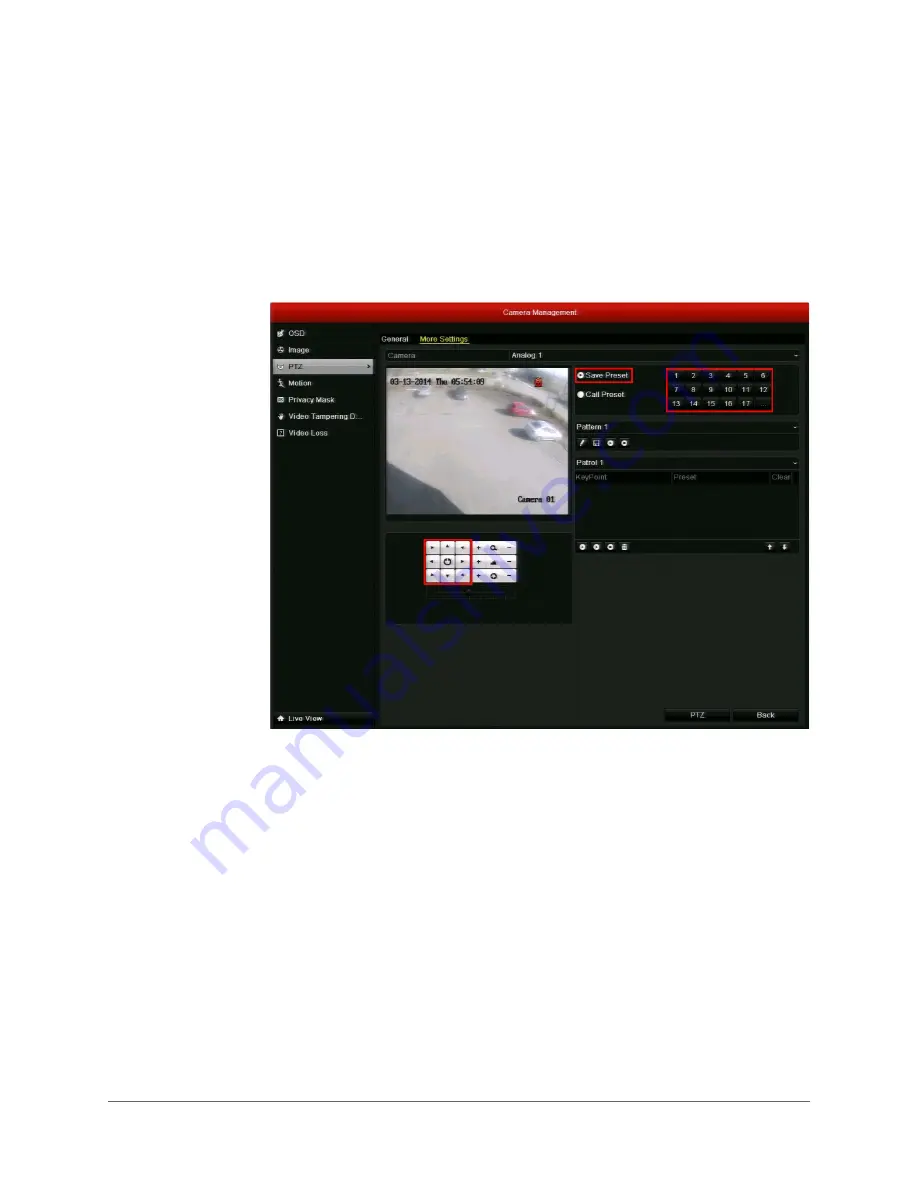
To program a preset:

1. Go to 

Menu > Camera > PTZ > More Settings

.

2. Use the direction buttons to point the camera at the location where you want to set the 

preset.

3. Click 

Save Preset

, and then click the number you want to assign to the preset. For 

example, clicking "1" will save the preset as Preset 1, clicking "2" will save the preset as 
Preset 2, and so on.

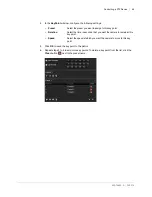
4. Repeat steps 2 and 3 to save more presets. You can click 

 to display additional 

numbers.

Содержание HRGX161

Страница 1: ...00 16694 Rev A 04 2014 User Manual HRGX Performance Series 4 8 16 Channel Embedded DVR HRGX45 HRGX85 HRGX161 HRGX45X HRGX85X HRGX161X HRGX41 HRGX81 HRGX162 HRGX41X HRGX81X HRGX162X HRGX82 HRGX164 HRGX82X HRGX164X ...

Страница 2: ...Revisions Issue Date Revisions A 04 2014 New document ...

Страница 3: ...Started 23 Installation Precautions 23 Connecting External Devices 24 Typical Installation 26 Starting Up and Shutting Down the DVR 27 Using the Setup Wizard 28 Accessing the Main Menu 31 Setting the System Date and Time 32 Upgrading the Firmware 33 HDD Storage Calculation 34 3 Viewing Live Video 35 About Live View 35 Configuring Live View Settings 37 Setting the Screen Layout 37 Setting the Video...

Страница 4: ...laying Back Video by System Log 75 Playback Operations 76 Creating Video Clips 76 Working with Tags 76 Using Digital Zoom 77 Using Smart Search 78 7 Exporting Video 79 Exporting Recorded Video Files 79 Exporting Video Clips 81 8 Configuring Alarm Settings 83 Configuring Alarms Inputs 84 Configuring Alarm Outputs 87 Configuring Motion Detection Settings 89 Configuring Video Tampering Detection Sett...

Страница 5: ... PTZ Connection Settings 126 Configuring Motion Detection Settings 126 Configuring Privacy Masks 127 Configuring Video Tampering Detection Settings 129 Configuring Video Loss Settings 129 12 Managing the DVR 131 Configuring General System Settings 132 Viewing System Information 134 Searching and Exporting Log Files 137 Exporting and Importing Configuration Files 139 Upgrading the Firmware 140 Rest...

Страница 6: ...www honeywell com security 6 HRGX DVR User Manual ...

Страница 7: ... interference to radio communications Operation of this equipment in a residential area is likely to cause harmful interference in which case the user will be required to correct the interference at his own expense Changes or modifications not expressly approved by the party responsible for compliance could void the user s authority to operate the equipment Canadian Compliance Statement This Class...

Страница 8: ...r source indicated on the marking label If you are not sure of the type of power supplied to your facility consult your product dealer or local power company 4 HEAT Situate away from items that produce heat or are heat sources such as radiators heat registers stoves or other products including amplifiers 5 WATER AND MOISTURE This unit is intended for indoor use only Do not use this unit outdoors o...

Страница 9: ...o provides instructions for configuring the DVR s recording settings Chapter 6 Playing Back Video provides instructions for searching and playing back video by channel time event tag and system log Chapter 7 Exporting Video provides instructions for exporting recorded video fies and customized video clips to an external storage device Chapter 8 Configuring Alarm Settings provides instructions for ...

Страница 10: ...following documents Document title Part number HRGX DVR Getting Started Guide 800 16694 HRGX DVR Remote Web Access User Guide 800 18321 HRGX DVR Apple Device Mobile App User Guide 800 18322 HRGX DVR Android Device Mobile App User Guide 800 18323 Multi Site 4200 User Guide for Windows 800 12064V2 Multi Site 4200 User Guide for Mac 800 13101 ...

Страница 11: ...puts H 264 video compression with high reliability and superior definition Encoding at up to WD1 NTSC 960 480 PAL 960 576 resolution Each channel supports dual stream Independent configuration for each channel including resolution frame rate bit rate image quality etc Input and output video quality is configurable Normal and event recording parameters configurable per individual camera Encoding fo...

Страница 12: ...vent video encoding parameters Multiple recording types manual normal and motion 8 recording time periods with separated recording types Pre record and post record time for event and schedule recording Record file searches by event Customization of tags searching and playing back by tags Locking unlocking record files Local redundant recording Search and playback of record video by channel number ...

Страница 13: ...ding Remote FTP server upgrade Remote PTZ control Two way audio and voice broadcasting Embedded web server HDD Management 1 SATA hard disk up to 1 TB can be connected to 4 channel models and 2 SATA hard disks up to 4 TB to 8 and 16 channel models 8 network disks 8 NAS disks or 7 NAS disks 1 IP SAN disk can be connected HDD group management Support HDD standby function HDD property redundancy read ...

Страница 14: ...LAY accesses the playback interface 7PQRS REC Enters 7 P Q R S REC accesses the manual recording interface manually starts stops recording 8TUV PTZ Enters 8 T U V PTZ accesses the PTZ control interface 9WXYZ PREV Enters 9 W X Y Z In live view mode PREV enables multi camera display In playback mode PREV deletes selected tag 0 A Enters 0 A switches between uppercase and lowercase letters symbols num...

Страница 15: ... 8 T U V PTZ accesses the PTZ control interface 9WXYZ PREV Enters 9 W X Y Z In live view mode PREV enables multi camera display In playback mode PREV deletes selected tag 0 A Enters 0 A switches between uppercase and lowercase letters symbols numeric input In playback mode A adds default tag 2 Direction Enter Buttons Direction buttons move the cursor up down left right In live view mode the direct...

Страница 16: ...finition digital video output 5 Loop Out DB26 socket for independent video output 6 VGA Port DE15 socket for local video output 7 Audio In RCA connectors for audio input 8 Audio Out RCA connector for audio output 9 Alarm In Out Connector for alarm input output 10 LAN Port RJ45 10 100M Ethernet interface 11 RS 485 Connects RS 485 devices Connect D and D terminals to R and R terminals of PTZ receive...

Страница 17: ...video output 5 Loop Out DB26 socket for independent video output 6 VGA Port DE15 socket for local video output 7 Audio In RCA connectors for audio input 8 Audio Out RCA connector for audio output 9 Alarm In Out Connector for alarm input output 10 LAN Port RJ45 10 100M Ethernet interface 11 RS 485 Connects RS 485 devices Connect D and D terminals to R and R terminals of PTZ receiver 12 12V 12 V DC ...

Страница 18: ... digital video output 5 Loop Out DB26 socket for independent video output 6 VGA Port DE15 socket for local video output 7 Audio In RCA connectors for audio input 8 Audio Out RCA connector for audio output 9 Alarm In Out Connector for alarm input output 10 LAN Port RJ45 10 100M Ethernet interface 11 RS 485 Connects RS 485 devices Connect D and D terminals to R and R terminals of PTZ receiver 12 12V...

Страница 19: ... table describes basic mouse operations Name Action Description Left Mouse Button Click Live view Select channel and display quick set menu Menu Select and enter Double click Live view Switch between single screen and multi screen Press and drag Live view Select time bar PTZ control Pan tilt and zoom Privacy masking and motion detection Select target area Digital zoom Select target area Right Mous...

Страница 20: ...e 4 EDIT Deletes characters before cursor selects check boxes in edit mode Generatesvideoclipsforbackupin playback mode 5 A Switches between uppercase and lowercase letters symbols numeric input 6 REC Accesses manual record menu Calls preset in PTZ mode press REC then preset number 7 PLAY Accesses all day playback menu 8 INFO Reserved 9 PREV Switches between single screen and multi screen layout i...

Страница 21: ... General page click the More Settings tab 7 Make a note of the device number of the DVR The default device number is 255 8 Press the DEV button on the remote control input the device number and then press the ENTER button Troubleshooting the Remote Control If there is no response when you try to use the remote control follow these steps 1 Check that the batteries are properly installed Ensure that...

Страница 22: ...ttings Shutdown Maintenance Record Alarm General Advanced HDD Detect Lock Shutdown Reboot Schedule Encoding Advanced Holiday General Network Alarm Display Exceptions User System Info Log Search Configuration Upgrade Default Net Detect OSD Image PTZ Motion Privacy Mask Video Tampering Video Loss Normal Event Tag ...

Страница 23: ...n page 34 Installation Precautions Follow these precautions when installing the DVR Use brackets for rack mounting Ensure that there is at least 0 75 in 2 cm of space between rack mounted devices Ensure that there is ample room for the audio and video cables When installing cables ensure that the bend radius of the cable is at least five times the cable diameter Ensure that the DVR is properly gro...

Страница 24: ...A connector Connecting to a Local Area Network Connect a Cat5 Ethernet cable to the LAN RJ45 jack Connecting a Mouse Connect the supplied USB mouse to the rear panel USB port This leaves the front panel USB port available for importing data from or exporting data to a USB flash drive Connecting a PTZ Camera or Other RS 485 Device Connect the R and R terminals of the PTZ receiver or other RS 485 de...

Страница 25: ...connections to AC DC loads DC loads must be within the limit of 12 V DC 1 A Refer to the following diagram when connecting to AC DC loads CAUTION Risk of electric shock An external relay is necessary to prevent electric shock when connecting to an AC load Connecting Power Connect the supplied power adapter to the 12 V DC power input It is strongly recommended that you use an uninterruptible power ...

Страница 26: ...ng diagram shows a typical HRGX DVR installation Main Monitor VGA Spot Monitor BNC IR Remote Control USB Mouse Support Microphone USB Mobile Device Internet For backing up video clips Multi Site Software Web Browser Alarm Sensor Alarm Out Alarm Input Output Video In Cameras Video Out ...

Страница 27: ...the rear panel of the DVR The POWER LED on the front panel lights solid green when the DVR is receiving power Note The DVR takes approximately 45 seconds to initialize after it is turned on To turn off the DVR Note To shut down the DVR you must be logged in as the admin user or else have shutdown privileges assigned to you 1 In live view mode right click anywhere on the screen to display the short...

Страница 28: ... Note It is strongly recommended that you use the supplied mouse to set up and operate the DVR If you have not already done so plug the mouse into the USB on the rear panel of the DVR 1 The Start wizard when device starts check box is enabled by default If you want to stop the setup wizard from starting each time you turn on the DVR clear the check box 2 Click Next to continue to the next screen ...

Страница 29: ...o create a new password select the New Admin Password check box enter a new password in the New Password field and then re enter the new password in the Confirm field 5 Click Next to continue to the next screen 6 Specify your DVR s network settings If you want to configure the IP address subnet mask default gateway and DNS addresses manually clear the Enable DHCP check box 7 Click Next to continue...

Страница 30: ... to help you determine these settings See also HDD Storage Calculation page 34 9 Specify the recording settings for each camera that is connected to your DVR To copy the same settings to one or more additional cameras click Copy select the check boxes of the channel s that you want to copy the settings to or select the Analog check box to select all the channels and then click OK 10 Click Next to ...

Страница 31: ...ssing the Main Menu Use the following procedure to access the main menu To access the main menu 1 In live view mode right click anywhere on the main monitor screen to display the shortcut menu and then click Menu 2 If prompted enter the DVR s admin password and then click OK The default admin password is 12345 3 In Menu click the submenu you want to open Clip Search Manual HDD Record Camera Settin...

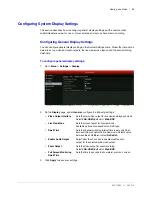
Страница 32: ...me 1 Go to Menu Settings The System Settings window opens 2 On the General page under General configure the following settings 3 Click Apply to save your settings Time Zone Select your time zone from the list Date Format Select MM DD YYYY YYYY MM DD or DD MM YYYY System Date Click the calendar icon to display the on screen calendar and then select the current date System Time Click the clock icon ...

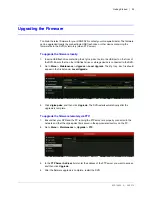
Страница 33: ...e device is connected to the DVR 2 Go to Menu Maintenance Upgrade Local Upgrade The digicap dav file should appear in the file list under Local Upgrade 3 Click digicap dav and then click Upgrade The DVR restarts automatically after the upgrade is complete To upgrade the firmware remotely via FTP 1 Ensure that your DVR and the PC running the FTP server are properly connected to the network and that...

Страница 34: ... estimates storage space usage based on recording one channel for hour at a fixed bit rate Actual usage will vary Bit Rate Kbps Storage Used MB 96 42 128 56 160 70 192 84 224 98 256 112 320 140 384 168 448 196 512 225 640 281 768 337 896 393 1024 450 1280 562 1536 675 1792 787 2048 900 3072 1350 ...

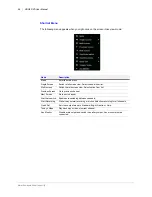
Страница 35: ...owing icons appear in the upper right corner of each channel s screen when the camera is recording and or when an event alarm has been triggered Quick Setting Toolbar The following toolbar appears when you click on a channel in live view mode Indicates video is being recorded This may be a scheduled recording a recording initiated manually by the DVR operator or it may be initiated by motion or a ...

Страница 36: ...multi screen view Select option from list Previous Screen Go to previous channel Next Screen Go to next channel Start Auto switch Enable auto switching between channels Start Recording Start all day normal recording or motion detection recording for all channels Quick Set Set video output mode to Standard Bright Gentle or Vivid Today s Video Play back day s video of current channel Aux Monitor Dis...

Страница 37: ...icking the left mouse button In full screen mode use the scroll wheel on the mouse to switch between channels Moving the scroll wheel up displays the previous channel and moving the scroll wheel down displays the next channel To display video from multiple channels simultaneously 1 Right click anywhere on the screen to display the shortcut menu and then click Multi screen 2 Select a display mode f...

Страница 38: ... on the anticipated lighting conditions for the specified time range next to Mode select one of the following Standard default Indoor Dim Light Outdoor 5 Adjust the following image settings by moving the slider or by clicking the up down arrows Brightness 0 255 Contrast 0 255 Saturation 0 255 Hue 0 255 Sharpness 0 15 De noising 0 5 6 If you want to define different image settings for the remaining...

Страница 39: ...age under General configure the following settings 3 Click Apply to save your settings Video Output Interface Sets the main video output for live view and playback mode Select VGA HDMI default or Main BNC Live View Mode Sets the screen layout for live view mode Available options are dependent on DVR type Dwell Time Sets the channel switching interval time in seconds when auto switching is enabled ...

Страница 40: ...output in live view and the AUDIO OUT is used as the main video output for live view playback or two way audio Setting the Camera Order You can set the order in which the cameras appear on screen in live view mode in the System Settings menu To set the camera order 1 Go to Menu Settings Display View 2 In the Video Output Interface list select VGA HDMI or Main BNC as your main video output 3 Select...

Страница 41: ...view for a single camera double click the camera name The camera icon changes to yellow To disable live view for a single camera double click the camera name again or click the in the corresponding screen The camera icon changes to white To enable live view for all cameras click the play button The camera icons for all cameras change to yellow To disable live view for all cameras click the stop bu...

Страница 42: ...e quality To enable channel zero encoding 1 Go to Menu Settings Display Channel Zero Encoding 2 Select the Enable Channel Zero Encoding check box 3 Configure the following settings 4 Click Apply to save your settings To disable channel zero encoding 1 In System Settings on the Display page click the Channel Zero Encoding tab 2 Clear the Enable Channel Zero Encoding check box and then click Apply F...

Страница 43: ...utomatically cycling through each channel The period of time each channel s video feed appears on the screen is determined by the dwell time you specified in the Display Settings To stop cycling through all the channels Right click anywhere on the screen to display the shortcut menu and then click Stop Auto switch Main Aux Output Switching You can access certain live view mode features using an au...

Страница 44: ...splay the shortcut menu and then click Digital Zoom The picture on the screen is magnified by 4 times and the normal screen view appears as an inset window in the lower right corner of the screen The magnified area is indicated by a red frame 2 In the inset window drag the red frame to the area of the screen you want to zoom in on To exit digital zoom mode Right click anywhere on the screen and th...

Страница 45: ...u can control a connected PTZ camera in live view mode using the on screen PTZ control interface You can access this interface in live view mode by clicking the PTZ Control button on the quick setting toolbar see Quick Setting Toolbar page 35 Zoom Zoom Focus Focus Iris Iris Speed Direction Buttons Auto Cycle Button Enter PTZ Settings Menu Camera Preset Patrol Pattern List Light On Off Wiper On Off...

Страница 46: ...o Menu Camera PTZ General 2 Configure the following settings 3 To copy the same settings to one or more additional PTZ cameras click Copy select the channel s that you want to copy the settings to or click Analog to select all channels and then click OK 4 Click Apply to save your settings Camera Select the PTZ camera you want to configure settings for Baud Rate Select your PTZ camera s baud rate s...

Страница 47: ...akes place To program a preset 1 Go to Menu Camera PTZ More Settings 2 Use the direction buttons to point the camera at the location where you want to set the preset 3 Click Save Preset and then click the number you want to assign to the preset For example clicking 1 will save the preset as Preset 1 clicking 2 will save the preset as Preset 2 and so on 4 Repeat steps 2 and 3 to save more presets Y...

Страница 48: ...ext in a specific order and define the length of time the camera remains at each preset This is called a patrol You can program up to 3 patrols To program a patrol 1 Go to Menu Camera PTZ More Settings 2 Select the patrol you want to program from the patrol list Patrol 1 Patrol 2 or Patrol 3 3 Click the Add KeyPoint button The KeyPoint window opens ...

Страница 49: ... Repeat steps 3 to 5 to add more key points To delete a key point from the list click the Clear button next to the preset name Preset Select the preset you want to assign to this key point Duration Select the time in seconds that you want the camera to remain at this key point Speed Select the speed at which you want the camera to move to this key point ...

Страница 50: ...n program up to 3 patterns To program a pattern 1 Go to Menu Camera PTZ More Settings 2 Select the pattern you want to program from the pattern list Pattern 1 Pattern 2 or Pattern 3 3 Click the Record button 4 Drag the mouse over the live image or alternatively use the direction buttons to define the desired path of the PTZ camera 5 Click the Save button to save the path as the selected pattern 6 ...

Страница 51: ...lay the quick setting toolbar see Quick Setting Toolbar page 35 2 On the toolbar click the PTZ Control button 3 In the on screen PTZ control interface under Camera select your PTZ camera from the list 4 Click Preset to view the list of presets and then click the preset you want to call To call a preset in the PTZ configuration interface 1 Go to Menu Camera PTZ More Settings or click Configuration ...

Страница 52: ...ect your PTZ camera from the list 4 Click Patrol to view the list of patrols and then click the patrol you want to call 5 Click the start button to start the patrol To stop the patrol click the stop button To call a patrol in the PTZ configuration interface 1 Go to Menu Camera PTZ More Settings or click Configuration in the PTZ control interface 2 Select the patrol you want to call from the drop d...

Страница 53: ...our PTZ camera from the list 4 Click Pattern to view the list of patterns and then click the pattern you want to call 5 Click the start button to start the pattern To stop the pattern click the stop button To call a pattern in the PTZ configuration interface 1 Go to Menu Camera PTZ More Settings or click Configuration in the PTZ control interface 2 Select the pattern you want to call from the drop...

Страница 54: ...www honeywell com security 54 HRGX DVR User Manual ...

Страница 55: ...hannel In live view mode click on a channel to display the quick setting toolbar and then click the Start recording button to start recording video from the channel To stop recording video from the channel click the Stop recording button To start all day normal recording of all channels In live view mode right click anywhere on the screen to display the shortcut menu click Start Recording and then...

Страница 56: ...guring a Record Schedule You can set channels to start or stop recording according to a defined schedule To configure the schedule 1 Go to Menu Record Schedule 2 Select the camera you want to configure the schedule for 3 Select the Enable Schedule check box ...

Страница 57: ...me periods Note You must configure the alarm input and or motion detection settings before selecting an event recording type Motion Alarm Motion Alarm Motion Alarm See Chapter 8 Configuring Alarm Settings 7 To copy these settings to one or more additional days click Copy to open the Copy to window select the days s you want to copy the settings to or click All to copy the settings to all days and ...

Страница 58: ...on twice next to Analog to enable manual recording for all channels By default the channels are set to recording by schedule green ON Clicking the status button once turns off recording red OFF and clicking it again changes the recording status to recording by manual operation yellow ON To start all day normal recording of all channels In Menu Record next to Normal click The message Start all day ...

Страница 59: ...it button The Edit window opens 4 Configure the following settings 5 Click Apply to save your settings and then click OK 6 Set the recording schedule for the holiday See Configuring a Record Schedule page 56 Holiday Name Enter the name of the holiday Enable Select clear the check box to enable disable this setting Mode Select By Date By Week or By Month Start Date Select the start date for the set...

Страница 60: ...for 3 Configure the following encoding parameters for Main Stream Normal and Main Stream Event Stream Type Set the stream type to Video or Video Audio Resolution Set the recording resolution to one of the following settings WD1 4CIF 2CIF CIF or QCIF Bitrate Type Set the bitrate type to Variable or Constant Video Quality Set the recording video quality 6 levels configurable Frame Rate Set the recor...

Страница 61: ...r a scheduled recording time or event Expired Time day The expired time is the longest time a record file can be kept in the HDD After this the file is deleted If the expired time is set to 0 the file will not be deleted The actual keeping time for the file should be determined by the capacity of the HDD Redundant Record This option is only available when the HDD storage mode is set to Group Selec...

Страница 62: ... to copy the settings to all cameras and then click OK 5 Click Apply to save your settings 6 To restore the current substream settings to the default parameters click Restore Stream Type Set the stream type to Video or Video Audio Resolution Set the recording resolution to one of the following settings WD1 4CIF 2CIF CIF or QCIF Bitrate Type Set the bitrate type to Variable or Constant Video Qualit...

Страница 63: ... HDD Information select the HDD you want to configure as the redundant HDD and then click the Edit button to open the Local HDD Settings window 3 Click Read only click Apply to save the setting and then click OK 4 Go to Menu Record Encoding Record 5 In the Camera list select the camera you want to record to both the R W and Read only HDDs 6 Select the Redundant Record check box 7 To copy these set...

Страница 64: ...ecorded video files 1 Go to Menu Clip Search Normal 2 Under Normal select the channel s you want to search or click Analog to select all the channels 3 Configure the following search parameters Note The start and end search points must fall within the range listed next to Start End time of record Record Type Select one of the following recording types Normal Motion Alarm Motion Alarm Motion Alarm ...

Страница 65: ...u want to edit and then click the Edit button to open the Local HDD Settings window 3 Click Read only click Apply to save the setting and then click OK Note If you want to save files to the HDD change the property to R W If there is only one HDD and it is set to Read only the device will not record any files Only live view mode will be available If you set the HDD to Read only while the device is ...

Страница 66: ...www honeywell com security 66 HRGX DVR User Manual ...

Страница 67: ...ons Searching and Playing Back Video by Channel page 68 Searching and Playing Back Video by Time page 70 Searching and Playing Back Video by Event page 72 Searching and Playing Back Video by Tag page 74 Searching and Playing Back Video by System Log page 75 Playback Operations page 76 ...

Страница 68: ...g toolbar 2 On the toolbar click the Instant Playback button The channel begins playing back video from the last five minutes You can use the on screen playback controls to move backwards or forwards through the video or to pause playback 3 To return to live view mode click the Exit button To search and play back video from the current day or other dates 1 Right click a channel in live view mode t...

Страница 69: ...d indicates event recording 3 Control playback using the control panel at the bottom of the screen Drag the yellow indicator to the desired playback point in the timeline 4 To close the playback interface click the Exit button Audio on off Clipping start stop Add default tag Add customized tag Tag management Go to date time Play reverse Stop Pause Play 30s reverse 30s forward Slow down Speed up Pr...

Страница 70: ... next to Start End time of record 4 Do one of the following To view the time ranges and record types of the video matching your search parameters click Detail Click Previous or Next to see information for the previous or following day Click Back to close the window To play back video matching your search parameters from the earliest point click Playback The video begins playing in the playback int...

Страница 71: ...To search for a specific video file to play back click Search The Search result window opens displaying a list of search results Select the video file that you want to view and then click Play The video begins playing in the playback interface ...

Страница 72: ...ck video by event 1 Go to Menu Clip Search Event 2 Under Event configure the following search parameters 3 Do one of the following If Alarm Input was selected as the event type select the alarm input s you want to search from the list or click Alarm Input No to select all the alarm inputs If Motion was selected as the event type select the channel s you want to search from the list or click Analog...

Страница 73: ...nt information found appears 5 Select the clips s you want to view and then click the Play button If you want you can adjust the Pre play and Post play settings By default playback starts 30 seconds before the start of the event and continues 30 seconds past the end of the event To view the file details start time end time file size click Details ...

Страница 74: ... by tag 1 Go to Menu Clip Search Tag 2 Under Tag select the channel s you want to search or click Analog to select all the channels 3 Configure the following search parameters Tag Type Select Tag Keyword or All Tag Keyword If Tag Keyword was selected as the tag type enter the tag keyword you want to search for Start Time Select the date and time for the start point of the search End Time Select th...

Страница 75: ...he Play button If you want you can adjust the Pre play and Post play settings By default playback starts 30 seconds before the tag and continues 30 seconds after the tag To edit the tag name click the Edit button Enter a new name in the Tag Name field and then click OK To delete the tag click the Delete button Searching and Playing Back Video by System Log See Searching and Exporting Log Files pag...

Страница 76: ...at you may want to return to later see Searching and Playing Back Video by Tag page 74 To add a default non editable tag 1 In the playback interface select the point in the video where you want to add a tag by using the controls on the playback control panel for example drag the yellow indicator to the desired insertion point in the timeline 2 On the playback control panel click the Add default ta...

Страница 77: ...ick the Delete button Using Digital Zoom You can use the digital zoom function during playback to enlarge an area of the on screen image To use digital zoom during playback 1 In the playback interface right click on the screen to display the shortcut menu and then click Digital Zoom The picture on the screen is magnified by 4 times and the normal screen view appears as an inset window in the lower...

Страница 78: ...rch area To set a portion of the screen as the smart search area drag the mouse over the area of the scene you want to search You can set multiple smart search areas To set the whole screen as the smart search area click the Full Screen Detection button on the on screen toolbar The smart search area is indicated by a red grid 3 Click the Search button on the on screen toolbar The search results ar...

Страница 79: ...o a USB flash drive or other external storage device You can search for video by date and time or by event motion detection and or alarm To export recorded video files 1 Insert a USB flash drive or other external storage device into the USB port on the front of the DVR 2 Go to Menu Clip Search Normal 3 On the Normal page under Normal select the channel s you want to search or click Analog to selec...

Страница 80: ...esults 6 Select the file s that you want to export and then click Export The Export window opens 7 Click Export to save the file s to the storage device Record Type Select one of the following recording types Normal Motion Alarm Motion Alarm Motion Alarm Manual or All File Type Select one of the following file types Unlocked Locked or All Start Time Select the date and time for the start point of ...

Страница 81: ... panel to create one or more video clips See Creating Video Clips page 76 2 Close the playback interface The following message appears There are some video clips to be saved Do you want to save them now Click Yes The Export window opens 3 If you have not already done so insert a USB flash drive or other external storage device into the USB port on the DVR and then click Refresh 4 Click Export to s...

Страница 82: ...www honeywell com security 82 HRGX DVR User Manual ...

Страница 83: ...puts page 84 Configuring Alarm Outputs page 87 Configuring Motion Detection Settings page 89 Configuring Video Tampering Detection Settings page 92 Configuring Video Loss Detection Settings page 94 Configuring Exception Settings page 96 Configuring Email Settings page 97 Configuring Remote Alarm Host Settings page 99 ...

Страница 84: ...Video Recording Video begins recording on the triggered channel Full Screen Monitoring The monitor displays full screen video from the triggered channel When multiple channels are triggered simultaneously the images switch at regular intervals the default dwell time is 10 seconds Audio Alarms An audible beep sounds Surveillance Center Notification A signal is sent to a remote alarm host See Config...

Страница 85: ...he channels and then click Apply to save your settings Note To automatically start recording video on the channel when an alarm input event is detected you must set the recording schedule to Alarm Motion Alarm or Motion Alarm See Configuring a Record Schedule page 56 b Click the Arming Schedule tab to set the arming schedule of the alarm input You can set up to eight time periods per day the time ...

Страница 86: ...ng tab to set the PTZ linkage of the alarm input Select the preset patrol or pattern you want to call when the alarm input generates an alarm signal click Apply to save your settings and then click OK to close the window 7 To copy these settings to one or more additional alarm inputs click Copy to open the Copy Alarm Input to window select the alarm input s you want to copy the settings to or clic...

Страница 87: ...om the Alarm Output No drop down list 3 If you want in the Alarm Name field enter a descriptive name for the alarm output 4 Next to Dwell Time set the alarm output dwell time in seconds Select a value between 5 seconds and 600 seconds 10 minutes or select Manually Clear Note If the alarm output dwell time is set to Manually Clear you must go to Menu Manual Alarm to clear the alarm Select the alarm...

Страница 88: ...r overlap To copy the arming schedule to other days of the week click Copy Click Apply to save your settings 6 To copy these settings to one or more additional alarm outputs click Copy to open the Copy Alarm Output to window select the alarm output s you want to copy the settings to or click Alarm Output No to copy the settings to all alarm outputs and then click OK 7 Click Apply to save your sett...

Страница 89: ...ion area click Clear and then drag the mouse over the area you want to detect motion in on the preview window Video Recording Video begins recording on the triggered channel Full Screen Monitoring The monitor displays full screen video from the triggered channel When multiple channels are triggered simultaneously the images switch at regular intervals the default dwell time is 10 seconds Audio Ala...

Страница 90: ...otion is detected or click Analog to select all the channels and then click Apply to save your settings Note To automatically start recording video on the channel when motion is detected you must set the recording schedule to Motion Motion Alarm or Motion Alarm See Configuring a Record Schedule page 56 b Click the Arming Schedule tab to set the arming schedule You can set up to eight time periods ...

Страница 91: ...ing to the action s you want to enable click Apply to save your settings and then click OK to close the window 7 To copy these settings to one or more additional channels click Copy to open the Copy to window select the channel s you want to copy the settings to or click Analog to copy the settings to all channels and then click OK 8 Click Apply to save your settings ...

Страница 92: ...ng Detection check box 4 Click the Handling button to set up the alarm response actions The Handling window opens Full Screen Monitoring The monitor displays full screen video from the triggered channel When multiple channels are triggered simultaneously the images switch at regular intervals the default dwell time is 10 seconds Audio Alarms An audible beep sounds Surveillance Center Notification ...

Страница 93: ... when video tampering is detected Select the check box corresponding to the action s you want to enable click Apply to save your settings and then click OK to close the window 5 Drag the Sensitivity slider to set the desired sensitivity level 3 levels configurable 6 To copy these settings to one or more additional channels click Copy to open the Copy to window select the channel s you want to copy...

Страница 94: ...ing button to set up the alarm response actions The Handling window opens Full Screen Monitoring The monitor displays full screen video from the triggered channel When multiple channels are triggered simultaneously the images switch at regular intervals the default dwell time is 10 seconds Audio Alarms An audible beep sounds Surveillance Center Notification A signal is sent to a remote alarm host ...

Страница 95: ...dling tab to set the action s you want to occur when video loss is detected Select the check box corresponding to the action s you want to enable click Apply to save your settings and then click OK to close the window 5 To copy these settings to one or more additional channels click Copy to open the Copy to window select the channel s you want to copy the settings to or click Analog to copy the se...

Страница 96: ... Select one or more of the following alarm responses for the exception s 4 Click Apply to save your settings HDD Full The DVR s hard disk drive HDD is full HDD Error The HDD has experienced a writing or formatting error Network Disconnected The network cable is disconnected IP Conflicted There is an IP address conflict Illegal Login An incorrect user name or password was entered Input Output Video...

Страница 97: ...ed to a local intranet or the Internet depending on the location of the email accounts you want to notify To configure email settings 1 Go to Menu Settings Network Email 2 Configure the following settings Enable Server Authentication Optional Select the check box to enable server authentication Clear the check box to disable it User Name Sender s email address For example my hrgx dvr gmail com Pas...

Страница 98: ...ender For example My HRGX DVR Sender s Address Enter the email address of the sender For example my hrgx dvr gmail com Select Receivers Select the receiver to be notified You can configure up to 3 receivers Receiver Enter the name of the receiver you have selected Receiver s Address Enter the email address of the receiver you have selected Enable Attached Picture Select the check box to attach ala...

Страница 99: ...tware installed on it such as Multi Site 4200 To configure a remote alarm host 1 Go to Menu Settings Network More Settings 2 In the Alarm Host IP and Alarm Host Port fields enter the IP address and port of the remote alarm host The Alarm Host IP refers to the IP address of the remote PC on which Multi Site 4200 or other CMS software is installed The Alarm Host Port must be the same as the alarm mo...

Страница 100: ...www honeywell com security 100 HRGX DVR User Manual ...

Страница 101: ...04 2014 9 Configuring Network Settings 9 This chapter contains the following sections Configuring General Network Settings page 102 Configuring Advanced Network Settings page 103 Managing Network Settings page 109 ...

Страница 102: ...save your settings NIC Type Select your network interface controller type from the list Enable DHCP DHCP is enabled by default To disable it clear the check box IPv4 IPv6 and DNS If DHCP is disabled manually enter your DVR s network settings MTU Bytes Select a value between 500 and 1500 Default setting is 1500 Bandwidth Throttle Select a value between 1Mbps and 30Mbps or select None Server Port Us...

Страница 103: ...X supports Point to Point Protocol over Ethernet PPPoE network connections To configure PPPoE settings 1 Go to Menu Settings Network PPPOE 2 Select the Enable PPPOE check box to enable a PPPoE network connection 3 In the User Name and Password fields enter the user name and password assigned by your Internet service provider for PPPoE access 4 Click Apply to save your settings and then restart the...

Страница 104: ... default 4 In the Server Address field enter the server address of the DDNS service If you selected DynDNS as the DDNS type enter members dyndns org If you selected hrgDDNS as the DDNS type enter www hrgdvr ddns com 5 In the Device Domain Name field do one of the following If you selected DynDNS as the DDNS type enter the domain name hostname that you created on the DynDNS website for example hrgx...

Страница 105: ...nu Settings Network NTP 2 Select the Enable NTP check box to enable time synchronization with an NTP server 3 Configure the following settings 4 Click Apply to save your settings Interval min Sets the time interval in minutes between two synchronizing actions with the NTP server Select a value from 1 to 10080 The default value is 60 NTP Server Enter the IP address of the NTP server NTP Port Enter ...

Страница 106: ...e information via SNMP To configure SNMP settings 1 Go to Menu Settings Network SNMP 2 Select the Enable SNMP check box to enable this feature 3 Configure the following settings SNMP Version SNMP Port Read Community Write Community Trap Address and Trap Port Note By setting the trap address you are allowing the device to send alarm event and device exception notification messages to the surveillan...

Страница 107: ...he DVR is set as multi address the Default Route should be in the same network segment as the LAN IP address of the router To configure UPnP settings 1 Go to Menu Settings Network UPnP 2 Select the Enable UPnP check box to enable Universal Plug and Play on your DVR 3 Set Mapping Type to Auto or Manual When Auto is selected the mapping ports are automatically assigned by the router When Manual is s...

Страница 108: ...multicast 1 Go to Menu Settings Network More Settings 2 In the Multicast IP field enter a multicast address for the DVR It is recommended that you use an IP address in the range of 239 252 0 0 to 239 255 255 255 Note When adding a device using Multi Site 4200 or other CMS software the multicast address must be the same as the multicast IP of the DVR 3 Click Apply to save your settings ...

Страница 109: ...ng Network Traffic and Bandwidth You can view real time information about the network including linking status MTU sending receiving rate and bandwidth statistics for remote live view remote playback and net total idle To view network traffic data Go to Menu Maintenance Net Detect Traffic You can view the sending and receiving rate You can also view the linking status and MTU size below the graph ...

Страница 110: ...R User Manual To view network bandwidth data 1 Go to Menu Maintenance Net Detect Network Stat Bandwidth information for remote live view remote playback and net total idle is displayed 2 Click Refresh to view the latest bandwidth statistics ...

Страница 111: ...n the Destination Address field enter the IP address of the packet destination 3 Click Test button to start testing network delay and packet loss A message will appear telling you whether the test succeeded or failed To view network status 1 Go to Menu Maintenance Net Detect Network Detection 2 Click Status to check the network status If the network is operating normally the message Network status...

Страница 112: ...device To export a network packet 1 Go to Menu Maintenance Net Detect Network Detection 2 Under Network Packet Export select your external storage device from the Device Name drop down list If your device is not displayed click Refresh to refresh the list 3 Click Export 4 After the export process is complete click OK You can export up to 1 MB of data each time ...

Страница 113: ...r contains the following sections Viewing HDD Status page 114 Adding a Network HDD page 115 Configuring HDD Groups page 117 Configuring Recording Quotas page 119 Configuring S M A R T Testing page 120 Detecting Bad Sectors page 121 Configuring HDD Alarms page 122 ...

Страница 114: ...us of each installed HDD is displayed If the status of the HDD is listed as Normal or Sleeping then the HDD is working correctly If the status is listed as Uninitialized or Abnormal initialize the HDD select the HDD and click Init This will erase all data on the hard disk If the initialization fails replace the HDD You can also view the HDD status in the System Maintenance menu See Viewing System ...

Страница 115: ...an add up to 8 NAS devices or 7 NAS devices 1 SAN device To add a network HDD 1 Go to Menu HDD General 2 Click Add to open the Add NetHDD window 3 In the NetHDD list select the NetHDD you want to add 4 Set the Type to NAS or IP SAN 5 In the NetHDD IP Address field enter the IP address of the NAS or SAN device 6 Do one of the following For NAS enter the directory of the NAS disk in the NetHDD Direc...

Страница 116: ...lick OK to add the disk as the selected network HDD The newly added network HDD is displayed in the lists of HDDs on the General page 8 If the status of the newly added network HDD shows as Uninitialized select the HDD and then click Init to initialize the HDD The HDD must be initialized before it can be used To delete a network HDD In Menu HDD General select the HDD you want to delete from the li...

Страница 117: ...ou can set the property of an HDD to R W Read only or Redundancy To set up an HDD group 1 Go to Menu HDD Advanced 2 Under Storage Mode set the Mode to Group and then click Apply 3 Restart the DVR for the change to take effect 4 Go to Menu HDD General 5 Select an HDD from the list and then click the Edit button to open the Local HDD Settings window ...

Страница 118: ...ly to save your settings click Yes to confirm and then click OK to close the window R W Read write The default setting Read only When the HDD is set to read only the recorded files are not overwritten when the HDD becomes full in overwrite recording mode Redundancy When the HDD is set to redundancy video can be recorded both onto the redundancy HDD and the R W HDD simultaneously for additional sec...

Страница 119: ...e set the Mode to Quota 3 In the Camera list select the camera you want to configure a recording quota for 4 In the Max Record Capacity GB field enter the maximum storage limit for the camera in gigabytes If the value is left as 0 then all cameras will use the total capacity of the HDD for recording 5 To copy these settings to one or more additional cameras click Copy to open the Copy to window se...

Страница 120: ...sues To set up a S M A R T test 1 Go to Menu HDD HDD Detect S M A R T Settings 2 Select the HDD you want to test from the HDD drop down list 3 To continue using the HDD even it fails the self test select the Continue to use this disk when self evaluation is failed check box 4 In the Self test Type list select one of the following options Short Test Expanded Test Conveyance Test 5 Click the S M A R...

Страница 121: ...section describes how to detect and repair bad sectors To detect a bad sector 1 Go to Menu HDD HDD Detect Bad Sector Detection 2 Select the HDD you want to scan from the HDD No drop down list and then click Detect You can pause resume or cancel the detection process at any time 3 When the detection process has completed click Error info to view any error information ...

Страница 122: ...Manual Configuring HDD Alarms You can set up the DVR to generate alarm responses such as an audible warning or notification email when the hard disk drive is full or when an error is detected See Configuring Exception Settings page 96 for details ...

Страница 123: ...s Configuring OSD Settings page 123 Configuring Image Settings page 125 Configuring Privacy Masks page 127 Configuring OSD Settings You can customize the appearance and location of on screen display OSD text such as the date time and camera name To configure the OSD settings 1 Go to Menu Camera OSD ...

Страница 124: ...era you want to configure OSD settings for by clicking a number from the drop down list Camera Name If you want you can enter a descriptive name for the camera for example Front Door instead of Camera 01 Display Name To display the camera name on screen select the check box To hide the camera name clear the check box Display Date To display the date on screen select the check box To hide the date ...

Страница 125: ...e that you want to configure the image settings for such as 07 00 19 00 4 Based on the anticipated lighting conditions for the specified time range next to Mode select one of the following Standard default Indoor Dim Light Outdoor 5 Adjust the following image settings by moving the slider or by clicking the up down arrows Brightness 0 255 Contrast 0 255 Saturation 0 255 Hue 0 255 Sharpness 0 15 De...

Страница 126: ...o copy the settings to or click Analog to copy the settings to all cameras and then click OK 8 Click Apply to save your settings To restore the default camera image settings In Menu Camera Image click Restore Configuring PTZ Connection Settings See Configuring PTZ Connection Settings page 46 Configuring Motion Detection Settings See Configuring Motion Detection Settings page 89 ...

Страница 127: ...f the scene from the view of the operator To add a privacy mask zone 1 Go to Menu Camera Privacy Mask 2 Select the camera you want to create a privacy mask for by clicking a number in the Camera drop down list 3 Select the Enable Privacy Mask check box 4 Drag the mouse over the area you want to mask on the preview window to draw a privacy mask zone You can mask up to four areas ...

Страница 128: ...he camera s you want to copy the settings to or click Analog to copy the settings to all cameras and then click OK 6 Click Apply to save your settings To remove a privacy mask zone 1 In Menu Camera Privacy Mask click the Clear Zone button corresponding to the zone s you want to remove or click Clear All to clear all zones 2 Click Apply to save your settings ...

Страница 129: ...ttings 129 800 16694 A 04 2014 Configuring Video Tampering Detection Settings See Configuring Video Tampering Detection Settings page 92 Configuring Video Loss Settings See Configuring Video Loss Detection Settings page 94 ...

Страница 130: ...www honeywell com security 130 HRGX DVR User Manual ...

Страница 131: ...e following sections Configuring General System Settings page 132 Viewing System Information page 134 Searching and Exporting Log Files page 137 Exporting and Importing Configuration Files page 139 Upgrading the Firmware page 140 Restoring the Default Settings page 141 ...

Страница 132: ...esolution Select 1024 768 60HZ 1280 720 60HZ 1280 1024 60HZ or 1920 1080 60HZ 1080P Must be same as monitor screen resolution Time Zone Sets the time zone Select your time zone from the list Date Format Sets the date format Select MM DD YYYY YYYY MM DD or DD MM YYYY System Date Sets the system date Click the calendar icon to display the on screen calendar and then select the current date System Ti...

Страница 133: ...e your settings Device Name Sets the device name Enter a name for the device Device Number Sets the device s serial number If you want enter a number for the device between 1 and 255 The default number is 255 Output Brightness Sets the video output brightness Drag the slider to select the desired brightness 10 levels configurable Operation Timeout Sets the duration of menu inactivity before the sy...

Страница 134: ...D To view device information Go to Menu Maintenance System Info Device Info The device name model serial number firmware version encoding version and MAC address are displayed To view camera information Go to Menu Maintenance System Info Camera Information for each camera including its name activity status motion detection status video tampering detection status and video loss status is displayed ...

Страница 135: ...it rate resolution record type encoding parameters and redundant record status are displayed To view alarm input information Go to Menu Maintenance System Info Alarm Details for the alarm inputs and alarm outputs including alarm type normally open or normally closed alarm status and triggered cameras are displayed Note You can also view the alarm status by going to Menu Settings Alarm Alarm Status...

Страница 136: ...k The DVR s network settings including IP address subnet mask default gateway DNS server addresses DHCP and PPOE settings are displayed To view HDD information Go to Menu Maintenance System Info HDD The hard disk drive details including the label name status capacity free space read write properties type and group are displayed ...

Страница 137: ...ny time To search log files 1 Go to Menu Maintenance Log Search Log Search 2 Set the log search parameters including Start Time End Time Major Type and Minor Type 3 Click Search to start searching log files A list of log files matching the search parameters is displayed 4 To view a log file s details double click the log file or click the log file s button The Log Information window opens ...

Страница 138: ...6 Click Export to save the log file s to the connect external storage device To export all log files stored on the HDD 1 Go to Menu Maintenance Log Search Log Export 2 Insert a USB flash drive or other external storage device into the USB port on the front of the DVR 3 Select your HDD from the list and then click Export The Export window opens 4 If you want you can click New Folder to create a new...

Страница 139: ... the front of the DVR 2 Go to Menu Maintenance Configuration 3 Click Export to export configuration files to the connected external storage device The message Export succeeded appears and the file is added to the file list To import a configuration file 1 Insert a USB flash drive or other external storage device containing a configuration file into the USB port on the front of the DVR 2 Go to Menu...

Страница 140: ...device is connected to the DVR 2 Go to Menu Maintenance Upgrade Local Upgrade The digicap dav file should appear in the file list 3 Click digicap dav and then click Upgrade The message System will reboot automatically after upgrading completed Continue appears Click Yes To upgrade the firmware remotely via FTP 1 Ensure that your DVR and the PC running the FTP server are properly connected to the n...

Страница 141: ...Settings You can restore your all of your DVR s settings including user and network settings to their factory defaults To restore the default settings 1 Go to Menu Maintenance Default 2 If you want to restore user and network settings to their default settings select the Include user and network settings check box Otherwise the current user and network settings will not be changed 3 Click OK to re...

Страница 142: ...www honeywell com security 142 HRGX DVR User Manual ...

Страница 143: ...edit user account permissions There are three types of user accounts available Administrator The administrator account has unlimited access to the DVR user interface Operator An operator account has the following default permissions local and remote camera operation including PTZ camera operation local and remote camera playback remote two way audio local video export and local and remote log sear...

Страница 144: ...figure the following settings 4 Click OK to save your settings and close the window The user is added to the list of users User Name Enter the user name Password Enter the password Confirm Re enter the password Level Select Operator or Guest User s MAC Address If the user is logging in to the DVR remotely enter the MAC address of the user s PC The user must log in from this MAC address to access t...

Страница 145: ...export configuration files Local Advanced Operation Manage HDD initialize HDD set HDD property upgrade system firmware clear I O alarm output Local Shutdown Reboot Shut down or reboot the DVR Remote Configuration Remote Log Search Remotely view logs saved on the device Remote Parameters Settings Remotely configure parameters restore factory defaults and import export configuration files Remote Ser...

Страница 146: ...cally control PTZ movement of the selected camera s Remote PTZ Control Remotely control PTZ movement of the selected camera s Local Video Export Locally export recorded files of the selected camera s Note Select the specific camera s for which each operation permission is configured or select the Analog check box to select all cameras 5 Click Apply to save your settings and then click OK to close ...

Страница 147: ...to Menu Settings User 2 Select from the list of users the user you want to delete 3 Click the Delete button to delete the user The message Delete this user appears Click Yes Changing the Admin Password If you are logged in as the admin user you can change the admin password To change the admin password 1 Go to Menu Settings User ...

Страница 148: ... window 3 In the Old Password field enter the old admin password The default admin password is 12345 4 Select the Change Password check box 5 In the Password field enter the new admin password 6 In the Confirm field re enter the new admin password 7 Click Apply to save your settings and then click OK to close the window ...

Страница 149: ......
Страница 150: ...ity Products Americas Caribbean Latin America 9315 NW 112th Ave Miami FL 33178 USA www honeywell com security clar 1 305 805 8188 Honeywell Security Asia Pacific 35F Tower A City Center 100 Zun Yi Road Shanghai 200051 China www asia security honeywell com 86 21 2219 6888 Honeywell Security Middle East N Africa Emaar Business Park Sheikh Zayed Road Building No 2 Office No 301 Post Office Box 232362...

Отзывы: