


Rev A
11
Document 800-04354
04/09
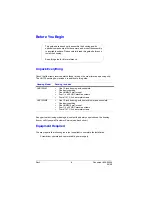
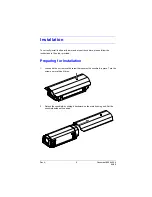
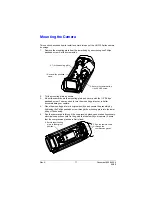
Mounting the Camera
This section describes how to install a camera into any of the HHC12 Series camera
housings.
1.
Remove the mounting plate from the lower body by unscrewing one Philips
panhead screw. Set the screw aside.
2.
Tilt the mounting plate as shown.
3.
Mount the camera onto the mounting plate and secure with the 1/2” Philips
panhead screw. You may need to turn the mounting plate over to better
accommodate your camera.
4.
Place the mounting plate in its original position and secure the assembly by
tightening the Philips panhead screw through the mounting plate into the lower
body of the housing.
5.
Run the camera cable through the compression glands and make all necessary
electrical connections (refer to the guide that came with your camera). Ensure
that the compression glands are firmly fixed.
1. Unscrew the panhead
screw.
2. Tilt the mounting plate.
3. Secure the camera with a
1/4 x 20 UNC screw.
5. Run the camera cable
through the
compression glands.
4. Return the mounting
plate to the original
position.


