4. Set Up and Calibration Procedures - Calibration
Revision 5
10260S HercuLine® Actuator Installation, Operation and Maintenance Manual
65
7/07
Table 27 Non Contact Sensor Calibration Procedure
Step
Action
1
Remove AC power to the actuator.
2
Remove the seven screws and the extended cover from the actuator case. See Figure 2.
Lay extended cover assembly on a flat surface.
3
Reapply AC power to the actuator.
4
Press SET UP key to access the INPUT set up group.
Press FUNCTION key until the lower display reads Direct.
Press the
or
keys to set Actuator Rotation direction to CCW.
NOTE: Actuator direction must be set to CCW for this procedure. Direction can be changed
after calibration is complete.
5
Drive the actuator to the 50% position (this refers to the position on the actuator scale for CCW
rotation). This should be done manually with the handwheel or with the AUTO - MANUAL
switch.
6
Press SET UP key until the display reads CAL POSOUT.
Press the FUNCTION key until the dispaly reads DIS CALPOS.
Press the
or
keys until the lower display reads BEGN CALPOS.
Press FUNCTION key.
The upper display now shows the output of the non-contact sensor PWA in Volts.
7
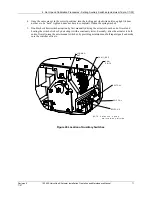
Loosen the allen screw in the hub of the NCS spoiler just enough to be able to rotate the
spoiler. See Figure 19.
8
Adjust the NCS spoiler so that the voltage in the local display is 2.500 + or – 0.020 volts dc.
The allen screw should be almost in a vertical position. The bottom edge of the spoiler should
almost be horizontal in relation to the NCS PWA. See Figure 19.
9
Tighten NCS spoiler set screw with an allen wrench, holding spoilers located on each side of
the NCS PWA in position.
IMPORTANT
: Spoilers need to be held in position both rotationally and longitudinally along
the drive shaft extension. An air gap must be maintained between the surface of the PWA and
each spoiler. (Any plastic or paper insulating material may be used to create this gap while
positioning the spoilers). Make sure that neither spoiler is touching the sensor PWA when the
adjustment is complete.
10
Press DISPLAY key to exit calibration mode.
11
Remove AC power to the actuator.
Содержание HercuLine 10260S
Страница 10: ......
Страница 94: ......
Страница 121: ......
Страница 122: ...Honeywell Field Solutions Honeywell Inc 512 Virginia Drive Fort Washington PA 19034 ...


