background image

EKM-E ETHER-MON KEY DE-211

29

31-00160—01

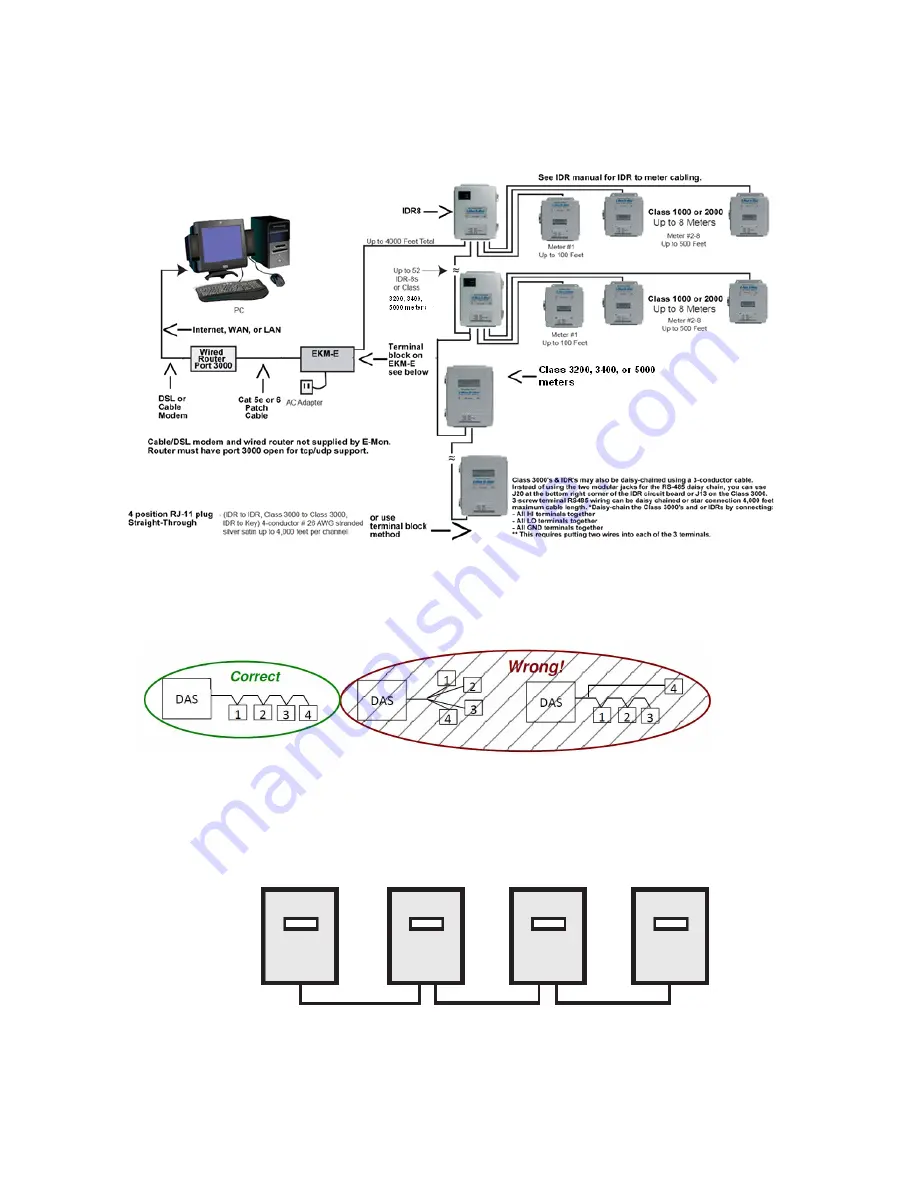
EZ7 RS485 WIRING TYPICAL INSTALLATION

Fig. 50. 

Daisy Chain configuration shown in figure 2 on the left is correct, Star connection on the right is incorrect. 

Fig. 51. 

Correct Daisy Chain Configuration

Fig. 52. 


Содержание E-Mon E10039

Страница 1: ...Switch Pre and Post Configuration 7 Ethernet Configuration 8 Installing the Moxa software NPort Utility 9 Connecting the E10039 to a PC 13 EZ7 RS485 Wiring Typical Installation 29 Correct Daisy Chain Configuration 29 2 Wire RS 485 Terminal Block Wiring 31 EZ7 RS485 Wiring 32 Typical Cable Part Numbers 33 Enabling Termination Resistor 34 Honeywell E Mon Recommends Enabling the Built In 120 Ω Termin...

Страница 2: ... TCP IP network Since the host communicates with the COM port on NPort Express over a TCP IP network you are able to control your asynchronous serial device from virtually any location FEATURES 2 in 1 EZ7 RS 485 interface and 10 Mbps Ethernet Supports 2 wire EZ7 RS 485 with patented ADDC and built in terminator Terminal block for easy RS 485 serial wiring Supports MAC based IP configuration Suppor...

Страница 3: ...LIST 1 A C 120 volt to 12 VDC Power Adapter 0 5 A 1 E10039 EKM E NPort Express DE 2111 NP21103 DB25 terminal block kit for RS 485 Installed on E10039 RJ 45 Patch Cable Quick Installation Guide Product Warranty Booklet NPort Documentation Software CD Fig 1 ...

Страница 4: ...EKM E ETHER MON KEY DE 211 31 00160 01 4 Fig 2 ...

Страница 5: ... mm to allow room for sliding the NPort Express unit s ears between the wall and the screws Fig 3 LED Name LED Color LED Function PWR Red Power is on Off Power is off or power error condition exists Link Orange 10 Mbps Ethernet connection Off Ethernet cable is disconnected or has a short Ready Green NPort Server systen us ready Blinking NPort is requesting an IP address from the DHCP or BootP serv...

Страница 6: ...E 211 31 00160 01 6 2 Insert the two screw heads through the large parts of the keyhole shaped apertures and then slide the NPort Express downward as indicated Fig 4 3 For added stability simply tighten the two screws Fig 5 ...

Страница 7: ...ON IMPORTANT Before powering up the E10039 turn all 4 dip switches to Off down postion Fig 6 1 Plug the power supply in Ethernet Key The Red PWR and Green Ready LED light should illuminate as shown below Fig 7 2 Turn the middle two dip switches switch 2 3 on in the up position ...

Страница 8: ...EKM E ETHER MON KEY DE 211 31 00160 01 8 ETHERNET CONFIGURATION Default IP address 192 168 127 254 MAC Address see the back of the case Fig 8 ...

Страница 9: ... CD to configure the E10039 Static IP address and network settings as required for Honeywell E MonEnergy software Use the supplied Moxa software CD or download from the following link http www emon com media downloads manuals dssetup ashx la en If downloading from the web select Save as and save the file to you desktop Fig 9 Fig 10 ...

Страница 10: ...EKM E ETHER MON KEY DE 211 31 00160 01 10 1 Open or extract from the downloaded zip file dssetup Fig 11 2 Open the software installer and click Run at this pop up window Fig 12 ...

Страница 11: ...EKM E ETHER MON KEY DE 211 11 31 00160 01 3 Click Next Fig 13 4 Select Configuration and Management Tools deselect COM Port Mapping Tools 5 Click Next Fig 14 ...

Страница 12: ...EKM E ETHER MON KEY DE 211 31 00160 01 12 6 Click Next Fig 15 7 Click Next Fig 16 ...

Страница 13: ...E10039 Ether Mon key More about Cross over cables http en wikipedia org wiki Ethernet_crossover_cable You may purchase pre made Cross over cables at an office supply or electronics stores When configuring drivers and software need to hook the E10039 NPort Express directly to your computer s Ethernet card To do this you will need to use a cross over Ethernet cable This type of Ethernet cable is har...

Страница 14: ... one end of the Cross over cable into the LAN Ethernet port of your PC and the other end into the Ethernet RJ 45 port of the E10039 Ether Mon key Fig 19 11 The Orange Link LED should blink as it is acquiring the network and then light up solid Fig 20 ...

Страница 15: ...EKM E ETHER MON KEY DE 211 15 31 00160 01 12 Open your PC Control Panel click Network and Internet Fig 21 13 Click Network and Sharing Center Fig 22 ...

Страница 16: ...EKM E ETHER MON KEY DE 211 31 00160 01 16 14 Click Change adapter settings WIRED ONLY Fig 23 15 Double Click Local Area Connection Fig 24 ...

Страница 17: ...EKM E ETHER MON KEY DE 211 17 31 00160 01 16 Click Properties Fig 25 17 Click to highlight Internet Protocol Version 4 TCP IPv4 18 Click Properties Fig 26 ...

Страница 18: ...ess Fig 27 20 Next you will temporarily set the IP address of your computer to be a number close to the default IP address of the EKM E Ethernet Key a For example set the computer IP address to 192 168 127 253 final digit is one number lower than default EKM E IP address Fig 28 ...

Страница 19: ...00160 01 b Clicking into the Subnet mask field will auto populate to 255 255 255 0 Fig 29 c Click OK and close any of the Internet Protocol Version 4 properties screens 21 Launch the NPort Management Suite Configurator software Fig 30 ...

Страница 20: ...EKM E ETHER MON KEY DE 211 31 00160 01 20 Fig 31 22 Click Locate Server Specify by IP Address Fig 32 23 Type in the E10039 default IP address of 192 168 127 254 and click OK Fig 33 ...

Страница 21: ...ER MON KEY DE 211 21 31 00160 01 24 Model DE 211 should auto populate the IP Address MAC Address and Status Fixed Fig 34 25 Note if the Status displays Locked type in the password emon if prompted Fig 35 Fig 36 ...

Страница 22: ... Address Netmask and Gateway to modify these for your LAN or WAN settings as provided by your Internet Service Provider ISP or Network Administrator IMPORTANT The IP configuration must a Static IP to communicate properly with Honeywell E Mon Energy software Fig 38 28 Click on the OP_Mode tab 29 Check the box Change OP Mode ...

Страница 23: ...EKM E ETHER MON KEY DE 211 23 31 00160 01 30 Select TCP Server from the dropdown menu Fig 39 31 Click More Settings Fig 40 ...

Страница 24: ...et up the TCP Server exactly as shown below a TCP Port 3000 b Check the box for Delimiter 1 and set to 13 c Check the box for Delimiter 2 and set to 10 d Force transmit time out set to 2000 e Inactivity time 0 f TCP alive check time to 5 g Click OK Fig 42 ...

Страница 25: ...ings exactly as shown in the window above a Baud Rate 9600 b Parity None c Data Bits 8 d Stop Bit 1 e Flow Control None f UART FIFO Enable 35 Click the Password tab 36 Select the box Change Password 37 Honeywell E Mon recommends using emon lower case as the defalt password in the event technical support requires remote access to configure the E10039 settings ...

Страница 26: ...8 Type in New Password emon lower case 39 Confirm Password emon lower case Fig 44 40 Click OK to save and upload all changes and settings 41 Set Configuration uploaded settings Progress OK indicates finished Fig 45 42 Close Configurator utility ...

Страница 27: ...e Internet Protocol Version 4 Fig 48 45 Use the supplied patch cable to plug the E10039 EKM E into a router or switch 46 Your Internet Service Provider ISP or Network Administrator is responsible for suppling routers or switches 47 Please note your ISP or your Network Administrator must configure the router or switch with Port 3000 TCP open NOTE E MonEnergy software requires Port No 3000 as shown ...

Страница 28: ...EKM E ETHER MON KEY DE 211 31 00160 01 28 Fig 49 IMPORTANT Port 3000 TCP must be open on all routers or switches in the network ...

Страница 29: ...E 211 29 31 00160 01 EZ7 RS485 WIRING TYPICAL INSTALLATION Fig 50 Daisy Chain configuration shown in figure 2 on the left is correct Star connection on the right is incorrect Fig 51 Correct Daisy Chain Configuration Fig 52 ...

Страница 30: ...EKM E ETHER MON KEY DE 211 31 00160 01 30 Please see the specific product installation manual for more detailed EZ7 RS 485 wiring Fig 53 Fig 54 Front View E10039 ...

Страница 31: ...Y DE 211 31 31 00160 01 Fig 55 5 Position Screw Terminal Block 2 Wire RS 485 Terminal Block Wiring Fig 56 Terminal 1 SGND Do not use the ground Terminal 2 RXDB DATA B to RS485 HI or Terminal 3 RXDA DATA A to RS485 LO or ...

Страница 32: ... it may be more affordable to convert from EZ7 RS485 to EZ7 Ethernet Please consult with your system integrator for communication device options What should the cable impedance and capacitance be Cables suitable for use in an RS 485 network should have an impedance of between 100 and 130 ohms a capacitance between conductors of less than 30 pF per foot 100 pF per meter and a capacitance between co...

Страница 33: ... 115 12 5 Blue 1000 Reel in a Box 33242106 3328 22 2pr Stranded Shielded CMP EIA 485 MS TP BACnet 115 12 5 Brown 1000 Reel in a Box 33282107 3322 18 2pr Stranded Shielded CMP EIA 485 MS TP BACnet 115 12 5 Orange 1000 Reel 33221003 3252 22 1pr Stranded CMP Echelon LonWorks 100 14 5 White 1000 Reel in a Box 32522101 Yellow 1000 Reel in a Box 32522102 Blue 1000 Reel in a Box 32522106 Purple 1000 Reel...

Страница 34: ... means that the built in 120 Ω termination resistor is disabled completely removing the jumper from the pins also disables the resistor 3 Use the jumper to short the bottom two pins of JP6 to enable the built in 120 Ω termination resistor Fig 57 COMPLIANCE NOTICE Federal Communications Commission Statement FCC This device complies with part 15 of the FCC Rules Operation is subject to following two...

Страница 35: ...EKM E ETHER MON KEY DE 211 35 31 00160 01 ...

Страница 36: ...1 M S 05 18 Printed in United States By using this Honeywell literature you agree that Honeywell will have no liability for any damages arising out of your use or modification to the literature You will defend and indemnify Honeywell its affiliates and subsidiaries from and against any liability cost or damages including attorneys fees arising out of or resulting from any modification to the liter...

Отзывы: