background image

® U.S. Registered Trademark 
US Pat 8,950,687 and other patents pending
© 2018 Honeywell International Inc.
33-00322EFS—01  M.S.  02-18
Printed in U.S.A. 

Need Help?

Go to 

customer.honeywell.com

Call


1-800-633-3991

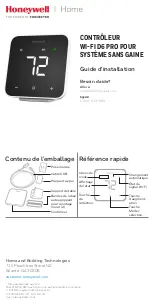
In this box

Wall plug

USB cable

Back plate

Tabletop stand

Wall mount  

hook and loop  

strips (2)
Controller

AUTO

Quick reference

Auto  

Changeover

Wi-Fi status

Up button

Mode/ 

Select 

button

Mode 

icons

Status 

display

Down 

button

D6 PRO Wi-Fi  

DUCTLESS 

CONTROLLER

Installation Guide

Home and Building Technologies

715 Peachtree Street NE
Atlanta, GA 30308

customer.honeywell.com

33-00322EFS-01

Содержание D6 PRO

Страница 1: ...00 633 3991 In this box Wall plug USB cable Back plate Tabletop stand Wall mount hook and loop strips 2 Controller AUTO Quick reference Auto Changeover Wi Fi status Up button Mode Select button Mode icons Status display Down button D6 PRO Wi Fi DUCTLESS CONTROLLER Installation Guide Home and Building Technologies 715 Peachtree Street NE Atlanta GA 30308 customer honeywell com 33 00322EFS 01 ...

Страница 2: ...batteries from the remote controller that came with the ductless unit That way the two controllers won t send conflicting commands The controller sends an IR signal from three places One on each side left and right and one from the top Consider them when you choose a location 150 10 m 30 ft 1 150 30 ft 10 m 75 30 ft 10 m ...

Страница 3: ...ook and loop strips to the controller slightly overlapping the back plate on both sides Place the controller in your selected location Attach the controller to the wall in your selected location Plug the power cord into the controller Snap the back plate onto the controller Plug the power cord into the wall adapter and plug in the wall adapter Plug the power cord into the wall adapter and plug in ...

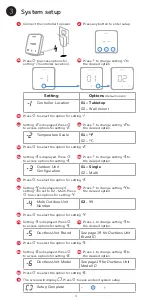
Страница 4: ...tion for setting 5 Press oto select the option for setting 6 Press oto select the option for setting 4 Press to change setting 1 to the desired option Press to change setting 2 to the desired option Press to change setting 3 to the desired option Press to change setting 5 to the desired option Press to change setting 6 to the desired option Press to change setting 4 to the desired option The scree...

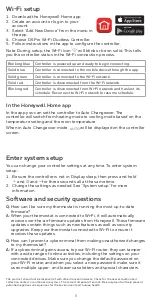
Страница 5: ...on screen After a short period of time the screen will change to display the room temperature Change temperature 1 Be sure the controller is not in Display sleep then press or more than once to change the set temperature so it is higher or lower in the current mode 2 Stop pressing or when you reach the temperature you want 3 The screen will pulse and then return to the room temperature display 1 B...

Страница 6: ...gs at any time To enter system setup 1 Be sure the controller is not in Display sleep then press and hold and o and for three seconds all at the same time 2 Change the settings as needed See System setup for more information Software and security questions Q How can I be sure my thermostat is running the most up to date firmware A When your thermostat is connected to Wi Fi it will automatically re...

Страница 7: ...lage Prise murale Câble USB Plaque d appui Support de table Bandes de ruban autoagrippant pour montage mural 2 Contrôleur AUTO Référence rapide Changement automatique État du signal Wi Fi Touche d augment ation Touche Mode sélection Icônes de mode Affichage de l état Touche de réduction CONTRÔLEUR WI FI D6 PRO POUR SYSTÈME SANS GAINE Guide d installation Home and Building Technologies 715 Peachtre...

Страница 8: ... piles de la télécommande qui accompagne l unité murale De cette manière les commandes des deux contrôleurs n entreront pas en conflit Le contrôleur transmet un signal IR depuis trois endroits Un de chaque côté gauche et droit et un du dessus Veuillez en tenir compte lors du choix de l emplacement 150 10 m 30 ft 1 150 30 ft 10 m 75 30 ft 10 m ...

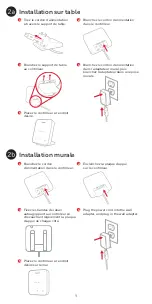
Страница 9: ...oagrippant au contrôleur en chevauchant légèrement la plaque d appui de chaque côté Placez le contrôleur à l endroit désiré Placez le contrôleur à l endroit désiré sur le mur Branchez le cordon d alimentation dans le contrôleur Enclenchez la plaque d appui sur le contrôleur Branchez le cordon d alimentation dans l adaptateur mural puis branchez l adaptateur dans une prise murale Plug the power cor...

Страница 10: ...régler 5 à la valeur voulue Appuyez sur opour régler 6 à la valeur voulue Appuyez sur opour régler 4 à la valeur voulue Appuyez sur pour régler 1 à la valeur voulue Appuyez sur pour régler 2 à la valeur voulue Appuyez sur pour régler 3 à la valeur voulue Appuyez sur pour régler 5 à la valeur voulue Appuyez sur pour régler 6 à la valeur voulue Appuyez sur pour régler 4 à la valeur voulue L écran af...

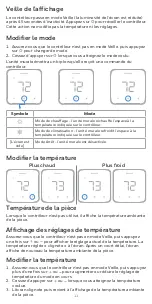
Страница 11: ... écran Après un court délai l écran affiche de nouveau la température ambiante de la pièce Modifier la température 1 Assurez vous que le contrôleur n est pas en mode Veille puis appuyez plus d une fois sur ou pour augmenter ou réduire le réglage de température du mode en cours 2 Cessez d appuyer sur ou lorsque vous atteignez la température voulue 3 L écran clignote puis revient à l affichage de la...

Страница 12: ...a configuration système 1 Assurez vous que le contrôleur n est pas en mode Veille puis maintenez enfoncées simultanément les touches et o et durant trois secondes 2 Modifiez les paramètres voulus Consultez la rubrique Configuration du système pour en savoir plus Questions relatives à la sécurité et au logiciel Q Comment puis je être sûr que mon thermostat est configuré avec le plus récent microlog...

Страница 13: ...3 3991 En esta caja Enchufe de pared Cable USB Placa posterior Soporte para mesa Bandas de velcro para montaje de pared 2 Controlador AUTO Referencia rápida Conversión automática Estado de wifi Botón para subir Botón de modo selección Íconos de modo Pantalla de estado Botón para bajar D6 PRO CON WIFI CONTROLADOR SIN CONDUCTO Guía de instalación Home and Building Technologies 715 Peachtree Street N...

Страница 14: ...s del controlador remoto que vino con la unidad sin conducto De esa forma los dos controladores no enviarán comandos contradictorios El controlador envía una señal de IR desde tres lugares Una desde cada lado izquierdo y derecho y otra desde arriba Tenga esto en cuenta a la hora de elegir una ubicación 150 10 m 30 ft 1 150 30 ft 10 m 75 30 ft 10 m ...

Страница 15: ...ntaje de pared en el controlador de modo tal que se superpongan un poco a la placa posterior en ambos lados Coloque el controlador en la ubicación elegida Coloque el controlador en la pared en la ubicación elegida Conecte el cable de alimentación al controlador Encaje la placa posterior en el controlador Conecte el cable de alimentación al adaptador para pared y enchufe este último Conecte el cabl...

Страница 16: ...pción para el ajuste 6 Presione opara elegir la opción para el ajuste 4 Presione para cambiar el ajuste 1 a la opción deseada Press to change setting 2 to the desired option Presione para cambiar el ajuste 3 a la opción deseada Presione para cambiar el ajuste 5 a la opción deseada Presione para cambiar el ajuste 6 a la opción deseada Presione para cambiar el ajuste 4 a la opción deseada En la pant...

Страница 17: ...talla Después de un breve período la pantalla cambiará para mostrar la temperatura ambiente Cambiar la temperatura 1 Asegúrese de que el controlador no se encuentre en el modo de pantalla en reposo Luego presione o más de una vez para cambiar la temperatura establecida de forma tal que sea más alta o más baja en el modo actual 2 Deje de presionar o cuando llegue a la temperatura que desea 3 La pan...

Страница 18: ...nto Para ingresar la configuración del sistema 1 Asegúrese de que el controlador no se encuentre en el modo de pantalla en reposo Luego mantenga presionados o y al mismo tempo durante tres segundos 2 Modifique los ajustes según sea necesario Consulte Configuración del sistema para obtener más información Preguntas sobre software y seguridad P Cómo puedo saber si mi termostato está operando con el ...

Страница 19: ...1 LS HSV4 Series 2 LS HEV1 Series 3 LS HXV Series 4 LMN HVT Series 1 5 LMN HVT Series 2 6 Samsung 5 Wind Free 1 Pearl 2 Smart Whisper 3 Smart Pearl 4 Whisper Wi Fi 5 Max 6 Quantum 17 SEER 7 Novus 8 FJM Whisper 9 Wireless Remote Controller 10 Brand Marque Marca ID Model Modèle Modelo ID Gree 6 SAPHIRE 1 CROWN CROWN 2 TERRA 3 VIERO VIERO 4 NEO 5 LIVO LIVO 6 RIO 7 UMATCH 8 Hand held Remote Adapter 9 ...

Страница 20: ...TION FCC 47 CFR 15 19 a 3 Cet appareil est conforme à la partie 15 du rè glement de la FCC Son fonctionnement est soumis aux deux condi tions suivantes 1 Ce dispositif ne peut pas causer d interférences dangereuses et 2 Ce dispositif ne doit accepter aucune interférence reçue notamment les interférences à l origine d un fonctionnement indésirable 47 CFR 15 21 États Unis uniquement Les modification...

Отзывы: