Honeywell CTP-20 Скачать руководство пользователя страница 1

IND.CONT.EQ.

3JHX

INSTALLATION INSTRUCTIONS

62-0245—01

Solid Core and Split Core 4-20 mA

Output Current Sensors

CTS-20; CTP-20

SAFETY

WARNING

For CTS-20 Series current sensors, ensure 
that all power sources are disconnected and 
locked out before installation as severe injury 
or death may result from electrical shock due 
to contact with high voltage wires.

CAUTION

This product is not intended to be used for life 
or safety applications.

CAUTION

This product is not intended for use in any 
hazardous or classified locations.

INSTALLATION

Make sure that all installations are in compliance with all 
national and local electrical codes. Only qualified 
individuals that are familiar with codes, standards, and 
proper safety procedures for high-voltage installations 
should attempt installation. The current sensor is a 2-
wire, 4 to 20 mA Loop Powered device that requires a 
reg12 to 30 Vdc external power source.

IMPORTANT

The current switch should be used on insulated 
conductors only!

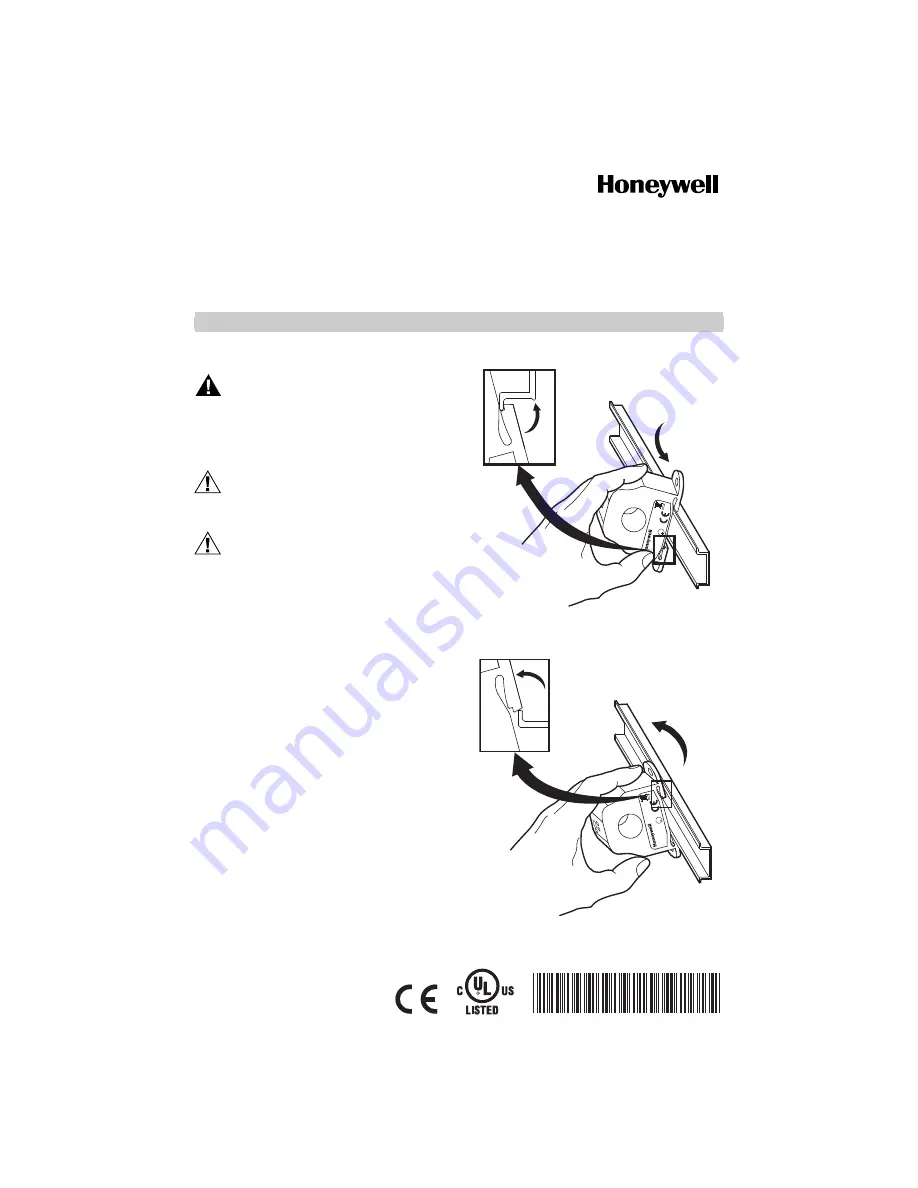
The current sensors may be mounted in any position 
using the two (2) #8 x 3/4 in (19 mm) Tek screws and the 
mounting holes in the base or snapped directly on to the 
1-3/8 in. (35 mm) DIN rail (See Figures 3 and 4). Leave a 
minimum distance of 1 in. (25 mm) between the current 
sensor and any other magnetic devices such as 
contactors and transformers.

Fig. 1. Sensor placed on DIN rail

Fig. 2. Sensor removed from DIN rail

C

R

U

L

U

S

3X

M25289

3X

M25290

C

R

U

L

U

S

Содержание CTP-20

Страница 1: ... electrical codes Only qualified individuals that are familiar with codes standards and proper safety procedures for high voltage installations should attempt installation The current sensor is a 2 wire 4 to 20 mA Loop Powered device that requires a regulated 12 to 30 Vdc external power source IMPORTANT The current switch should be used on insulated conductors only The current sensors may be mount...

Страница 2: ...ised Operation can be impaired if anything prevents good contact between pole pieces Visually check the mating parts of the core before closing the current sensor Fig 4 Opening sensor by hand Fig 5 Opening with a screwdriver Wiring Honeywell recommends the use of 16 to 22 AWG 1 3 to 0 3 mm2 shielded cable copper wire only for all current sensor applications A maximum wire length of less than 98 4 ...

Страница 3: ...RMS 0 10 Amps 0 20 Amps 0 50 Amps Low Middle High 60 Amps 100 Amps 160 Amps 80 Amps 200 Amps 300 Amps CTS 20 250 VFD 001b Solid 4 20 mA True RMS 0 100 Amps 0 200 Amps 0 250 Amps Low Middle High 160 Amps 320 Amps 400 Amps 200 Amps 400 Amps 500 Amps CTP 20 005 AVG 001 Split 4 20 mA Average 0 5 Amps Fixed None 100 Amps 125 Amps CTP 20 050 AVG 001 Split 4 20 mA Average 0 10 Amps 0 20 Amps 0 50 Amps Lo...

Страница 4: ...0 0 NOTE 4 mA 0 Amps 20 mA 250 Amps Problem Solution No reading Confirm that you have 12 to 30 Vdc in series with the current sensor output terminals and the analog input of the control panel Check the polarity of the circuit Verify that the terminals are screwed down wires are firmly in place Disconnect the input to the control panel and then insert a current meter mA range in series with the cur...

Отзывы: