background image

Attach  caster  arm 

(2) 

to 

the  frame  rail  as  shown 

with  bolt 

(4) 

and  flange  locknut 

(6). 

Attach 

adjustment brackets 

(3) 

to 

frame rail and caster arm 

(2) 

as shown with carnage 

bolts 

(5) 

and flange lock- 

nuts 

(6). 

Repeat for opposite caster. 

Do 

not tighten 

this hardware as the casters will require adjustment 
when cutting height is set. 

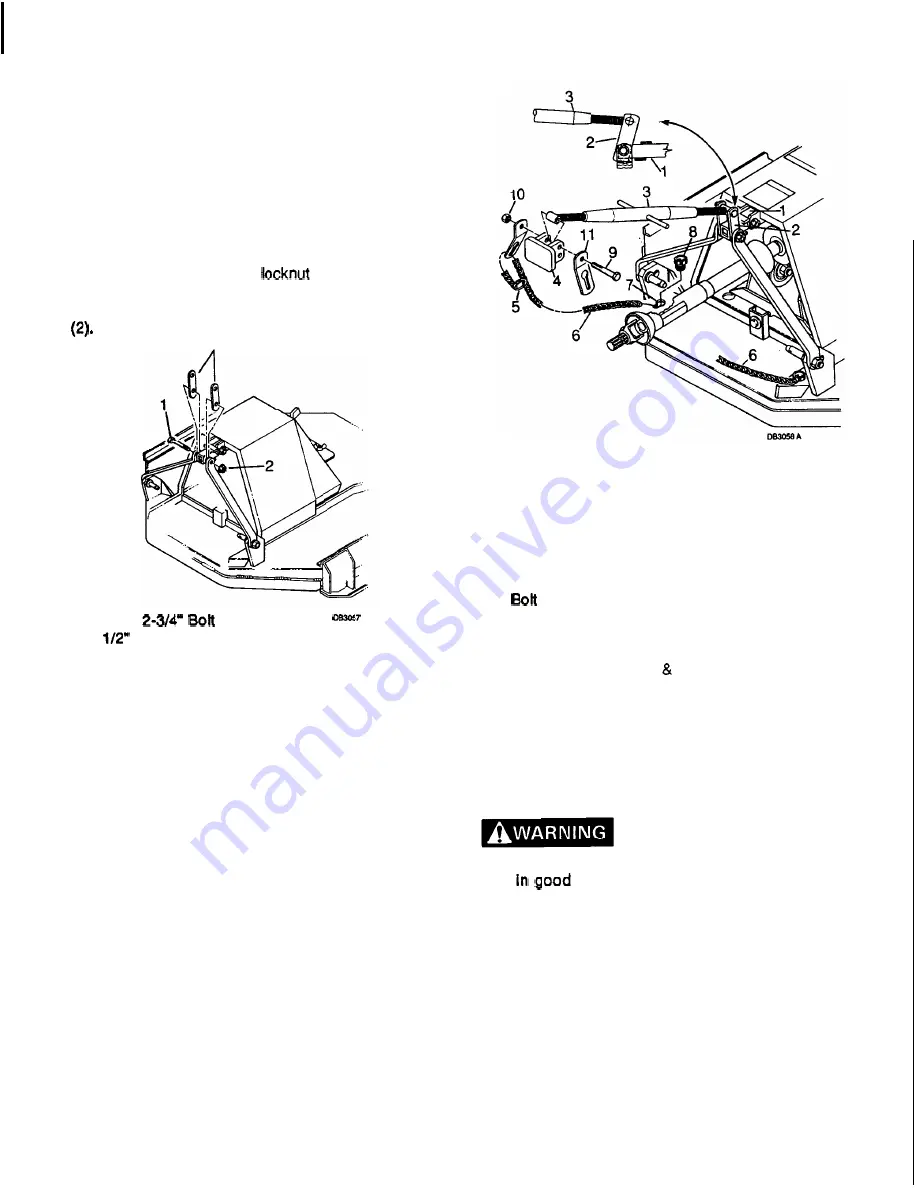
Top  Link Pivot Installation 

(figure 

4) 

Remove bolt 

(1) 

and flange 

(2) 

from A-frame 

arm  installation and  insert  top  pivot  links 

(3) 

as 

shown then secure with 

bolt  (1) 

and flange locknut 

1.  1/2 

2. 

Flanged hex locknut 

3. 

Top pivot link 

Figure 

4. 

A-Frame  Installation 

Check Chain Installation 

(figure 

5 )  

Place check chain 

( 6 )  

into 

slot 

on mower frame and 

secure with  caplug 

(8). 

Repeat for  opposite check 

chain. 

Insert chains through check chain brackets 

(1 1) 

and 

secure with  quick  links 

(5). 

Insert 

bolt 

(9) 

through 

check chain brackets 

(1 1) 

and secure with nut 

(10). 

1. 

Tube assembly 

2. 

Top pivot link 

3. 

Tractor top link 

4. 

Tractor top link attachment point 

5. 

Quick link 

6. 

Check chain 

7 .  

Check chain keyhole 

8. 

Caplug 

9. 

10. 

Nut 

11. 

Check chain bracket 

Figure 

5. 

Check Chain  Top Link Adjustment 

Drive Shaft Installation 

Install front drive half into rear drive half. 

Ensure shlelds and guards are properly Installed 
and 

condltlon. 

F-7756  (1 

0-89) 

11 

Содержание RM752A

Страница 1: ......

Страница 2: ......

Страница 3: ... INDEX TO PARTS LISTS 29 INDEX 36 WARRANTY SERVICE Inside Back Cover SPECIFICATIONS Cutting Width 42 Cutting Height Range 2 1 4 5 112 Shipping Weight approximate 429 Ibs Blade RPM 1 076 2 000 rpm PTO Blade Tip Speed feet per minute 11 831 2 000 rpm PTO Blade Spindle 1 Number of Blades 2 Universal Drive L6W Maximum PTO Speed RPM 2 000 Caster Wheels Solid Rubber 10 25 x 3 5 Mower Frame Thickness 10 ...

Страница 4: ...produced without written permission Pay special attention to the statements preceded by the following symbols Indicatesthat serious injury or death WILL result if instructions are not followed Indicatesa strong possibilitythat serious injuryor deathcould resultif instructions Indicatesa possibilitythat minor injury can result if instructionsare not followed IUWORTANT NOTICE I Indicates that equipm...

Страница 5: ... and either the discharge chute or right side shield are installed Make sure blades are sharp free of nicks or cracks and are securely fastened Make sure all hardware is securely fastened and in good condition Check that mower is properly and securely attached to tractor Check that all safety decals are installed and in good condition Check that shields and guards are properly installed and in goo...

Страница 6: ...ition Remove accumulated debris from mower to avoid fire hazard Make sure tractor PTO spring activated locking collar slides freely and is seated firmly in mower driveline spline groove 4 Ensure all safety decals are installed and in good condition W Ensure shields and guards are properly installed and in good condition Ensure both side skids the left side shield and either the discharge chute or ...

Страница 7: ...forming anyservice or maintenance BIO mower securely before working under neath Keep all persons away from operator control area while performing adjustments service or maintenance Make certain all movement of mower compo nents has stoppedbefore opening blade access cover Frequentlycheck blades They shouldbe sharp free of nicks and cracks and securely fastened Your dealer can supply genuine replac...

Страница 8: ...PMENTQUICKLY INAN EMERGENCY BLOCK UP IMPLEMENT AND REMOVE CONTACTDEALER FOR MANUALS KEEP SHIELDS AND GUARDS IN PLACE KEY BEFORE WORKING UNDERNEATH KEEP CLEAR OF DRIVES AND BELTS ALLOW NO CHILDREN OR UNQUALIFIED LOWER IMPLEMENT STOP ENGINE AND PERSONS TO RUN EQUIPMENT CLEAR MOWING AREA OF DEBRIS DECREASE SPEED WHEN TURNING DO NOT OPERATE MOWER IN VICINITY DO NOT OPERATE IN TRANSPORT OF OTHER PERSON...

Страница 9: ...NT FAILURE AND PERSONAL INJURY I5 6 KEEP AWAY ROTATING DRIVE LINE ENTANGLEMENT CAN CAUSE SERIOUS INJURY OR DEATH KEEP ALL DRIVE SHIELDS AND GUARDS IN PLACE AND IN GOOD CONDITION TRACTOR PTO YOKE MUST BE LOCKED IN PLACE ADJUST TRACTOR HITCH TO PROPER DIMENSIONS 29029 DB1518 DE3108 9 F 7756 10 89 SHIELD MISSING DO NOTOPERATE SHIELD MISSING DO NOTOPERATEI 7 DE2410 8 Serial Number Plate D m 7 1 7 ...

Страница 10: ...55 75 38 52 23 31 318 25 34 21 28 13 18 5116 14 19 11 15 6 8 1 2 120 165 85 115 57 77 9116 180 245 125 170 82 111 518 230 310 175 240 111 150 314 440 600 300 410 200 270 718 720 975 450 610 280 380 1 1035 1400 680 925 350 475 1 118 1255 1700 600 815 1 114 885 1200 450 610 1 318 1620 2200 675 915 1 112 2200 2990 920 1250 HARDWAREABBREVlATlONS ATF Automatic Transmission Fluid M Male F Female MPa Meg...

Страница 11: ...ivered to the owner completely assembled lubricated and adjusted for normal mowing conditions Complete check list on page 3 when assembly is complete The mower is shipped partially assembled Assembly will be easier if components are aligned and loosely assembled before tightening hardware Recommended torque values for hardware are locatedon page 8 Select a suitable working area Lay parts and hardw...

Страница 12: ...th bolt 8 and flange locknut 9 as shown Attach front end of baffle 6 to side shield 4 with bolt 8 and flange locknut 9 as shown Attach side shield 4 to mower frame with bolts 7 and flange locknuts 9 as shown Discharge Chute Installation figure 2 The discharge chute 3 may be installedinplace of baffle 6 and side shield 4 Attach dischargechute 3 to right side of mower with bolts 7 and flange locknut...

Страница 13: ... 2 Flanged hex locknut 3 Top pivot link Figure 4 A Frame Installation Check Chain Installation figure 5 Place check chain 6 into slot on mower frame and secure with caplug 8 Repeat for opposite check chain Insertchains through check chain brackets 11 and secure with quick links 5 Insert bolt 9 through check chain brackets 11 and secure with nut 10 1 Tube assembly 2 Top pivot link 3 Tractor top lin...

Страница 14: ...NOTES 12 F 7756 10 89 ...

Страница 15: ... low suction blades Optional high suction blades are available for added suction and shredding Recommended mowing speed range for most conditions is from two to five mph Do not allow children or unqualified persons to operate equlpment Do not operate PTO durlng transport Keep bystanders away from equipment while it is in operation Block mower securely beforeworklng under neath Keep all persons awa...

Страница 16: ... end clears the ground and top pivot links have free travel when raised Cutting Height Adjustment figure 7 Place tractor and mower on a level surface Check tractor tire pressure to make sure it is correct and equal The adjustments given are to provide you with a starting point Adjustments are approximate and may vary due to machine wear You may desire to fine tune them for your situation IIMPORTAN...

Страница 17: ... each side Chains may be twisted to obtain finer adjustment Secure excess chain to taut chain with quick link 5 With check chains properly adjusted you will be able to raise mower with 3 point hitch and returnto the original cutting height Check top link adjustment to be sure mower front end raises at least 10 and the back end clears the ground and top pivot links have free travel when raised Side...

Страница 18: ...und speed will depend upon the terrain and the height type and density of material to be cut Normally ground speed will range from two to five mph Tall dense material should be cut at a low speed thin medium height material can be cut at a faster ground speed Always operate tractor PTO at 2 000 rpm This is necessary to maintain proper blade speed and produce a clean c u t Under certain conditions ...

Страница 19: ...6 f 8 I 10 c 11 7 c 9 7 1 5 I 14 I 12 d 16 J 15 13 J L 4 J J t k 2 Flgure 10 Mowing Pattern DE 1276 Uneven Terrain H Do not operate on steep slopes Do not stop start or change dlrectlons suddenly on slopes rn Use extreme care and reduce ground speed on slopes and rough terraln W Watch for hidden hazards on the terraln durlng operatlon Pass diagonallythrough sharp dips and avoidsharp drops to preve...

Страница 20: ... freely and Is seated firmly Inmower driveline spline groove 3 SERVICE LUBRICATION INFORMATION figure 11 Do not let excess grease collect on or around parts particularly when operating in sandy areas The accompanying illustration shows lubrication points The chart gives the frequency of lubrication in operating hours based on normal operating conditions Severe or unusual conditions may require mor...

Страница 21: ...as stopped before opening blade access cover Open blade access cover reach through and align one end of the crossbar with the hole Use a block of wood to hold blade carrier and loosen blade retainer bolt 3 rotate retainer 4 until half moonis aligned with blade pin 2 and remove blade pin Remove blade 5 2 TORQUE BOLT 3 I TO 20 FT LBS 1 Crossbar 2 Blade Din 3 Blade ietainer bolt 4 Blade retainer 5 Bl...

Страница 22: ...ction between the left side of the drive pulley and left idler pulley can be deflected approximately 1 4 with thumb pressure Rotate pulley by hand until belt makes two revolutions and recheck tension When proper tension is set tighten all four nuts 1 and tighten locknut 2 on adjustment bolt 3 CORRECT Belt replacement is accomplishedin these steps 1 INCORRECT I REMOVAL Loosen all four nuts l figure...

Страница 23: ...g is in the top portionof spindle housing To minimizewear bearing cups cones and sleeves are press fit to shaft and will require a press or similar device for removal When disassembling support housing casting to prevent damage Remove bearingcups by placing a punchin housing slots and driving cup out Alternate punch positions from side to side Use care to prevent housing damage Permatex 30 Aviatio...

Страница 24: ...bottom seal 4 bottom cone 5 and cup 7 installedover shaft and crossbar 9 Carefully guide seal over shaft and press shaft into housing Fill housing cavity with a medium grade grease Place top bearing cone 5 and sleeve 2 on shaft Press sleeve and bearingonto shaft until all bearing free play is removed and there is a slight drag similar to adjusting the front wheel bearings on an automobile Check by...

Страница 25: ...r Tips As a reference point the grease fitting is in the top portionof spindle housing To minimizewear bearingcups cones and sleeves are press fit to shaft and will require a press or similar device for removal When disassembling support housing casting to prevent damage Remove bearingcups by placing a punch in housing slots and driving cup out Alternate punch positions from side to side Use care ...

Страница 26: ... too smallwill bow seal cage Carefully press seal into housing preventing distortionto metal seal cage Seal should seat firmly and squarely against the machined shoulder in housing Make sure seal lip did not roll under Distortion to seal cage or damage to seal lip will cause seal to leak Damaged seals must be replaced Lubricate spindle with a medium grade grease Rotate housing on spindle shaft che...

Страница 27: ... Place seals securely on bearing cups Insert cup into yoke from outside and press in with hand pressureas far as possible Insertjournal cross into bearing cross with grease fitting away from shaft Be careful not to disturb needle bearings Insert another bearing cup across from first cup and press in as far as possible with hand pressure Trap cups in a vise and apply pressure Be sure journal cross ...

Страница 28: ...to check for free movement Should movement be restricted rap on yokes sharply with a hammer to relieve any tension Repeat until both yokes move in all directions without restriction Make sure tractor PTO spring activated locking collar Slides freely and is seated firmly In mower driveline spilne groove 26 NOTES F 7756 10 89 ...

Страница 29: ...F 7756 10 89 NOTES 27 ...

Страница 30: ...and front are within 1 2 of same height See instructionson page 14 Allow grass to dry before mowing Slow ground speed of tractor but keep engine running at full PTO rpm Cutting lower will help Sharpenor replace blades Reduce ground speed but maintain 2 000 rpm at tractor PTO or make two passes over material Raise the mowerfor the first pass and lower to desired height for the second and cut at 90 ...

Страница 31: ...F 7756 10 89 INDEX TO PARTS LISTS MAIN FRAMEASSEMBLY 30 MOUNTINGFRAMEASSEMBLY 32 FRONT DRIVE81SHIELD ASSEMBLY 34 REAR DRIVE SHIELD ASSEMBLY 34 DRIVE SPINDLE ASSEMBLY 35 BLADE SPINDLE ASSEMBLY 35 29 ...

Страница 32: ...MAIN FRAME ASSEMBLY 18 COMPLETE ENGLISH DECAL SET 19 ENGLISH SAFETY DECAL SET 20 FRENCH SAFETY DECAL SET 30 F 7756 10 89 I ...

Страница 33: ... 3 8 sleeve Caster arm assembly 1 4 28 Tapered threadgrease fitting Casterarm adjustment bracket Access hole cover assembly or Ref M i 13 14 15 16 17 18 19 20 Ref hlp 29 30 31 32 33 34 35 36 37 38 39 40 No llsaci 1 P e s c r W Dischargechute foruseon mowerswith CW blade rotation Side shieldbaffle Right side shield Right side skid Frontcorner baffle Complete Englishdecal set Englishsafety decal set...

Страница 34: ...MOUNTING FRAME ASSEMBLY i 32 F 7756 10 89 ...

Страница 35: ...ave P Check chainbracket Ref NQ 80 81 82 83 84 85 86 87 88 89 90 91 92 93 94 95 96 97 98 99 100 101 102 103 104 105 106 107 DescriDtion 114x 114x 1 114 Key 114 NCx 3 4 Hex headcap screw GR5 1 4 x 3 8 x 2 Key 5 16 NCx 1 Hex headcap screw GR5 5 16 x 1 34 Spirolpin Link screwtype 4 0 Twisted link chain 27 1 2NCx 1 Carriage bolt 1 2NFx 1 1 4 Hex headcap screw GR5 1 2NCx 1 114 Hex headcap screw GR5 1 2...

Страница 36: ...M 1 1 1 1 2 1 2 1 3 1 4 1 4 1 5 1 5 1 6 1 P lRtlQIl Front drive and shield L6W complete 13 long or Front drive and shield 6W complete 11 1 2 long 1 15 Toothsplined male yoke 3 1 4 long splinedshaft L6W 1 15 Toothsplinedmale yoke 1 58 longsplinedshaft L6W U Joint repairkit 6RW 314x 7 8x 13 Shaft and welded yoke 6W or 314x 7 8x 11 1 2Shaft and welded yoke 6W Outer U jointshield 10 1 4 long 6W Outer ...

Страница 37: ...4 NFSlotted hex nut Hubcap D m A CW BLADE SPINDLE ASSEMBLY 5 1 D B U 9 Ref r JQ 1 2 3 4 5 6 7 8 9 10 11 12 13 14 14 No userd 1 1 2 2 2 1 2 1 1 2 2 2 2 2 2 CW Blade spindle 1 318x 1 314x 518 Sleeve 1 314x 2 3 8 x 13 GA Flat washer Sealfor 1 3 4 shaft Bearing cone LM48548 Spindle housingwith cups Bearingcup LM48510 Straight 118 pipethreadgrease fitting Spindle shaft and crossbar Blade pin retainerwa...

Страница 38: ...ENERAL OPERATION Attaching Mower to Tractor 14 Check Chain Installation 15 Cutting Height Adjustment 14 Pre Operation Check List 16 Removing Mower from Tractor 15 Tips 16 Tractor Stablllty 14 UnevenTerrain 17 Operating Technique 16 Side Skid Adjustment 15 OWNER SERVICE Belt Replacement 19 Blade Servicing 19 Lubrication Information 18 Index to Parts Lists 29 Check Lists 3 16 Safety Decals 6 Safety ...

Страница 39: ...sfaction contact the Power Equipment CustomerService Department of American Honda Motor C a Inc AmericanHonda MotorCo Inc PowerEquipment CustomerService Duluth Georgia30136 9421 Telephone 404 497 6400 W e will need the following in order to assist you Your name address and telephone number Productmodel and serial number Date of purchase Dealer name and address Natureof the problem After reviewing ...

Страница 40: ......

Отзывы: