background image

TABLE OF CONTENTS

INDEX

VISUAL INDEX

VOICE COMMAND 

INDEX

SAFETY 

INFORMA

TION

CUSOTMER

INFORMA

TION

INSTRUMENT P

ANEL

SPECIFICA

TIONS

VEHICLE


CONTROLS


MAINTENANCE

AUDIO AND 

CONNECTIVITY

HANDLING THE 

UNEXPECTED

BLUETOOTH®


HANDSFREELINK®

DRIVING

HONDALINK®

NA
VIGA

TION

76    |

|    77

       AUDIO AND CONNECTIVITY

AUDIO AND CONNECTIVITY

Models with Display Audio

Apple CarPlay


Connect an Apple CarPlay-compatible iPhone to the system. You can use the 

touchscreen to make a phone call, listen to music, and more. Visit the Apple 

CarPlay website for more information.

When your iPhone is connected to Apple CarPlay, it is not possible to use the 

Bluetooth

®

 Audio or 

Bluetooth

®

 HandsFreeLink

®

.  However, other previously 

paired phones can stream audio via 

Bluetooth

®

 while Apple CarPlay is 

connected.

Park in a safe place before connecting your iPhone and launching any 

compatible apps.

n


Bluetooth

®

 Setup 

1.  Press the 

HOME

 button, then select 

NFC Manager

. Or touch the NFC 

logo near the glove box with the NFC tag of your phone. The 

NFC 

Manager

 screen is displayed.

2.  Select 

Connect Device to Vehicle Bluetooth

.

3.  Touch the NFC logo near the glove box with the NFC tag of your phone.
4.  A notification appears on the screen if pairing is successful. Confirm if 

the pairing code on the screen and your phone match. This may vary by 

phone.

n

  Wallpaper Image Transfer

1.  Press the 

HOME

 button, then select 

NFC Manager

 or touch the NFC logo 

near the glove box with the NFC tag of your phone.

2.  Select 

Transfer Image

.

3.  Open the photo you want to transfer on your phone, then select 

Next

.

4.  Touch the NFC logo near the glove box with the NFC tag of your phone.
5.  Select the photo on your phone.
6.  A confirmation message appears on the screen. Select 

Wallpaper

.

Models with Display Audio 

Near Field Communication (NFC)*

Near Field Communication (NFC) allows you to connect select Android phones 

to the audio system via 

Bluetooth

®

.

1.  Press the 

HOME

 button, then Select 

Settings

.

2.  Select 

Connections

.

3.  Select 

NFC

, then 

ON

.

4.  Select 

Android Beam

, then 

ON

.

*if equipped

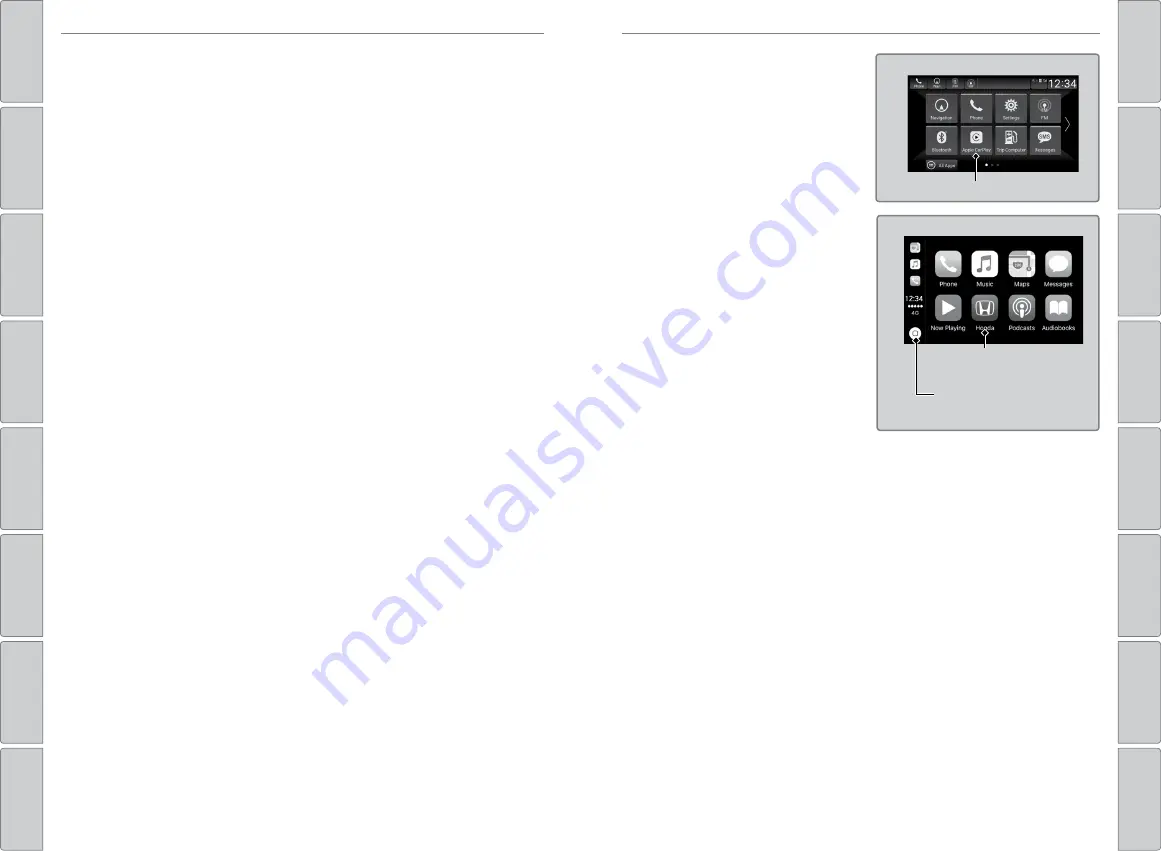
1.  Connect the iPhone to the USB port 

(2.5 A) in the center pocket or console 

compartment.

2.  Apple CarPlay requires you to send 

vehicle information to Honda. Select 

Enable to continue. Your phone 

may prompt you to allow access for 

CarPlay to be launched.

Home screen

Apple CarPlay

3.  From the 

HOME

 screen, select Apple 

CarPlay.

4.  Select a menu option. 

Phone:

 Access your contacts, make 

phone calls, or listen to voicemail. 

While connected to Apple CarPlay, 

calls can only be made through Apple 

CarPlay, not through 

Bluetooth

®


HandsFreeLink

®

.

Music: 

Play music stored on your 

iPhone. 

Apple CarPlay menu

Return to the 

Home screen

Return to the 

CarPlay menu

Maps:

 View a map and operate navigation. You can only use Apple Maps 

or the pre-installed navigation system to set a destination with routing 

guidance.

Models with navigation

Only one navigation system (pre-installed navigation or Apple CarPlay) can 

give directions at a time.

Messages:

 View and reply to text messages or have messages read to you 

aloud by the system. 

Once connected, press and hold the Talk button on the steering wheel (see 

p. 93) to operate the system using voice commands with Siri.

Depending on use, Apple CarPlay can share certain vehicle information (e.g., vehicle 

location, speed, and other operating conditions) with the connected iPhone. See Apple’s 

privacy policy for details regarding Apple’s use and handling of data uploaded by 

CarPlay. Use of CarPlay is at user’s own risk, and is subject to agreement to the CarPlay 

terms of use, which are included as part of the Apple iOS terms of use. CarPlay vehicle 

integration is provided “as is,” and Honda cannot guarantee CarPlay operability or 

functionality now or in the future due to, among other conditions, changes in CarPlay 

software/Apple iOS, service interruptions, or incompatibility or obsolescence of 

vehicle-integrated hardware or software. See dealer for details. Only use CarPlay when 

conditions allow you to do so safely. See your Owner’s Manual at 

owners.honda.com


(U.S.) or 

myhonda.ca

 (Canada) for further license and warranty terms.

*if equipped

Содержание Accord 2018 Hybrid

Страница 1: ...E COMMAND INDEX SAFETY INFORMATION CUSOTMER INFORMATION INSTRUMENT PANEL SPECIFICATIONS VEHICLE CONTROLS MAINTENANCE AUDIO AND CONNECTIVITY HANDLING THE UNEXPECTED BLUETOOTH HANDSFREELINK DRIVING HONDALINK NAVIGATION 2018 HYBRID OWNER S GUIDE ...

Страница 2: ...ice Diagnostic Recorders This vehicle is equipped with service related devices that record information about powertrain performance The data can be used to verify emissions law requirements and or help technicians diagnose and solve service problems It may also be combined with data from other sources for research purposes but it remains confidential Some diagnostic and maintenance information is ...

Страница 3: ...o help you quickly get acquainted with your 2018 Honda Accord Hybrid Sedan It provides basic information and instructions on technology and convenience features as well as emergency procedures and how to get assistance This guide is for vehicles sold in the United States and Canada It covers all Accord models so you may find descriptions of features and equipment that are not in your vehicle Image...

Страница 4: ...PORT Mode 123 EV Button 124 Honda Sensing 125 Adaptive Cruise Control ACC with Low Speed Follow ACC with LSF 126 Lane Keeping Assist System LKAS 129 LaneWatch 130 Road Departure Mitigation RDM 131 Traffic Sign Recognition System 133 Collision Mitigation Braking System CMBS 134 Parking Sensor System 136 Multi View Rear Camera 137 Blind Spot Information BSI 138 Refueling 140 Improving Fuel Economy a...

Страница 5: ...arning button y Front seat heater and ventilation buttons p 59 z Climate control system p 58 Rear window defogger Heated door mirror button Vehicle Stability Assist VSA system OFF button p 122 Safety Support switch p 134 p 131 Parking Sensor System button p 136 Heated windshield button p 55 if equipped Dashboard and Other Controls if equipped u v w x y z u Power window switches p 40 Door lock swit...

Страница 6: ... children and or another person s can be injured or killed Also depending on the ambient temperature the temperature of the interior may reach extreme levels which can result in injury or death Even if the climate control system is on never leave children in the vehicle unattended as the climate control system can shut off at any time Engaging in cell phone conversation or other activities that ke...

Страница 7: ...ce or repair have it performed by a dealer WARNING Do not cover the air intake Air intake n Carbon Monoxide Gas The engine exhaust from this vehicle contains carbon monoxide a colorless odorless and highly toxic gas As long as you properly maintain your vehicle and follow the instructions set forth below you will not accumulate dangerous levels of carbon monoxide gas in the vehicle interior Have t...

Страница 8: ...ehicle is equipped with airbags make sure you and your passengers always wear your seat belts and wear them properly n Lap Shoulder Seat Belts All five seating positions are equipped with lap shoulder seat belts with emergency locking retractors In normal driving the retractor lets you move freely while keeping some tension on the belt During a collision or sudden stop the retractor locks to restr...

Страница 9: ...nt of the driver s airbag The front passenger s advanced airbag system has weight sensors We advise against allowing a child age 12 or under to ride in the front passenger s seat However if you do allow a child age 12 or under to ride in the front passenger s seat note that the system will automatically turn off the front passenger s airbag if the sensors detect that the child is approximately 65 ...

Страница 10: ...he driver s and front passenger s seat backs Both are marked SIDE AIRBAG n Side Curtain Airbags Side curtain airbags help protect the heads of the driver and passengers in outer seating positions during a moderate to severe side impact The side curtain airbags equipped in this vehicle are also designed to help reduce the likelihood of partial and complete ejection of vehicle occupants through side...

Страница 11: ... the indicator comes on at any other time besides vehicle start up or does not come on at all have the system checked by a dealer as soon as possible Ignoring the SRS indicator can result in serious injury or death if the airbag systems or tensioners do not work properly Have your vehicle checked by a dealer as soon as possible if the SRS indicator alerts you to a possible problem WARNING Passenge...

Страница 12: ...dicator is on 4 Two side curtain airbags one for each side of the vehicle The airbags are stored in the ceiling above the side windows The front and rear pillars are marked SIDE CURTAIN AIRBAG 5 An electronic control unit that when the vehicle is on continually monitors information about the various impact sensors seat and buckle sensors rollover sensor airbag activators seat belt tensioners and o...

Страница 13: ...enough to kill them They could also activate vehicle controls causing it to move unexpectedly Children who are unrestrained or improperly restrained can be seriously injured or killed in a crash Any child too small for a seat belt should be properly restrained in a child seat A larger child should be properly restrained with a seat belt using a booster seat if necessary WARNING Allowing a child to...

Страница 14: ...f A rear seat is the safest place for a child Placing a forward facing child seat in the front seat can result in serious injury or death if the front airbag inflates If you must place a forward facing child seat in front move the vehicle seat as far back as possible and properly restrain the child WARNING n Selecting a Child Seat Most child seats are LATCH compatible Lower Anchors and Tethers for...

Страница 15: ...can reach is buckled the lockable retractor is activated and the belt is fully retracted and locked n Installing a Child Seat with a Lap Shoulder Seat Belt A child seat can be installed with a lap shoulder belt in any rear seat or if absolutely necessary the front passenger seat 1 Place the child seat on the vehicle seat 2 Route the seat belt through the child seat according to the seat manufactur...

Страница 16: ...e tether strap hook to the anchor 4 Tighten the tether strap as instructed by the child seat manufacturer 7 Make sure any unused seat belt that a child can reach is buckled the lockable retractor is activated and the belt is fully retracted and locked To deactivate a lockable retractor release the buckle and allow the seat belt to wind up all the way Cover Tether Anchorage Points Anchor Anchor Tet...

Страница 17: ...u your dealer or American Honda Motor Co Inc To contact NHTSA you may call the Vehicle Safety Hotline toll free at 1 888 327 4236 TTY 1 800 424 9153 go to http www safercar gov or write to Administrator NHTSA 1200 New Jersey Avenue SE Washington DC 20590 You can also obtain other information about motor vehicle safety from http www safercar gov In Canada If you believe that your vehicle has a defe...

Страница 18: ...Turn off all electrical items but do not turn off the vehicle to prevent further battery discharge Have your vehicle repaired immediately Learn about the indicators gauges and displays related to driving the vehicle if equipped Supplemental Restraint System SRS There is a problem with one of the airbag systems or seat belt tensioners Malfunction indicator lamp check engine light The emissions cont...

Страница 19: ...s and inflate tire s if necessary Recalibrate the TPMS after adjusting air pressure The indicator also appears if your vehicle is fitted with the compact spare tire Have your regular tire repaired or replaced as soon as possible System message When a condition or malfunction indicator comes on a message also appears in the driver information interface Check the display for more information Immobil...

Страница 20: ...tailed information n Sub display Press the TRIP button to change the display TRIPButton Trip A Odometer Outside Temperature Trip B TRIP TRIP TRIP Safety Support Indicates the state of RDM CMBS and Blind Spot Information for example On Off or Failure by color and letters n How It Works The following colors indicate the state of any of the above mentioned systems Green The system is on Gray The syst...

Страница 21: ...using the HUD button on the steering wheel They are displayed when the power mode is in ON To turn the head up display on and off Press the HUD button on the driver side control panel The display can be moved up and down to come level with your eyes To raise or lower the head up display Press and hold the p or q button until the desired position is reached if equipped Head Up Display 4 Button HUDB...

Страница 22: ...t 32 inches 80 cm radius from the trunk release button You can customize door locking and unlocking settings See page 60 n Walk Away Auto Lock When you walk away from the vehicle while carrying the smart entry remote the doors can automatically lock if the following conditions are met The smart entry remote is within a range of 5 feet 1 5 m All doors and the hood are closed There is not an additio...

Страница 23: ...r seat where childproof door locks are provided n Using the Trunk Opener Press and hold the trunk opener on the driver s door to unlock and open the trunk n Childproof Door Locks The childproof door locks prevent the rear doors from being opened from the inside regardless of the position of the lock tab Slide the lever in the rear door to the lock position and close the door Open the door using th...

Страница 24: ...ush the center of the switch To close Push the switch forward firmly then release Closing a power window on someone s hands or fingers can cause serious injury Make sure your passengers are away from the windows before closing them WARNING Closing the moonroof on someone s hands or fingers can cause serious injury Make sure your passengers are away from the moonroof before closing it WARNING if eq...

Страница 25: ...urn on or off depending on ambient brightness when the vehicle is on Headlights automatically come on after the wipers are engaged for a certain time When you turn the light switch to AUTO the headlights and other exterior lights will switch on and off automatically depending on the ambient brightness The headlights come on when you unlock a door in dark areas with the headlight switch in AUTO Tur...

Страница 26: ...s once by pulling the lever toward you To turn the system back on pull and hold the lever toward you for a few seconds Your vehicle Oncoming vehicle Vehicle ahead of you If you do not want the system to be activated at any time when the headlight switch is in AUTO consult a dealer or disable the system n Using the Auto High Beam System If you find the timing of beam changes inconvenient for drivin...

Страница 27: ...speed fewer sweeps Higher speed more sweeps Wiper Operation The windshield wipers and washers can be used when the power mode is in ON Intermittent Time Adjustment Ring Pull to use washer MIST OFF INT 1 AUTO 2 LO Low speed wipe HI High speed wipe 1 without automatic intermittent wipers 2 with automatic intermittent wipers n Headlight Wiper Integration When the headlights are in the AUTO position t...

Страница 28: ...k from the front airbag in the dashboard as possible The National Highway Traffic Safety Administration and Transport Canada recommend that drivers allow at least 10 inches 25 cm between the center of the steering wheel and the chest Horizontal Position Adjustment Seat back Angle Adjustment Height Adjustment Driver s seat only the Lumbar support Higher part of Lumbar Support Switch Adjustment the ...

Страница 29: ... height of the restraint To raise the head restraint Pull it upward To lower the head restraint Push it down while pressing the release button To remove the head restraint Pull the restraint up as far as it will go Then push the release button and pull the restraint up and out To reinstall a head restraint Insert the legs back in place then adjust the head restraint to an appropriate height while ...

Страница 30: ...to its original position push it firmly back Also make sure all rear shoulder belts are positioned in front of the seat back and the center shoulder belt is re positioned in the guide Adjusting the Steering Wheel The steering wheel height and distance from your body can be adjusted so that you can comfortably grip the steering wheel in an appropriate driving posture Adjusting the steering wheel po...

Страница 31: ...ower Door Mirrors You can adjust the door mirrors when the power mode is in ON L R selector switch Select the left or right mirror After adjusting the mirror return the switch to the center position Mirror position adjustment switch Press the switch left right up or down to move the mirror Selector switch Adjustment switch n Rear Defogger and Heated Door Mirror Button Press the rear defogger and h...

Страница 32: ...ner A Press and release the HomeLink button Press hold and release the button on the remote every 2 secs Does the HomeLink indicator LED change from slowly flashing orange to rapidly flashing or continuously on green The process should take less than 60 seconds 3a Hold the button on the remote 1 Position the remote transmitter you wish tolink 1 to 3 inches 3 8 cm from the HomeLink button you want ...

Страница 33: ...r outlets ON OFF button Passenger s side temperature control dial Rotate to adjust the temperature SYNC button Press to set the passenger s side temperature to the same as the driver s side if equipped Seat Heaters and Ventilation Quickly warm or ventilate the seats when the vehicle is on Press the seat heater or the seat ventilation button Once The HI setting three indicators on Twice The MID set...

Страница 34: ...elect an option and make your preferred changes 3 Press HOME to exit the menu n Customization Example Door Lock Unlock Settings To customize the door lock unlock settings the vehicle must be stopped and the power mode set to ON For Models with Color Audio follow the steps below 1 Press the MENU CLOCK button 2 Select Settings 3 Select Vehicle Settings 4 Select Door Window Setup à à To customize doo...

Страница 35: ... Time then select OFF 5 Select Set Date or Set Time 6 Adjust the dates hours and or minutes by using the por q arrows to make selections 7 Select Save to set the time AUDIO AND CONNECTIVITY Learn how to operate the vehicle s audio system Basic Audio Operation The audio system features AM FM radio and SiriusXM Radio service It can also play USB flash drives and iPod iPhone and Bluetooth devices You...

Страница 36: ...t will come on Make sure that the device is compatible with the system and placed with the chargeable side in the center of the charging area 3 When charging is completed the green indicator light will come on Depending on the device the amber indicator light will stay on Green indicator Amber indicator Charging area Power button FCC statement This product complies with the appropriate requirement...

Страница 37: ... select the next preset radio station Press 9 To select the previous preset radio station Press and hold To select the next strong station Press and hold 9 To select the previous strong station Notes In the following cases charging may stop or not start The device is already fully charged The temperature of the device is extremely high while charging You are at a place that emits strong electromag...

Страница 38: ...tor wheel 9 Seek Skip buttons When listening to the radio Press To select the next preset radio station Press 9 To select the previous preset radio station Press and hold To select the next strong station Press and hold 9 To select the previous strong station When listening to an iPod USB flash drive or Bluetooth Audio or Smartphone Connection Press To skip to the next song Press 9 To go back to t...

Страница 39: ...io mode Audio Information screen Power volume knob Press to turn the audio system on or off Rotate to adjust volume button Adjust display brightness BACK button Go back to the previous display or cancel a setting Menu display Models with Display Audio Touchscreen Operation Use simple gestures including touching swiping and scrolling to operate certain audio functions Some items may be grayed out d...

Страница 40: ...d hold Drag and drop to hide icon 1 Download the HondaLink Connect app to your compatible smartphone 2 Pair your phone to Bluetooth HandsFreeLink see page 97 3 From the HOME screen select HondaLink You need to allow the consent of the location service to enable the HondaLink service Select from one of the following options Disable Does not allow consent Enable Once Allows only one time Shows again...

Страница 41: ...ehicle automatically will attempt to connect to the HondaLink operator If connected information about your vehicle its location and its condition can be sent to the operator 1 you also can speak to the operator when connected Your phone must be paired to the system and have good cellular connection Visit hondalink honda com for more information IMPORTANT In a crash HondaLink will attempt to notify...

Страница 42: ...t Connections 3 Select NFC then ON 4 Select Android Beam then ON if equipped 1 Connect the iPhone to the USB port 2 5 A in the center pocket or console compartment 2 Apple CarPlay requires you to send vehicle information to Honda Select Enable to continue Your phone may prompt you to allow access for CarPlay to be launched Home screen Apple CarPlay 3 From the HOME screen select Apple CarPlay 4 Sel...

Страница 43: ...e access point and select Done When the connection is successful the Wi Fi icon will display on the list 6 Press the HOME button to return to the home screen iPhone users You may need to go through an initial setup for Wi Fi connection again after you boot your phone Depending on use Android Auto can share certain vehicle information e g vehicle location speed and other operating conditions with G...

Страница 44: ...all while Vehicle OFF A notification appears on the screen if the update is successful Notification For battery protection Install while vehicle OFF cannot be selected when the battery is low on power If you want to install the updated data recharge the battery or select Install Now Models with Display Audio System Updates The audio system s firmware can be updated with a Wi Fi connection or with ...

Страница 45: ...elect System Updates 2 Select via USB A notification appears on the screen 3 Connect a USB device into the USB port in the center pocket or console compartment see p 63 The inventory data is copied into the USB device 4 Remove the USB device from the USB port 5 Connect the USB device into your computer and download the update files Follow the link to download the required software update files See...

Страница 46: ...and hold a preset number to store the current station Select a preset number to select a previously stored station Models with Display Audio SiriusXM Radio Available on a subscription basis only For more information or to subscribe contact your dealer or visit www siriusxm com subscribenow Available in the U S and Canada except Hawaii Alaska and Puerto Rico XM is a registered trademark of Sirius X...

Страница 47: ...uttons Press to change tracks Press and hold to move rapidly within a track Play Play mode buttons Pause n Searching for Music Use the selector knob to search for tracks stored on the iPod 1 From the audio screen press the selector knob 2 Select a category to display a list of items 3 Select the track you want to play Models with Display Audio iPod Play and operate an iPod through the vehicle s au...

Страница 48: ...drive if connected Play mode buttons 1 6 Selector knob Rotate to change files Press to select n Searching for Music Use the selector knob to search for tracks stored on the flash drive 1 From the audio screen press the selector knob 2 Select a folder to display a list of files in the folder 3 Select the track you want to play Models with Display Audio USB Flash Drive Play and operate a USB flash d...

Страница 49: ...ess to change tracks Preset button 2 Pause playing Media button Press to select Bluetooth if connected Selector knob Rotate to change groups Press to select n Searching for Music Use the selector knob to search for tracks stored on the device 1 From the audio screen press the selector knob 2 Select a category to display a list of items 3 Select the track you want to play Models with Display Audio ...

Страница 50: ...h HandsFreeLink see page 96 Applicable laws may prohibit the operation of handheld electronic devices while operating a vehicle Launch streaming audio on your phone only when safe to do so Selector knob Rotate to change the station Skip button Go to the next song Preset buttons Press the button for each function 1 Pause resume 2 Dislike song 3 Like song 4 Bookmark track Media button Press to selec...

Страница 51: ... button Press to go directly to the phone menu on the driver information interface or to answer an incoming call Hang up button Press to end a call Back button Press to go back to the previous screen or cancel a command Talk button Press to access Voice Portal Left Selector Wheel Press the HOME button then roll up or down to select Phone on the driver information interface and then press the left ...

Страница 52: ... the screen if pairing is successful Applicable laws may prohibit the operation of handheld electronic devices while operating a vehicle models with navigation Models with Display Audio To use hands free phone and streaming audio functions you must first pair your phone to the system This can only be done when the vehicle is stopped Use the touchscreen to make and enter selections Some functions a...

Страница 53: ...Add New 4 Select an entry method 5 If desired you can create a voice tag for the number Follow the prompts When a voice tag is created you can press the Talk button and say Call and the stored voice tag to quickly call the number n Using Call History Make calls quickly using stored speed dial entries or call history numbers Using voice commands 1 Press the Talk button before you say each command 2...

Страница 54: ... icon Recent Calls screen Star icon n Using Favorite Contacts Make calls quickly using stored favorite contact entries 1 Press the HOME button then select Phone 2 Select Favorite Contacts 3 Select a number Models with Display Audio SMS Text Messaging Certain phones can receive and send messages when paired and connected Visit automobiles honda com handsfreelink U S or call 888 528 7876 Canada to c...

Страница 55: ...alk button Press and hold until the display changes as shown Learn how to enter a destination and operate the navigation system Basic Navigation Operation A real time navigation system uses GPS and a map database to show your current location and help guide you to a desired destination You can operate the system using voice commands or the system controls To reduce the potential for driver distrac...

Страница 56: ...ore your home address in the system so you can easily route to it 1 Press the MAP button select the Search icon then select 2 Select Set Home Location 3 Select Enter My Address 4 Enter the house number and street name 5 Select Done or a suggestion 6 Enter a house number and street name 7 Select the address from the list Select Select When your home address is stored you can press the Talk button a...

Страница 57: ...t you want to save 3 Select Info 4 Select Save 5 Enter a name and select Done You can also save your current location From the map screen select the vehicle icon Select Save Enter a name for the location Select Done Routing to a saved location 1 Press the MAP button select the Search icon 2 Select Saved 3 Select a destination in the Saved list 4 Select Go Routing After a destination is set you can...

Страница 58: ...use warm water around the door edges to melt any ice Do not try to force them open as this can damage the rubber trim around the doors When done wipe dry to avoid further freezing Do not pour warm water into the key cylinder You will be unable to insert the key if the water freezes in the hole NOTICE n Interior Checks Store or secure all items on board properly Do not pile items higher in the carg...

Страница 59: ...ng GVWR or the Gross Axle Weight Rating GAWR Both are on a label on the driver s doorjamb Load limits example Example1 Max load 850 lbs 385 kg Cargo weight 550 lbs 249 kg Passenger weight 150 lbs x 2 300 lbs 68 kg x 2 136 kg Example2 Max load 850 lbs 385 kg Cargo weight 100 lbs 45 kg Passenger weight 150 lbs x 5 750 lbs 68 kg x 5 340 kg The headlight aim on your vehicle was set by the factory and ...

Страница 60: ...ting the Power System Make sure the parking brake is applied Depress the brake pedal Keep your foot firmly on the brake pedal when starting the power system The power system is harder to start in cold weather and in thinner air found at altitudes above 8 000 feet 2 400 m When starting the power system in cold weather turn off all electrical accessories such as the lights climate control system and...

Страница 61: ... the brake pedal depressed Operating the shift button before the vehicle has come to a complete standstill can damage the transmission NOTICE Auto park mode If you open the driver s door under the following conditions the shift position automatically changes to Park P The vehicle is in stationary with the power mode in ON or moving at 1 mph 2 km h or slower The transmission is in other than Park P...

Страница 62: ...hold the brake pedal 2 Press and release the Neutral N button Neutral hold mode will appear on the driver information interface 3 Press and hold the Neutral N button again for two seconds This puts the vehicle in car wash mode You can exit the vehicle without it shifting to Park P If the POWER button is pressed after car wash mode has been activated the power mode will change to ACCESSORY and a me...

Страница 63: ...er the power system has been started while vehicle accelerates Brake pedal and or the vehicle body vibration when ABS activates These vibrations and sounds are normal to ABS systems and are no cause for concern The ABS may not function correctly if you use an incorrect tire type or size NOTICE Release the parking brake fully before driving The rear brakes and axle can be damaged if you drive with ...

Страница 64: ...lt properly then start the power system Press the automatic brake hold button The automatic brake hold system indicator comes on The system is turned on 2 With the transmission in Drive D or Neutral N press the brake pedal and come to a complete stop The HOLD indicator appears and brake hold is applied Release the brake pedal 3 Press the BRAKE HOLD button behind the gear selector The BRAKE HOLD in...

Страница 65: ...ll be less effective To restore VSA functionality features press the VSA OFF button until you hear a beep VSA is turned on every time you turn the power system on even if you turned it off the last time you drove the vehicle VSA OFF Indicator SPORT Button SPORT Mode Indicator Press Models without adaptive damper system Models with adaptive damper system SPORT Mode Enhances the throttle response fo...

Страница 66: ...sensor camera mounted to the interior side of the windshield behind the rearview mirror Do not change the position of the radar sensor or any of the surrounding parts Do not apply paint stickers or attach nongenuine accessories to the front part of the radar sensor or the surrounding area Be particularly careful that any custom license plate frame or other accessory does not block any part of the ...

Страница 67: ...e interval when using ACC with LSF Additionally ACC with LSF may not work properly under certain conditions n Adjusting the Vehicle Speed Increase or decrease the vehicle speed using the RES or SET button on the steering wheel Each time you press the RES or SET button the vehicle speed is increased or decreased by about 1 mph or 1 km h accordingly If you keep pressing the RES or SET button the veh...

Страница 68: ...mation interface and the head up warning lights flash Important Safety Reminder As with any system there are limits to ACC with LSF Use the brake pedal whenever necessary and always keep a safe interval between your vehicle and other vehicles if equipped if equipped Lane Keeping Assist System LKAS Provides steering input to help keep the vehicle in the middle of a detected lane and provides tactil...

Страница 69: ... preferred changes Important Safety Reminder Like all assistance systems LaneWatch has limitations Over reliance on the system may result in a collision LaneWatch display Road Departure Mitigation RDM Alerts and helps to assist you if the system determines a possibility of your vehicle unintentionally crossing over detected lane markings and or leaving the roadway altogether while driving between ...

Страница 70: ...Normal default Steering control starts from inside the lane edge Wide Steering control starts from outside the lane edge Warning Only The system only provides a BRAKE message but does not apply steering or braking Narrow Use for driving on narrow roads if equipped Traffic Sign Recognition System Reminds you of road sign information such as the current speed limit your vehicle has just passed throu...

Страница 71: ...rning lights flash and a beep sounds The system activates when The speed difference between your vehicle and a vehicle or pedestrian detected in front of you is about 3 mph 5 km h and over with a chance of a collision Your vehicle speed is about 62 mph 100 km h or less and there is a chance of a collision with an oncoming detected vehicle or a pedestrian in front of you n Turning CMBS On or Off Pr...

Страница 72: ...lect Rear Camera 3 Select an option Fixed Guidelines Guidelines appear when you shift into Reverse Dynamic Guidelines Guidelines move as you turn the steering wheel 4 Select On or Off The rear camera view is restricted You cannot see the corner ends of the bumper or what is underneath the bumper Its unique lens also makes objects appear closer or farther than they actually are Visually confirm tha...

Страница 73: ...is for your convenience only Failure to visually confirm that it is safe to change lanes before doing so may result in a crash and serious injury or death Do not rely only on the blind spot information system when changing lanes Always look in your mirrors to either side of your vehicle and behind you for other vehicles before changing lanes WARNING if equipped Comes On Blinks The system does not ...

Страница 74: ...a fuel filler cap You can insert the filler nozzle directly into the filler neck The tank seals itself again when you pull out the filler nozzle The fuel fill door is located at the left rear of the vehicle Park next to the service pump that is most accessible 1 Turn off the power system 2 Unlock the driver s door using the master door lock switch The fuel fill door on the outer side of the vehicl...

Страница 75: ...pedal to slow down the vehicle and stop immediately in a safe place The transmission automatically changes to P after the vehicle comes to a complete stop Then the power mode changes to VEHICLE OFF Do not press the button while driving unless it is absolutely necessary for the engine to be switched off NOTICE Jump Starting Turn off the power to electric devices such as audio and lights Turn off th...

Страница 76: ...low Engine To Cool message disappears If the cooling fan is not operating immediately turn the power system off Engine coolant reserve tank MAX MIN if equipped Trying to lift or tow your vehicle by the bumpers will cause serious damage The bumpers are not designed to support the vehicle s weight Improper towing such as towing behind a motorhome or other motor vehicle can damage the transmission NO...

Страница 77: ...nutes of cumulative driving at speeds between 30 60 mph 48 97 km h The vehicle must be stopped to begin calibration and the process finishes automatically Models with Color Audio Use the selector knob and the audio information screen to calibrate the system 1 Press the MENU CLOCK button 2 Select Settings then Vehicle Settings 3 Select TPMS Calibration 4 Select Calibrate If the Calibration Failed t...

Страница 78: ...ale will flash for approximately one minute and then remain continuously illuminated This sequence will continue upon subsequent vehicle start ups as long as the malfunction exists When the malfunction indicator is illuminated the system may not be able to detect or signal low tire pressure as intended TPMS malfunctions may occur for a variety of reasons including the installation of replacement o...

Страница 79: ...applicable fuse is blown Fuse locations are shown on the fuse box cover Locate the fuse in question by the fuse number and box cover number Refer to the Owner s Manual at owners honda com for a complete fuse chart n Engine Compartment Fuse Box Located near the 12 volt battery Push the tabs to open the box Push the tabs to open the box n Interior Fuse Box Located under the dashboard on the driver s...

Страница 80: ...onary and parked on level ground with the parking brake set and the power system turned off Be aware that hot parts can burn you Make sure to let the power system including the engine and exhaust system cool thoroughly before touching vehicle parts Be aware that moving parts can injure you Improperly maintaining this vehicle or failing to correct a problem before driving can cause a crash in which...

Страница 81: ...ires Replace air cleaner element 2 Replace dust and pollen filter 3 Replace transmission fluid 4 Replace spark plugs Inspect valve clearance Replace engine coolant Replace brake fluid 5 n Maintenance Minder Service Codes These codes indicate what services are due on your vehicle U S models Minder If you regularly drive your vehicle under these conditions have the transmission fluid changed at 76 0...

Страница 82: ...ip Mount the support rod in the hood When closing remove the support rod and stow it in the clamp then gently lower the hood Remove your hand at a height of approximately 12 inches 30 cm and let the hood close Support rod Grip Clamp Do not open the hood when the wiper arms are raised The hood will strike the wipers and may damage either the hood or the wipers NOTICE Engine Oil Park the vehicle on ...

Страница 83: ...e NOTICE n Adding Oil 1 Unscrew and remove the engine oil fill cap 2 Add oil slowly 3 Reinstall the engine oil fill cap and tighten it securely 4 Wait for three minutes and recheck the engine oil dipstick Engine Oil Fill Cap n Resetting the Engine Oil Life If you change or replace the vehicle s engine oil yourself you must reset the engine oil life Use the Info p q and SEL RESET buttons on the ste...

Страница 84: ...scalding you Always let the engine and radiator cool down before removing the radiator cap WARNING Radiator Cap Genuine Honda engine coolant is a 50 50 mixture of antifreeze and water that can withstand freezing at temperatures as low as about 31 F 35 C If your vehicle is consistently subjected to temperatures below this the concentration of antifreeze in the coolant should be increased Consult a ...

Страница 85: ...Window Washer Fluid If the washer fluid level is low fill the washer reservoir Pour the washer fluid carefully Do not overflow the reservoir Canadian models If the washer fluid level is low the washer level indicator or a message appears on the driver information interface Do not use engine antifreeze or a vinegar water solution in the windshield washer reservoir Antifreeze can damage your vehicle...

Страница 86: ...er to the driver s doorjamb label or the specifications see page 172 for the specified pressure Underinflated tires wear unevenly adversely affect handling and fuel economy and are more likely to fail from overheating Overinflated tires make your vehicle ride harshly are more prone to road hazards and wear unevenly Every day before you drive look at each of the tires If one looks lower than the ot...

Страница 87: ...o replace all four tires at the same time If that isn t possible replace the front or rear tires in pairs If you change or replace a wheel make sure that the wheel s specifications match those of the original wheels Installing improper tires on your vehicle can affect handling and stability This can cause a crash in which you can be seriously hurt or killed Always use the size and type of tires re...

Страница 88: ...ark FW6X Tire type code 22 09 Date of Transportation Year Week n Glossary of Tire Terminology Cold Tire Pressure The tire air pressure when the vehicle has been parked for at least three hours or driven less than 1 mile 1 6 km Load Rating The maximum load that a tire is rated to carry for a given inflation pressure Maximum Inflation Pressure The maximum tire air pressure that the tire can hold Max...

Страница 89: ...porator with one removed from a used or salvaged vehicle Refrigerant in your vehicle s air conditioning system is flammable and can be ignited during servicing if proper procedures are not followed NOTICE Testing of Readiness Codes Your vehicle has readiness codes as part of the onboard self diagnostic system Some states use these codes for testing to verify whether your vehicle s emissions compon...

Страница 90: ... 66 L in the reserve tank Inverter Coolant Specified Ratio Capacity Honda Long Life Antifreeze Coolant Type2 50 50 with distilled water 0 219 US gal 0 83 L change including the remaining 0 048 US gal 0 18 L in the filler tank Brake Fluid Specified Transmission Fluid Honda Heavy Duty Brake Fluid DOT 3 Specified Capacity Change Honda ATF DW 1 automatic transmission fluid 2 3 US qt 2 2 L Washer Fluid...

Страница 91: ...tations apply Call 866 864 5211 U S or 800 465 7587 Canada Warranty Coverages Below is a brief summary of the warranties covering your new vehicle New Vehicle Limited Warranty Covers your new vehicle except for the emissions control system and accessories against defects in materials and workmanship Emissions Control Systems Defects Warranty and Emissions Performance Warranty Covers your vehicle s...

Страница 92: ...how Map Go Home Find Place Find Address Find City Find intersection Saved Places Recent Places Stop Route Detour n Phone Commands The System accepts these commands on most screens Not available during use of Apple CarPlay The Phone Command is as follows Phone Call Your Contact Name Call Phone Number Also the following command is displayed in the footer Voice Help Cancel USB n Audio Commands The sy...

Страница 93: ...igation RDM 131 Shifting 114 115 Traffic Sign Recognition System 133 Vehicle Stability Assist VSA 122 Wiper Blades 163 Driving Position Memory System 53 Eco Assist System 121 ECON Button 121 122 ECON mode 31 Emergency Towing 145 Engine Coolant 160 Engine Oil 157 ENGINE START STOP button 113 Exterior Lights 42 43 Fastening a Seat Belt 9 Fluids 172 FM AM Radio 83 Fog lights 31 Foot Brake 118 Frequen...

Страница 94: ...163 Wiper Operation 46 n California Proposition 65 Warning WARNING Operating servicing and maintaining a passenger vehicle or off highway motor vehicle can expose you to chemicals including engine exhaust carbon monoxide phthalates and lead which are known to the State of California to cause cancer and birth defects or other reproductive harm To minimize exposure avoid breathing exhaust do not idl...

Страница 95: ...owners honda com U S myhonda ca Canada 2018 Honda Accord Hybrid Owner s Guide 2018 Honda Motor Co Ltd All Rights Reserved 31TWAG00 OG 08655 00X31 TWA G001 Printed in U S A ...

Отзывы: