background image

Entering a Destination


u


Address

48

Na
vi

ga

ti

on

4.

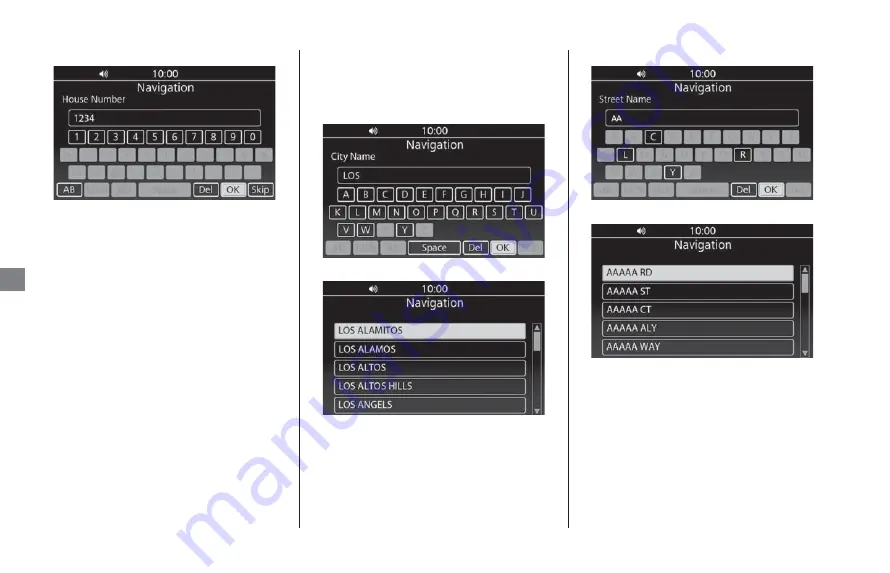
Enter the house number and select 

OK

.

u

If you want to search for the selected 

street, select 

Skip

.

5.

Select the house number from the list.

u

If prompted, enter the city name and 

select 

OK

, then select the city from the 

list.

6.

Select 

GO

 to set the route to your 

destination

2

 P. 55

City Name

1.

Select 

City Name

 on the Address 

screen. 

2

 P. 47

2.

Enter the city name and select 

OK

.

3.

Select the city from the list.

4.

Enter the street name and select 

OK

.

5.

Select the street from the list.

NOTE

The order of the steps may change depending on the 
map data loaded on your system.

Содержание 2018 Gold Wing

Страница 1: ... 22 Favorite Places P 23 Routes P 26 Guidance Mode Settings P 30 Map View Settings P 31 Track Log Setup P 35 Other Navigation Settings P 38 Restore All Settings P 40 Navigation P 41 Map Menu P 42 Navigation Menu P 43 Entering a Destination P 44 Calculating the Route P 55 Riding to Your Destination P 59 Changing Your Route P 61 Changing Your Destination P 63 Viewing Information P 65 Troubleshooting...

Страница 2: ...perate the controls The Navigation System is designed to provide route information to help you reach your destination However this route guidance may sometimes conflict with road conditions such as street closures road construction and detours Additionally the system itself has certain limitations 2 P 76 Therefore you must verify the voice guidance and visual route information provided by the syst...

Страница 3: ...Preface Introduction P 5 How to Use this Manual P 6 System Controls Operation While Riding P 6 Accessory Precautions P 6 Preface ...

Страница 4: ...he center panel and left handlebar controls If a desired destination is not in the system s database you can still enter it and the system should be able to direct you to it in most cases You can also save store locations in the system s Favorite List The system also retains your last 30 destinations as Previous Destination so you can easily return to them and allows you to store a home address to...

Страница 5: ...trols are automatically disabled while your motorcycle is in motion While riding you can use the left handlebar controls to operate the navigation system Accessory Precautions Installing metallic or metalized accessories near the left saddlebag can seriously degrade or prevent GPS reception because the GPS antenna is located near the left saddlebag If you plan to install electronic components such...

Страница 6: ...r home location Store favorite locations P 23 Store locations to use as the destination Enter destination P 44 Select your destination using several methods Calculate route P 55 Set route preferences and roads to detour around Track route P 59 Follow your route in real time with voice guidance Add waypoints P 62 Add pit stops along your route While not in motion you can use the center panel and le...

Страница 7: ...zoom in or out of the map ENTER Back Button Press to return to the previous screen P 10 While using the navigation system press and hold to display the map screen with your current location centered Home Button Press to display the Home screen P 10 Back Switch Press to return to the previous screen P 11 While using the navigation system press and hold to display the map screen with your current lo...

Страница 8: ...SB connector For more information see the Owner s Manual Open the shelter case and connect your USB flash drive to the USB connector For more information see the Owner s Manual USB connector GL1800DA USB connector Except GL1800DA NOTE Use a USB 2 0 flash drive with 256 MB to 64 GB capacities formatted in FAT32 ...

Страница 9: ...the interface dial clockwise counterclockwise to zoom in or out of the map Map Scroll Return to Previous Screen Press Back button to return to the previous screen Press Home button to display the main Home screen P 13 Display Home Screen Select Menu Rotate or move the interface dial to highlight the desired menu option item and press Enter to set your selection Move the interface dial up down left...

Страница 10: ...nd hold Source Private Mode switch to mute the volume To resume the volume operate lever while volume is muted Pressing and holding Source Private Mode switch mutes the voice guidance and audio NOTE You can also adjust the guidance volume from the map menu P 42 VOL VOL Back Switch Home Switch Switch ENT Press Home switch to display the main Home screen P 13 Display Home Screen Select Menu Press 3 ...

Страница 11: ...ft handlebar to highlight the character you want to enter b Press Enter on the center panel or press switch on the left handlebar c Repeat steps 1 and 2 to enter another character d Select OK to display a list of possible entries Select ab AB to display upper lower case characters Select 12 to display other types of characters Select Space to enter a space character Select Del to remove the last e...

Страница 12: ...38 Map Menu Display the map screen and operate the navigation features Select Navigation on the Home screen then press Enter on the center panel or press switch on the left handlebar The map menu will be displayed on the bottom of the maps screen P 42 ENT Navigation Menu Use main navigation functions change settings and view useful information From the map menu select Menu The navigation menu will...

Страница 13: ...e P 10 Street Feature Area POI Icon P 32 54 Current Vehicle Position North Up Heading Up Heading Up 3D GPS icon NOTE Honda motorcycle dealership icons will appear when the map scale is 0 5 mile 1 kilometer or smaller and other POI icons will appear when the map scale is 600 feet 200 meters or smaller ...

Страница 14: ...reen Next Three Maneuvers Current Street Name Arrival Time Travel Distance Destination Calculated Route Waypoint Next Maneuver Current Street Name Arrival Time Calculated Route Travel Distance Destination Waypoint Next Maneuver Street Name Countdown Bar Lane Information Remaining Distance ...

Страница 15: ...een P 13 b Select a search method to find your home location from the destination input section P 44 c Press and hold Enter on the center panel or switch on the left handlebar while the location is selected and then select Set to Home uIf you select the location directly from the map the confirmation screen is displayed Select Save to set the location to home Going Home a Select Go Home from the m...

Страница 16: ... to store P 44 c Press and hold Enter on the center panel or switch on the left handlebar while the location is selected uIf you select the location directly from the map proceed to step 4 d Select Save to Favorite Going to a Favorite Place a Select Destination Input from the navigation menu P 13 b Select Favorite c Select your destination from the list d Select GO to set the route to your destina...

Страница 17: ...during route guidance Adding a Waypoint a Select Navigation on the Home screen P 13 b Select a search method and find a location to add P 44 c Select Add As Waypoint d If necessary move the location to the desired position e Press Enter on the center panel or press switch on the left handlebar f Select NO uSelect YES to add another waypoint g Select GO ENT ...

Страница 18: ... 64 Select a search method to find a new location and select Set As New Destination to cancel your current route and start a new route Canceling Your Route a While the map screen is displayed press Enter on the center panel or press switch on the left handlebar b Select Clear Guidance uIf you are in the route with multiple destinations the following screen is displayed Select a destination to clea...

Страница 19: ... 26 Route Menu List Screen P 26 Creating a New Route P 27 Editing a Saved Route P 28 Guidance Mode Settings P 30 Map View Settings P 31 Map View Settings Screen P 31 Map Setup P 32 POI List P 32 Track Log Setup P 35 Track Log Setup Screen P 35 Import Track P 36 Export Track to USB P 37 Tracks P 37 Other Navigation Settings P 38 Interface Language P 38 Voice Guidance Language P 38 Map Screen Bright...

Страница 20: ...or ON At start up the following confirmation screen is displayed 1 Select OK u If you do not select OK the system will automatically select OK after a certain period of time 2 Press Home button on the center panel or press Home switch on the left handlebar 3 Select Navigation uThe map screen is displayed ...

Страница 21: ...button on the center panel or press Home switch on the left handlebar 2 Select Navigation 3 Select a search method to find your home location 2 P 44 4 Press and hold Enter on the center panel or switch on the left handlebar while the location is selected and then select Set to Home uIf you select the location directly from the map the confirmation screen is displayed Select Save to set your home l...

Страница 22: ...the location is selected uIf you select the location directly from the map proceed to step 3 3 Select Save to Favorite Importing a Favorite Place You can import a favorite place from the USB 1 Connect the USB 2 P 9 2 Press Home button on the center panel or press Home switch on the left handlebar 3 Select Navigation 4 Press Enter on the center panel or press switch on the left handlebar 5 Select M...

Страница 23: ...een to edit or delete a favorite place 1 Press Home button on the center panel or press Home switch on the left handlebar 2 Select Navigation 3 Press Enter on the center panel or press switch on the left handlebar 4 Select Menu 5 Select Destination Input 6 Select Favorite NOTE If 30 favorite places are stored Import Favorite is grayed out Delete stored places A file which has or space in the filen...

Страница 24: ... available Delete Deletes the favorite place Select YES on the confirmation screen Rename Changes the name of the favorite place Enter a new name and select OK Export to USB Exports a favorite place data to the USB Set to Home Sets a favorite place to your home location Exporting a Favorite Place You can export a favorite place to the USB 1 Connect the USB 2 P 9 2 Select Export to USB on the Edit ...

Страница 25: ...Press Enter on the center panel or press switch on the left handlebar 4 Select Menu 5 Select Routes 6 Select an option The following options are available Create New Route Creates and saves a new route Import Route Imports your route from a USB 2 P 27 Export Route to USB Exports a saved route to a USB 2 P 29 Current Route Displays the current route and route options 2 P 55 Routes Displays the list...

Страница 26: ...ons 5 Move the location to the desired position 6 Press Enter on the center panel or press switch on the left handlebar Importing a Route Set on Website You can set and save a route on Honda Trip Planner website and import it to the navigation system via USB For details on how to set a route visit http www TripPlanner honda com and see HELP SUPPORT 1 Connect the USB 2 P 9 2 Select Import Route on ...

Страница 27: ...on Sets the route 2 P 52 Delete Route Deletes the route Select YES on the confirmation screen Rename Route Changes the route name Enter the new name and select OK NOTE A maximum of 15 routes can be saved You will need to delete an existing route to use Import Route The route set on the website may look different when imported because the route will be optimized by the map software in the navigatio...

Страница 28: ...stem Setup Exporting a Saved Route You can export a saved route to the USB 1 Connect the USB 2 P 9 2 Select Export Route to USB on the Route Menu List screen 2 P 26 3 Select the route to export uSelect Export All to export all the routes ...

Страница 29: ...e left handlebar 2 Select Navigation 3 Press Enter on the center panel or press switch on the left handlebar 4 Select Menu 5 Select Setup 6 Select Guidance Mode 7 Select an option The following options are available Map Displays only the map screen Route List Default Displays the map and direction list simultaneously on the map screen ENT ...

Страница 30: ...n the left handlebar 4 Select Menu 5 Select Setup 6 Select Map View Settings 7 Select an option The following options are available Map Setup Changes the map orientation 2 P 32 Auto Zoom Turns the auto zoom on or off Speed and Flow Sets whether the system shows the driving speed and flow on the map screen POI List Display the list of categories to show on the map 2 P 32 ENT NOTE Auto Zoom is set t...

Страница 31: ...Up Default Displays the map with north always pointing up Heading Up Displays the map with your direction of travel facing upwards Heading Up 3D Displays the map in 3D with your direction of travel facing upwards POI List Set the point of interest POI to show 1 Select POI List on the Map View Settings screen 2 P 31 2 Select categories to show uSelect All Categories to show icons of all the categor...

Страница 32: ...Food Seafood Barbecue Southern Fast Food Grill Jewish Kosher Food Steak House Turkish Food African Food Pizza Snacks Beverages Breakfast Ice Cream Tapas Caribbean Food Sushi Accommodation All Hotel Other Accommodation Shopping All Apparel Accessories Books Computers Electronics Convenience Stores Department Stores Gifts Grocery Stores Home Garden Housewares Office Supply Pharmacies Shopping center...

Страница 33: ...s Transport Travel All Border Crossing Train Station Ferry Terminal Commuter Train Bus Station Airport Rent a Car Facility Parking Lot Parking Garage Park and Ride Rest Area Emergency Services All Hospital Medical Center Fire Starions Police Stations Community Services All City Halls Community Centers Court Houses Fire Stations Police Stations Post Offices Everyday Life All Fitness Gyms Libraries ...

Страница 34: ...ear for any map scale up to and including 30 miles Track Log Setup Screen Access the Track Log Setup screen to change the track log settings 1 Press Home button on the center panel or press Home switch on the left handlebar 2 Select Navigation 3 Press Enter on the center panel or press switch on the left handlebar 4 Select Menu 5 Select Setup 6 Select Track Log Setup ENT ...

Страница 35: ...to USB Exports the track log to the connected USB 2 P 37 Tracks Displays the list of tracks 2 P 37 Import Track You can import a track data from a USB 1 Connect the USB 2 P 9 2 Select Import Track on the Track Log Setup screen 2 P 35 3 Select the track to import uSelect Import All to import all the tracks NOTE Display Track and Recording Track are set to off as factory default Up to 15 tracks can ...

Страница 36: ...track to export uSelect Export All to export all the tracks Tracks View replay or delete the track 1 Select Tracks on the Track Log Setup screen 2 P 35 2 Select the track 3 Select an option The following options are available View On Map Displays the track on the map Navigate to Start Point Sets the route to the starting point of the track 2 P 53 Delete Track Deletes the track Select YES on the co...

Страница 37: ...n the left handlebar 2 Select Audio setting 3 Select General setting 4 Select Language 5 Select the desired language uFor more information see the Owner s Manual Voice Guidance Language Change the language for voice guidance 1 Press Home button on the center panel or press Home switch on the left handlebar 2 Select Audio setting 3 Select General setting ...

Страница 38: ...ness Adjust the display brightness for the map screen 1 Press Home button on the center panel or press Home switch on the left handlebar 2 Select Vehicle setting 3 Select Day Night 4 Select the brightness level or select an option The following options are available Hold day mode Set the map screen to Day mode Hold night mode Set the map screen to Night mode uFor more information see the Owner s M...

Страница 39: ...Press Home button on the center panel or press Home switch on the left handlebar 2 Select Audio setting 3 Select General setting 4 Select System reset 5 Select YES uFor more information see the Owner s Manual NOTE When you restore the settings all the data saved in the navigation system will be also deleted ...

Страница 40: ...ddress P 47 Intersection P 50 Phone Number P 51 Routes P 52 Tracks P 53 Map Input P 54 Calculating the Route P 55 Destination Confirmation Screen P 55 Editing the Route P 55 Changing Route Preferences P 57 Riding to Your Destination P 59 Viewing the Route P 59 Changing Your Route P 61 Canceling the Route P 61 Taking a Detour P 61 Adding Waypoints P 62 Changing Your Destination P 63 Finding an Emer...

Страница 41: ...following options are available Clear Guidance Cancels the current route guidance 2 P 61 Go Home Sets the route to your home location 2 P 16 Menu Displays the navigation menu 2 P 43 Navi Volume Changes the guidance volume POI ON Default POI OFF Shows hides POI icons on the map screen You can select the categories of icons to show on the map screen 2 P 32 Adjusting the Guidance Volume 1 Select Navi...

Страница 42: ...estination by selecting one of your favorite destinations or recent destinations selecting a point of interest entering an address or selecting a location on the map 2 P 44 Emergency Searches for emergency services or displays information about your current location 2 P 63 Routes Creates and saves the route with multiple destinations or edits the current route 2 P 26 P 55 Information Displays the ...

Страница 43: ...tination Sets a destination by selecting a previous destination 2 P 45 Point of Interest Sets a destination by selecting a point of interest 2 P 45 Address Sets a destination by entering an address 2 P 47 Intersection Sets a destination by finding an intersection 2 P 50 Phone Number Sets a destination by entering a phone number 2 P 51 Favorite Select a favorite location to use as the destination 1...

Страница 44: ...st e g gas stations restaurants hotels stored in the map database to search for the destination 1 Select Point of Interest on the Destination Input screen 2 P 44 2 Select a category NOTE You can save a previous destination as your favorite or home location Press and hold Enter on the center panel or switch on the left handlebar while the place is selected and then select Save to Favorite or Set to...

Страница 45: ...e following options are available City Searches near the city you enter Current city Searches near your current city Near Current Location Default Searches near your current location Along Route Searches along your current route Near Destination Searches near your current destination NOTE You can save the found location as your favorite or home location Press and hold Enter on the center panel or ...

Страница 46: ...able Street Name Searches for your destination street City Name Searches for your destination city 2 P 48 Zip code Searches for your destination zip code 2 P 49 Country State Sets the country state in which to search 2 P 50 Street Name 1 Select Street Name on the Address screen 2 Enter the street name and select OK 3 Select the street from the list NOTE Unless Country State is set the other option...

Страница 47: ... the city name and select OK then select the city from the list 6 Select GO to set the route to your destination 2 P 55 City Name 1 Select City Name on the Address screen 2 P 47 2 Enter the city name and select OK 3 Select the city from the list 4 Enter the street name and select OK 5 Select the street from the list NOTE The order of the steps may change depending on the map data loaded on your sy...

Страница 48: ...he zip code from the list 4 Enter the street name and select OK 5 Select the street from the list uIf prompted enter the house number and select OK then select the house number from the list 6 Select GO to set the route to your destination 2 P 55 NOTE When you select Skip in step 6 the system may display the list of zip codes If so select the zip code and proceed to step 8 The order of the steps m...

Страница 49: ...Intersection Select the intersection of two streets as the destination 1 Select Intersection on the Destination Input screen 2 P 44 2 Select Street Name 3 Enter the first street name and select OK 4 Select the street from the list uIf prompted enter the city name and select OK then select the city from the list 5 Enter the second street name and select OK 6 Select the street from the list 7 Select...

Страница 50: ... Intersection on the Destination Input screen 2 P 44 2 Select Country State 3 Enter the country state name and select OK 4 Select the country state from the list Phone Number Search for your destination by entering a phone number 1 Select Phone Number on the Destination Input screen 2 P 44 2 Enter the phone number and select OK ...

Страница 51: ...ation 2 P 55 Routes Set the route by selecting one of the saved routes 1 Select Routes from the navigation menu 2 P 43 2 Select Routes from the route menu list 3 Select a saved route from the list 4 Select Set Destination 5 Select GO to set the route to your destination 2 P 55 NOTE You can save edit or delete the route 2 P 26 ...

Страница 52: ...ecorded track The starting point of the selected track is set to your destination 1 Select Setup from the navigation menu 2 P 43 2 Select Track Log Setup 3 Select Tracks 4 Select the track 5 Select Navigate to Start Point 6 Select GO to set the route to your destination 2 P 55 ...

Страница 53: ...t intersection or POI icon 2 P 10 2 Select Set Destination uSelecting POI displays a list of POIs around the location you selected When selecting a POI from the list proceed to step 3 3 Select GO to set the route to your destination 2 P 55 NOTE You can save the location as your favorite or home location Select Save to Favorite or Set to Home in step 2 ...

Страница 54: ...rch method to find your destination 2 P 44 2 Select an option The following options are available GO Sets the route to your destination The system calculates and displays the route on the map screen Edit Option Edits your destinations and route Route Option Changes the route preferences 2 P 57 Editing the Route Rearrange add or delete destinations and save the route using the edit menu Edit Option...

Страница 55: ... OK Delete Removes the route from the list of saved routes Save as Route Adds the route to the list of saved routes 2 P 57 Changing the Order of Destinations 1 Select Rearrange Waypoints on the Edit Option screen 2 P 55 2 Select the destination to move 3 Move the selected destination to the desired position 4 Press Enter on the center panel or press switch on the left handlebar NOTE Rearrange Wayp...

Страница 56: ...Save as Route on the Edit Option screen 2 P 55 2 Enter the route name and select OK Changing Route Preferences Recalculate the current route using another route preference Route Option Screen Access the Route Option screen by selecting Route Option on the Destination Confirmation screen 2 P 55 When en route access the screen as follows 1 Select Routes from the navigation menu 2 P 43 NOTE You can u...

Страница 57: ...utes that are shorter in distance but can take more time to ride Avoid Expressways Avoids expressways Avoid Toll Roads Avoids toll roads Avoid Tunnels Avoids tunnels Avoid Ferries Avoids ferries Avoid Carpool Avoids car share lanes Avoid U Turn Avoids u turns View Route Displays the entire route 2 P 60 Detour Calculates a detour route 2 P 61 Dynamic Route Guidance Set the dynamic route guidance fe...

Страница 58: ...the estimated time and distance of each destination by selecting the flag icon The next guidance point and its distance from the current position are displayed at the top right of the screen On a multilane road the lane information is also available The lanes and their directions are displayed with small arrows The lane s you should take will be shown in white Guidance Screen The guidance screen w...

Страница 59: ...Route You can check the entire route by selecting View Route on the Route Option screen 2 P 57 Deviating From the Planned Route If you go off the route the system automatically recalculates a route to the desired destination based on your current location and direction ...

Страница 60: ...ute to clear all destinations 3 Select YES Taking a Detour Calculate a new route to avoid something ahead of you The system creates a new route if possible and attempts to get you back on your original route as quickly as possible 1 Select Detour on the Route Option screen 2 P 57 2 Select the street to avoid 3 Press Back button on the center panel twice or press Back switch on the left handlebar t...

Страница 61: ...ition 4 Press Enter on the center panel or press switch on the left handlebar 5 Select NO uSelect YES and repeat steps 1 through 4 to add another waypoint 6 Select GO Adding Waypoints from the Edit Option Screen 1 Select Add Destination on the Edit Option screen 2 P 55 2 Select a search method to add a new destination or waypoint 2 P 44 3 Move the location to the desired position 4 Press Enter on ...

Страница 62: ...ent Hospital or Police uPlaces of your selected category are listed with the nearest place at the top 3 Select a location from the list 4 Select GO to set the route to your destination uYou can edit destinations or route preferences 2 P 55 P 57 Viewing Information about Your Current Location View the address and coordinates of your current location 1 Select Emergency from the navigation menu 2 P 4...

Страница 63: ...New Destination This section describes how to change or add a new destination to your route 1 Select a search method to enter a new destination 2 P 44 2 Select an option The following options are available Set As New Destination Clears the current route and starts the new route to the location Add As Waypoint Adds the location as a waypoint 2 P 62 ...

Страница 64: ...raffic events near your location or on your route Weather Displays the current weather information System Information Displays information about the navigation system and map database 2 P 66 SiriusXM Subscriptions Displays information about SiriusXM subscriptions SiriusXM is a registered trademark of SiriusXM Radio Inc Current Location Information View the address and coordinates of your current l...

Страница 65: ...ion u System Information 66 Navigation System Information View information about the navigation system and map database 1 Select System Information on the Information screen 2 P 65 uThe system information is displayed ...

Страница 66: ...Troubleshooting System Messages P 68 Troubleshooting P 70 Hardware P 70 Voice Guidance P 70 Screen P 70 Software P 71 Routing P 72 GPS Signal P 74 Troubleshooting ...

Страница 67: ...elect a destination to delete 2 P 57 Reached the maximum number of routes Route entry has reached the maximum number Delete a route entry to create or import a route 2 P 28 In case of emergency please contact the facility to verify their availability before proceeding Message for emergency confirmation Read the message and select OK Reached the maximum number of favorites Favorite entry has reache...

Страница 68: ...B failed Reconnect the USB flash drive and try importing again If the problem persists try using another USB flash drive The import of the following Track failed Importing Track from USB failed Reconnect the USB flash drive and try importing again If the problem persists try using another USB flash drive Selected street does not contain any intersections When entering the destination by intersecti...

Страница 69: ... you are listening to the sound source you selected PROBLEM EXPLANATION While I ride my screen shows purple dots on it What do they mean These are called breadcrumbs They appear if Display Track is set to on in the track log settings The default is off 2 P 35 After using the cursor radius point locator I resumed riding but the map display is frozen If you resume riding after using this feature wit...

Страница 70: ...ecome part of a fully verified detailed coverage area The mapping database supplier is constantly verifying new and existing areas that currently show on the map as unverified Alaska and Hawaii are covered Will the navigation system work outside North America It will work in Hawaii Alaska Canada and Mexico as well as the continental U S Why is the street I am on not on the map It has been here for...

Страница 71: ...ted up again the route was no longer in the system If you turn the ignition off when you are within 220 yards 200 meters of your destination the system assumes you have reached your destination I went more than 33 yards 30 meters off my route but the system did not alert me The automatic re routing feature will normally give you visual and voice alerts if you move more than 33 yards 30 meters off ...

Страница 72: ...the GPS status The distance unit is not what I set It may recover as you keep the ignition on The route guidance stops When you use the navigation of Apple CarPlayTM the route guidance on the navigation system is cleared A road that I selected to avoid is being used when routing The system might calculate the route containing the road you select to avoid if it cannot find another route to your des...

Страница 73: ... you ride When I set a route and turned the ignition off then on the route disappeared The system may take time to resume the guidance depending on the GPS status or the route PROBLEM EXPLANATION The Navigation System is unable to acquire a proper GPS signal Make sure there is nothing blocking the GPS antenna located near the left saddlebag 2 P 6 If there is not move the vehicle to an open space a...

Страница 74: ...echnical Consumer Information System Limitations P 76 Database Limitations P 79 Customer Support P 80 Honda Customer Support P 80 Legal Information P 81 End User Terms P 81 Technical Consumer Information ...

Страница 75: ...l Positioning System GPS to determine its current location The GPS is operated by the U S Department of Defense The system is subject to changes that could affect the accuracy and performance of all GPS equipment including your Navigation System Favorable Reception Areas for GPS Signals GPS reception is best in open areas with no trees tall buildings or other tall objects that can interfere with t...

Страница 76: ...may diffuse your GPS signal and cause an inaccurate display of your current location on the map screen If this occurs the GPS icon on the top of the screen shows its signal strength and displays poor GPS satellite reception by the strength bar If the satellite reception has been lost the icon will be grayed out Low GPS satellite position less than 10 degrees on the horizon Areas with tall building...

Страница 77: ...pletes the reboot it should allow you to complete whatever functions you were performing before the reboot Honda has made every effort to verify that the system s database was accurate at the time it was created However businesses do close or move to new locations and new businesses start in the old locations For this reason you may occasionally find inaccurate information when you select and ride...

Страница 78: ...this database does not include analyze process consider or reflect any of the following categories of information Population density Neighborhood quality or safety Availability or proximity of law enforcement Construction work zones or hazards Legal restrictions such as vehicular type weight load height and speed restrictions Road slope or grade Bridge height width weight or other limits Traffic f...

Страница 79: ...ustomer Service Motorcycle Division American Honda Motor Co Inc P O Box 2200 mailstop 100 4C 7B Torrance CA 90509 2200 Telephone 866 784 1870 Canada Honda Customer Relations Honda Canada Inc 180 Honda Boulevard Markham Ontario L6C 0H9 Telephone 888 946 6329 Fax 877 939 0909 e Mail honda_cr ch honda com ...

Страница 80: ...lar purposes Accordingly but subject to the restrictions set forth in the following paragraphs you agree not to otherwise reproduce copy modify decompile disassemble create any derivative works of or reverse engineer any portion of this Data and may not transfer or distribute it in any form for any purpose except to the extent permitted by mandatory laws Restrictions Except where you have been spe...

Страница 81: ...untries do not allow certain liability exclusions or damages limitations so to that extent the above may not apply to you Export Control Honda shall not export from anywhere any part of the Data or any direct product thereof except in compliance with and with all licenses and approvals required under applicable export laws rules and regulations including but not limited to the laws rules and regul...

Страница 82: ...bedded as appropriate with the following Notice of Use and shall be treated in accordance with such Notice If the Contracting Officer federal government agency or any federal official refuses to use the legend provided herein the Contracting Officer federal government agency or any federal official must notify HERE prior to seeking additional or alternative rights in the Data NOTICE OF USE CONTRAC...

Страница 83: ... D Delete Waypoints 57 Destination Input 44 Detour 61 Display Track 36 E Edit Option 55 Delete 56 Rename 56 Emergency 63 Export Track to USB 36 F Favorite 23 Deleting 24 Editing 24 Exporting 25 Importing 23 Storing 23 Using 44 G Go 55 Go Home 16 Guidance Mode 30 Guidance Volume 42 H Home Screen 13 I Import Track 36 Information 65 Intersection 50 Country State 51 L Language 38 Left Handlebar 8 Inde...

Страница 84: ...F 42 POI ON 42 Point of Interest 45 Previous Destination 45 R Rearrange Waypoints 56 Recording Track 36 Route List 15 30 Route Option 57 Routes 26 Creating 27 Deleting 28 Exporting 29 Importing 27 Setting 52 S Save as Route 57 Set As New Destination 64 Speed and Flow 31 Street Name 47 System Controls 8 System Reset 40 T Track Log Setup 35 Tracks 37 Using 53 TTS Language 38 U USB Connector Location...

Отзывы: