background image


11 


HOT


RESTART 

If the engine is operated at higher ambient temperatures, then turned off and allowed to sit for a short 
time, it may not restart on the first pull.  
 

5.2


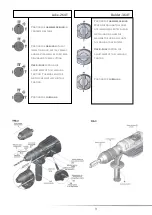
SETTING THE OPERATING MODE 2-26 (LOKE-26 4T)  (FIG. 3) 

The operating mode of the drill is selected with the mode selector switch 

11

. To change the operating 

mode push the release button 

10

 and turn the mode selector switch 

11 

to the requested position until it 

can be heard to latch 

NOTE: Change the operating mode only when the machine is switched off!! Otherwise the machine can 
be damaged.  
 

5.3


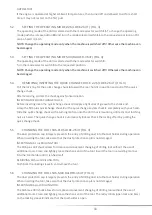
SETTING THE OPERATING MODE 5-40 (BALDER-36 4T) (FIG. 4) 

The operating mode of the drill is selected with the mode selector switch 

3.


Turn the mode selector switch 

to the requested position.  

NOTE: Change the operating mode only when the machine is switched off!! Otherwise the machine can 
be damaged.  
 

5.4


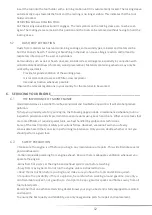
REMOVING/INSERTING THE QUICK CHANGE CHUCK  2-26 (LOKE-26 4T) (FIG. 3) 

Pull the lock ring for the quick change chuck 

6

 toward the rear, hold it in position and pull off the quick 

change chuck. 
After removing, protect the chuck against contamination.  
INSERTING


THE


QUICK


CHANGE


CHUCK  

Before inserting clean the quick change chuck and apply a light coat of grease to the shank end. 
Grasp the SDS-plus quick change chuck 

or the quick change keyless chuck

 1 

completely with your hand

Slide the quick change chuck with a turning motion onto the drill chuck mounting, until a distinct latching 
noise is heard. The quick change chuck is automatically locked. Check the locking effect by polling the 
quick change chuck.   
 

5.5


CHANGING THE TOOL SDS-PLUS LOKE-26 4T (FIG. 3) 

The dust protection cap  

largely prevents the entry of drilling dust into the tool holder during operation. 

When inserting the tool, take care that the dust protection cap 

is not damaged.   

INSERTING


SDS-

PLUS 

DRILLING


TOOL: 

The SDS-plus drill chuck allows for simple and convenient changing of drilling tool without the use of 
additional tools. Clean and lightly grease the shank end of the tool. Insert the tool in a twisting manner 
into the tool holder until it latches itself. 
REMOVING


SDS-

PLUS 

DRILLING


TOOL


Push back the docking sleeve 

5

 and remove the tool.  


5.6


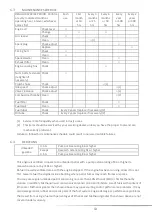
CHANGING THE TOOL SDS-MAX BALDER-36 4T (FIG. 4) 

The dust protection cap  

largely prevents the entry of drilling dust into the tool holder during operation. 

When inserting the tool, take care that the dust protection cap 

is not damaged.   

INSERTING


SDS-

MAX 

DRILLING


TOOL: 

The SDS-max drill chuck allows for simple and convenient changing of drilling tool without the use of 
additional tools. Clean and lightly grease the shank end of the tool. The red symbols (open lock and bars) 
on the locking sleeve 

2

 indicate that the tool holder is open.  

Содержание 11985

Страница 1: ...1 Instruction manual Loke 26 4T V nr 11986 Balder 36 4T V nr 11985 Blinken a s Østkilen 4 1621 Gressvik Tlf 90 70 11 00 Fax 69 36 09 20 www blinken no ...

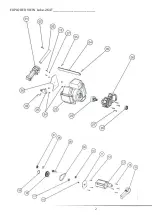
Страница 2: ...2 EXPLODED VIEW Loke 26 4T_______________________________________ ...

Страница 3: ...3 EXPLODED VIEW Balder 36 4T_______________________________________ ...

Страница 4: ... Page 11 1 4 REMOVING INSERTING THE QUICK CHANGE CHUCK Loke 26 4T Page 11 1 5 CHANGING THE TOOL SDS plus Loke 26 4T Page 11 1 6 CHANGING THE TOOL SDS max Balder 36 4T Page 11 1 7 DUST CHIP EXTRACTION Page 12 2 SERVICING YOUR ENGINE Page 12 2 1 THE IMPORTANCE OF MAINTENANCE Page 12 2 2 SAFETY PRECAUTION Page 12 2 3 MAINTENANCE SCHEDULE Page 13 2 4 REFUELING Page 13 2 5 ENGINE OIL Page 14 2 6 OIL LE...

Страница 5: ...tructions for future reference Failure to follow the warnings and instructions may result in electric shock fire and or serious injury 1 Work area safety Keep work area clean and well lit Cluttered or dark areas invite accidents Do not operate drill in explosive atmospheres such as in the presence of flammable liquid gases or dust Drill create sparks which may ignited the dust or fumes Keep childr...

Страница 6: ...nism during work carry out cooling cycles otherwise the timing belt could deteriorate and break replacement of the timing belt is not covered by warranty Store idle drill out of the reach of children and do not allow persons unfamiliar with the drill or this instruction to operate it Maintain drill check for misaligned or binding of moving parts breakage of parts and any other condition that may a...

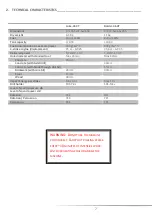
Страница 7: ...5 Delivered power 0 70 KW 1 HP 1 0 KW 1 3 HP Hole diameter with standard tool Max 26mm Max 40mm Concrete 26mm Concrete with twist drill 40mm Concrete with break through drill bit 55mm Brickwork with core bit 26mm 90mm Steel 13mm Wood 30mm Impact Energy per stroke Max 3 0 J Max 10 J Drill holder SDS Plus SDS Max Level of sound pressure dB Level of sound power dB Rotation YES NO Rotation Percussion ...

Страница 8: ...8 3 COMPONENT AND CONTROL LOCATION________________________________________________________________ ...

Страница 9: ...OR ADJUSTMENT OF THE CHISELLING POSITION THE MODE SELECTOR SWITCH DOES NOT LATCH IN THIS POSITION POSITION FOR CHISELLING POSITION FOR HAMMER DRILLING WHEN THE DRILLING TOOL DOES NOT IMMEDIATELY ROTATE UPON SWITCHING ON ALLOW THE MACHINE TO RUN SLOWLY UNTIL THE DRILLING TOOL ROTATES VARIO LOCK POSITION FOR ADJUSTMENT OF THE CHISELLING POSITION POSITION FOR CHISELLING Loke 26 4T Balder 36 4T ...

Страница 10: ... filter element will restrict air flow to the carburetor reducing engine performance CHECK THE IMPACT MECHANISM 1 A damaged dust protection cap should be changed immediately We recommend having this carried out by an after sales service 2 To provide safe and good operations check that the tools are cleaned 3 Check that the impact mechanism is free of oil leaks In this case consult an after sales s...

Страница 11: ...ange chuck 2 or the quick change keyless chuck 1 completely with your hand Slide the quick change chuck with a turning motion onto the drill chuck mounting until a distinct latching noise is heard The quick change chuck is automatically locked Check the locking effect by polling the quick change chuck 5 5 CHANGING THE TOOL SDS PLUS LOKE 26 4T FIG 3 The dust protection cap 4 largely prevents the en...

Страница 12: ...ood maintenance is essential for safe economical and troublefree operation It will also help reduce pollution To help you properly care for your engine the following pages include a maintenance schedule routine inspection procedure and simple maintenance procedures using basic hand tool s Other service tasks that are more difficult or require special tools are best handled by professional technici...

Страница 13: ...ficient Failure to follow this maintenance schedule could result in non warrantable failures 6 4 REFUELING Unleaded gasoline U S A Pump octane rating 86 or higher Except U S A Research octane rating 91 or higher Pump octane rating 86 or higher This engine is certified to operate on unleaded petrol with a pump octane rating of 86 or higher a research octane rating of 91 or higher Refuel in a well v...

Страница 14: ...e and service life Use 4 stroke auto motive detergent oil RECOMMENDED OIL Use 4 stroke motor oil that meets or exceeds the requirements for API service classification SJ or later or equivalent Always check the API service label on the oil container to be sure it includes the letters SJ or later or equivalent SAE 10W 30 is recommended for general use The recommended operating range of this engine i...

Страница 15: ...an 80 cm Slowly add enough oil to fill to the bottom edge of the oil fill hole FIG 6 RUNNING THE ENGINE WITH A LOW OR EXCESSIVE OIL LEVEL CAN CAUSE ENGINE DAMAGE THIS TYPE OF DAMAGE IS NOT COVERED BY THE DISTRIBUTOR S LIMITED WARRANTY 5 Reinstall the oil filler cap dipstick securely If any oil is spilled make sure to wipe it up 6 8 AIR CLEANER FIG 8 A dirty air cleaner will restrict air flow to th...

Страница 16: ... from the rotating parts or burned by the muffler 2 Disconnect the spark plug cap and remove any dirt from around the spark plug area 3 Remove the spark plug with a 5 8 inch spark plug wrench 4 Inspect the spark plug Replace it if damaged or badly fouled if the sealing washer is in poor condition or if the electrode is worn 5 Measure the spark plug electrode gap with a wire type feeler gauge Corre...

Страница 17: ...point solvent If the fuel filter is excessively dry replace it 5 Remove water and dirt from the fuel tank by rinsing the inside of the fuel tank with non flammable or high flash point solvent 6 Insert the fuel filter into the fuel tank and tighten the fuel filler cap securely 6 12 SPARK ARRESTER In some areas it is illegal to operate an engine without a spark arrester Check local laws and regulati...

Страница 18: ...arm Engine switch OFF on the equipment Turn engine switch to ON position 2 Check fuel Out of fuel Refuel FIG 5 Bad fuel engine stored without treating or draining gasoline or refueled with bad gasoline Drain fuel tank and carburetor FIG 13 Refuel with fresh gasoline FIG 5 3 Remove and inspect spark plug Spark plug faulty fouled or improperly gapped Gap or replace spark plug FIG 11 Spark plug wet w...

Страница 19: ...ranty from the date of purchase always keep the receipt or the invoice Damaged materials and manufacturing defects are covered by warranty in this case no expenses will be demanded for repair or replacement at manufacturer s premises the purchaser should bear transport expenses Damage attributable to normal wear and tear overload or improper handling will be excluded from the warranty see APPROPRI...

Страница 20: ...20 Blinken a s Østkilen 4 1621 Gressvik Tlf 90 70 11 00 Fax 69 36 09 20 www blinken no ...

Отзывы: