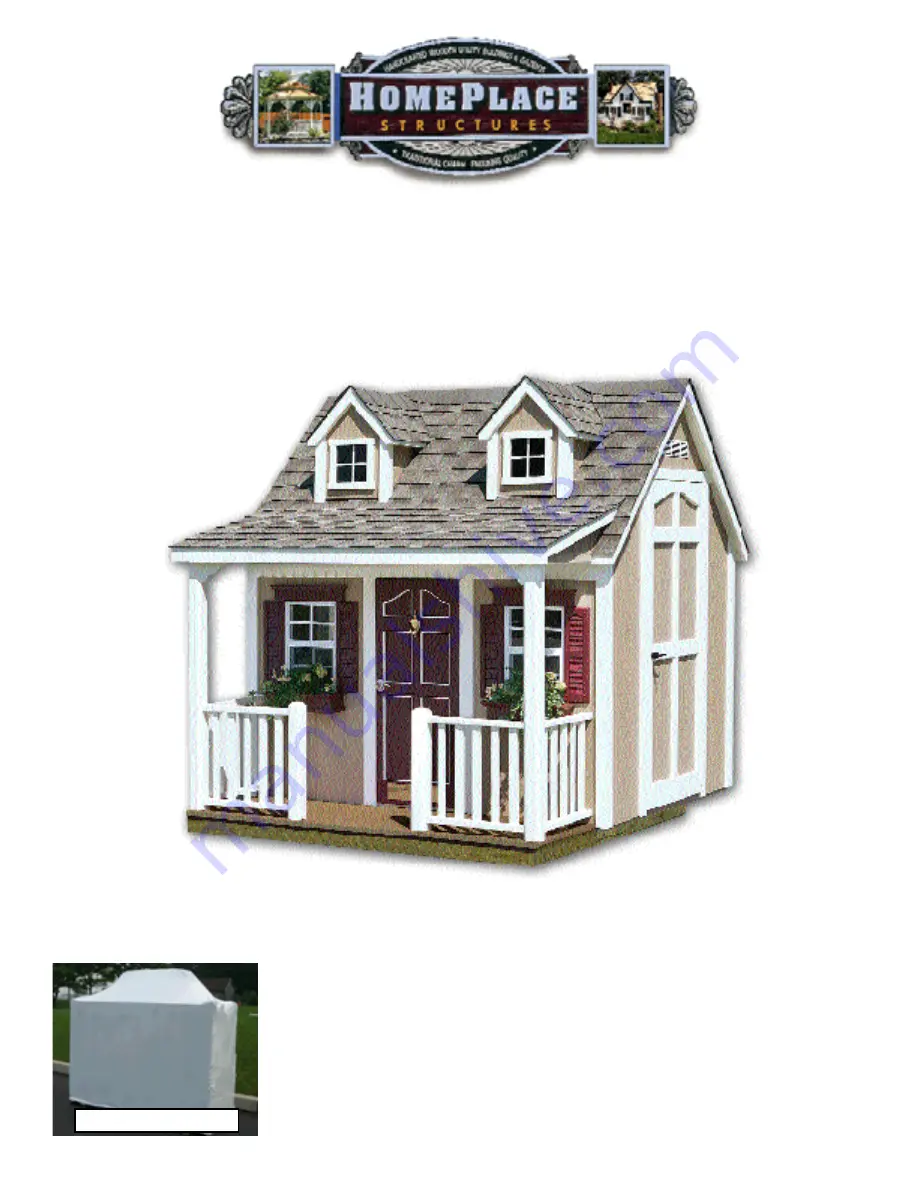
HomePlace Backyard Cottage Скачать руководство пользователя страница 1

Backyard Cottage

Assembly Manual

© HomePlace Structures

Shown with optional porch & railing and cus-

tomer supplied shingles

HomePlace Structures

Phone: 717.354.3777

Hours: 9-5 Monday-Friday EST

www.HomePlaceStructures.com

Kit ships as shown

Rev 7/17/06

Содержание Backyard Cottage

Страница 1: ...bly Manual HomePlace Structures Shown with optional porch railing and cus tomer supplied shingles HomePlace Structures Phone 717 354 3777 Hours 9 5 Monday Friday EST www HomePlaceStructures com Kit ships as shown Rev 7 17 06 ...

Страница 2: ...much of the unit in this manual the unit can also be assembled with screws or hand nails Take a deep breath and get at it the satisfaction and enjoyment of this playhouse is only a few hours away Have Fun Remember it is very important that you have a level site for your playhouse and that the play house floor is perfectly level prior to assembling the playhouse Note The playhouse depicted in this ...

Страница 3: ...Cut shrink wrap and unwrap kit page 3 HomePlace Structures Step 3 Cut off packaging bands and remove one section at a time by backing out screws used for packaging Carry sections to site where unit will be built Note Use caution when unpacking kit keep sections from falling after screws are removed Do not throw away bottom of skid this is the large floor section ...

Страница 4: ... wall using 2 1 2 fasteners as shown Note Make sure wall panel is plumb up and down HomePlace Structures Step 8 Fasten wall to floor as shown using 2 1 2 nails or screws Fasteners should be spaced approximately 12 apart Step 5 Set floor on leveled site If needed level site with a bed of crushed stone or gravel It is very impor tant for site to be level Step 4 Assemble floor sections by aligning ma...

Страница 5: ...nly one rafter gusset keeping rafter gusset towards inside of playhouse Align edge of rafter flush with edge of top wall plate and fasten using 2 1 2 fasteners Step 11 Align inside of rafter flush with marks keep point even with the outside edge of 2x6 top plate Using 3 nails toenail rafter into the top of side wall After nailing front side repeat on back wall Step 12 Caulk end gables as shown usi...

Страница 6: ...sten to rafters along bottom as shown Optional door kick removal It is recommended to remove door kick from side and front doors this should be completed after roof is set Step 18 Remove screw from door as shown Step 16 Install ripped OSB section and fasten to rafters repeating previous steps Repeat steps 13 16 on back roof section Step 17 Paint playhouse and trim desired colors with paint purchas...

Страница 7: ...Trim Shutters Flower Box Installation Step 21 Gable end rafters complete repeat steps on opposite gable end Step 22 Install fascia trim aligning flush at both ends with end raf ters and against bottom of roof sheathing Fasten with 1 1 2 galva nized trim nails HomePlace Structures Step 19 Install window shutters top window trim and flower boxes as shown ...

Страница 8: ...omePlace Structures Step 23 Front fascia trim com plete repeat steps on back wall Step 24 Align gable trim as shown and fasten to building using 1 1 2 trim nails Step 25 Install top door trim before installing back gable trim and fasten to building using 1 1 2 trim nails Step 27 Caulk above top door trim piece using clear silicone sealer as shown ...

Страница 9: ...nt side of playhouse Note If your unit includes the optional porch only install first three rows of shingles on front side of playhouse Step 28 Install corner trim pieces as shown and fasten using 1 1 2 trim nails Note Corner trim pieces are each cut to fit at one specific corner If pieces don t fit make sure you have the correct corner trim piece page 9 HomePlace Structures ...

Страница 10: ...n door down at least 1 1 2 to prevent bracket from hitting door header Step 30 Install door handle for large door as shown Note When installing inside of door handle keep interior and exte rior handles vertically aligned as shown Step 31 Fasten decorative small door handle to child s door as shown ...

Страница 11: ...building Step 3 Secure porch floor to playhouse using 2 1 2 nails or screws as shown Optional Porch Installation Step 2 Slide back of porch under door trim and center on building The front of the floor has an extended lip Step 4 Replace remaining floor boards and fasten with nails or screws as shown page 11 HomePlace Structures ...

Страница 12: ... 1 2 galvanized nails or screws Note Railing sections are interchangeable Step 6 Properly align front posts and attach to railing and porch floor as shown Repeat on opposite side of porch Step 7 Align porch roof end rafter and siding sections and fasten to roof section as shown page 12 HomePlace Structures ...

Страница 13: ...Step 14 Set roof on porch posts align with playhouse roof and fasten to playhouse using 2 1 2 nails or screws Note Nails screws should be fastened to rafters in roof page 13 HomePlace Structures ...

Страница 14: ...Assembly of Optional Dormers Assemble dormer by fitting pieces together and fastening with galvanized staples or nails as shown page 14 HomePlace Structures ...

Страница 15: ...ch roof above bottom of dormers and then align dormers where desired as shown Fasten dormers to roof using roof nails or staples Finish shingling house and dormers following instructions from shingle manufacturer ...

Страница 16: ...2 nails or screws HomePlace Structures Optional Loft Installation Place loft onto support pieces and fasten using 2 1 2 nails or screws Install loft railing as shown Install left side loft support piece 9 down from top of wall this is 48 from floor level and fasten into wall studs using 2 1 2 nails or screws page 16 ...

Страница 17: ...Previous step continued Align loft ladder with opening and fasten to loft using 2 1 2 screws or nails Fasten loft to floor as shown ...

Отзывы: