Home Decorators Collection Windward 91165 Скачать руководство пользователя страница 3

3

HOMEDEPOT.COM/HOMEDECORATORS

Please contact 1-800-986-3460 for further assistance.

Pre-Installation

Warranty

The supplier warrants the fan motor to be free from defects in workmanship and material present at time of shipment from the factory for a 
lifetime after the date of purchase by the original purchaser. The supplier also warrants that all other fan parts, excluding any glass or acrylic 
blades, to be free from defects in workmanship and material at the time of shipment from the factory for a period of two years after the date 
of purchase by the original purchaser. We agree to correct such defects without charge or at our option replace with a comparable or superior 
model if the product is returned. To obtain warranty service, you must present a copy of the receipt as proof of purchase. All costs of removing 
and reinstalling the product are your responsibility. Damage to any part such as by accident, misuse, improper installation, or by affixing any 
accessories, is not covered by this warranty. Because of varying climatic conditions this warranty does not cover any changes in brass finish, 
including rusting, pitting, corroding, tarnishing, or peeling. Brass finishes of this type give their longest useful life when protected from varying 
weather conditions. A certain amount of “wobble” is normal and should not be considered a defect. Servicing performed by unauthorized persons 
shall render the warranty invalid. There is no other express warranty. Home Decorators Collection hereby disclaims any and all warranties, 
including but not limited to those of merchantability and fitness for a particular purpose to the extent permitted by law. The duration of any 
implied warranty which cannot be disclaimed is limited to the time period as specified in the express warranty. Some states do not allow a 
limitation on how long an implied warranty lasts, so the above limitation may not apply to you. The retailer shall not be liable for incidental, 
consequential, or special damages arising out of or in connection with product use or performance except as may otherwise be accorded by 
law. Some states do not allow the exclusion of incidental or consequential damages, so the above exclusion or limitation may not apply to you. 
This warranty gives specific legal rights, and you may also have other rights which vary from state to state. This warranty supersedes all prior 
warranties. Shipping costs for any return of product as part of a claim on the warranty must be paid by the customer.

Contact the Customer Service Team at 1-800-986-3460 or visit www.HomeDepot.com/homedecorators.

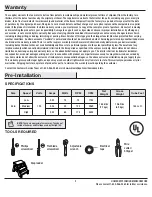
SPECIFICATIONS

TOOLS REQUIRED

NOTE:

 These are approximate measures. They do not

include the Amps and Wattage used by the light kit.

Phillips 
screwdriver

Flat blade 
screwdriver

Adjustable 
wrench

Electrical 
tape

Wire 
cutter/ 
Stripper

Step ladder

Size

Speed

Volts

Amps

Watts

RPM

CFM

Net

Weight

Gross

Weight

Cube Feet

44 in.

Low

Medium

High

120

0.25

0.38

0.53

13

30

65

75

120

175

1735

2969

4425

16.98 lbs

(7.7 kgs)

19.62 lbs

(8.9 kgs)

1.54 cu.ft.

Содержание Windward 91165

Страница 1: ...lity products designed to enhance your home Visit us online to see our full line of products available for your home improvement needs Thank you for choosing Home Decorators Collection Item 1002 543 1...

Страница 2: ...proper assembly 8 After making electrical connections spliced conductors should be turned upward and pushed carefully up into the outlet box The wires should be spread apart with the grounded conduct...

Страница 3: ...rranty invalid There is no other express warranty Home Decorators Collection hereby disclaims any and all warranties including but not limited to those of merchantability and fitness for a particular...

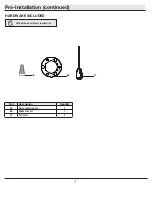
Страница 4: ...4 Part Description Quantity AA Wire connecting nut 3 BB Rubber Gasket 1 CC Pull chain 2 Pre Installation continued HARDWARE INCLUDED NOTE Hardware not shown to actual size AA BB CC...

Страница 5: ...n motor assembly 1 E Light kit pan 1 Part Description Quantity F Decorative motor collar cover 1 G Blade 5 H Light kit fitter assembly 1 I Glass bowl 1 J LED Bulb 9 5 watts maximum 2 IMPORTANT This pr...

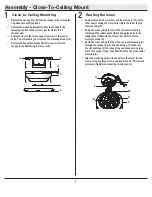
Страница 6: ...ure Use the appropriate fasteners and materials The outlet box and its bracing must be able to fully support the weight of the moving fan at least 35 lbs Do not use a plastic outlet box The illustrati...

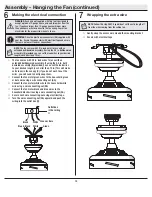
Страница 7: ...assembly D by turning it counter clockwise Install the downrod B by inserting it into the motor collar M and turning it clockwise until it is tight Re tighten the setscrew DD on the motor collar M on...

Страница 8: ...d lock washers FF every other one securing the motor collar M to the top of the fan motor housing D Route the wires exiting the top of the fan motor assembly D through the rubber gasket BB aligning th...

Страница 9: ...cket of the slide on mounting bracket Turn the ball downrod assembly clockwise until it is seated with the tab of the slide on mounting bracket aligned with slot in the ball If using close to ceiling...

Страница 10: ...no shorter than 12 in The fan comes with 30 in lead wires for use with an extended ball downrod assembly If using the 4 5 in ball downrod assembly B provided you can cut the lead wires to your desired...

Страница 11: ...aligning the ring s slots with the screws in the canopy C Rotate the ring counter clockwise to lock in place WARNING When using the standard ball downrod mounting the tab in the ring at the bottom of...

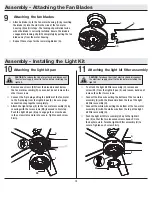
Страница 12: ...to locking clip QQ completely by pulling the fan blade away from the motor housing Repeat these steps for the remaining blades G G C D QQ CAUTION To reduce the risk of electric shock disconnect the el...

Страница 13: ...re removing J I CC E Assembly Installing the Light Kit continued Operation of your fan V V V V The pull chain controls the fan speed as follows 1 pull High 2 pulls Medium 3 pulls Low and 4 pulls Off S...

Страница 14: ...eck this level by selecting a point on the ceiling above the tip of one of the blades Measure from a point on the center of the blade to the point on the ceiling Rotate the fan until the next blade is...

Страница 15: ...ion If this equipment does cause harmful interference to radio or television reception which can be determined by turning the equipment off and on the user is encouraged to try to correct the interfer...

Страница 16: ...a mejorar tu hogar Vis tanos por Internet para ver nuestra l nea completa de productos disponibles para las necesidades de mejoras de tu hogar Gracias por elegir Home Decorators Collection Art culo n...

Страница 17: ...ones el ctricas debes voltear los conductores empalmados hacia arriba y meterlos con cuidado en la caja el ctrica Los cables deben estar separados con el cable a tierra y el conductor a tierra del equ...

Страница 18: ...autorizado invalidar la garant a No existe ninguna otra garant a expresa Mediante la presente Home Depot Decorators Collection se exime de cualquier garant a incluyendo pero sin limitarnos a aquellas...

Страница 19: ...Descripci n Cantidad AA Tuerca para conectar cables 3 BB Junta de goma 1 CC Interruptor de cadena 2 Preinstalaci n continuaci n HERRAJES INCLUIDOS NOTA No se muestra el tama o real de los herrajes AA...

Страница 20: ...dor 1 E Carcasa del kit de luces 1 Pieza Descripci n Cantidad F Cubierta decorativa del collar n del motor 1 G Aspa 5 H Ensamblaje del soporte del kit de luces 1 I Taz n de vidrio 1 J Bombilla LED m x...

Страница 21: ...s y materiales apropiados La caja el ctrica y su soporte deben poder sostener el peso completo del ventilador en movimiento al menos 15 9 kg No uses una caja el ctrica de pl stico Las ilustraciones a...

Страница 22: ...otor M en la parte superior del conjunto del motor y el ventilador D Instala el tubo bajante B insert ndolo en el collar n del motor M y gir ndolo hacia la derecha hasta que quede fijo Vuelve a apreta...

Страница 23: ...e superior de la carcasa del motor del ventilador D Pasa los cables que salen de la parte superior del ensamblaje del motor del ventilador D a trav s de la junta de goma BB y alinea los orificios de l...

Страница 24: ...e A Gira el ensamblaje del tubo bajante bola de izquierda a derecha hasta que quede encajado con la pesta a del soporte de montaje deslizante alineada con la ranura de la bola Si usas el montaje cerca...

Страница 25: ...s al largo deseado no menos de 30 5 cm El ventilador viene con cables terminales de 76 2 cm para uso con un ensamblaje extendido de tubo bajante bola Si usas el ensamblaje extendido de tubo bajante bo...

Страница 26: ...los tornillos en la cubierta C Gira el aro en sentido contrario a las manecillas del reloj para fijarlo en su lugar ADVERTENCIA Cuando uses el ensamblaje del tubo bajante bola est ndar la pesta a en...

Страница 27: ...i n en la presilla de traba QQ completamente halando el aspa del ventilador de la carcasa del motor Repite estos pasos para las aspas restantes G G C D QQ PRECAUCI N Para disminuir el riesgo de descar...

Страница 28: ...r el kit de luces continuaci n C mo poner en funcionamiento el ventilador V V V V El interruptor de cadena controla las velocidades del ventilador de la siguiente manera 1 vez alta 2 veces media 3 baj...

Страница 29: ...yor a de los problemas de oscilaci n del ventilador se deben a que las aspas no est n a un mismo nivel Verifica este nivel seleccionando un punto en el techo sobre la punta de una de las aspas Mide de...

Страница 30: ...encia en una instalaci n particular Si este equipo causa interferencia que perjudica la recepci n de radio o televisi n lo cual puede determinarse encendiendo y apagando el equipo se recomienda al usu...

Отзывы: