


14
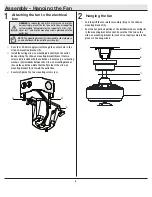
Assembly - Attaching the Light (continued)
Installing the decorative cage
3
□
Remove three screws (NN) from light kit pan (H) .
□
Push up the decorative cage (K) to the light kit pan (H) and
align the round hole of light kit pan (H) with the hole in the
decorative cage (K).
□
Re-install the three screws (NN) removed in step 1 and tighten
the screws to secure the decorative cage (K) properly.
NN
K
H
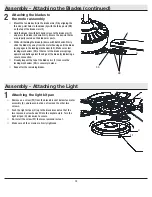
Assembly - Attaching the Accessories
Mounting the remote control holder
□
Slide the screw cover plate up to remove it from the wall
cradle.
□
Position the wall cradle in the desired position and attach it to
the wall using the included wall cradle screws.
□
Slide the screw cover plate back onto the wall cradle to
conceal the screws.
Screw cover plate
NOTE:
Screw wall anchors are included for extra support. The
included screws are designed to screw easily into the wall. If
you would like a more permanent or secure hold, install the wall
anchors prior to attaching the wall cradle to the wall.
1