


11
HOMEDEPOT.COM/HOMEDECORATORS
Please contact 1-800-986-3460 for further assistance.
Assembly - Attaching the Blades
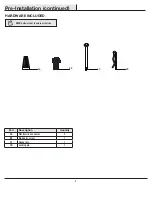
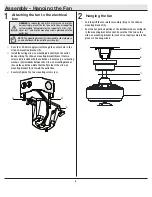
Attaching the blade arms
to the motor
1
□
Fasten the blade arms (F) to the fan-motor assembly (E) by
inserting the alignment post into the slot on the bottom of the
motor and tightening the pre-installed blade bracket screws
(BB).
□
Repeat this step for the remaining blade assemblies.
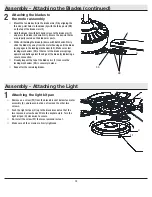
Assembly - Hanging the Fan (continued)
Mounting the fan-motor assembly
(standard mount)
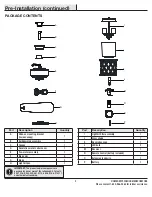
□
Align the locking slots of the canopy (C) with the two screws
(GG) and alignment post (KK) in the mounting bracket (A).
□
Push up the canopy (C) and turn clockwise until the
alignment post (KK) engage to the round hole and the
screws (GG) engage to the key slots.
□
Firmly tighten the two mounting screws (GG).
□
Align the oval shape on the canopy (C) with canopy bottom
cover (II), Push up the canopy bottom cover (II) until the
screw (GG) heads engage to the slots on the canopy bottom
cover (II) so that the magnetic canopy bottom cover (II) can
be attached to the bottom of the canopy (C) properly.
7
WARNING:
When using the standard ball/downrod mounting,
the tab in the ring at the bottom of the mounting bracket
must rest in the groove of the hanger ball. Failure to properly
seat the tab in the groove could cause damage to the wiring.
NOTE:
The magnet is pre-attached on the canopy bottom
cover for you to remove and install easily.
NOTE:
Your fan features revolutionary advancements for
quick and easy blade installation, including an alignment
post and captive blade bracket screws.
Attaching the blade arms
to the motor
1
M
C
A
GG
II
B
E
D
KK
E
F
BB