background image

ONDERHOUD 

HOLZMANN MASCHINEN GmbH   www.holzmann-maschinen.at 

 73


ABS 850


ONDERHOUD 


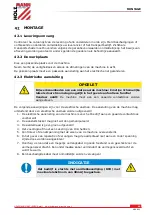
OPGELET 


Schakel  de  machine  vóór  onderhoudswerkzaamheden 

uit en trek de stekker uit! 
Zo  worden  materiële  schade  en  ernstige  lichamelijke 

letsels  door  onbedoeld  inschakelen  van  de  machine 

voorkomen! 


De machine is onderhoudsarm en bevat maar enkele onderdelen waaraan de bediener een 

instandhouding moet uitvoeren. 
Laat storingen of defecten welke de veiligheid van de machine kunnen benadelen onmiddellijk 

verhelpen. 
 

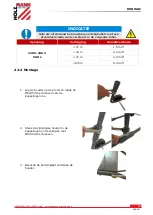
INDICATIE 

Slechts  een  regelmatig  onderhouden  en  goed  gereinigd  apparaat  kan  een  bevredigend 

hulpmiddel zijn. Gebreken aan onderhoud en reiniging kunnen tot onvoorziene ongevallen en 

letsels leiden. 
Reparaties  waar  speciale  vakkennis  voor  nodig  is  dienen  enkel  door  geautoriseerde  service 

centers te worden uitgevoerd.  

Een  ondeskundig  ingrijpen  kan  de  machine  beschadigen  en  is  gevaarlijk  voor  uw 

veiligheid. 


Controleer regelmatig of de waarschuwings- en veiligheidsindicaties aan de machine voorhanden 

en in een perfect leesbare toestand zijn.  
Controleer de perfecte toestand van de veiligheidsvoorzieningen vóór elk bedrijf! 
De machine mag niet in een vochtige ruimte worden opgeslagen en moet tegen de invloed van 

weersomstandigheden worden beschermd. 
Vóór de eerste ingebruikname alsook na 100 bedrijfsuren moeten alle beweeglijke verbindingen 

(indien nodig vooraf met een borstel van spanen en stof reinigen) met een dunne laag smeerolie 

of smeervet worden ingesmeerd. 

44.1


Instandhouding en onderhoudsplan 


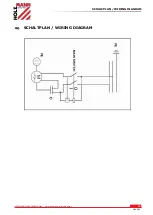
Reinig de filterzak in periodieke intervallen om de filtercapaciteit te bewaren. 


Reinig  de  afzuigaansluitingen  van  de  installatie,  met  name  bij  het  rooster  kunnen  zich 

mettertijd afzettingen verzamelen, die het afzuigvermogen benadelen. 

44.1.1


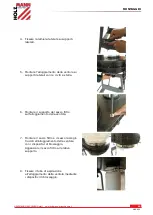
Spaanzak wissel 

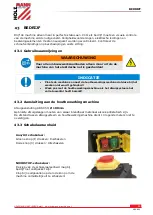
De machine moet alvorens de spaanzak te wisselen minstens 10 minuten zijn uitgeschakeld, opdat 

zich  de  stofdeeltje  neerlaten.  Alvorens  de  spaanzak  te  wisselen  moet  de  machine  van  de 

stroomvoeding  worden  gescheiden.  Wissel  de  spaanzak  als  hij  tot  60-70%  gevuld  is.  Gebruik 

uitsluitend spaanzakken die voldoen aan de afmetingen van de machine. Gebruik uitsluitend 100% 

dichte spaanopvangzakken. 

Содержание ABS 850

Страница 1: ...riginalfassung DE BETRIEBSANLEITUNG ABSAUGANLAGE bersetzung Translation EN USER MANUAL DUST COLLECTOR FR MODE D EMPLOI ASPIRATEUR CZ N VOD K POU IT ODS VAC ZA ZEN IT ISTRUZIONI PER L USO IMPIANTO DI A...

Страница 2: ...itshinweise 12 5 3 Restrisiken 13 MONTAGE 14 6 1 Lieferumfang 14 6 2 Der Arbeitsplatz 14 6 3 Elektrischer Anschluss 14 6 4 Zusammenbau 15 BETRIEB 17 7 1 Betriebshinweise 17 7 2 Anschluss an die Holzbe...

Страница 3: ...of dust collector to machine 28 15 3 Switch unit 28 MAINTENANCE 29 16 1 Maintenance plan 29 16 1 1 Change of dust collector bag 29 16 2 Cleaning 30 16 3 Disposal 30 TROUBLE SHOOTING 30 PR FACE FR 31...

Страница 4: ...yclage 41 D PISTAGE DES PANNES 41 P EDMLUVA CZ 42 TECHNIKA 43 26 1 Komponenty 43 26 2 Obsah dodavky 43 26 3 Technicke udaje 43 BEZPE NOST 44 27 1 U el pou iti 44 27 2 Bezpe nostn pokyny 45 27 3 Dal ri...

Страница 5: ...a 58 35 2 Postazione di lavoro 58 35 3 Allacciamento elettrico 58 35 4 Montaggio 59 USO 61 36 1 Istruzioni per l uso 61 36 2 Allacciamento alla macchina per la lavorazione del legno 61 36 3 Unit inter...

Страница 6: ...Schakelaareenheid 72 ONDERHOUD 73 44 1 Instandhouding en onderhoudsplan 73 44 1 1 Spaanzak wissel 73 44 2 Reiniging 74 44 3 Verwijdering 74 VERHELPEN VAN FOUTEN 74 SCHALTPLAN WIRING DIAGRAM 75 ERSATZT...

Страница 7: ...e ke kod m na stroji a zran n m osob IT LEGGERE LE ISTRUZIONI Leggere attentamente le istruzioni d uso e di manutenzione della vostra macchina e familiarizzare con gli elementi di comando della macchi...

Страница 8: ...ella manutenzione e delle pause e scollegare la spina di rete NL Machine v r onderhoud en pauzes uitschakelen en stekker uittrekken DE Warnung vor rotierenden Teilen EN Warning of rotating parts FR At...

Страница 9: ...eise Missachtung kann zu ernsten Verletzungen f hren Durch die st ndige Weiterentwicklung unserer Produkte k nnen Abbildungen und Inhalte geringf gig abweichen Sollten Sie Fehler feststellen informier...

Страница 10: ...5 Absaugschlauch 6 Klemmteile 7 Halterung unten 8 Bodenblech und Seitenblech 9 Seitenhalterung 10 Kleinteile 4 3 Technische Daten Motorleistung S1 100 S6 40 0 75kW 1 05kW Sp nesack 280mm 900mm Filter...

Страница 11: ...aufweisen Beachten Sie auch die Betriebsanleitung der angeschlossenen Holzbearbeitungsmaschine Arbeitsbedingungen Die Maschine ist f r die Arbeit unter folgenden Bedingungen bestimmt Feuchtigkeit max...

Страница 12: ...eiches die Maschine ausschalten und warten bis die Maschine still steht Vor Wartungs oder Einstellarbeiten ist die Maschine von der Spannungsversorgung zu trennen Stellen Sie sicher dass die Maschine...

Страница 13: ...r jeder Inbetriebnahme die Maschine auf einwandfreien Zustand Gefahr durch elektrischen Schlag Betreiben sie die Maschine nur an einer Stromquelle die mit einem FI Schalter abgesichert ist Steckdosen...

Страница 14: ...schine muss an einer geerdeten Steckdose betrieben werden Folgende Anweisungen richten sich an einen Elektrofachmann Der Anschluss der Maschine ist ausschlie lich durch einen Elektrofachmann durchzuf...

Страница 15: ...uerschnitt Spannung Verl ngerung Litzenquerschnitt 220 V 240 V 50 Hz 27 m 1 5 mm2 44 m 2 5 mm2 70 m 4 0 mm2 105 m 6 0 mm2 6 4 Zusammenbau 1 Die Halterung unten auf den Boden legen und die M6x35mm Schr...

Страница 16: ...n 5 Das L fterradgeh use mit den 4 Sternschrauben an den Seitenhalterungen montieren 6 Filtersackhalterung am L fterradgeh use montieren 7 Filtersack und Sp nesack mit den Klemmen am L fterradgeh use...

Страница 17: ...zbearbeitungsmaschine dass diese sie bei der Arbeit nicht behindert Arbeiten sie mit der Holzbearbeitungsmaschine erst wenn die Absauganlage die volle Drehzahl erreicht hat 7 2 Anschluss an die Holzbe...

Страница 18: ...fen Sie vor jedem Betrieb den einwandfreien Zustand der Sicherheitseinrichtungen Bei Lagerung der Maschine darf diese nicht in einem feuchten Raum aufbewahrt werden und muss gegen den Einfluss von Wit...

Страница 19: ...EHEBUNG BEVOR SIE DIE ARBEIT ZUR BESEITIGUNG VON DEFEKTEN BEGINNEN TRENNEN SIE DIE MASCHINE VON DER STROMVERSORGUNG Fehler M gliche Ursache Behebung Maschine l uft nicht Schalter defekt Schalter repar...

Страница 20: ...advancements in product design construction pictures and content may diverse slightly However if you discover any errors inform us please Technical specifications are subject to changes Please check...

Страница 21: ...tor 5 Dust hose 6 Clamp parts 7 Lower bracket 8 Bottom panel and side panel 9 Side bracket 10 Hardware 12 3 Technical details Motor power S1 100 S6 40 0 75kW 1 05kW Chip bag 280mm 900mm Dust bag 360mm...

Страница 22: ...minate certain residual risk factors WARNING Inflammable gases e g paint or varnish mist must not be extracted Polyethylene dust bags must be a minimum thickness of 0 2mm When using bags made of other...

Страница 23: ...unning unattended Before leaving the working area switch the machine off and wait until the machine stops Always disconnect the machine prior to any actions performed at the machine Avoid unintentiona...

Страница 24: ...n of the machine in the meantime Hazard of electric shock Undetected malfunctions in the power supply and or the connected wood working machine might result in electric shock when touching the machine...

Страница 25: ...h non grounded machines Severe injury or even death may arise though electrocution Therefore The machine must be operated at a grounded power socket The connection of the machine to the electric power...

Страница 26: ...table declared Voltage Extension Cross section 220 V 240 V 50 Hz 27 m 1 5 mm2 44 m 2 5 mm2 70 m 4 0 mm2 105 m 6 0 mm2 14 4 Assembly 1 Place the lower bracket on the floor and loose the bolts M6x35mm o...

Страница 27: ...brackets 5 Using 4 knobs to install the fan wheel housing on the side brackets 6 Install the bag support on the fan wheel housing 7 Set the bag on the fan wheel housing and tighten the bag clamp then...

Страница 28: ...next to the woodworking machine in a way that it will not interfere with your work Start to work with the woodworking machine only until the dust collector has reached full speed 15 2 Connection of du...

Страница 29: ...f the guiding rollers is essential for a smooth band guidance and a clean cut Store the machine in a closed dry location NOTICE Clean your machine regularly after every usage it prolongs the machines...

Страница 30: ...OU START WORKING FOR THE ELIMINATION OF DEFECTS DISCONNECT THE MACHINE FROM THE POWER SUPPLY Trouble Possible cause Solution The magnetic support has no magnetic force Switch defective Repair switch P...

Страница 31: ...s informer en utilisant le formulaire de commentaires Les caract ristiques techniques peuvent varier sans avis pr alable S il vous pla t v rifier le contenu du produit imm diatement apr s r ception po...

Страница 32: ...yau d aspiration 6 Colliers de serrage 7 Support inf rieur 8 Panneau inf rieur et lat ral 9 Supports lat raux 10 Petit mat riel 19 3 Donn es techniques Puissance moteur S1 100 S6 40 0 75kW 1 05kW Sac...

Страница 33: ...nant des dommages mat riels ou des blessures Holzmann Maschinen ne prend aucune responsabilit ou garantie ATTENTION Les gaz inflammable ex Poussi re de peinture ou vernis Ne doivent pas tre aspir s Le...

Страница 34: ...a zone de travail D brancher la machine du secteur avant chaque entretien activit s similaires ou pause Mettre l interrupteur sur arr t avant de d brancher l alimentation Ne pas utiliser la machine av...

Страница 35: ...ments non d tect s sur le syst me lectrique peut tre cause de choc lectrique S assurer d avoir une installation lectrique de qualit et laisser r guli rement contr ler par un lectricien Danger d un d m...

Страница 36: ...s graves par lectrocution peuvent se produire en cas de d fauts ou de disfonctionnement Par cons quent La machine doit toujours tre reli e la terre par une prise de terre La connexion de la machine l...

Страница 37: ...ectriques de la rallonge voir tableau ci dessous Voltage Rallonge paisseur de fil 220 V 240 V 50 Hz 27 m 1 5 mm2 44 m 2 5 mm2 70 m 4 0 mm2 105 m 6 0 mm2 21 4 Assemblage 1 Placer le support inf rieur s...

Страница 38: ...le logement du ventilateur aux supports lat raux 6 Installer le support du sac filtrant sur le logement du ventilateur 7 Fixer le sac filtrant au logement du ventilateur en utilisant les fixations des...

Страница 39: ...s avec votre travail Commencer travailler avec votre machine bois uniquement lorsque la machine a atteint sa pleine puissance 22 2 Connect l aspirateur votre machine Diam tre du tuyau d aspiration de...

Страница 40: ...si n cessaire Contr ler galement la bonne condition g n rale de la machine Stocker la machine dans un endroit sec hors de la port e des enfants NOTICE Nettoyer la machine r guli rement apr s chaque ut...

Страница 41: ...ctrique Probl me Cause possible Solution La machine ne fonctionne pas Interrupteur Marche Arr t endommag V rifier l interrupteur Machine d branch V rifier les connexions lectriques Surcharge Laisser l...

Страница 42: ...kod m Dodr ujte bezpe nostn pokyny a dbejte v strah Opom jen bezpe nostn ch pokyn m e v st k v n m kod m na zdrav apod Z d vodu neust l ho v voje na ich produkt se mohou vyobrazen nebo obsah tohoto n...

Страница 43: ...torem 5 Saci hadice 6 Spony 7 Spodni dr ak 8 Plech podlahy a plech bo ni 9 Bo ni dr ak 10 Drobne komponenty 26 3 Technicke udaje Vykon motoru S1 100 S6 40 0 75kW 1 05kW Pilovy vak 280mm 900mm Filtra n...

Страница 44: ...k z jinych material museji tyto vykazovat shodne vlastnosti ohledn mechanicke pevnosti Dodr ujte rovn pokyny v navodu na obsluhu p ipojovaneho d evoobrab ciho stroje Provozni podminky Stroj je ur en p...

Страница 45: ...u t n stroj nesm b t nikdy ponech n bez dozoru P ed opu t n m pracovi t stroj vypn t a vy kejte dokud se zcela nezastav P ed kony dr by a nastaven odpojte stroj od p vodu elektrick ho proudu Ujist te...

Страница 46: ...ujte stroj s p ipojen m k s ti kter je zabezpe ena ochrann m sp na em FI Z suvky mus b t nainstalov ny v souladu s platn mi p edpisy uzemn n a zkontrolovan Kontrolu z suvek a p vodu elektrick ho proud...

Страница 47: ...lat Stroj mus b t p ipojen k uzemn n z suvce N sleduj c pokyny dejte k p e ten va emu elektrik i P ipojen ods v n na elektrickou s a n sledn kontrola zapojen sm b t provedena pouze kvalifikovan m elek...

Страница 48: ...dle tabulky n e Nap t Prodlou en Pr ez kabelu 220 V 240 V 50 Hz 27 m 1 5 mm2 44 m 2 5 mm2 70 m 4 0 mm2 105 m 6 0 mm2 28 4 Sestaven 1 Dr k polo te dol na podlahu a povolte rouby M6x35mm na p ipojovac...

Страница 49: ...ku 5 Kryt ventil toru namontujte pomoc 4 hv zdicov ch roub na bo n dr k 6 Dr k filtra n ho vaku namontujte na kryt ventil toru 7 Filtra n vak a pilov vak p ipevn te pomoc svorek ke krytu ventil toru F...

Страница 50: ...ak bl zko d evoobr b c ho stroje aby p i pr ci nep ek elo S d evoobr b c m strojem za n te pracovat a tehdy kdy dos hne ods vac za zen pln ho v konu 29 2 P ipojen k d evoobr b c mu stroji P pojka ods...

Страница 51: ...n stav bezpe nostn ch prvk Uskladn n stroje je mo n pouze v such m prost ed a mus b t zaji t n proti vlivu po as P ed prvn m uveden m stroje do provozu a n sledn ka d ch 100 motohodin je nutn aplikova...

Страница 52: ...star stroj od v s bezplatn p evz t k odborn likvidaci ODSTRA OV N Z VAD P ED ZAPO ET M PR CE NA ODSTRA OV N Z VAD ODPOJTE STROJ OD S T Z vada Mo n p ina Odstran n Stroj nefunguje Vadn sp na Sp na nech...

Страница 53: ...sicurezza La violazione pu causare gravi lesioni A causa del costante sviluppo dei nostri prodotti possibile che le immagini e i contenuti siano leggermente differenti Se doveste riscontrare errori si...

Страница 54: ...Parti di fissaggio 7 Supporto inferiore 8 Piastra di base e piastra laterale 9 Supporto laterale 10 Minuteria 33 3 Dati tecnici Potenza del motore S1 100 S6 40 0 75kW 1 05kW Sacchetto raccogli trucio...

Страница 55: ...zano altri sacchetti in materiali diversi questi devono avere la medesima resistenza meccanica Osservare anche le istruzioni per l uso della macchina per la lavorazione del legno collegata Condizioni...

Страница 56: ...i lavoro spegnere la macchina e attendere che si sia completamente arrestata Prima di svolgere lavori di manutenzione o regolazione la macchina deve essere scollegata dall alimentazione di tensione As...

Страница 57: ...are che la macchina sia in condizioni perfette Pericolo da scossa elettrica Usare la macchina solo collegandola a una fonte di alimentazione protetta da interruttore per correnti di guasto Le prese de...

Страница 58: ...amento Pertanto vale la regola La macchina deve essere usata su una presa con messa a terra Le seguenti istruzioni sono rivolte ad un elettricista specializzato L allacciamento della macchina deve ess...

Страница 59: ...seguente tabella Tensione Prolunga Sezione del cavo 220 V 240 V 50 Hz 27 m 1 5 mm2 44 m 2 5 mm2 70 m 4 0 mm2 105 m 6 0 mm2 35 4 Montaggio 1 Mettere il supporto inferiore sul pavimento e allentare le v...

Страница 60: ...laterali con le 4 viti a stella 6 Montare il supporto del sacco filtro sull alloggiamento della ventola 7 Montare il sacco filtro e il sacco raccogli trucioli all alloggiamento della ventola con i di...

Страница 61: ...in modo tale da non ostacolare il lavoro Lavorare con la macchina per la lavorazione del legno solo quando il sistema di aspirazione ha raggiunto la piena velocit 36 2 Allacciamento alla macchina per...

Страница 62: ...ollare che i dispositivi di sicurezza siano in condizioni perfette In caso di stoccaggio della macchina questa non deve essere conservata in un locale umido e deve essere protetta dall influsso degli...

Страница 63: ...AVORARE PER ELIMINARE I DIFETTI SCOLLEGARE LA MACCHINA DALL ALIMENTAZIONE DI CORRENTE Errore Possibili cause Soluzione La macchina non parte Interruttore difettoso Riparare l interruttore Alimentazion...

Страница 64: ...ties Misvatting kan tot ernstige letsels leiden Door de permanente verdere ontwikkeling van onze producten kunnen afbeeldingen en inhoud minimaal verschillen Als u fouten vaststelt gelieve ons te info...

Страница 65: ...zuigslang 6 Klemdelen 7 Houder onderaan 8 Bodemplaat en zijplaat 9 Zijdelingse houder 10 Kleine onderdelen 40 3 Technische gegevens Motorcapaciteit S1 100 S6 40 0 75kW 1 05kW Spaanzak 280mm 900mm Filt...

Страница 66: ...rtonen Neem ook de gebruiksaanwijzing van de aangesloten houtbewerkingsmachine in acht Arbeidsvoorwaarden De machine is voor werk onder de volgende voorwaarden bestemd Vochtigheid max 70 Temperatuur v...

Страница 67: ...masker De lopende machine mag nooit zonder toezicht zijn Schakel de machine uit en wacht tot de machine stilstaat voordat u de werkzone verlaat V r onderhouds of instelwerkzaamheden moet de machine va...

Страница 68: ...roleer v r iedere ingebruikname de machine op perfecte staat Gevaar door elektrische stroomslag Drijf de machine slechts aan via een stroombron die met een aardlekschakelaar is beveiligd Contactdozen...

Страница 69: ...foutieve functie Vandaar geldt De machine moet aan een geaarde contactdoos worden aangedreven De volgende aanwijzingen zijn voor de elektrische vakman De aansluiting van de machine mag uitsluitend do...

Страница 70: ...rklaart in de volgende tabel Spanning Verlenging Draaddoorsnede 220 V 240 V 50 Hz 27 m 1 5 mm2 44 m 2 5 mm2 70 m 4 0 mm2 105 m 6 0 mm2 42 4 Montage 1 Leg de houder op de grond en maak de M6x35mm schro...

Страница 71: ...eluchtingsrotor met de 4 sterschroeven aan de zijdelingse houders 6 Monteer de houder voor de filterzak aan de behuizing van de beluchtingsrotor 7 Monteer filterzak en spaanzak met de klemmen aan de b...

Страница 72: ...s de machine zo naast de houtbewerkingsmachine dat deze bij het werken niet wordt gehinderd Werk pas met de houtbewerkingsmachine als het afzuigsysteem het volle toerental heeft bereikt 43 2 Aansluiti...

Страница 73: ...de machine voorhanden en in een perfect leesbare toestand zijn Controleer de perfecte toestand van de veiligheidsvoorzieningen v r elk bedrijf De machine mag niet in een vochtige ruimte worden opgesl...

Страница 74: ...te verwijderen VERHELPEN VAN FOUTEN VOORDAT U MET HET VERHELPEN VAN DEFECTEN BEGINT SCHEID DE MACHINE VAN DE STROOMVOEDING Fout Mogelijke oorzaak Verhelpen Machine loopt niet Schakelaar defect Schake...

Страница 75: ...SCHALTPLAN WIRING DIAGRAM HOLZMANN MASCHINEN GmbH www holzmann maschinen at 75 ABS 850 SCHALTPLAN WIRING DIAGRAM...

Страница 76: ...m Vorwort dieser Dokumentation With original HOLZMANN spare parts you use parts that are attuned to each other shorten the installation time and elongate your products lifespan IMPORTANT The installat...

Страница 77: ...china il numero di parte di ricambio e la denominazione Per evitare incomprensioni si raccomanda di allegare agli ordini di parti di ricambio una copia del disegno delle parti di ricambio su cui sono...

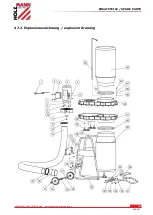
Страница 78: ...ERSATZTEILE SPARE PARTS HOLZMANN MASCHINEN GmbH www holzmann maschinen at 78 ABS 850 47 2 Explosionszeichnung explosion drawing...

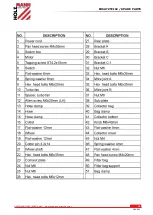
Страница 79: ...ERSATZTEILE SPARE PARTS HOLZMANN MASCHINEN GmbH www holzmann maschinen at 79 ABS 850...

Страница 80: ...he machine not being explicitly authorized by us in advance renders this document null and void Nous d clarons que la machine mentionn e sur ce document est aux normes de s curit de la directive de la...

Страница 81: ...gedeckt E Garantieausschluss bei M ngeln an Maschinenteilen welche gebrauchsbedingten oder sonstigen nat rlichen Verschlei unterliegen sowie M ngeln an der Maschine die auf einen gebrauchsbedingten od...

Страница 82: ...ent is principally the HOLZMANN Service Center in Haslach Austria Transport charges for sending to and from our Service Center are not covered in this guarantee E The Guarantee does not cover Wear and...

Страница 83: ...s exp ditions vers et partir de notre centre de service ne sont pas inclus dans cette garantie E La garantie ne comprend pas les l ments suivants Pi ces d utilisation d usure comme les courroies les o...

Страница 84: ...e je s dlo spole nosti HOLZMANN MASCHINEN na adrese 4707 Haslach sterreich Tato z ruka v robce nekryje p padn n klady na p epravu zbo do s dla firmy E V luky ze z ruky Na d ly kter vykazuj zn mky opot...

Страница 85: ...no contemplati nella presente garanzia del produttore E Esclusione di garanzia in caso di difetti sulle componenti meccaniche che sono soggette a usura legata all uso o altra usura naturale e difetti...

Страница 86: ...ze garantie van de fabrikant E Garantie uitsluiting bij gebreken aan onderdelen van de machine welke onderworpen zijn aan gebruik of andere natuurlijke slijtage alsook gebreken aan de machine welke te...

Страница 87: ...auftreten experiences that may be useful for other users and for product design Erfahrungen die f r andere Benutzer wichtig sein k nnen Experiences with malfunctions that occur in specific operation m...

Страница 88: ......
Отзывы: