Hodedah HIK 93 Скачать руководство пользователя страница 1

HODEDAH 

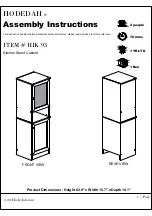
Assembly Instructions

This instruction booklet contains important safety information, please read and keep for future reference.
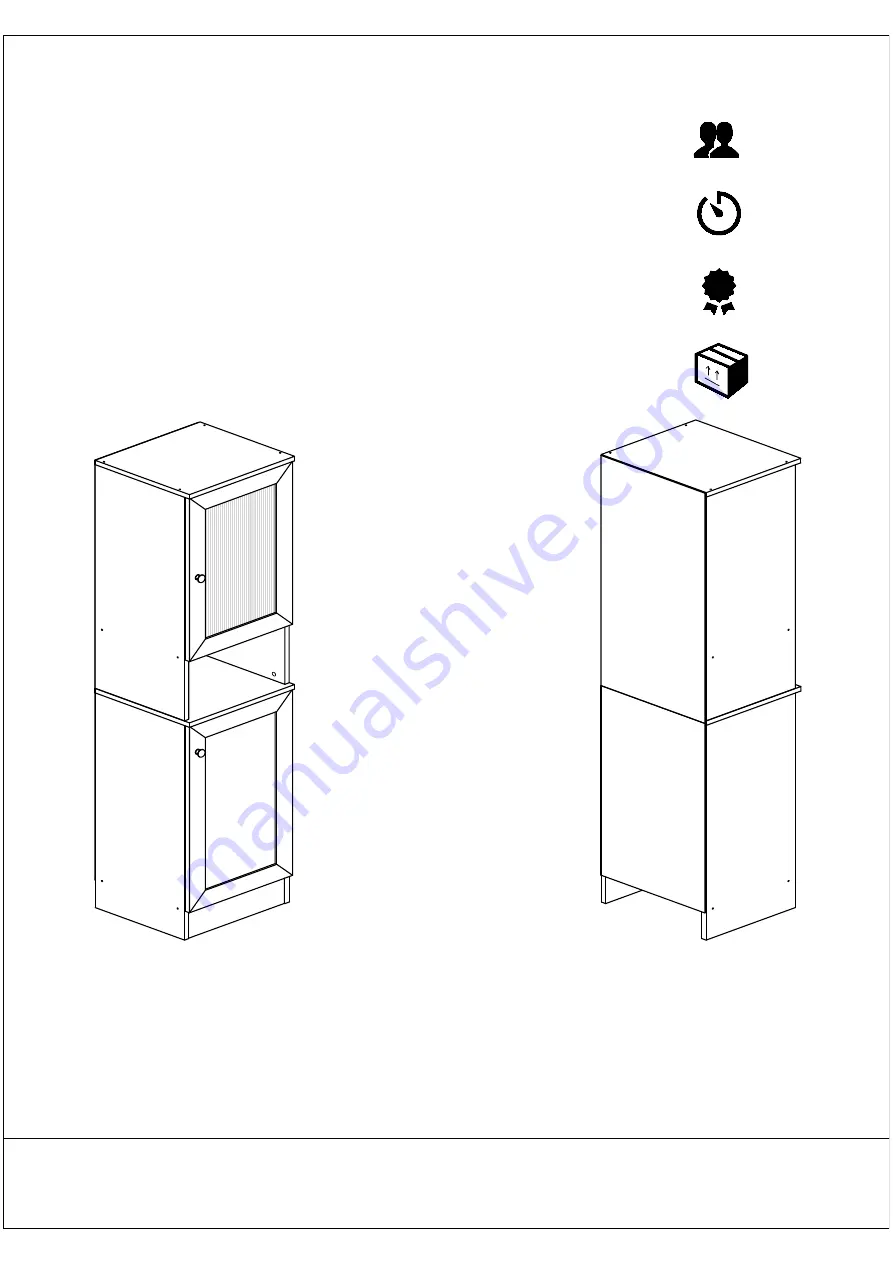
ITEM # HIK 93

FRONT VIEW

REAR VIEW

Product Dimensions : Height 62.9'' x Width 15.7'' x Depth 14.1''
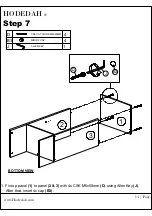
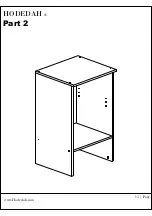
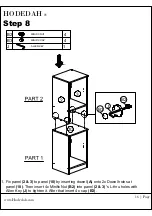
www.Hodedah.com

1

 | Page

2 people

70 mins

1 YR LTD

1 Box

Kitchen Stand Cabinet

Содержание HIK 93

Страница 1: ...let contains important safety information please read and keep for future reference ITEM HIK 93 FRONT VIEW REAR VIEW Product Dimensions Height 62 9 x Width 15 7 x Depth 14 1 www Hodedah com 1 Page 2 p...

Страница 2: ...roduct that has been improperly assembled subjected to misuse abuse or which has been altered or repaired in any way To obtain warranty service original purchaser must present the following original b...

Страница 3: ...ur package should include the following hardware and parts Parts are labeled or stamped on the raw edge Please inspect contents to ensure you have received all components If you are missing any hardwa...

Страница 4: ...hem to parts 3 Do not completely tighten all hardware until the entire assembly is complete unless indicated otherwise A QTY 22 Pcs QTY B2 QTY H E1 B3 QTY E2 2 Pcs 2 Pcs I J M8X25MM Handle 9200 PVC B1...

Страница 5: ...s 800x340x15mm 1 Pcs 4 5 6 1 Pcs 7 8 9 678x395x2 5mm 366x300x15mm 2 Pcs 1 Pcs 10 400x360x15mm 366x339x15mm 800x340x15mm 1 Pcs 1 Pcs 1 Pcs 1 Pcs 1 Pcs 11 366x339x15mm 1 Pcs 12 366x96x15mm 1 Pcs 13 584x...

Страница 6: ...HODEDAH www Hodedah com 6 Page The Breakdown I Main Unit II Door Drawer 1 2 3 5 4 6 7 8 9 10 11 12 8 14 13...

Страница 7: ...A WOOD DOWEL M8x25MM 22 1 Insert 22 x Wood Dowels A into panel 2 3 4 5 9 11 12 HODEDAH www Hodedah com Step 1 7 Page A 3 2 4 5 9 11 12...

Страница 8: ...ten 8x Minifix Bolt B1 onto top and bottom side of panel 10 with 4x Minifix Bolt B1 onto each side of panel 10 As Shown HODEDAH www Hodedah com Step 2 8 Page B1 8 MINIFIX BOLT B1 TOP VIEW BOTTOM VIEW...

Страница 9: ...3 5X16MM E1 2 HANDLE 9200 PVC 1 Tighten handle E1 onto front side of door panel 13 14 with CB Screw M4x25mm E2 using screwdriver As Shown 2 Fix Hinges H onto door panel 13 14 back view with CB Screw M...

Страница 10: ...11 12 to panel 4 5 by using dowels A onto non thru holes at panel 4 5 and tighten 4x CSK M6x50mm D from the thru holes of panel 4 5 with Allen Key J After that insert 4x cap B3 J 1 ALLEN KEY D 4 CSK...

Страница 11: ...4 5 by inserting dowel A onto non thru holes at panel 4 5 Then insert 4 x Minifix Nut B2 into panel 4 5 s L thru holes and using Allen Key J to tighten it After that insert 4 x cap B3 1 ALLEN KEY 4 M...

Страница 12: ...Part 1 HODEDAH www Hodedah com 12 Page...

Страница 13: ...osition fix panel 9 to panel 2 3 by using dowels A onto non thru holes at panel 2 3 and tighten 4x CSK M6x50mm D from the thru holes of panel 2 3 with Allen Key J After that insert 4x cap B3 1 ALLEN K...

Страница 14: ...DEDAH www Hodedah com 14 Page 1 Fix top panel 1 to panel 2 3 with 4x CSK M6x50mm D using Allen Key J After that insert 4x cap B3 1 ALLEN KEY 4 CSK CAP WOOD M6X50MM 4 MINIFIX CAP D J B3 1 2 3 D B3 J BO...

Страница 15: ...Part 2 HODEDAH www Hodedah com 15 Page...

Страница 16: ...4 4 MINIFIX CAP MINIFIX NUT 1 Fix panel 2 3 to panel 10 by inserting dowel A onto 2x Dowel holes at panel 10 Then insert 4x Minifix Nut B2 into panel 2 3 s L thru holes with Allen Key J to tighten it...

Страница 17: ...face down position place 2x panel 6 7 onto the back of the main unit and align it properly for nailing Use hammer to nail the Nails F one by one As Shown at center of 4 side edges 2 Then fix 4x PVC Na...

Страница 18: ...HODEDAH www Hodedah com Step 10 18 Page G 8 SHELF SUPPORT 1 Insert 8 x Shelf Support G into panel 2 3 4 5 G 2 3 4 5...

Страница 19: ...HODEDAH www Hodedah com 19 Page 1 Slide it panel 8 between panel 2 3 2 Slide it panel 8 between panel 4 5 2 3 4 5 8 8 Step 11...

Страница 20: ...ah com Step 12 C 8 20 Page CB SCREW M3 5X16MM Adjust door in out Adjust door left right C H 1 Attach door panels 13 14 to panel 4 5 with Hinges H by using 8x CB Screws M3 5x16mm C with screwdriver Fin...

Страница 21: ...HODEDAH www Hodedah com Job Complete Enjoy Thank you for purchasing from Hodedah 21 Page...

Страница 22: ...on drawers doors or shelves Never open more than one drawer at a time Do not defeat or remove the drawer interlock system Use tip over restraints may only reduce but not eliminate the risk of tip ove...

Страница 23: ...ket on the wall stud 2 inches below the mounting bracket secured to the back of your unit Attach to the wall stud using through the smaller hole of a c a STEP 3 Repeat the same step a few inches away...

Отзывы: