background image

© 2018 RISE, a Hobbico company.

RISE0300 v1.5

WARNING

INSTRUCTION

MANUAL

Please read and understand this manual, the operation and all safety aspects 
required for the safe operation of the product. Before use, if you feel that this 
product is not for you, please return it to the place of purchase.

Manual Specifications and Description Changes

The instruction manual, warranties, and other associated documentation are 
subject to change without notice. Hobbico assumes no responsibility for 
inadvertent errors to this manual.

e x p l o r e - r i s e . c o m

WARNING! 

This product includes a lithium polymer (LiPo) battery. 

Improper handling may result in FIRE! You are responsible for following all safety 
precautions as outlined in this instruction manual.

Содержание Archon Rise

Страница 1: ...o the place of purchase Manual Specifications and Description Changes The instruction manual warranties and other associated documentation are subject to change without notice Hobbico assumes no responsibility for inadvertent errors to this manual e x p l o r e r i s e c o m WARNING This product includes a lithium polymer LiPo battery Improper handling may result in FIRE You are responsible for fo...

Страница 2: ...adcopter can cause serious injury When choosing a flying site for your Archon stay clear of obstacles trees and power lines AVOID flying in or near crowded areas DO NOT fly close to people or pets Maintain a safe distance from the quadcopter Your Archon should not be considered a toy Because of its performance capabilities the Archon if not operated correctly could cause injury to you or spectator...

Страница 3: ...t of any clothing Keep LiPo batteries out of reach of animals A punctured battery may cause a fire Do not use the included charger for any other battery other than the one included with this model In the event of a crash place the battery into a fireproof container immediately Examine the battery for damage before further use Only operate and store batteries between 40 110 F 4 43 C NEVER allow the...

Страница 4: ...harge Adapter 4 AA Batteries Screwdriver Instruction Manual FEATURES Entry Level 370 mm GPS FPV Quad Ready to Fly no building required 200 mW VTX GPS Stability and Return To Home DIMENSIONS Size 370 mm 14 6 in diagonally motor to motor Width 300 mm 11 8 in Length 304 mm 12 0 in Height 110 mm 4 3 in Prop 203 mm 8 0 in Empty Weight 430 9 g 15 2 oz without battery without prop guards MONITOR SPECIFIC...

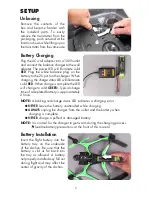
Страница 5: ...e LED will change to solid GREEN Typical charge time of a depleted battery is approximately 2 hours NOTE A blinking red charge status LED indicates a charging error NEVER leave the battery unattended while charging ALWAYS unplug the charger from the outlet and the battery when charging is complete NEVER charge a puffed or damaged battery NOTE It is normal for the charger to get warm during the cha...

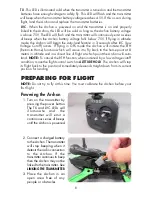
Страница 6: ...n the package Repeat this procedure for the other three prop guards RADIO SYSTEM Remove the battery door screw and slide the door down to access the battery compartment Install the included AA batteries and replace the door Flight Mode Switch Altitude Hold sets the Archon to just maintain its altitude when the left stick is centered In this mode the drone can drift with the wind The right stick an...

Страница 7: ... the Archon Picture Button Push this button to capture a still picture on a memory card not included that has been installed in the camera Video Button Push this button to record a video on a memory card not included that has been installed in the camera Transmitter LED Indicators There are LED indicators on the transmitter and the Archon The behavior and color of the LEDs will communicate to you ...

Страница 8: ...h will cause it to fly back to the home point at 8 meters in altitude and in a direct line of flight at which point the Archon will auto land NOTE To cancel the RTH function when initiated by a low voltage cutoff condition move the flight control switch to ALTITUDE HOLD The Archon will stop its flight back to the point and immediately descend straight down from its current position for landing PRE...

Страница 9: ...ure Compass Calibration When the Archon is powered on it will automatically take magnetic readings of the surroundings and compare them to its current compass settings If the Archon determines that the compass needs to be calibrated it will initiate the compass calibration procedure indicated by the Archon rear LED flashing fast green Compass calibration should be done in an open area free of any ...

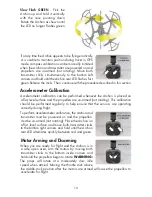
Страница 10: ...lat level surface and the propellers are un armed not rotating This calibration should be performed regularly to help ensure that the sensors are operating correctly during flight To perform accelerometer calibration the Archon and transmitter must be powered on and the propellers must be un armed not rotating Place the Archon on a flat level surface and move both transmitter sticks to the bottom ...

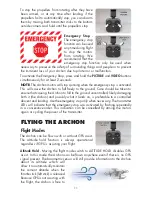
Страница 11: ... to ensure that causing the Archon to fall to the ground uncontrolled likely damaging both it the Archon and possibly what it lands on is preferable to a controlled descent and landing Use the emergency stop only when necessary The transmitter LEDs will indicate that the emergency stop was activated by flashing repeatedly in a consecutive order This indication can be cancelled by arming the motors...

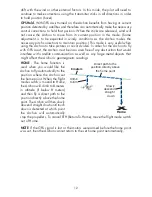
Страница 12: ...st be in an area free of any obstruction that would interfere with satellite communication as well as any large metal objects that might affect the Archon s geomagnetic readings HOME The home function is used when you would like the Archon to fly automatically to the position where the Archon set the home point When the flight mode switch is moved to Home the Archon will climb to 8 meters in altit...

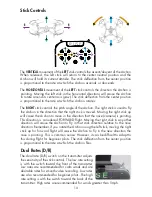
Страница 13: ...irection that the nose camera is pointing This direction is considered FORWARD flight Moving the right stick in any other direction will cause the Archon to fly in that stick direction relative to the nose direction Remember if you rotate the Archon using the left stick moving the right stick up for forward flight will cause the Archon to fly in the new direction the nose is pointing This is commo...

Страница 14: ...t altitude position When the stick is released back to center the Archon s current height will be the new set altitude NOTE It is normal to see slight deviations from the set altitude Windy conditions or sensors that are out of calibration may increase the deviation from the set altitude Recalibrate the accelerometers if the Archon is flying erratically or does not appear to be maintaining altitud...

Страница 15: ...ccurred and will then automatically stop the propellers Continue to hold the throttle stick in the lowest position until the propellers stop rotating RTH Landing Move the flight mode switch to HOME The Archon will initiate the RTH function by climbing to 8 meters if currently below that altitude flying to the set home point descending until landed and then automatically stopping the propellers If ...

Страница 16: ...ate ventilation around the monitor during charge Always keep LiPo batteries away from children Do not place the monitor on flammable surfaces or near combustible materials carpet paper wood plastic vinyl foam etc while charging DVR The FPV RM2 monitor has a DVR that will record and playback avi format video clips A memory card not included must be installed in the monitor before the DVR will opera...

Страница 17: ...tal Time the monitor has been on FPV Band FPV Channel FPV Frequency Memory Card is installed Battery Charge Level Video Clip Timer indicates the length of a video that has not been saved to the memory card POWER The On Off switch is on the right side of the monitor CH Press repeatedly to manually scroll through the 8 channels that are available for the current band The current channel will be indi...

Страница 18: ...radle is included on the top of the transmitter to hold the monitor in place while you fly your Archon The cradle acts like a spring clamp so the top section of the cradle must be pushed up to separate the grips far enough to fit the monitor between them Release the grips and confirm the monitor is held securely in place A detachable sun shield is included to help shield the display from sunlight ...

Страница 19: ...atch the included Tactic monitor channels see channel frequency chart in Receiver The channel display screen on the camera always displays the current band and channel setting by alternating the display between the band letter designation and the channel number Pressing the CH button on the camera will change either the channel band to the next letter or change the channel to the next number When ...

Страница 20: ...al between camera and monitor The micro memory card slot is located on the side of the camera as shown Insert a memory card not included with the contact points facing the channel display screen Push in on the memory card until you hear it click into place DO NOT FORCE THE CARD INTO THE MEMORY SLOT If there appears to be resistance when inserting the card remove it and confirm that you are install...

Страница 21: ...memory card installed in the camera preparing it for use Note this function will erase the contents of the card Be sure that any data you wish to save that is currently stored on the card is backed up in a recoverable location Typically only new memory cards or a card that exhibits problems would need to be formatted Language Changes the language displayed for all menu and playback text TV Output ...

Страница 22: ...o a secure location Thumbnail Displays list of small thumbnail images for every picture video saved to the camera memory card Short press the up or down buttons to scroll through the thumbnails Short press the M button to select a thumbnail to display in full size on the monitor Setup This accesses the Setup function described in the Menu section Taking Pictures and Videos Pictures and videos are ...

Страница 23: ... linked to the Archon PROBLEM TX LED transmitter flashes with audible beeping when transmitter is powered on SOLUTION Replace with new AA batteries PROBLEM The balance charger charge status LED blinks when attempting to charge the battery SOLUTION The battery voltage is too low to charge The battery voltage may recover on its own with time in order to be safely charged Wait 1 hour and try charging...

Страница 24: ...bration before flying 3 GPS signal is weak or intermittent Take the Archon to a new location being sure to perform compass calibration before flying 4 Windy conditions make it difficult for the Archon to maintain position and altitude Wait for calmer conditions to fly PROBLEM Archon is shaking SOLUTION 1 Check the canopy chassis motors and propellers for damage 2 Windy conditions make it difficult...

Страница 25: ... description in the Taking Pictures and Videos section If yes try formatting the memory card or using a different memory card If no review the steps for taking pictures and videos Contact product support if the problem continues PROBLEM The monitor screen turns on but does not display video feed from the camera SOLUTION 1 The monitor and camera are not operating on the same channel Review the inst...

Страница 26: ...ppear in video or pictures SOLUTION Avoid aiming the camera directly into the sun or reflected sunlight PROPELLER REPLACEMENT 1 Remove the screw that secures the propeller to the gear shaft 2 Pull the propeller off the gear shaft 3 Install the new propeller and secure it with the screw NOTE The propellers have arrows that indicate which direction they rotate Please refer to this diagram to verify ...

Страница 27: ...4 Reinstall the parts in the same order in which they were removed NOTE While the gear is out check it carefully for any cracks or damage to the teeth MOTOR REPLACEMENT 1 Remove the four screws from the black motor cover and lift it off the frame if installed the prop guard will also need to be removed before the motor cover can be removed 2 Disconnect the motor connector Grasp the motor by the ge...

Страница 28: ...icult procedure but there are many screws that need to be taken out to remove the flight control board from the quad Have a clean work space prepared and we recommend using a container to hold all the screws 1 If equipped remove the camera by pushing down on the camera retainer tab and sliding the camera forward Disconnect the camera wire from the quad 2 Remove the three camera mount screws and li...

Страница 29: ...the three frame bottom covers from the underside of the frame Make note of the different screw sizes used when removing the covers Carefully push the LED lenses out of the frame bottom covers 6 Unscrew the camera connector and the battery connector from the frame NOTE Before moving on to step 7 take a close look at how the wires and LEDs are positioned in the frame Take a picture if possible for f...

Страница 30: ...ke it is fitting back into place properly do not force it Check that the part is properly aligned and that the wires are not interfering with the installation 9 Before attempting to fly your Archon recalibrate the compass and accelerometers FCC IC PRECAUTIONS Archon 370 Brand RISE Part number RISE0300 FCC IYF0300 IC 11104A 0300 RISE J2020 Transmitter Brand RISE Part number RISJ2020 FCC IYJF2020 IC...

Страница 31: ...ble protection against harmful interference in a residential installation This equipment generates uses and can radiate radio frequency energy and if not installed and used in accordance with the instructions may cause harmful interference to radio communications However there is no guarantee that interference will not occur in a particular installation If this equipment does cause harmful interfe...

Страница 32: ...of disposal will help to conserve natural resources and ensure that it is recycled in a manner that protects human health and the environment For more information about where you can drop off your waste equipment for recycling please contact your local city office your household waste disposal service or location where you purchased the product Declaration of Conformity Product Tactic FPV RM2 4 3 ...

Страница 33: ...cluded with the Archon as well as other battery sizes and chemistries DTXP4225 Duratrax Onyx 225 AC DC Advanced Charger DTXP4255 Duratrax Onyx 255 AC DC Dual Balancing Charger GPMM3155 Great Planes ElectriFly Triton EQ AC DC Charger DTXP4260 Duratrax Onyx 260 AC DC Dual Touch Screen Charger ...

Страница 34: ...34 EXPLODED VIEW 1 2 12 11 5 6 7 8 9 14 17 18 22 21 15 20 13 10 3 16 19 10 2 ...

Страница 35: ...in Motors CCW Right Front Left Rear 19 RISE2119 Screw Set 20 RISE2120 Camera Mount Dampers 21 RISE2114 Camera Power Wire 22 RISE2112 LED Covers RISJ2020 J2020 6 Channel Transmitter RISE2023 2S 3S Balance Charger RISE2024 A C Balance Charger Adapter TACZ5160 FPV Wrist Monitor TACZ5200 FPV G1 Goggles w o Monitor optional TACZ1010 4G Class 10 Micro Memory Card optional TACZ5300 FPV 5 8GHz RP SMA TX A...

Страница 36: ...36 2018 RISE a Hobbico company RISE0300 v1 5 ...

Отзывы: