background image

AGITATORS AND ATTACHMENTS 

Attachments for attachment hub and agitators are covered in a separate Hobart Legacy Mixer Use

and Application Handbook on the Mixer Operator Information CD. Follow the instructions

accordingly.

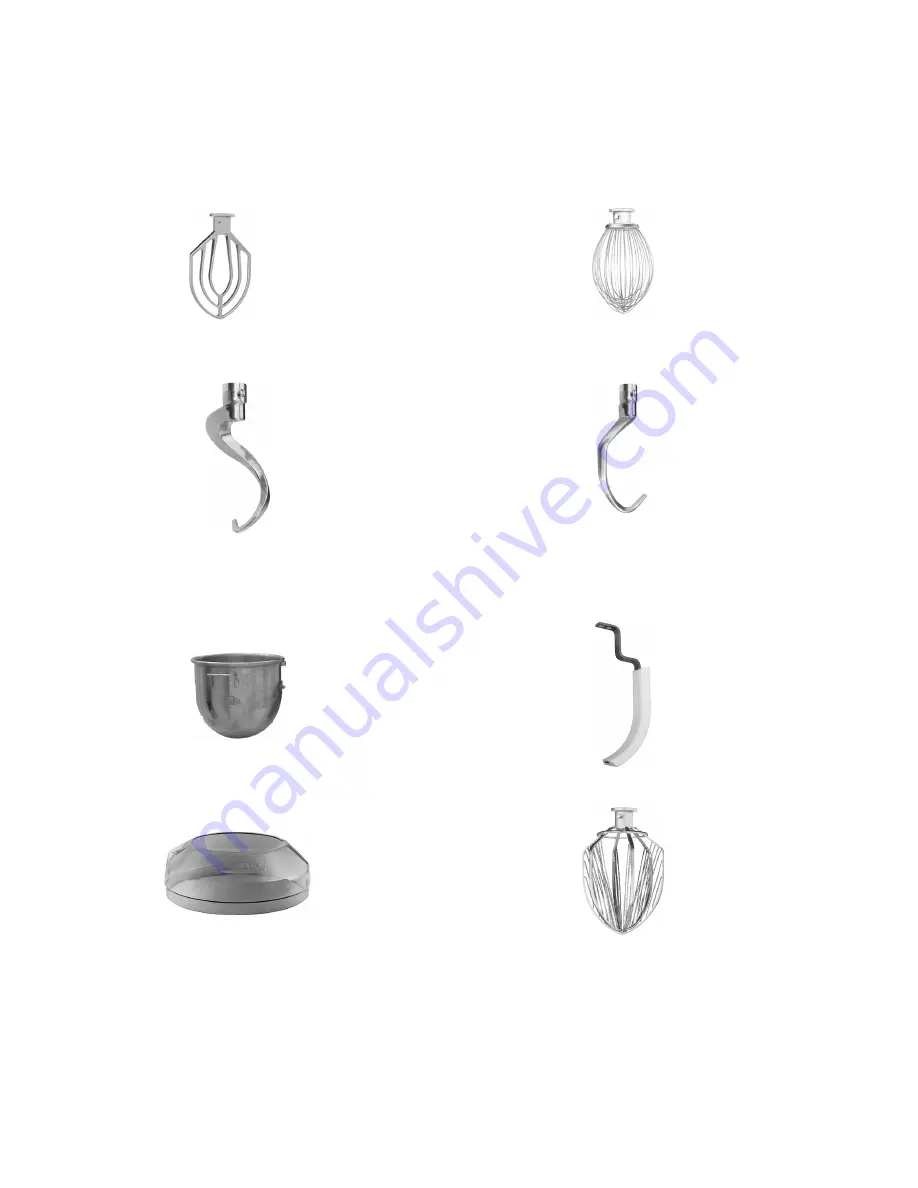
Available Agitators and Attachments

12 & 20 Qt. B Flat Beater

12 & 20 Qt. D Wire Whip

12 & 20 Qt. ED Dough Hook 

20 Qt. E Dough Hook

12 & 20 Qt. SST Bowl

12 & 20 Qt. Scraper

12 & 20 Qt. Splash Cover

12 & 20 Qt. C Wing Whip 

16

Содержание LEGACY 134450

Страница 1: ......

Страница 2: ... 6 Recipe Timer Control 7 Bowl Placement 8 Agitator 8 Prepare for Mixing 9 Standard Timer Operation 9 Recipe Timer Operation 11 View Recipe 12 Programming Recipe Timer 12 Unloading 14 Wire Cage 14 Agitators and Attachments 16 CLEANING 17 MAINTENANCE 18 Lubrication 18 Adjustments 19 TROUBLESHOOTING 20 Service 20 HOBART 2006 ...

Страница 3: ...se and Applications Handbook which is furnished on the Legacy Mixer Operator Training CD provided with each mixer INSTALLATION UNPACKING Immediately after unpacking the mixer check for possible shipping damage If this machine is found to be damaged after unpacking save the packaging material and contact the carrier within 15 days of delivery LOCATION Prior to installation test the electrical servi...

Страница 4: ...PRONG FROM THE PLUG WARNING ELECTRICAL AND GROUNDING CONNECTIONS MUST COMPLY WITH THE APPLICABLE PORTION OF THE NATIONAL ELECTRICAL CODE AND OR OTHER LOCAL ELECTRICAL CODES Check Initial Operation 1 Apply power to the mixer by inserting the cord plug into a properly grounded outlet 2 Install the bowl and raise into mix position with the bowl support up and bowl guard wire cage closed 3 Turn the SP...

Страница 5: ... Refer to Fig 1 for operating parts and OPERATION section for their functions The bowl guard wire cage must be in closed position or the mixer will not operate The bowl must remain in mix position on bowl support and the bowl support must be raised mix position or the mixer will not operate 5 CONTROLS BOWL GUARD WIRE CAGE ATTACHMENT HUB AGITATOR SPLASH GUARD Fig 1 SLOT DRIP CUP APRON BOWL SUPPORT ...

Страница 6: ... Mixer Speeds STIR Slow The lowest speed is for incorporating ingredients SPEED 1 Low This speed is for heavy mixtures such as pizza dough heavy batters and potatoes SPEED 2 Medium This speed is for mixing cake batters mashing potatoes and developing bread dough SPEED 3 High This speed is for incorporating air into light batches as well as finishing whipped items 6 ...

Страница 7: ...lizing continuous and timed mixing Recipe Mode x Use mode buttons to switch mixer operation between recipe and standard timed operation x Up to 4 recipes can be stored in memory x Each recipe can contain 5 steps x Each step can be programmed to operate with the following speeds and time SPEED SETTINGS TIME SETTINGS SPd 1 DEFAULT 00 00 15 00 minutes 10 second increments SPd 2 End default SPd 3 Stir...

Страница 8: ...AGITATOR Fig 4 To install an agitator the bowl must be on the bowl support To Install 1 Lower the bowl 2 Open the bowl guard wire cage 3 Place the agitator inside the bowl and align the horizontal slot on the agitator with the agitator shaft pin 4 Slide the agitator up the agitator shaft until it stops and latches An audible click should be heard when the agitator locks in position To Remove 1 Ope...

Страница 9: ...TIR is to be used for incorporating ingredients Do not use to develop dough products 2 Set the timer on hold by turning the TIME selector counterclockwise until HoLd appears in the TIME window 3 Press the START button to begin mixing The timer starts counting forward from 00 00 NOTE If the wire cage is opened at any time the mixing operation will stop To resume the mixing operation close the wire ...

Страница 10: ...t SPEED 1 for 30 seconds and is stopped after 10 seconds A new time is entered by turning the TIME selector The new time will replace the initial 30 seconds for SPEED 1 after the START button is pressed c If the time is changed while mixing the mixer will operate until the new time expires The adjustment to the time will not be stored d If speed is changed while mixing the time will change to the ...

Страница 11: ...ing The Recipe Timer 1 Press Recipe mode button 2 Turn the RECIPE selector to select a recipe 3 Press START mixer will operate at the programmed speed for the programmed time a Speed is displayed momentarily b Remaining time for the operating step will be displayed and the step light is flashing NOTE Recipe and Time selectors are disabled 4 Mixer will continue to perform the programmed speeds and ...

Страница 12: ...rmal recipe mode sequence PROGRAMMING RECIPE TIMER Fig 16 HL200 is powered with display showing a mix time Standard Mode or recipe number Recipe Mode 1 If a mix time is displayed Press RECIPE mode button Display corresponds with position of recipe speed selector 2 Press and hold TIME Continue holding TIME then press PGM and hold until rP1 is displayed with step 1 blinking buzzer sounds and program...

Страница 13: ...d A Use arrows to select the mixing time increments of 10 seconds for selected step NOTE If all 5 steps are programmed the recipe will terminate at the end of step 5 If fewer than 5 steps are used the default time setting of END will terminate the recipe B Press SELECT SAVE to set the time for the step SAVE momentarily displayed and buzzer sounds 9 Display alternates between speed and time to indi...

Страница 14: ...cage can be rotated out of the way to add ingredients or to access the bowl and agitator Note how the plastic carriers allow the wire cage to ride around the circumference of the planetary drip cup x Open the bowl guard wire cage rotate it to your left Fig 9 x Close the bowl guard wire cage rotate it to your right until it stops closed position Fig 10 NOTE The bowl guard wire cage must be returned...

Страница 15: ... 11 3 Wash the bowl guard wire cage in a sink rinse with clear water and dry with a clean cloth 4 The splash guard can be wiped off and or washed with a cloth or sponge using warm soapy water Rinse with clear water and dry with a clean cloth Reinstall Bowl Guard Wire Cage 1 Position the ring of the bowl guard wire cage so the carriers are positioned above the slots in the planetary drip cup 2 Lowe...

Страница 16: ... Mixer Use and Application Handbook on the Mixer Operator Information CD Follow the instructions accordingly Available Agitators and Attachments 12 20 Qt B Flat Beater 12 20 Qt D Wire Whip 12 20 Qt ED Dough Hook 20 Qt E Dough Hook 12 20 Qt SST Bowl 12 20 Qt Scraper 12 20 Qt Splash Cover 12 20 Qt C Wing Whip 16 ...

Страница 17: ...hly cleaned daily DO NOT use a hose to clean the mixer it should be washed with a clean damp cloth The base allows ample room for cleaning under the mixer The apron Fig 1 may be removed for cleaning by loosening the screws The drip cup Fig 1 should be removed which is secured with 3 screws periodically and wiped clean For cleaning the bowl guard wire cage refer to page 15 17 ...

Страница 18: ...twice a year To reach these areas fully lower the bowl support and remove the apron which is secured by slotted screws Wipe a thin coat of Lubriplate 630AA on the bowl pad area of the bowl supports and on each slideway Install the apron Planetary Seal Occasionally the planetary seal Fig 13 may become dry and begin to squeak To correct this work a little lubrication mineral oil under the lip of the...

Страница 19: ...ttom of the bowl where the beater travels With the bowl fully raised beater should not touch the bottom of the bowl briefly run the mixer at the lowest speed Turn off the mixer disconnect the electrical power supply and measure the depth of flour where the beater has traced a path This measurement should be taken at several points around the bowl to assure accuracy Adjust the Bowl Agitator Clearan...

Страница 20: ...20 ...

Отзывы: