


© 2022 HME Clear-Com Ltd. All rights reserved.
3
INSTALLING THE SYSTEM
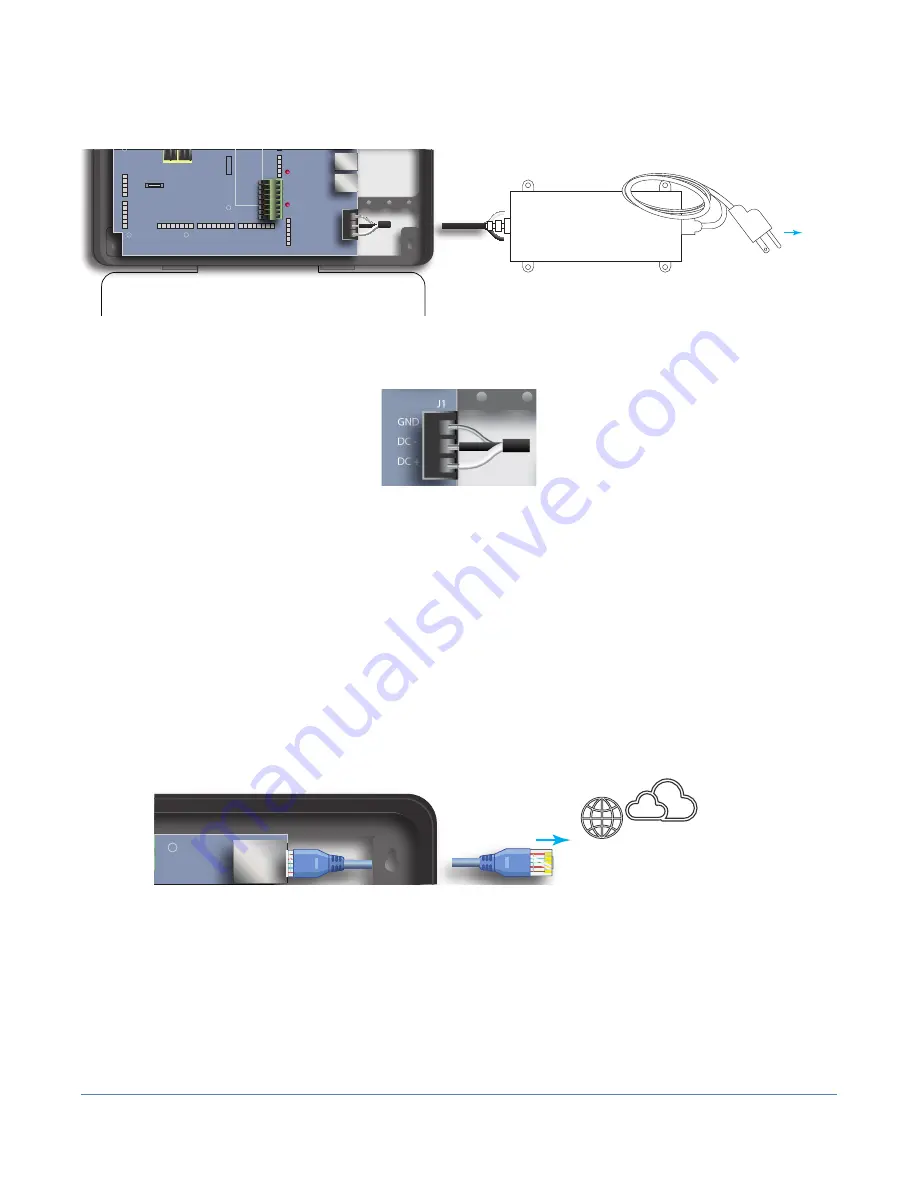
The EQUIP base station ships with a power supply and terminal strip cable connection between the
power supply and base station� See Fig� 3 and 4�
Remote
XCVR 4
Remote
XCVR 3
Remote
XCVR 2
Remote
XCVR 1
Ethernet
DC +
DC -
GND
Micro
USB
J200
J600
J201
J800
J801
J802
J805
J804
J803
J2003
J3000
J4501
J4500
J1400
J3200
J3400
J3600
J3800
1
1
1
1
1
1
1
1
1
1
1
Serial
Debug
USB
J?301
J?300
J1
12
3
4
5
6
7
8
1
2
3
45
6
1
2
3
4
Base Station
opened
PCBA
To NETWORK ROUTER
For CLOUD CONNECTION
48 V
BASE STATION
POWER SUPPLY
To REMOTE
TRANSCEIVER REAR
To WALL
OUTLET
TRANSCEIVER
Front View
BASE STATION
Partial Inside View
This Way
Up
DC+
GND
DC-
To REMOTE
TRANSCEIVER REAR
Fig. 3
Connecting power supply to the base station
Fig. 4
Base Station Power Supply:
1� Terminate the positive wire of the power supply to J1 DC + terminal (pin 1)� (White Wire)
2� Terminate the negative wire of the power supply to J1 DC - terminal (pin 2)� (Black Wire)
3� Terminate the shield to J1 GND (pin 3)� (Clear Wire)
NETWORK CONNECTION
A network connection is required for system updates or to configure your system remotely using a
PC� Use an Ethernet cable to connect the Base Station (at J1400) to a Network Router�
Note:
- You MUST connect to a router to have access to network settings�
Remote
XCVR 4
Remote
XCVR 3
Remote
Remote
XCVR 1
Ethernet
DC +
DC -
GND
Micro
USB
J200
J600
J201
J800
J801
J802
J805
J804
J803
J2003
J3000
J4501
J4500
J1400
J3200
J3400
J3800
1
1
1
1
1
1
1
1
1
1
1
Serial
Debug
USB
J?301
J?300
J1
12
3
4
5
6
7
8
1
2
3
45
6
1
2
3
4
Base Station
opened
PCBA
To NETWORK ROUTER
For CLOUD CONNECTION
48 V
BASE STATION
POWER SUPPLY
To REMOTE
TRANSCEIVER REAR
To WALL
OUTLET
TRANSCEIVER
Front View
BASE STATION
Partial Inside View
This Way
Up
DC+
GND
DC-
To REMOTE
TRANSCEIVER REAR
Fig. 5
The IP Address can be found by tapping the Network tile on the home page (see Fig�6)� To access
the User Interface from a PC, use a web browser and type in https:// (IP address of EQUIP base
station)� Also see "IP Address" on page 4�
Note:
"https://" needs to be added before the IP address for a remote base station connection� If
your web browser prompts that the connection is not secure or not private, click the "Advanced"
button and "proceed to��" to continue�


